€¦ · ……………………………… Exercise...
356
Transcript of €¦ · ……………………………… Exercise...

Arise, Awake and
Stop not
till the GOAL is Reached.
Swami Vivekananda
Table of Contents
Foreword ………………………………………………………………………………………………………….
Module 1 Getting Started
Unit 1 Introduction ….……………………………………………………………...…. 11
Objective .…………………………………………………………………………………….
………. 11
1.1Genesis of Business Accounting ..…………………………………………......... 11
1.2Advantages of Computerized Accounting ……………………………………. 11
1.3
Introducing BUSY ……………………………………………………………..…………. 12
1.4
Basic Concepts .…………………………………………………………………………… 12
1.4.1
Accounting………………………………………………………………
…....… 13
1.4.2
Inventory………………………………………………………………
……….… 151.4.3
Sales Tax & VAT……………………………………………………………..… 16
Review………………………………………………………………………………….
………..……… 18Exercise
…………………………………………………………………………………………...…… 18
Unit 2 Starting with BUSY ……………………………………………………..….... 21
Objective .……………………………………………………………………………………………… 21
2.1Operating Environment …………………………………………………………….….. 21
2.2
Installing BUSY ……………………………………………………………………………... 21
2.3BUSY Start-up Screen ………………………………………………………………….… 22
2.4Key Components in BUSY …………………………………………………………..…. 23
2.5
Using BUSY Help …………………………………………………………………….…….. 24
2.6
Quitting BUSY …………………………………………………………………………….…. 24
Review ……………………………………………………………..…………………………………… 25Exercise ………………………………………………………………………………………...…..…. 25
Unit 3 Setting up a Company in BUSY …………………………………….……. 27
Objective .……………………………………………………………………………………………... 27
3.1Creating a New Company .………………………………………………………….…. 27
3.2Opening a Company ……………………………………………………………….…….. 33
3.3Editing a Company .………………………………………………………………………. 33
3.4Closing a Company ………………………….……………………………………………. 34
3.5Deleting a Company …………………….……………………………………………….. 34
3.6Setting Data Directory ………………………………………………………………….. 35
3.7Setting Color Scheme ……………………………………………………………………. 36
Review ………………………………………..………………………………………………………… 40Exercise ………………………………………………………………………………………..…….… 40
Module 2 Configuring BUSY
Unit 4 Basic Configuration …………………………….……………………….….... 45
Objective …………………………………………………………………………………………..……. 45
4.1Features / Options …………………………………………………………..…………….. 45
4.1.1
General ……………………………………………………………..……….………. 46
4.1.2
Accounts …………………………………………………………………………….. 48
4.1.3Inventory ………………………………..……………………………………….…. 50
4.1.4Sales Tax / VAT / GST .…………………………………………………………. 53
4.2Hardware Configuration …………………………………………………………………. 56
4.3Warning Alarms ……………………………………………..…………………………….… 58
Review …………………………………………………………………………………..……………..… 59Exercise ….………………………………………………………………………………………..…..… 59
Module 3 Basic Accounting & Inventory
Unit 5 Masters ……………..……………………………….………………………....... 65
Objective ….…………………………………………………………………………………………….. 655.1 Creating Masters
…………………………………………………………………………65
….
5.1.1
Accounts …..………………………………………………………………………… 68
5.1.2Account Group .……………………………….…………………………………. 78
5.1.3Standard Narration ..…………………………………………………………… 83
5.1.4Item ………………….………………………………………………………………… 84
5.1.5
Item Group …….…………………………………………………………………… 88
5.1.6Material Centre ……..…………………………………………………………… 89
5.1.7Material Centre Group ….……………………………………………………. 91
5.1.8
Unit .…………….…………………………………………………………………….. 92
5.1.9Unit Conversion ..………………………………………………………………… 92
5.1.10
Bill Sundry ..………………………………………………………………………… 93
5.1.11
ST Form ………………………………………………………………………………. 99
5.1.12
Sale Type ..………………………………………………………………….………. 100
5.1.13
Purchase Type ………..………………………………………………….…….… 107
5.2Configuring Masters …………………………………………………………………..….. 107
Review ……………………………………………..…………………………………………………….. 111Exercise ………………………………………………………………………………………………….. 112
Unit 6 Transactions ……………………………………….…………………………….. 117
Objective ……………………………………………………………………………….……………….. 117
6.1Voucher Numbering ..………………………………………………………..…………… 117
6.2Entering Vouchers ……..…………………………………………………………..………. 121
6.2.1
Sales ….…..…………………………………………………………………………… 123
6.2.2Sales Return …....…………………………………………………………………. 131
6.2.3Purchase …………....………………………………………………………………. 131
6.2.4Purchase Return .………………………………………………………………… 136
6.2.5
Payment …….……………………………………………………………….……... 137
6.2.6
Receipt ..……………………………………………………………………………… 144
6.2.7
Journal ………….……………………………………………………………….…... 144
6.2.8
Contra …...…………………………………………………………………………… 146
6.2.9Debit Note ………..………………………………………………………………… 148
6.2.10
Credit Note ………...………………………………………………….………….. 150
6.2.11
Stock Transfer .……………………………………………………………………. 150
6.2.12
Forms Received …………………………………………………………….……. 153
6.2.13
Forms Issued .…………………………………………………………………..... 155
6.2.14
VAT Journal ..………………………………………………………………………. 156
6.3Configuring Vouchers …………………………………………………………..……...… 158
Review ……………………………………………………………………. 170
………………………………Exercise ………………………………………………………..…………………………………..….… 171
Unit 7 Printing Documents ………………………………………………………….… 177
Objective ….…………………………………………………………………………………………….. 177
7.1Configuring Documents (Standard) ….……………………………………..……… 177
7.2Printing Documents …...………………………………………………………..………… 182
7.2.1
Online Printing .…………………………………………………………………… 183
7.2.2
Print Utilities ....…………………………………………………………………… 183
Review …..………………………………………………………………………….……………………. 186Exercise ……………………….…………………………..………..…………………………………… 186
Module 4 Displaying & Printing Reports
Unit 8 Accounting Reports…………………………………………………………….
191
Objective ….…………………………………………………………………………………………….. 191
8.1
Balance Sheet ..….…………………………………………………………………………
… 191
8.2Trial Balance .…..….
……………………………………………………………………….… 192
8.3Account Books ….….
………………………………………………………………………… 196
8.4Account Summaries ..
……………………………………………………………………… 205
8.5Outstanding Analysis .
…………………………………………………………………….. 208Review ……………………………………….…………………………………………………………… 214Exercise ……………………………………..…………………………………………………..…….… 214
Unit 9 Inventory Reports …………………………………………………………….… 217
Objective ….…………………………………………………………………………………………….. 217
9.1
Stock Status ..….………………………………………………………………………….….. 217
9.2Inventory Books ….…………………………………………………………………………. 221
9.3Inventory Summaries …………………………………………………………………..... 226
Review ………………………………………………………………………………..…………..……… 233Exercise ………………………………………………………………………………………….…….… 234
Unit 10 Sales Tax & VAT Reports …..……………………………………………...
237
Objective ….…………………………………………………………………………………………….. 237
10.1ST Forms Reports ..……………………………………………………………………….. 237
10.2Sales Tax / VAT Summaries …………………………………………………………… 240
10.3Sales Tax / VAT Registers (General) .……………………………………………… 247
10.4Sales Tax / VAT Reports (State Specific) ..………………………………..……. 250
10.5VAT Adjustment Details .……………………………………………………..…….…. 250
10.6Reconcile Accounts & Sales / Purchase Tax ………………………………….. 251
Review ……………………………………………………………….…………………………………… 252Exercise ……………………………………………………………………..…………………..…….… 253
Module 5 Managing Data
Unit 11 Managing Backup …………………………………….…………..………..… 257
Objective ….…………………………………………………………………………………………….. 257
11.1Backup Configuration …….………………………………………………..…………… 257
11.2Taking Backup ……………..………………………………………………………..…….. 259
11.3
Restore Data ………………………………………………………………………………… 261
Review ….………………………………………………………………………………………………… 263Exercise ..…………………………………………………………………………………………..….… 263
Unit 12 Utilities ………………………………………….………………………………...
267
Objective ….…………………………………………………………………………………………….. 267
12.1
Data Freezing ...…………………………………………………………………………….. 267
12.2Data Export (MS Excel / PDF / HTML) …..………………………………..…….. 268
Review ….………………………………………………………………………………………………… 270Exercise ..………………………………………………………………………………………......…… 270
Unit 13 Housekeeping …….……………………………………………………………. 273
Objective ….……………………………………………………………………………………………..
273
13.1Rebuild Databases ...…….…………………………………………………………….… 273
13.2Rewrite Books …………….………………………………………………………………… 274
Review ….………………………………………………………………………………………………… 275Exercise ..…………………………………………………………………………………………..….… 275
Unit 14 Year-end Process …..…………………….……………………………..…...
277
Objective ….…………………………………………………………………………………………….. 277
14.1
Year-end Entries .………………………………………………………………………….. 277
14.2Changing Financial Year ………………..…..……………………………….……..…. 280
Review ….………………………………………………………………………………………………… 283Exercise ..………………………………………………………………………………………...……… 283
Shortcut Key Combinations …………………………………………………………………………..…... 286Glossary ..……………………….……………………………………………………………………………….…. 288
Module 1
Getting Started
Unit 1 – Introduction
Unit 2 – Starting with BUSY
Unit 3 – Setting up a Company in BUSY

Teachers open the Door,
but you must Enter
By Yourself.
Unit 1Introduction
The main objective of this unit is to familiarize the User with the basic concepts ofaccounting & inventory management. As accounting & inventory management isan integral part of a business, we will learn how the need for efficient and correctaccounting & inventory management has given birth to the business accounting.The unit also describes that with the passage of time, how business accountingfrom being managed manually is now largely dependent on the computerizedaccounting.
Topics covered under this unit:
Genesis of Business Accounting
Advantages of Computerized Accounting
Introducing BUSY
Basic Concepts
1.1 Genesis of Business AccountingAccounting is the art of classifying, summarizing and recording the transactions ofthe business in a prescribed format so as to use this information to takemanagerial decisions and to ensure the smooth running of the business. In abusiness, there is a need to keep a record of multiple things such as expenses,amount receivable and payable, tax submission, stock maintenance and so on.The recording of all these entries or managing all such issues is jointly termed asbusiness accounting.
One of the major purpose of accounting is to provide data needed for decision-making and efficient operation of business. For example, the owners, who providecapital for the business, are interested in interest yielded on the capital and thefinancial stability of the business. This can be done only by maintaining accountsof the company. Similarly, accounting also serves creditors purpose by displaying afair view of assets and liabilities of the company. In addition, government relies onaccounting for assessing the taxable capacity of the business. Thus, accounting isan inevitable part of a business.
1.2 Advantages of Computerized Accounting
Computerized Accounting has lots of benefits with it. With the availability of User-friendly accounting software at a relatively low cost, it is a wise decision tomaintain accounting records through accounting software instead of manualmaintenance of records. Given here is a list of the advantages of computerizedaccounting:
12
Availability of records with just a click of buttonData accuracyReliability of data
Automatic generation of accounting documents like Invoices, Statement of Account and so on Generation of VAT and other statutory reports
Ability to handle high volumes of transactions without compromising on speed or efficiency Increase revenue while lowering operating costs
1.3 Introducing BUSYBUSY is an integrated business accounting software for small & mediumbusinesses. It was launched in 1994 at IT-ASIA'94, Pragati Maidan, New Delhi andhas received an overwhelming response since then. With over 90,000 installationsin over 20 countries, it is one of the leading accounting software in India.
The salient features of BUSY are:
Financial Accounting (Multi-Currency)Multi-Location Inventory ManagementProduction / Bill of MaterialSales / Purchase Order ProcessingFully User-Configurable InvoicingUser-Configurable Documents / LettersSales Tax Reports / RegistersVAT Reports / Registers (State-Wise)Mfg / Trading Excise RegistersService Tax / TDS / FBTDirect E-Mail / SMS FacilityMIS Reports & Analysis
BUSY is known for its simplicity & reliability. It is available in Single-User (Desktop),Multi-User (LAN) and Client-Server (MS-SQL based) editions.
1.4 Basic ConceptsIn this topic, we will learn about the basic concepts of accounts & inventorymanagement along with some basic knowledge of Sales Tax & VAT.
Unit 1 - Introduction 13
1.4.1 AccountingThe prime motive for doing a business is to earn profit. To know the profit earnedor loss incurred in a particular period, it is necessary to record the financialtransactions for the same period. Financial accounting is an effective tool torecord, classify, and summarize financial transactions. Accounting is the art ofrecording, classifying and summarizing financial transactions and analyzing &interpreting the results thereof. To maintain uniformity in accounting, certainaccounting principles are followed. The accounting principles consist of accountingconcepts and accounting conventions.
Accounting is a business language used to communicate the financial informationof the business to the people concerned. This makes it important for accounting tobe based on certain concepts. These concepts imply the necessary assumptions orconditions upon which accounting is based. These can be listed as:
Business Entity ConceptDual Aspect ConceptAccounting Period Concept
Business Entity ConceptThis concept holds prime importance in Financial Accounting. According to thisconcept, a business is a separate entity from its owner. Business transactions arerecorded from the point of view of the business entity and not the owner. Thebusiness entity can be a company, firm or proprietorship.
Dual Aspect ConceptThis concept indicates that each transaction has two aspects and is recorded intwo different accounts. For example, if a business house purchases a machine oncash basis, the Machine account and the Cash account will be affected. Thedouble-entry system of accounting is based on this concept. The basicpresumption of this system is that every business transaction has two aspects.Under this system, both the aspects of a transaction are recognized and recorded.
Accounting Period ConceptThe time period during which the transactions of a business are recorded is calledthe accounting period. It states that the indefinitely long period of the business lifeshould be divided into shorter periods for summarizing accounting information.Accounts for a business are prepared for a specific period, generally a 12-monthperiod. In India, the accounting period is generally, taken from April 1 to March 31.
After discussing the concepts of Accounting, let us discuss the various Accountingconventions. Conventions are the customs and traditions that act as a guide to thepreparation of the final accounts. Following these conventions, results in thepresentation of clear and meaningful final accounts. The conventions followed toprepare accounting statements are:

Convention of Consistency
14
Convention of Conservatism
Convention of ConsistencyAccording to the convention of consistency the accounting practices and methodsshould not be changed from one accounting period to another. For example, thereare 2 methods to charge depreciation, Written Down Value method and StraightLine method. The method once chosen should be used consistently year after year.Consistency in accounting practices and methods makes the records of thecompany for different years comparable.
Convention of ConservatismAccording to this convention the accounting records should present a realisticpicture of the state of affairs of the business. All the prospective losses should beaccounted for and all prospective gains should be ignored. For example, to presenta realistic picture the closing stock is valued at market or cost price whichever isless. If the market price is Rs. 15 and the cost price is Rs. 10, then the closingstock will be valued at Rs. 10. On the other hand if the market price is Rs. 12 andcost price is Rs. 14, then the closing stock will be valued at Rs. 12.
Now that we have discussed the Accounting principles, let us move on to theaccounting terms that are used frequently.
Account
An Account is a summarized record of various transactions pertaining to aparticular account head. It is commonly referred to as a Ledger Account.
Debit & Credit
The terms debit and credit refer to the additions to or subtractions from anaccount. Debit is an accounting term that means 'to owe'. It is used to describe apayment, debt, or an entry in recording a transaction, the effect of which is todecrease a liability, income, or capital account or increase an asset or expenseaccount. Credit is the opposite of debit. It is an accounting term used to describean entry that increases an income, liability or capital account, and decreases anexpense or asset account.
AssetsAssets are resources owned by a business. It can be anything that enables a business to get benefit.For example, land, building, stock of goods, and cash.
Liabilities
A liability can be defined as something that a business owes to a third party in theform of an obligation to pay. For example, when a loan is taken from a bank or afinancial institution it raises a liability for the business.
Unit 1 - Introduction 15
Capital
Capital is the money that the owner invests to start the business and can claimfrom the business. Thus, for the business it is a liability towards the owner sincethe owner is a separate entity from the business. It can also be defined as thepositive difference of assets over liabilities.
IncomeIncome is money received by a person or organization because of effort or work done by the person.In other words, it is return on work done or returns on investments.
Expense
Expense is the amount spent in order to produce and sell the goods and services,which produce the revenue.
DebtorA debtor is a person or business concern that owes money to another business concern.
CreditorA creditor is a person or business concern to which a business concern owes money.
Stock
Stock refers to the goods lying unsold on a particular date. The stock can be eitheropening stock or closing stock. Opening stock is the stock lying unsold at thebeginning of the accounting period while closing stock refers to the stock lyingunsold at the end of the accounting period.
Golden Rules of AccountingFor making accounting entries, you must remember the three Golden Rules ofaccounting. The rules are:
Rule 1: Debit the receiver and credit the giver
Rule 2: Debit what comes in and credit what goes out
Rule 3: Debit all expenses and losses and credit all income and gains
1.4.2 InventoryIn a general business scenario, inventory management is an integral part thathelps in smooth running of the business and in determining the deficiency / excessof stock at any given time. Inventory includes the stock of raw material; semifinished goods and finished goods. Inventory management implies maintaining anaccurate record of incoming and outgoing stock.

Companies can be of two types, Trading and Manufacturing. Trading companiesjust sell the goods as they are purchased with no modification in it whereasManufacturing companies manufacture some

16
other goods (Finished Product) from the goods that are purchased (Raw Material).Let us understand this with the help of an example. A garment manufacturingcompany has its own production house. It purchases cloth from the market andmakes shirts out of that cloth. The company then sells the Shirts in the market. Inthis case, Cloth is the raw material and Shirt is the finished product.
Manufacturing companies require a high level of inventory management, as theyhave to keep a record of both raw material and finished goods. These companiesalso have to look after the composition of the finished product. Continuing with theabove example, company need to make a composition that for each Shirtmanufactured, one metre of cloth, ten buttons and a reel of thread is required.Hence, the company needs to keep a record about all the items that are used inmanufacturing of a finished product.
The task of maintaining inventory, with knowing in advance the material requiredfor manufacturing a product, the deficiency or excess of stock, cost involved in theprocess of production and stock in hand is called Inventory Management.Inventory Management forms a major part of any business.
1.4.3 Sales Tax & VAT
The primary difference between Sales Tax and VAT is in the way tax is levied. Incase of Sales Tax, the tax is generally levied at either the first point or the lastpoint in the production and distribution chain. It is therefore a single-point taxsystem. In case of VAT, the tax is levied at each point in the production anddistribution chain. Thus, VAT is a multi-point tax system.
VAT is the abbreviated form for Value Added Tax. Value Added Tax as the namesuggests, is an indirect tax calculated on the 'value added' to the goods andservices at each point in the production and distribution chain. It is charged as apercentage of prices, which means that the actual tax burden is visible at eachstage in the production and distribution chain.
In India, the Tax Credit method is followed to calculate VAT. VAT is calculated onboth the purchase and sale transactions in the chain of production and distributionof goods and services with the provision for a set-off for the tax paid at earlierstages in the chain.
There are few typical terms used in VAT that we need to know. Let us discuss theseterms. The terms used in VAT are:
Tax Payers Identification Number (TIN)Input TaxOutput TaxInput Tax CreditNet Tax Payable / ReceivableInvoice
Unit 1 - Introduction 17
Tax Payers Identification Number
Tax Payers Identification Number, popularly known, as TIN is the registrationnumber allotted to a dealer registered under the Value Added Tax (VAT) Act. TheSales Tax Department issues TIN to the registered VAT dealer.
Input TaxInput Tax is the tax that you have paid on your purchases of business inputs, whichinclude the goods that you bought for resale, raw material, capital goods, as wellas other inputs for use directly or indirectly in your business.
Output Tax
Output Tax is the tax that you charge on your sales that are subject to tax. This taxis payable to the government.
Input Tax CreditInput Tax Credit is the amount of input tax for which you are allowed to claim a credit.
Net Tax Payable / Receivable
Net Tax is the difference between your Output Tax and Tax Credits you are allowedto claim in a given tax period. It could be a positive or a negative amount. Thenegative amount represents tax credits in excess of output tax for a given period.
Net tax payable / receivable is calculated as:
Net tax payable / receivable = Output Tax – Input Tax Credit
Invoice
Invoice, popularly known as a bill, is a claim raised by the seller of the goods onthe buyer of the goods in respect of the goods sold. It provides complete detail ofthe goods sold by the seller.
There are primarily two types of invoices:
Tax Invoice - This invoice is issued when a registered dealer sells goods to another registered dealer for Resale or Manufacture or processing of goods for sale.
Retail Invoice - This invoice is issued when a dealer, registered or unregistered sells goods to an unregistered dealer or a consumer.
The significance of Tax Invoice in VAT is that the entire design of VAT and input taxcredit is based on documentation of tax invoice, cash memo, or bill. The dealercan claim input tax credit only when the goods are purchased on a tax invoice.

18
Review
In this unit, we have covered the need for business accounting and the benefitsof computerized accounting along with a brief introduction of BUSY accountingsoftware, its launching & the purpose it serves.
The unit has also covered the basic accounting, inventory concepts and a small introduction to the VAT concepts & calculation.
Exercise1. A Debtor is:
a) Who owes money to company
c) Any Party with whom you deal
b) To which company owes money d) Both a & b
2. Double Entry Accounting affects:a) One Account c) Only Two Accountsb) Two or More Accounts d) All of the above
3. Full form of TIN:a) Tax Invoice No. c) Tax Identifier No.b) Tax Payers Identification No. d) Total Invoice No.
4.Input Tax Credit can be claimed on:
a) Tax Invoice c) Goods sold without bill
b) Retail Invoiced) Goods sold to unregistereddealer
5.Accuracy & Reliability of data is more in:
a) Computerized Accounting c) Manual Accountingb) Spreadsheets d) Both a & c
6. Tax charged on goods sold is:a) Input Tax Credit c) Tax Depositb) Output Tax d) None of the above
7. Write any three advantages of using computerized accounting.
8. Describe three golden rules of accounting.
9. What is the formula for calculating Net Tax Payable / Receivable?

Unit 1 - Introduction 19
10. What is the difference between Tax Invoice and Retail Invoice?

The Journey of a Thousand
Miles must Begin with a
Single Step.
Unit 2Starting with BUSY
The objective of this unit is to help User to install BUSY accounting software on hiscomputer and to run its application. The unit describes about the minimumhardware and software configuration required for installing BUSY and the steps toinstall BUSY. The unit also introduces User to the start-up screen of BUSY and thekey components of BUSY software along with using the exhaustive online helpprovided in case User is not able to use any feature of BUSY software.
Topics covered under this unit:
Operating Environment
Installing BUSY
BUSY Start-Up Screen
Key Components in BUSY
Using BUSY Help
Quitting BUSY
2.1 Operating EnvironmentOperating Environment required for running BUSY application is:
PC with P-IV (or equivalent) ProcessorOperating system - Windows XP / 2000 / 2003 onwardsRAM 512 MBHard Disk Drive with 100 MB free space and aboveScreen resolution - 1024 X 768 pixelsDisplay Colour Palette - High Colour (32 bit)CD DrivePrinter - 80 column
2.2 Installing BUSYTo install BUSY software on your computer, first you have to check for the above-mentioned hardware and software requirements. Once all the requirements are fulfilled on a computer only then you can
22
install BUSY on it. You can install BUSY on your computer from the CD provided inthe pack when you buy BUSY software. To install BUSY from the CD provided, youneed to perform the following steps:
Insert CD into CD-ROM DriveDouble click My Computer folder to open the CD folderDouble click the Setup file in the CD folder to start the Setup Wizard
Setup Wizard will guide you through the rest of the Installation process. This may take a few minutes and BUSY will be successfully installed on your computer.
2.3 BUSY Start-Up ScreenAfter installation of BUSY, an icon of BUSY starts appearing on the desktop. Doubleclick the BUSY icon to run the application. On running the BUSY application, aSecurity Check message box appears displaying message that security device hasbeen found and program will run in the following edition of BUSY. Here securitycheck refers to detecting Dongle (a security device attached to LPT or USB portand used for authentication of software) and marking of data directory (see Unit 3)on computer. If you are using an Educational Copy of BUSY then this message boxwill not appear.
Click Ok button in the Security Check message box. On clicking the Ok button,Start-Up Screen of BUSY appears. Given here is a screenshot of Start-Up Screen ofBUSY.
Image on next Page
Unit 2 – Starting with BUSY 23
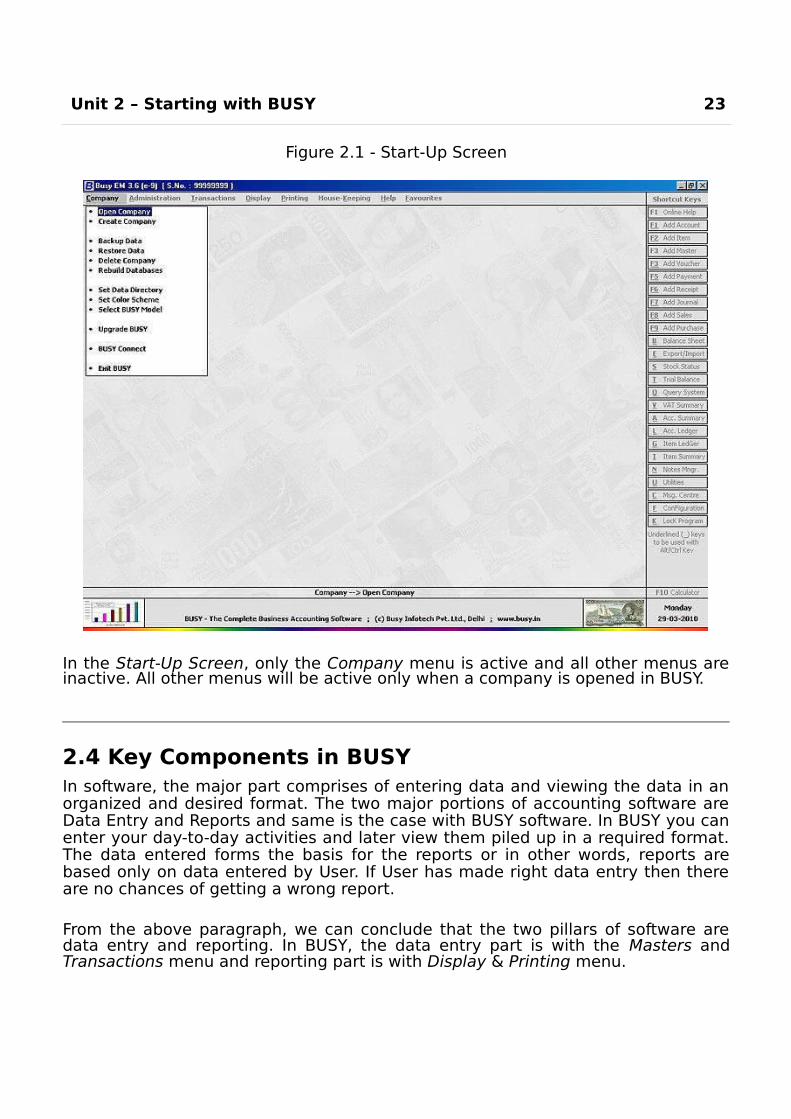
Figure 2.1 - Start-Up Screen
In the Start-Up Screen, only the Company menu is active and all other menus areinactive. All other menus will be active only when a company is opened in BUSY.
2.4 Key Components in BUSYIn software, the major part comprises of entering data and viewing the data in anorganized and desired format. The two major portions of accounting software areData Entry and Reports and same is the case with BUSY software. In BUSY you canenter your day-to-day activities and later view them piled up in a required format.The data entered forms the basis for the reports or in other words, reports arebased only on data entered by User. If User has made right data entry then thereare no chances of getting a wrong report.
From the above paragraph, we can conclude that the two pillars of software aredata entry and reporting. In BUSY, the data entry part is with the Masters andTransactions menu and reporting part is with Display & Printing menu.
24
Masters stores information, which requires to be entered once. Masters stores thestatic information that rarely gets changed. For example, the name of thecompany is a static information as in very rare case it will happen that companywill change its name. To enter Masters information, BUSY provides the Mastersmenu. When you start BUSY application, only the Company menu is active. Onceyou open a Company using the Company menu then only the Masters menu getactive.
Information stored in Masters is further used in the Transactions. Entering data inthe Masters is a one-time work but entering data in transactions is a day-to-dayactivity. Transactions store information about dealings of the business such as sale,purchase, payment, receipt and so on. You can enter data in Transactions menuonly if you have opened a company in BUSY. Transactions menu provides aclassified menu of voucher types providing voucher type according to varioustransactions. For example, if you have made a sale then you can enter a Salesvoucher, similarly if you have made a purchase then you can enter a Purchasevoucher.
After entering transactions, the next thing User requires is to view the data in arequired format. For example, after entering transactions, User may want to knowthe total sale made in the day or total outflow or inflow of cash. To view / printreports, BUSY provides the Display & Printing menu. With Display menu, you canview the reports on screen, and with the Printing menu, you can print the reports.
Apart from Data Entry and Reporting, which are without a doubt one of the majorpart of software; there are various small components also that complete thesoftware package. These small components can be the Utilities provided bysoftware or different features and options that User can enable / disable as per hisrequirement. BUSY also provides various utilities and numerous features to caterneeds of as many Users as possible. The utilities and features are all part of theUtilities and Configuration menu respectively. With the help of Utilities menu youcan manage your data more efficiently and with the help of the Configurationmenu you can customize BUSY as per your requirement.
2.5 Using BUSY HelpBUSY provides an exhaustive online help, which can be invoked either by pressing<F1> key or by clicking User's Manual option in Help menu. On pressing the <F1>key, the help for the topic in which you are working will be displayed.
2.6 Quitting BUSYTo quit BUSY, Company menu provides the Exit option. You cannot exit from BUSYif a company is opened in BUSY. You have to close the company in which you areworking and then only you can exit from BUSY. On clicking the Exit option, BUSY

will be closed. To maintain integrity of data, you should exit from BUSY by clickingthe Exit option only.
Unit 2 – Starting with BUSY 25
Review
Minimum Hardware requirement to run BUSY are, CD Drive, Hard Disk with at least 100 MB free space.
Minimum Software requirement to run BUSY are, P-IV or equivalent Processor, Windows XP / 2000 / 2003 Operating System, 512 MB RAM.
In BUSY Data Entry is with Masters and Transactions menu and Reporting is with Display and Printing menu.
Online Help can be invoked by pressing <F1> key or User’s Manual option from the Help menu.
You cannot exit from BUSY if a company is still opened.
To maintain integrity of data, always exit from BUSY by using the Exit option provided inCompany menu.
Exercise1 . BUSY cannot be installed on:
a) Windows 98 c) Windows XPb) Linux d) Windows Server 2003
2 . Minimum Processor requirement to installBUSY is:
a) P-III c) P-IVb) P-II d) Dual Core
3 . In BUSY, help can be invoked by using:a) F1 Key c) Help Menub) F2 Key d) Both a & c
4 . Recommended screen resolution for running BUSY is:a) 800 x 600 c) 1024 x 768b) 1152 x 864 d) Any Resolution
5 . Which menu is active in the start-up screen of BUSY:a) Company c) Transactionsb) Administration d) Configuration
6 . What is Dongle?
7 . What are the key components of BUSY?

8 . Why is it necessary to close the company before quitting from BUSY?

There is a Brilliant Child
locked inside
every Student.
Unit 3Setting up a Company in BUSY
The main objective of this unit is that the User should be able to create a companyin BUSY and should start maintaining records in it. Managing a company is animportant task while using a business accounting software and this unit focuses onthe different options that will ease User in managing the company created in BUSYand performing different actions on it.
Topics covered under this unit:
Creating a New Company
Opening a Company
Editing a Company
Closing a Company
Deleting a Company
Setting Data Directory
Setting Color Scheme
3.1 Creating a New CompanyIn accounting software, the first step is to create a company in which you canrecord all the transactions of your company. You can create a company in BUSYwith the name of your company, firm, factory or outlets. You can create a singlecompany or can create multiple companies. If you have different branches of yourcompany in different cities then you can create multiple companies with the nameof the city appended with the company name or if you are a Chartered Accountantthen you can create various companies for the different clients with whom youdeal.
Creating a company in BUSY is first and foremost step. To create a company inBUSY, you need to perform the following steps:
Double click the BUSY icon on the desktop. It will run the BUSY application.
On running the BUSY application, Startup screen of BUSY appears (see figure3.1). In the Startup screen of BUSY, only the Company menu is active. In theCompany menu, click the Create Company option.
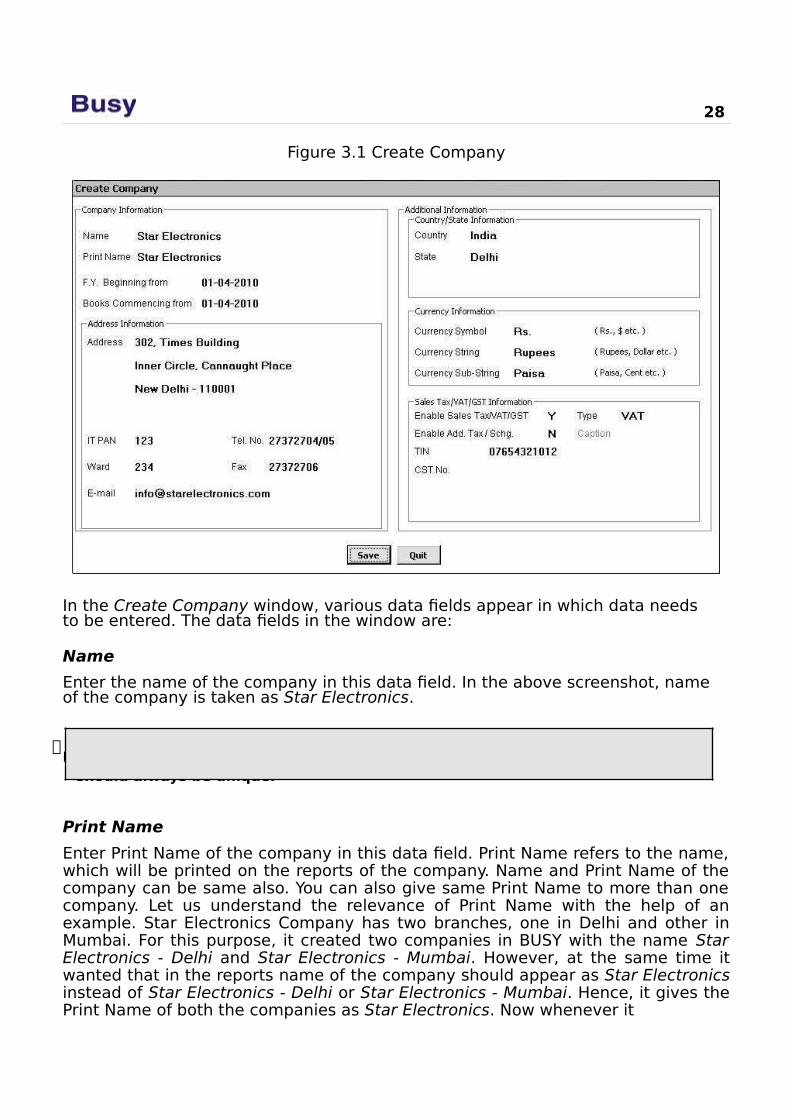
On clicking the Create Company option, a Create Company window appearsin which you can specify the name of company to be created and otherinformation about the company such as Address, Currency applicable, VAT
applicable for the company or not and so on. Given here is a screenshot ofCreate Company window.
28
Figure 3.1 Create Company
In the Create Company window, various data fields appear in which data needsto be entered. The data fields in the window are:
Name
Enter the name of the company in this data field. In the above screenshot, name of the company is taken as Star Electronics.
In BUSY, you cannot create two companies with same name. Companies name
should always be unique.
Print Name
Enter Print Name of the company in this data field. Print Name refers to the name,which will be printed on the reports of the company. Name and Print Name of thecompany can be same also. You can also give same Print Name to more than onecompany. Let us understand the relevance of Print Name with the help of anexample. Star Electronics Company has two branches, one in Delhi and other inMumbai. For this purpose, it created two companies in BUSY with the name StarElectronics - Delhi and Star Electronics - Mumbai. However, at the same time itwanted that in the reports name of the company should appear as Star Electronicsinstead of Star Electronics - Delhi or Star Electronics - Mumbai. Hence, it gives thePrint Name of both the companies as Star Electronics. Now whenever it
Unit 3 – Setting up a Company in BUSY 29
will print reports for any of these companies the name of the company in thereport will appear as Star Electronics.
F. Y. Beginning From
F. Y. is the abbreviated form for financial year. Financial year here refers to theaccounting period under which your company is incorporated. Generally, anaccounting period is from 1st April to 31st March. For example, if your company isincorporated on 1st June 2010 then enter 1st April 2010 in this data field as yourcompany is incorporated in the financial year starting from 1st April 2010.
You cannot change the original
beginning F. Y. successive financial yearsbut cannot go to the F. Y. year.
once it is saved. You can go to the prior to the original beginning financial
Books Commencing From
Enter the date on which you have started the books of your company. Continuing with the above example, Books Commencing From date will be 1st June 2010.
Address Information
In the Address Information sub-group, various data fields appear in which address,telephone number and other details about the company are to be entered. Variousdata fields under this sub-group are:
Address 1-4
Four lines for entering address of the company appear. You can enter address of the company in these four lines.
IT PANEnter the IT PAN of the company in this data field.
Tel. No.Enter telephone number of the company in this data field.
WardEnter the Ward under which the company falls in this data field.
FaxEnter fax number of the company in this data field.
E-mailEnter E-mail address of the company in this data field.
30
Country / State Information
Under this group, you have to specify the country and the state under which yourcompany exist. For this, two data fields, Country and State are provided. Select therequired Country and State in these data fields.
Currency InformationUnder this sub-group, you have to specify the currency of the country in which your company exists.Three data fields are provided under this sub-group. The data fields are:
Currency Symbol
Enter the currency symbol in this data field. For example, symbol of Rupees is Rs.,Dollar is $, Pound is £ and so on.
Currency String
Enter the currency string in this data field. For example, currency string is Rupees,Dollar, Pound and so on.
Currency Sub-String
Enter currency sub-string in this data field. For example, sub-string of Rupees isPaisa, Dollar is Cent, Pound is Pence and so on.
Sales Tax / VAT / GST Information
Under this sub group, you can enable the Sales Tax / VAT / GST for the companyand specify the type of tax applicable for your company. For example, if you payand charge VAT on the goods in which you deal then you can specify the type oftax as VAT. Various data fields that appear under this sub group are:
Enable Sales Tax / VAT / GSTSpecify ‘Y’ in this data field if you want to enable Sales Tax / VAT / GST for the company.
TypeSelect the type of tax i.e. LST, VAT or GST.
Enable Add. Tax / Schg.Specify ‘Y’ in this data field if you want to enable Additional Tax / Surcharge for thecompany.
Caption
This data field is active only if you have specified ‘Y’ in the Enable Add. Tax / Schg.data field. Specify the caption to be used for Additional Tax / Surcharge in this datafield. For example, for Additional Tax, you can use term as Add. Tax, for Surcharge,you can use term as Schg.
Unit 3 – Setting up a Company in BUSY 31
TIN
This data field is active only if you have selected type of tax as VAT. Specify TIN of the company in this data field.
LST No.
This data field is active only if you have selected type of tax as LST. Specify Local Sales Tax number of the company in this data field.
GST No.
This data field is active only if you have selected type of tax as GST. Specify GST number of the company in this data field.
CST No.
This data field is active only if you have selected type of tax as LST or VAT. Specify Central Sales Tax number of the company in this data field.
If you have selected a Country other than India in the Country /
State Information sub group then two additional data fields DefaultTax Rate 1 and Default Tax Rate 2 appear under the Sales Tax / VAT /GST Information sub group. Specify the default tax rates applicablefor the company in these data fields.
After entering required details, click the Save button to save the company details.On clicking the Save button, a Save message box appears.
Click the Yes button in the Save message box to save the information. On clickingthe Yes button, a Copy Masters & Configuration message box appears. If you are afirst time User, and creating first company in BUSY then this message box will notappear. It appears only when a company already exists at the path specified in theSet Data Directory option (See topic 3.6) or at the Server specified in the SetServer Information option. In the message box, there are two buttons. The buttonsare:
Yes - Click this button if you want to copy masters and configurations fromsome other company. On clicking this button, it will ask you to select anexisting company from where the Masters and Configuration settings will becopied.
No - Click this button if you do not want to copy Masters and Configurationsettings from any other company.
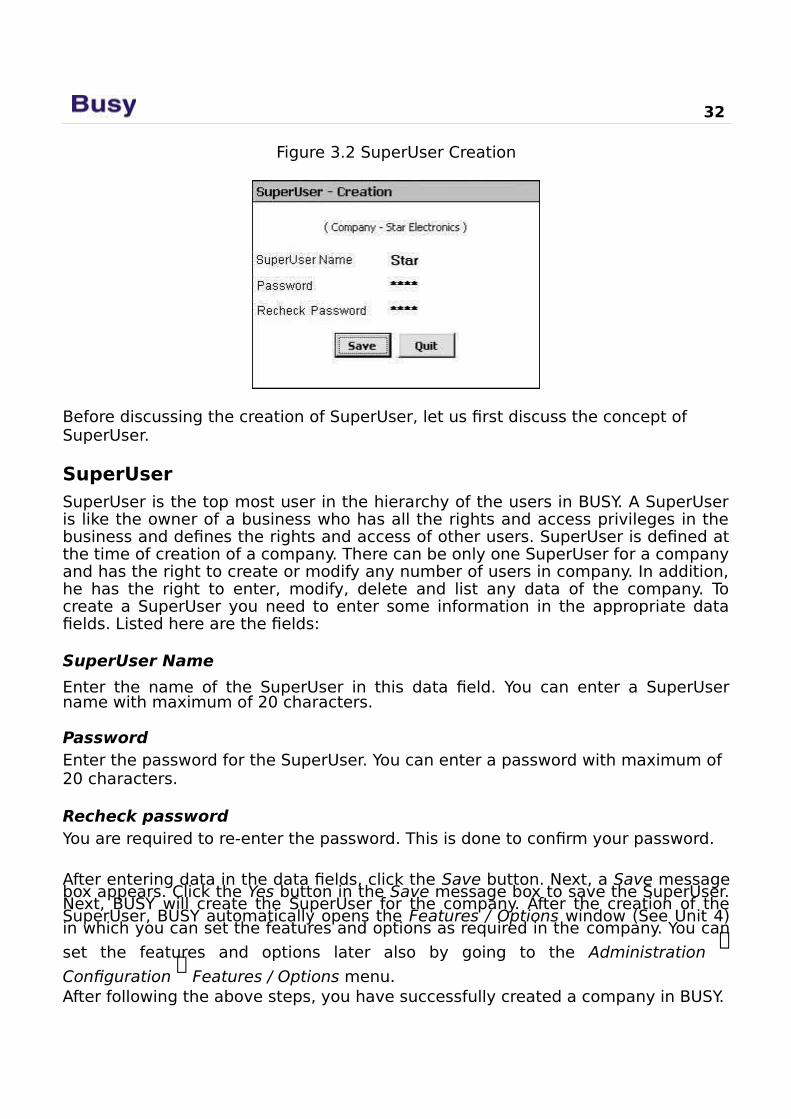
Once the company is created, a Congratulations message box appears confirmingthe creation of the company. On clicking the Ok button, in the Congratulationsmessage box, a SuperUser Creation window appears. Given here is a screenshot ofSuperUser Creation window.
32
Figure 3.2 SuperUser Creation
Before discussing the creation of SuperUser, let us first discuss the concept of SuperUser.
SuperUserSuperUser is the top most user in the hierarchy of the users in BUSY. A SuperUseris like the owner of a business who has all the rights and access privileges in thebusiness and defines the rights and access of other users. SuperUser is defined atthe time of creation of a company. There can be only one SuperUser for a companyand has the right to create or modify any number of users in company. In addition,he has the right to enter, modify, delete and list any data of the company. Tocreate a SuperUser you need to enter some information in the appropriate datafields. Listed here are the fields:
SuperUser Name
Enter the name of the SuperUser in this data field. You can enter a SuperUsername with maximum of 20 characters.
PasswordEnter the password for the SuperUser. You can enter a password with maximum of 20 characters.
Recheck passwordYou are required to re-enter the password. This is done to confirm your password.
After entering data in the data fields, click the Save button. Next, a Save messagebox appears. Click the Yes button in the Save message box to save the SuperUser.Next, BUSY will create the SuperUser for the company. After the creation of theSuperUser, BUSY automatically opens the Features / Options window (See Unit 4)in which you can set the features and options as required in the company. You can
set the features and options later also by going to the Administration
Configuration
Features / Options menu.After following the above steps, you have successfully created a company in BUSY.

Unit 3 – Setting up a Company in BUSY 33
3.2 Opening a CompanyOnce a company has been created, the next step you would like to do is to startworking in that company. To work in a company, you have to first open thecompany. To open a company in BUSY, you need to perform the following steps:
Open Company menu and click Open Company option. On clicking the OpenCompany option, a Select Company for Operation window appears. Thewindow displays the list of companies you have created. Select the companythat you want to open.
On selecting a company, a Security Check window appears. Given here is ascreenshot of Security Check window.
Figure 3.3 Security Check
Enter the User Name and Password that you have specified at the time of creationof a company in the Security Check window and click the Ok button. After youenter the correct User Name and Password, BUSY will open the company for you.
3.3 Editing a CompanySometimes need arises to edit the company details that you have specified at the time of company creation. For example, telephone number of your company has been changed then you have to edit the company details and update the new telephone number. To edit a company’s details, you need to perform the following steps:
Open Company menu and click Edit Company option. On clicking the EditCompany option, an Edit Company Details window appears. The windowdisplays the company’s details as entered at the time of company creation.Change the data in the data fields as per your requirement.
34
You cannot change the F. Y. Beginning Date. This data field is non-editable.
After making the required changes, click the Save button.
3.4 Closing a CompanyIt is necessary to close a company before exiting from BUSY. To close an activecompany, open Company menu and click the Close Company option. On clickingthe Close Company option, the company will be closed.
Close Company option is active only when a company is active or open. Onclicking, the Close Company option, BUSY closes the active company, and returnsto the Main window of BUSY.
3.5 Deleting a CompanyDeleting a company is an irreversible process in BUSY. If in rare case, a need arisesto delete a company then you should do so with utmost care because once acompany is deleted then its data cannot be recovered in any case. To delete acompany in BUSY, you need to perform the following steps:
Open Company menu and click the Delete Company option. On clicking theDelete Company option, a Select Company for Deletion window appears.Select the company that you want to delete and click the Select button.
On clicking the Select button, an Authority Check window appears. EnterSuperUser name and password of the company. This is done to check theauthenticity of the person who is deleting the company as only theSuperUser has the authority to delete a company.
Once you have entered the correct SuperUser name and password then aDelete Company window appears. In the window, there are following twooptions:
o Complete Company - Select this option if you want to delete data of allthe financial years of the company.
o Single F. Y. - Select this option if you want to delete data for a singlefinancial year of the company. If more than one financial year exists forthe company then a Select F.Y. message box appears in which you canselect the financial year for which you want to delete the data. You candelete data either for first or for last financial year. You cannot deletedata for a middle financial year. This is done to maintain integrity ofdata. If only one financial year exists for the company then a Can’tDelete message box appears informing you that since you have onlyone financial year, you have to select the Complete Company option.

Unit 3 – Setting up a Company in BUSY 35
After selecting any of the above option, a Data Deletion message box appears.Click the Yes button in the message box to delete the company.
3.6 Setting Data DirectoryData Directory refers to the directory where you want the company data to bestored. By default, BUSY stores company data in the COMP000x directory underthe parent directory DATA stored under the path, Hard Drive\BusyWin. Forexample, you want to store all your work of BUSY in BusyData folder in D drive. Forthis purpose, you can use the Set Data Directory option and specify the path forstoring BUSY data as D:\BusyData.
An important point to note here is that data directory is different from thedirectory or folder where BUSY application is stored.
To set the data directory or path where you want BUSY data to be stored, openCompany menu and click Set Data Directory option. On clicking the Set DataDirectory option, a Set Data Directory window appears. Given here is a screenshotof Set Data Directory window.
Figure 3.4 Set Data Directory
In the Set Data Directory window, following group and data field appear:
Data Directory
Under this group, specify the path where data is to be stored. You can also selectthe path by clicking the Browse button.
Above information is valid for current session only
Check this checkbox, if you want that the path specified in above data field will notget saved and is valid by the time you have not closed BUSY. After closing theBUSY, when you open it again then the default data directory will appear and notthe one on which you have last worked. On the contrary, if
36
you do not check this checkbox then the path specified in above data field will getsaved and next time when you open BUSY, the same path will be displayed in theData Directory data field.
After entering appropriate data in the data fields, click the Ok button to save thedata directory information.
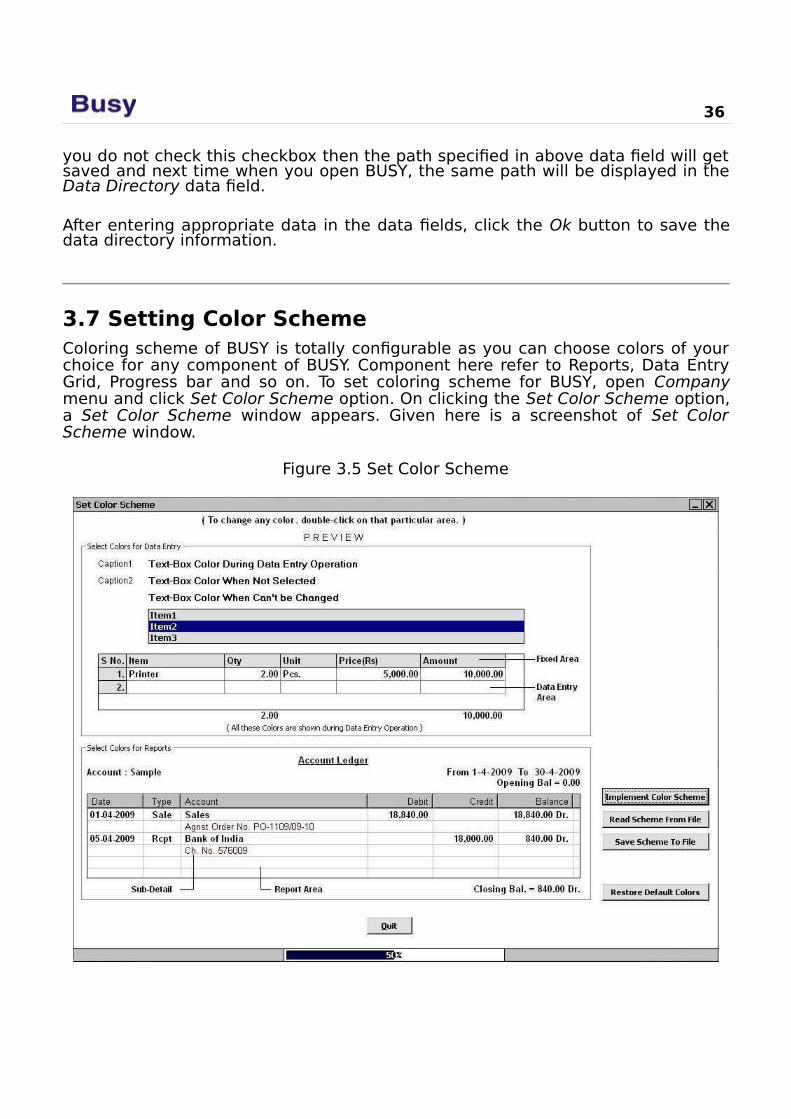
3.7 Setting Color SchemeColoring scheme of BUSY is totally configurable as you can choose colors of yourchoice for any component of BUSY. Component here refer to Reports, Data EntryGrid, Progress bar and so on. To set coloring scheme for BUSY, open Companymenu and click Set Color Scheme option. On clicking the Set Color Scheme option,a Set Color Scheme window appears. Given here is a screenshot of Set ColorScheme window.
Figure 3.5 Set Color Scheme
Unit 3 – Setting up a Company in BUSY 37
In the Set Color Scheme window, you can set colors for various components ofBUSY. Setting color for a component is very simple, as you have to double click thecomponent whose colors you want to change and select the required color fromthe Color palette. To change the background color of forms just double click anyplain area of the Set Color Scheme window and select the color of your choice.
Various groups and buttons that appear in the Set Color Scheme window are:
Title BarSelect Color for Data EntrySelect Color for ReportsRestore Default ColorsImplement Color SchemeRead Scheme from FileSave Scheme to FileProgress Bar
Title BarBy double clicking the Title bar, you can define font color and back color of the Title bar of the forms.
Select Color for Data entry
Under this group, you can configure colors for various data entry components suchas back color / fore color of textbox, color for selection list, colors for various labelsand so on. Within the Set Colors for Data Entry group various options appear. Theoptions are:
Textbox Color during Data Entry Operation
Double click this option to select the color for textbox when some data is enteredin it. On clicking this option, a Select Option message box appears. In the messagebox, there are two options. The options are:
Fore-Color - Select this option if you want to select fore color for textbox i.e. the color in which text will appear in the textbox.
Back-Color - Select this option if you want to select back color for textbox i.e.the color that will appear behind the text.
Textbox Color when not selected
Double click this option to select the color for textbox when it is not beingselected. For example, when you open a Master in Modify mode then the datafields in which no data is entered will appear inactive. Hence, with this option youcan select the color for textbox when it is not being active. On double clicking thisoption, a Color window will appear in which you can select the required color.
38
Textbox Color When Can’t Changed
Double click this option to select color for the textbox whose value cannot bechanged. This option is applicable for all such textboxes whose value cannot bechanged. On clicking this option, a Select Option message box appears. In themessage box, there are two options. The options are:
Fore-Color - Select this option if you want to select fore color for textbox i.e. the color in which text will appear in the textbox.Back-Color - Select this option if you want to select back color for the textbox i.e. the color that will appear behind the text.
On selecting any of the above option, a Color window will appear in which you canselect the color of your choice.
Selection List
Double click this option to select colors for the list that appear in BUSY. List hereimplies the list that appears for selecting Account, Item and so on. For example,while entering a transaction, various lists appear for selecting Series, Sale Type,Party, Material Centre, Item and so on. On clicking this option, a Select Optionmessage box appears. In the message box, there are two options. The options are:
Fore-Color - Select this option if you want to select fore color for textbox i.e. the color in which text will appear in the textbox.
Back-Color - Select this option if you want to select back color for the textbox i.e. the color that will appear behind the text.
On selecting any of the above option, a Color window will appear in which you can select the color of your choice.
Data Grid
Double click this option to select colors for the data grid. On selecting this option, a Select Option message box appears. In the message box, there are four options. The options are:
Fore-Color (Data Entry Area) - Select this option if you want to select fore color of the data entry area i.e. the color in which text will appear in the datagrid.Fore-Color (Fixed Area) - Select this option if you want to select fore color of the fixed area i.e.the color in which the static text or the headings or serial number will appear.
Back-Color (Data Entry Area) - Select this option if you want to select back color of the data entry area i.e. the color in which the portion behind the textwill appear in the data grid.Back-Color (Fixed Area) - Select this option if you want to select back color ofthe fixed area i.e.the color in which the portion behind the static text will appear.
Unit 3 – Setting up a Company in BUSY 39
Captions & Notes
Double click various captions or notes to select color for them. Caption hereimplies the headings for various textboxes and notes implies various notes thatappear at the bottom of the form. On double clicking a caption or a note, a Colorwindow appears in which you can select required color.
Select Color for Reports
Under this group you can select colors in which the report will be displayed. Ondouble clicking the report area, a Select Option message box appears. In themessage box, there are four options. The options are:
Fore-Color (Report Area) - Select this option if you want to select fore colori.e. the color in which the text in the report will appear. On selecting thisoption, a Color window will appear in which you can select the required color.
Back-Color (Report Area) - Select this option if you want to select back colori.e. the color in which the portion behind the text will appear.
Special Effect - Select this option if you want to select colors for the subheadings or data that shows details of the main master.
Report Heading & Labels - Double click various headings or labels to selectcolor for them. Label here implies the values that are shown at the bottom ofthe reports such as labels displaying totals of various columns and so on.
Progress Bar
Double click the progress bar to select back colors and fore color of Progress bar.On double clicking this option, a Select Options message box appears. In themessage box, there are two options. The options are:
Fore-Color - Select this option if you want to select fore color for the progressbar.Back-Color - Select this option if you want to select back color for the progress bar.
On selecting any of the above option, a Color window appears in which you can select the required color.
Implement Color SchemeClick this button to implement the configured color scheme in BUSY.
Restore Default ColorsClick this button to apply the default coloring scheme provided by BUSY.
Save Scheme to File
Click this button to save the configured color scheme to a file. On clicking this button, a Save As window appears in which you can specify the name and path of file.
40
Read Scheme from File
Click this button to read color scheme configuration from a file. On clicking this button, an Open window appears.
Specify the file name in the window from where the configuration data is to be read.Click the Ok button to read data from the specified file.
Review
You cannot create two companies with same Name but can create two companies with same Print Name.
Financial Year Beginning From and Books Commencing From Date can either be same or different.
You cannot modify the financial year beginning date in BUSY.
There can be only one SuperUser in a company. SuperUser is like owner of the companywith all the rights and privileges in the company.
You cannot exit from BUSY unless the active company is closed.
Data once deleted can never be recovered.
Only SuperUser has the authority to delete a company.
Data can be deleted only for first or last financial year. You cannot delete a middle financial year of the company.
You can set the path where BUSY data is to be stored by using the Set Data Directory option.
Coloring Scheme in BUSY is fully configurable.
Exercise1 . You cannot create two companies with:
a) Same Financial year c) Same Nameb) Same Print Name d) Same Address
2 . Number of SuperUser in a Company can be:a) Only One c) Only Twob) Infinite d) None
3 . Financial Year Beginning Date can be:
a) 1st of any month c) Any date - any monthb) 1st of F. Y. beginning month d) 30th of any month
Unit 3 – Setting up a Company in BUSY 41
4 . Books commencing from date can start from:a) 01-any month c) Any date - any monthb) 01-January d) 01-April
5 . A company can be deleted by:a) Any user c) Both a & bb) SuperUser d) None of the above
6 . You cannot modify:a) Name of the Company c) Books Commencing from Dateb) Address of the Company d) Financial Year Beginning Date
7 . Default Data Directory path is:a) Any path c) C driveb) Where BUSY is installed d) D drive
8 . What is the difference between Name and Print Name?
9 . What are the two options asked while deleting a company?
1 0 . Can in any case company deleted be recovered?
1 1 . What is the difference between Financial Year Beginning Date and Books Commencing From Date?
1 2 . Explain the option “Above information is valid for this session only” in set data directory.
1 3 . Create a color scheme of your choice and save it with the name ‘My Color Scheme’ in ‘D’ drive.
1 4 . Create a company named ‘Star Electronics’ with following details:a ) Financial Year - 01.04.2010b ) Books Commencing from – 01.04.2010c ) Address Line 01 - 302, Times Buildingd ) Address Line 02 - Inner Circle, Cannaught Placee ) Address Line 03 - New Delhi-110 001f ) Telephone - +91-11-27372704, 05g ) Enable VATh ) TIN - 07654321012i ) SuperUser - Starj ) Password - Star
1 5 . Edit the following company details of the Star Electronics:a ) Print Name - Star Electronics Co.b ) Address Line 02 - Inner Circle, C.P.

Module 2
Configuring BUSY
Unit 4 – Basic Configuration

Discipline is the Bridge
Between
Goals and Accomplishments.
Unit 4Basic Configuration
The objective of this unit is to communicate about various options or choices thatBUSY software offers. Each User has its own set of requirement therefore a feature,which is of high need for one User can be needless for other User. To cope up withsuch situations, BUSY comes up with the Configuration menu wherein User canenable / disable features as per his requirements. Configuration menu forms thebackbone of the BUSY software. Based on the settings in the Configuration menu,User can customize BUSY according to his requirement.
Topics covered under this unit:
Features / Options
Hardware Configuration
Warning Alarms
4.1 Features / OptionsWith Features / Options option, you can enable / disable various features andoptions in BUSY as per your requirement. Features / Options menu providesvarious features and options classified into eight sections or tabs. All the featuresand options are classified into the category to which they belong. For example, allthe features related to accounting are kept under Accounts tab; all the featuresrelated to inventory are kept under Inventory tab and so on. To set variousfeatures and options, you need to perform the following steps:
Click Administration
Configuration
Features / Options option.
On clicking the Features / Options option, a Features / Options window appears. Given here is a screenshot of Features / Options window.
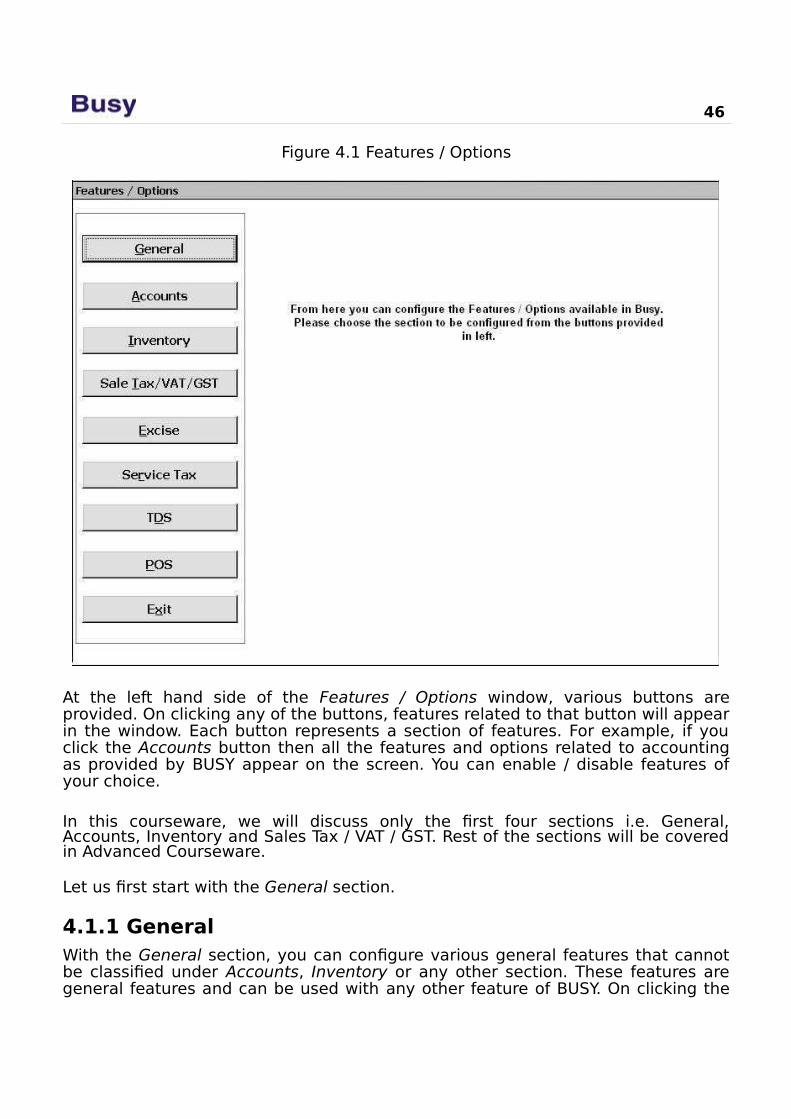
46
Figure 4.1 Features / Options
At the left hand side of the Features / Options window, various buttons areprovided. On clicking any of the buttons, features related to that button will appearin the window. Each button represents a section of features. For example, if youclick the Accounts button then all the features and options related to accountingas provided by BUSY appear on the screen. You can enable / disable features ofyour choice.
In this courseware, we will discuss only the first four sections i.e. General,Accounts, Inventory and Sales Tax / VAT / GST. Rest of the sections will be coveredin Advanced Courseware.
Let us first start with the General section.
4.1.1 GeneralWith the General section, you can configure various general features that cannotbe classified under Accounts, Inventory or any other section. These features aregeneral features and can be used with any other feature of BUSY. On clicking the

General button, features related to General section appears. Given here is a list offeatures that appears on clicking the General button.
Unit 4 – Basic Configuration 47
Currency Symbol
Enter currency symbol of the country where your company exists. By default,currency symbol as specified at the time of company creation appears here.
Currency String
Enter currency string of the country where your company exists. By default,currency string as specified at the time of company creation appears here.
Currency Sub-String
Enter currency sub-string of the country where your company exists. By default,currency sub-string as specified at the time of company creation appears here.
Format for Displaying Numbers
In this data field, you can select format for displaying numbers in BUSY. Oneoption is the Indian Decimal System (9,99,99,999.99) and other is the InternationalDecimal System (999,999,999.99).
Skip Currency Separator in Numbers
Specify ‘Y’ in this data field if you do not want the currency separator i.e. commato appear in numbers.
Date FormatSelect the format according to which date will be displayed in BUSY.
Date Separator
Specify the symbol to be used as date separator. For example, you can use ahyphen (-), slash (/), colon (:) as date separator.
Currency Decimal Place
Specify the number of digits to appear after decimal in the currency amount. Forexample, if you specify ‘2’ in this data field then a number 538.246 will bedisplayed as 538.24.
Country / State Information
Under this sub group, two data fields, Country and State appear. Specify thecountry and state where your company exists. By default the country and state asspecified at the time of company creation appears here.
If the country selected is India and state selected is Assam /
Chandigarh / Himachal Pradesh / Jammu & Kashmir / Kerala / Meghalaya /Mizoram / Punjab / Tripura then a Load Default Invoice Formats buttonappears next to the State data field. Click this button if you want to loadthe default invoice formats for the state. The default invoice formats arethe formats that are specified by the respective state governments.
48
Delete Exported Files on Closing the Company
Exported files refer to the files that are exported from BUSY in html, txt, xls or pdfformat. By default, these files are exported to the folder where data of thecompany is stored. With this option, you can delete all such files that are exportedto data folder of the company. In the list, there are three options. The options are:
Never - Select this option if you do not want to delete exported files from thecompany’s data folder.
Ask before Deletion - Select this option if you want to delete exported filesfrom data folder but only with your permission. On selecting this option, ifany file with html, txt, xls or pdf format exists in company’s data folder thena message box will appear at the time of closing the company. In themessage box, you can choose either to delete the exported files or to retainthe exported files.
Delete Automatically - Select this option if you want to delete exported filesfrom the company’s data folder whenever you close the company.
Display Thought of the DaySpecify 'Y' in this option if you want to view thought of the day at the time of company startup.
After you have entered the appropriate information, click the Save button to save the information.
Let us now move on to the Accounts section.
4.1.2 AccountsUnder Accounts section, you can set various accounting features. On clicking theAccounts button, various accounting features appear. We will cover only the basicaccounting features in this section. Rest of the features will be covered inAdvanced Courseware. Basic accounting features are:
Bill-by-bill Details
Bill-by-bill Details feature is useful in keeping track of bills payable / receivable.With this option, you can maintain various bills or references for a singletransaction. Along with maintaining bill references, you can keep track of duedates when payment is due and view various reports displaying pending bills,cleared bills and so on. For example, you have sold goods worth Rs. 10,000 oncredit basis to a party and the party ensures to pay the payment after fifteen daysof delivery of goods. Hence, in this case it is necessary for you to raise a bill for theparty stating the due amount and the due date of bill.
To use Bill-by-bill Details feature, you need to perform the following steps:
Click Administration
Configuration
Features / Options
Accounts tab.

Enable Bill-by-bill Details feature. On enabling this feature, a Configurebutton appears next to it. On clicking the Configure button, a Bill ReferenceGroup window appears. In the Bill Reference Group window, you can enablethe Enable Grouping of Reference option if you want
Unit 4 – Basic Configuration 49
to enable Bill Reference grouping. With Bill Reference Grouping, you canclassify bills according to their group. For example, a company StarElectronics deals in electronic goods, hence it can create group with namesuch as LG, Sony, Philips and so on.
Company’s Act Depreciation
In case your company follows the Company's Act then you can enable this featureto charge depreciation on fixed assets according to the Company's Act. By default,depreciation is charged according to the IT Act. Companies that need to maintainthe books of accounts according to the Company's Act as well as Income Tax Actneed to enable the Company's Act Depreciation feature. The need for this featurearises on two counts. Firstly, there is a requirement that depreciation should becharged in the books of accounts according to the Company's Act. Secondly,depreciation according to the Income Tax Act should be reflected in the books ofaccount for tax calculation purpose.
To enable the Company’s Act Depreciation feature, click the Administration
Configuration
Features / Options
Accounts button. Enable the Company’s ActDepreciation feature in it.Posting in Accounts Through Sales Return and Purchase Return
You can enable this option if you want to post the sale return / purchase returndirectly to Sale / Purchase account. Let us understand with the help of an example.In the month of April 2010, for Star Electronics Company, there was a Sale and aSale Return voucher for Rs. 10,000 and Rs. 5,000 respectively. Now if this featureis enabled then in the Sales account both the transactions are posted and the netbalance is Rs. 5,000 credit. In this way, both the inventory and accounting aspectof goods returned are taken care of.
On the other hand, if this feature is disabled then it means that Star ElectronicsCompany does not want Sales Return voucher to be posted to the Sales accountdirectly. Instead, it issues a credit note to reflect the debt on part of theorganisation / individual returning the goods. Thus, if the feature is disabled thenonly the Sales voucher will be posted to the Sales account and the balance will beRs. 10,000. Now for the goods returned, a Sales Return voucher is entered thattakes care of the inventory aspect of the transaction but the accounting aspect isleft out. For this purpose, Star Electronics enters a credit note against theorganisation / individual returning the goods thus taking care of the accountingaspect of the transaction.
Double Entry System for Payment & Receipt Voucher
Enable this option if you want to follow Double Entry system for enteringPayment / Receipt vouchers otherwise disable this option if you want to followSingle Entry system for entering Payment / Receipt vouchers. In the Double Entrysystem, you need to specify two accounts and the debit / credit aspect of theaccounts. Thus, you need to remember the debit / credit aspect of the transaction.In the Single Entry system, you only need to select the payment / receipt modeand specify the affected account. You do not need to remember and specify thedebit / credit aspect for the affected accounts.

If this option is enabled and any Payment / Receipt voucher exists then you
cannot disable this option.
50
Show Accounts Current Balance during Voucher Entry
Enable this option if you want to view current balance of the account at the time ofentering voucher. On enabling this option, when you select an account in thevoucher, current balance of the account will be displayed in the voucher. Thus, youare aware of the account’s balance right at the time of voucher entry and cancheck whether you are exceeding the credit limit fixed for the account.
Bank Reconciliation
Enable this option if you want to maintain bank reconciliation statement and wantto enter cheque issued / deposited details.
After you have enabled / disabled features as per your requirement, click the Savebutton, to save the changes made by you.
Let us now move to the Inventory section.
4.1.3 InventoryUnder Inventory section, you can configure various inventory features. On clickingthe Inventory button, various inventory related features appear. We will cover onlythe basic inventory features in this section. Rest of the features will be covered inAdvanced Courseware. Basic inventory features are:
Qty. Decimal Places
Specify the number of digits that will appear after the decimal in item quantity. Inother words, whenever you enter a quantity, the number of digits that appear afterthe decimal places is determined by the value in this data field. For example, ifyou enter ‘3’ in this data field then 3 digits after the decimal will be displayed.Thus, if the quantity is 100.5541 then 100.554 will be displayed.
Stock Val. Method
Under this option, you need to select the stock valuation method that will be usedfor valuing the closing stock. In the list, eight different stock valuation methods areprovided. You can choose the method, which is best suited for your company.
Stock Valuation method specified here is used for valuation of
closing stock only. It is important to note that the closing stock of onemonth is the opening stock of another month. Thus stock valuationmethod affects the closing stock / opening stock that appears in theInventory reports such as Stock Status. An exception to the aboverule is the opening stock of the first beginning financial year as theopening stock on first date is valued at the amount specified in theItem master.
Let us now have a brief look upon the eight stock valuation methods provided by BUSY.
Unit 4 – Basic Configuration 51
FIFO
FIFO refers to the First In First Out. Under this method, quantity of item purchasedfirst is assumed to be sold first.
LIFO
LIFO refers to Last In First Out. Under this method, quantity of item purchased lastis assumed to be sold first.
Last Purchase
Under this method, closing stock is valued at the price at which the last purchasewas made for the item. It takes into account only the Purchase voucher.
Last Qty. In
Under this method, closing stock is valued at the price at which the last quantitywas purchased or received. It takes into account Purchase voucher and MaterialRcvd. From Party voucher whichever was lastly entered.
Last SaleUnder this method, closing stock is valued at the price at which last sale was madefor the item.
Self Evaluation
Under this method, closing stock is valued at the price as specified by you in theSelf Evaluation Price data field in Item master (see Unit 5).
Weighted Average
Under this method, closing stock is valued at the weighted average price based onthe prices of all the quantities purchased or received.
Average PriceUnder this method, stock is valued by dividing total amount in by total quantity in.
Enable Multi-Godown Inventory
Enable this option if you want to maintain details of Material Centre from wherethe goods are dispatched or where the goods are received. A Material Centre is aplace where stock of raw material, semi-finished, finished products and so on canbe stored. If you enable this option then Material Centre and Material CentreGroup masters (see Unit 5) appears in the Masters menu and Stock Transfervoucher (see Unit 6) appears in the Transactions menu. For example, StarElectronics has a retail outlet or showroom and a godown where it keeps its stock.Hence, both the Showroom and Godown are Material Centres for the company.

52
Enable Bill Sundry Narration
Enable this option to enter narration for Bill Sundry at the time of voucher entry.On enabling this option, a Narration field will appear in the Bill Sundry Details gridin the voucher in which you can enter narration for each Bill Sundry used invoucher.
Show Items Current Balance during Voucher Entry
Enable this option if you want to view current balance or stock of the item in thevoucher entry. After enabling this option, when you enter a voucher and select anitem then current stock of the item will be displayed in the voucher. Thus, you areaware of the item’s current stock right at the time of voucher entry and can checkwhether stock of item is sufficient or not.
Separate Stock Updation Date in Dual Voucher
Enable this option if you want to maintain separate stock updation date andvoucher date. Stock updation date here refers to the date on which stock is movedout or moved in and voucher date is the date on which bill / voucher is entered.For example, Star Electronics Company sells a Refrigerator and an Air Conditionerto a customer on 10th April and enters a Sales voucher on 10th of April. However,the delivery of goods took place on 11th April as refrigerator was not available inthe godown for delivery and the customer does not want to take the refrigeratorkept for display. Hence, in this case, voucher date is 10th April and stock updationdate is 11th April as although the bill is raised on 10th April but goods are deliveredor stock is updated on 11th April.
Separate Sales / Purchase Accounts with Item
Enable this option if you want to post various items to different Sales / Purchaseaccount when the items are being sold or purchased. This is helpful in ascertainingthe sale / purchase turnover of the items. For example, Star Electronics Companywants that whenever it sells Air Conditioners of LG Company then the entry shouldbe posted in LG AC Sales account and whenever it sells Air Conditioners of VoltasCompany then entry should be posted in Voltas AC Sales account. For thispurpose, company enables this option and specifies the Sales / Purchase accountwith each item in Item master (see Unit 5). Now company can easily view the salesof LG Air Conditioners and Voltas Air Conditioners.
Separate Stock Valuation Method for Items
Enable this option if you want to value closing stock of various items by applyingdifferent stock valuation method. For example, Star Electronics want to valuateclosing stock of item Television with FIFO method and stock of item Mobile Phoneswith Average Price method. For this purpose, it can enable this feature and specifyseparate stock valuation method with both items in Item master (See Unit 5).
Items Pricing Mode in Vouchers
Click this button if you want to set a default pricing mode for the vouchers. PricingMode here refers to the mode according to which default price of items will bedisplayed at the time of voucher entry. For example, you want that whenever you

select an item in Sales voucher then the price at which item was last sold to aparty should automatically appear in the voucher so that you do not have to
Unit 4 – Basic Configuration 53
remember the price at which the item was last sold. On clicking this button, aPricing Mode Options window appears. The window is divided into two parts, one isfor Sales price and other is for Purchase price. Both the parts contain same optionswith only difference is that under Pricing Mode for Sales, you can select modeaccording to which Sale price will be displayed and under Pricing Mode forPurchase, you can select mode according to which Purchase price will bedisplayed.
Various options in Pricing Mode Options window are:
Show Party’s Last Prices in Sales / Purchase voucher – Select this option ifyou want to view sale / purchase price at which the item was sold to theparty. Here sale / purchase price will be picked only for the party for whichyou are entering the voucher.
Show Last Item Price – Select this option if you want to view sale / purchaseprice at which the item was last sold. Here price will be picked as the lastsale / purchase price irrespective of the party.
Default (Pick from Item Master) – Select this option if you want to pick sale /purchase price from Item Master (see Unit 5).Treat MRP as Sales Price – Enable this option if you want to make item MRP as its Sale price.
After enabling / disabling various features / options, click Save button to save thechanges made by you.
Let us now move on to the Sales Tax / VAT / GST section.
4.1.4 Sales Tax / VAT / GSTUnder Sales Tax / VAT / GST section, you can enable / disable Sales Tax / VAT / GSTfor a company and specify details regarding the same. On clicking the Sales Tax /VAT / GST button, various options appear. The options are:
Enable Sales Tax / VAT / GST Reporting
Enable this option if you want to enable Sales Tax / VAT / GST for the company. Ifyou have enabled Sales Tax / VAT / GST at the time of company creation then bydefault this option will be enabled.
Type
Select the type of tax applicable for the company. By default, the tax selected atthe time of company creation is selected in this option.
Default Tax Rate-1
This data field appears if you have selected a country other than India at the timeof company creation. By default, the default tax rate-1 specified at the time ofcompany creation appears here. You can change it as per your requirement.
54
Default Tax Rate-2
This data field appears if you have selected a country other than India at the timeof company creation. By default, the default tax rate-2 specified at the time ofcompany creation appears here. You can change it as per your requirement.
LST Reg. No.Enter the LST (Local Sales Tax) registration number of your company in the data field.
CST Reg. No.Enter the CST (Central Sales Tax) registration number of your company in the data field.
ST Ward No.Enter the Sales Tax Ward number of your company in the data field.
ST-37 Reg. No.
This data field appears if you have selected the type of tax as LST. Enter the ST-37registration number of your company in the data field.
TIN
This data field appears if you have selected the type of tax as VAT. Enter TIN foryour company in this data field. If you have specified TIN at the time of companycreation then that value will appear by default in this data field.
Signatory Details
This button appears if you have selected the type of tax as VAT. Click theSignatory's Details button to enter name, father / husband name and designationof the person on behalf of whom VAT related reports are submitted to theconcerned authorities. On clicking the button, an Authorized Signatory Detailswindow appears in which you can enter name, designation and other details of theconcerned person.
Adjust Output CST in Input VAT
This data field appears if you have selected the type of tax as VAT. Specify 'Y' inthis data field if you want to adjust Output CST in Input VAT. The centralgovernment allows you to adjust Output CST (payable) amount against Input VAT(claimable).
Pick VAT Op. Bal. from VAT Ledger A/C(s)
This data field appears if you have selected the type of tax as VAT. Specify 'Y' inthis data field if you want to consider VAT accounts balances as opening balances.If there is a debit balance in VAT account then only it will be considered as openingbalance.

Unit 4 – Basic Configuration 55
GST No.
This data field appears if you have selected the type of tax as GST. If you havespecified GST number at the time of company creation then that number willappear by default in this data field.
Specify Original Sales Details in Sales Return Voucher
Specify 'Y' in this data field if you want to enter details of Sales voucher againstwhich the sale is returned in the Sales Return voucher. If you specify 'Y' in this datafield then whenever you enter a Sales Return voucher, an Original Sales InvoiceDetails window appears in which you can specify details of Sales voucher againstwhich the stock is returned.
Transport Details in Local Sales / Purchase
Specify 'Y' in this data field if you want to enter transport details in local sales /purchase transactions. If you specify 'Y' in this data field then while enteringSales / Purchase voucher for local (within state) transactions, a Transport Detailswindow appears. In the window, you can enter transport related details such asTransport, GR / RR No., Vehicle No., and Station. By default, Transport Detailswindow appears for central (inter-state) transactions only. In local transactions, itwill appear only on specifying ‘Y’ in this data field.
Enable Add. Tax / Schg.Specify ‘Y’ in this data if you want to levy Additional Tax / Surcharge on Sales Tax / VAT / GST.
Caption
Enter name for the Additional Tax / Surcharge. The name you mention here willappear as heading for Additional Tax / Surcharge column in all the VAT / CSTreports and Invoices.
Enable Add. Tax / Schg. In Central transactions
This data fields gets active if you have specified 'Y' in the Enable Add. Tax / Schg.data field. Specify 'Y' in this data field if you want to enable Additional Tax /Surcharge in central transactions.
Item-wise Add. Tax / Schg. to be calculated onUnder this group, two options appear. The options are:
Item Amt. - Select this option if you want to calculate Additional Tax / Surcharge on item amount.Tax Amt. - Select this option if you want to calculate Additional Tax / Surcharge on tax amount.
After entering the appropriate details, click the Save button to save the Sales Tax / VAT / GST details.
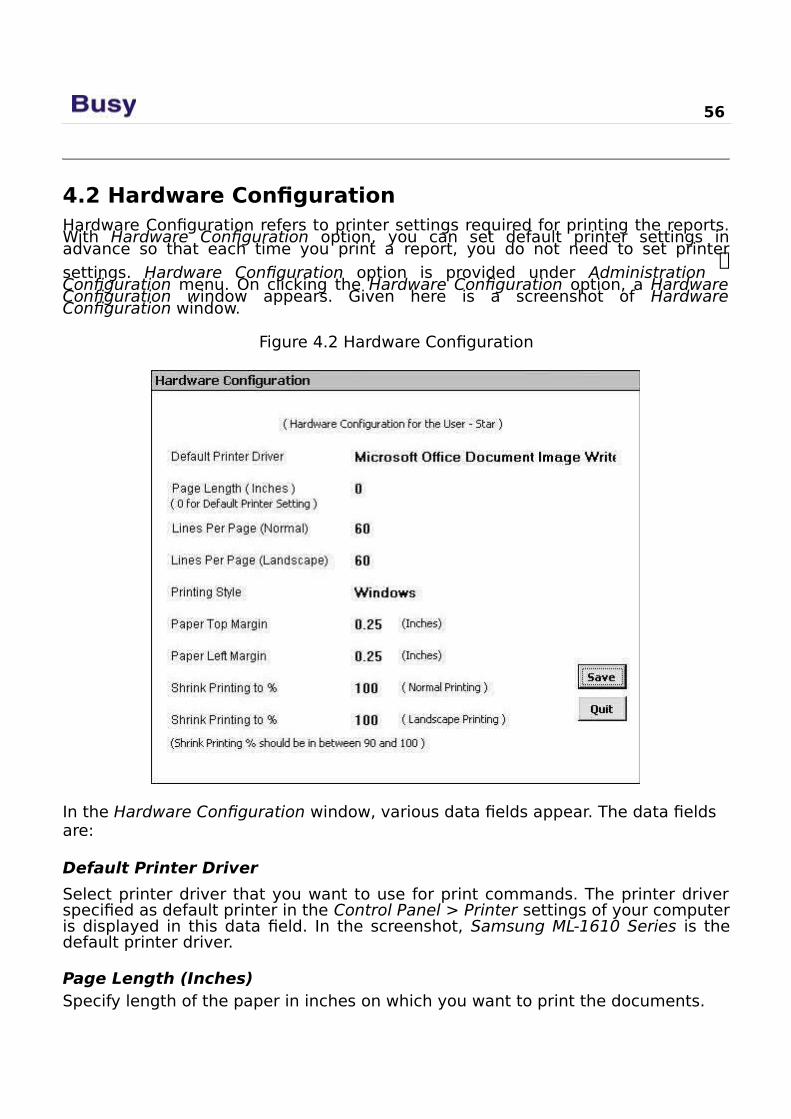
56
4.2 Hardware ConfigurationHardware Configuration refers to printer settings required for printing the reports.With Hardware Configuration option, you can set default printer settings inadvance so that each time you print a report, you do not need to set printer
settings. Hardware Configuration option is provided under Administration
Configuration menu. On clicking the Hardware Configuration option, a HardwareConfiguration window appears. Given here is a screenshot of HardwareConfiguration window.
Figure 4.2 Hardware Configuration
In the Hardware Configuration window, various data fields appear. The data fields are:
Default Printer Driver
Select printer driver that you want to use for print commands. The printer driverspecified as default printer in the Control Panel > Printer settings of your computeris displayed in this data field. In the screenshot, Samsung ML-1610 Series is thedefault printer driver.
Page Length (Inches)Specify length of the paper in inches on which you want to print the documents.
Unit 4 – Basic Configuration 57
Lines Per Page (Normal)Specify number of lines that will be printed on a single page. The default value is 60.
Lines Per Page (Landscape)
Specify the number of lines that will be printed on a single page, if you select theorientation as Landscape. The default value is 60.
Printing StyleYou can select the Printing Style from either of the following two options, Windows and DOS.
Windows
If you select the Printing Style as Windows then printing will be done in Graphicsmode. In case of Windows Printing Style, the default printer driver will generally bethe same as the printer you are using. For example, if you are using Samsung ML-1610 Series printer, the default driver will be Samsung ML-1610 Series. Onselecting this option, following four data fields become active:
Paper Top Margin - Specify the margin, in inches, for the top of the page. Bydefault, the top margin is 0.25.
Paper Left Margin - Specify the margin, in inches, for the left side of thepage. By default, the left margin is 0.25.
Shrink Printing to % (Normal) - Specify the percentage to which thedocument is to be reduced for printing in Normal mode. This feature allowsyou to scale the document for printing and thus helping you to avoidadjusting margins.
Shrink Printing to % (Landscape) - Specify the percentage to which thedocument is to be reduced for printing in Landscape mode. This featureallows you to scale the document for printing and thus helping you to avoidadjusting margins.
DOS
If you select this option then printing will be done in Draft mode. On selecting this option, a data field and a button gets active. The data field and button are:
DOS Emulation - Select the DOS printer driver to be used from the list ofoptions displayed in the data field. If the printer driver you are using is notlisted, choose the one that is nearest to it in print characteristics. Forexample, if you are using a dot matrix printer of Wipro, you can choose theprinter driver as Epson. By default, Epson is selected as the DOS PrinterDriver.
Configure Printer Command - Click this button to configure variouscommands for DOS Printer. On clicking this button, a Printer Configurationwindow appears. In the Printer Configuration window, you can configurevarious Printer commands. Apart from the Printer commands given, you canalso configure any other three commands in the Command 1, 2 & 3 data
fields. If you want to load the default settings, then click the Load Defaultbutton.
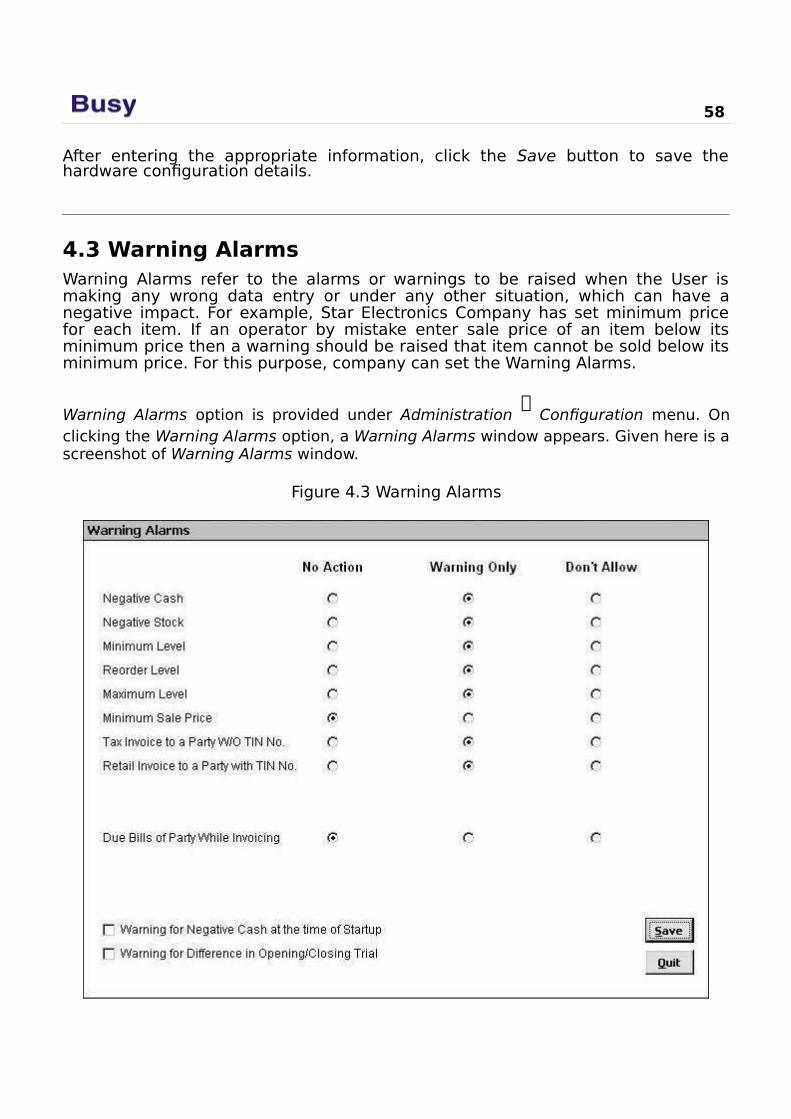
58
After entering the appropriate information, click the Save button to save thehardware configuration details.
4.3 Warning AlarmsWarning Alarms refer to the alarms or warnings to be raised when the User ismaking any wrong data entry or under any other situation, which can have anegative impact. For example, Star Electronics Company has set minimum pricefor each item. If an operator by mistake enter sale price of an item below itsminimum price then a warning should be raised that item cannot be sold below itsminimum price. For this purpose, company can set the Warning Alarms.
Warning Alarms option is provided under Administration
Configuration menu. Onclicking the Warning Alarms option, a Warning Alarms window appears. Given here is ascreenshot of Warning Alarms window.
Figure 4.3 Warning Alarms
Unit 4 – Basic Configuration 59
Using the Warning Alarms option, you can select different types of alerts for different conditions.There are three types of alerts that can be configured for Warning Alarms. These are:
No Action - No action will be taken if the condition occurs.Warning Only - Only a warning message will be displayed if the condition occurs.
Don't Allow - You cannot complete the action or move forward if the condition occurs. To move forward you need to make appropriate changes asper the condition.
To configure the alerts, select the appropriate alert against the condition.
Review
All the Features / Options in BUSY are classified under various tabs or sections such as Accounting, Inventory and so on.
BUSY has the provision to enter Payment / Receipt voucher in either Double Entry modeor Single Entry mode. Only one mode can be used at a time.
In BUSY, you can charge depreciation according to both Income Tax Act and Company’s Act.
Current account balance and current stock of item can be seen at the time of making voucher entry itself.
BUSY provides eight different types of stock valuation methods for valuing the closing stock of items.
You can create multiple Material Centres from where the goods are dispatched or wheregoods are received.
In BUSY, there is a provision to enter separate voucher date and stock updation date.
Various pricing modes are provided to set default sales / purchase price for the vouchers.
In Sales Return vouchers, you can specify the details of Sale voucher against which the actual sale has taken place.
You can print documents / reports in both Windows and DOS printing style.
You can also shrink documents to be printed to a certain percentage.
In Warning Alarms, you can choose either to take no action or to give warning only or don’t allow further data entry for certain conditions or situations.
Exercise1 . Default currency string is:
a) Rs. c) INRb) Rupees d) None of the above
60
2 . Default Date format is: a) dd/mm/yyyy b)mm/dd/yy
c) mm/dd/yyyyd) None of the above
3 . Stock Valuation method not provided by BUSY:a) Last in First out c) First in First outb) First in Last out d) Average method
4 . BUSY provides Warning Alarms for:
a) Negative cashb) Negative stock
c) Minimum Sales Priced) All of the above
5 . Printing can be shrink to:
a) 60-100%b) 70-100%
c) 80-90%d) 90-100%
6 . Reports of BUSY can be printed on:
a) Ink Jet printerb) Dot Matrix Printer
c) Laser Printerd) All of the above
7 . What is the use of Hardware Configuration?
8 . Can you enable / disable, 'Double Entry System for Payment / Receipt' voucher feature after entering any payment / receipt transaction?
9 . What is Multi Godown Inventory?
1 0 . Open Company ‘Star Electronics’ and enable the following features:a) Bill-by-bill Details under Accounts tabb) Last Item Price in Item Pricing Modesc) Separate Stock Updation Date in Dual vouchers under Inventory tab
Disable the following features:a) Multi Godown Inventory under Inventory tabb) Double Entry system for Payment & Receipt Vouchers under Accounts
tab
Change the following information:a) Qty. decimal places from 2 to 0

b) Change warning alarm ‘Minimum Sale Price’ from ‘No Action’ to ‘Don’t Allow’.
Module 3
Basic Accounting & Inventory
Unit 5 – Masters
Unit 6 – Transactions
Unit 7 – Printing Documents

What we Learn with Pleasure
we never Forget.
Unit 5Masters
The main objective of this unit is to focus on creating Masters in BUSY. The termMasters signifies the information that is generally entered once, usually aftercreating a company. Masters stores information that is either static or that seldomgets change. Information stored in Masters is further used in entering day-to-daytransactions. From User's point of view, Masters can be the parties with whom hedeals, the items in which he trades or manufactures and the taxes he use.
Topics covered under this unit:
Creating Masters
Configuring Masters
5.1 Creating MastersIn BUSY the term 'Master' signifies information that is generally entered once butfurther used in day-to-day activities and transactions. Masters contain a set ofinformation which is either static or which does not require high volume ofchanges. Before entering transactions of a business, one needs to create certainmasters, which will be used, in daily course of business. BUSY provides variousmasters under Masters menu such as Account master, Item master, Bill Sundrymaster and so on which are to be created before starting the operations ofbusiness. Basic masters that are generic and are required by any type of companyget created at the time of company creation itself. For example, almost every typeof company needs, Cash account, Stock account, and Miscellaneous Expenseaccount. Similarly, every company needs to charge or pay basic taxes such asSales Tax or VAT. Hence, to ease the workload of Users, BUSY creates genericmasters itself. Apart from these basic masters, other masters that vary fromcompany to company needs to be created by User itself. For example, eachcompany has its own set of parties with whom it deals, each company hasdifferent items to sell or purchase and so on. Thus, these company specificmasters are to be created by User as per his requirement. In this section, we willdiscuss creation of various Masters in BUSY.
Masters are provided under Administration menu of BUSY. On clicking theAdministration menu, various options appear. Click the Masters option to view thelist of Master types provided by BUSY. On clicking the Masters option, a list ofMasters is displayed. Given here is a screenshot of Masters menu displaying list ofMasters.
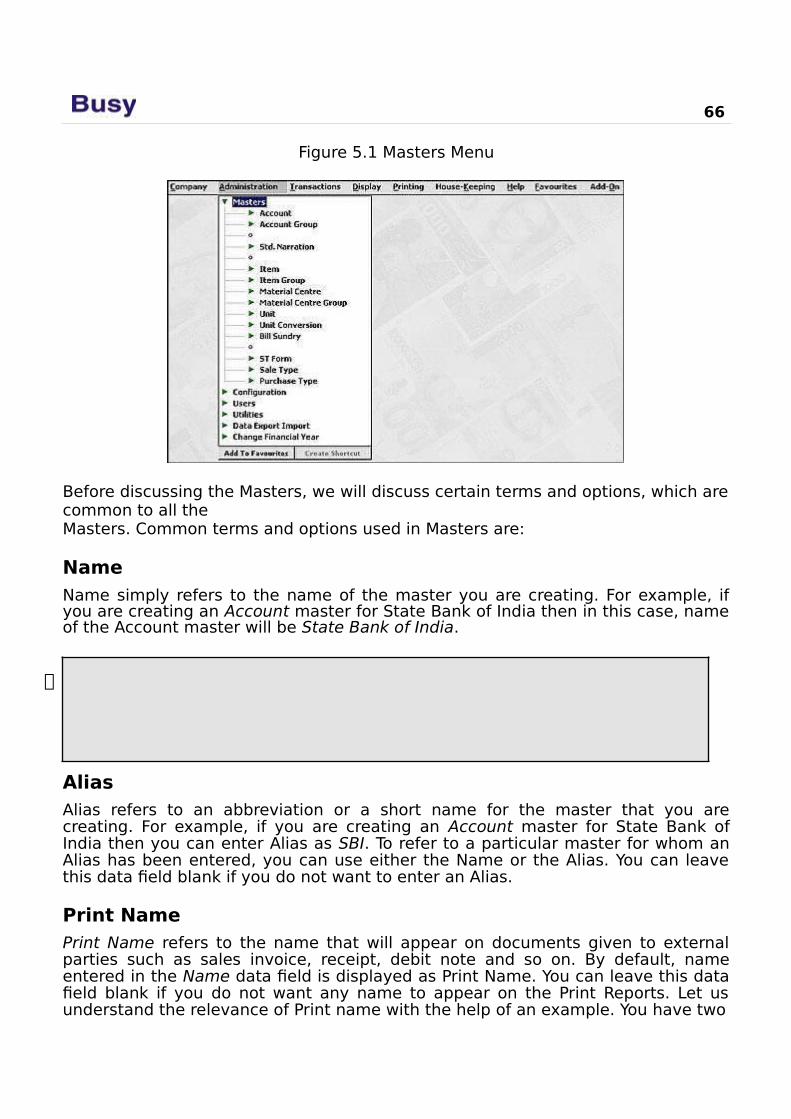
66
Figure 5.1 Masters Menu
Before discussing the Masters, we will discuss certain terms and options, which arecommon to all theMasters. Common terms and options used in Masters are:
NameName simply refers to the name of the master you are creating. For example, ifyou are creating an Account master for State Bank of India then in this case, nameof the Account master will be State Bank of India.
You cannot have two masters of the same type with the same name.BUSY does not allow you to create two masters of the same type such asAccount, Material Centre and so on with the same name. Further, blankspaces and reserved names (names of pre-defined masters – see sub-topic 5.1.1) are not accepted as names for masters.
AliasAlias refers to an abbreviation or a short name for the master that you arecreating. For example, if you are creating an Account master for State Bank ofIndia then you can enter Alias as SBI. To refer to a particular master for whom anAlias has been entered, you can use either the Name or the Alias. You can leavethis data field blank if you do not want to enter an Alias.
Print NamePrint Name refers to the name that will appear on documents given to externalparties such as sales invoice, receipt, debit note and so on. By default, nameentered in the Name data field is displayed as Print Name. You can leave this datafield blank if you do not want any name to appear on the Print Reports. Let usunderstand the relevance of Print name with the help of an example. You have two
Unit 5 - Masters 67
dealers with same name Rohan Kapoor, one is in Delhi and other is in Mumbai. Todifferentiate between the two Account masters, you append the name of the citywith their names. Thus, the account names will be Rohan Kapoor - Delhi and RohanKapoor - Mumbai. Now all the documents concerning these two accounts will havethe name of the cities appended with the customer's names. This is not acceptableto the company since it wants only the name of the customers to appear on thereports. For this purpose, the company specifies the Print Name as Rohan Kapoorfor both the accounts. Now the reports will display only Rohan Kapoor in theheader while the account names will remain different.
Parent GroupParent Group refers to the Group under which various masters can be classified. It helps to establish a hierarchy for the Masters. You can specify Parent Group for Account, Item, Material Centre and Cost Centre masters. For example, Star Electronics Company has many models of Televisions such as LCD, Flat Screen and so on, hence it can categorise all these models of Television under group Television. Let us take another example, Star Electronics has various debtors and creditors, hence it can specify the group as Sundry Debtors for all the parties, which are debtors of the company and can specify the group as Sundry Creditors for all the parties, which are creditors of the company.
Apart from the common terms, there are certain options that are common to all the Masters. The options are Add, Modify and List. On clicking any Master Type in Masters menu, these options appear. Let us discuss these options in detail.
AddBy using Add option of Masters, you can add a new master in BUSY. On clicking theAdd option, a Master – Add window appears in which you can create a new Master.For example, if you want to create a new Account master then click Administration
Masters
Accounts
Add Option. On clicking the Add option, an Account Master– Add window appears in which you can create a new Account master.
ModifyBy using Modify option of Masters, you can edit details of the already enteredMasters. On clicking the Modify option, a Select Master to Modify window appearsin which you can select the master to be modified. On selecting the master, clickthe Select button. On clicking, the Select button, a Master – Modify windowappears with already entered details of the Master. Edit the master informationand click the Save button.
You can also delete a Master by using the Modify option. At the top of Master –Modify window, a Delete button appears on clicking which you can delete a Master.Masters can be deleted based on certain conditions. The conditions are:
Master should not be used in any other MasterMaster should not be used in any transaction
68
Master is not a predefined Master
ListBy using List option of Masters, you can view / print list of Masters created for aMaster Type. For example, you want to view list of all the Item masters created by
you then you can do so by clicking Administration
Masters
Item
List option.
After discussing common terms and options, let us start discussing the Masters provided in BUSY. We will first start with the Account master.
5.1.1 AccountsAn Account is a summarized record of various transactions pertaining to aparticular account head. It is commonly referred to as a Ledger Account. In BUSY,it is called Account master. All the transactions pertaining to a particular accounthead are recorded under one Account master. For example, all the transactions ofcash payments and cash receipts are recorded under the Cash Account master.When you create a new company, 56 Account masters are created by default foryour convenience. The default Account masters are:
Additional Tax / Surcharge on VATAdvertisement & PublicityBad Debts Written OffBank ChargesBooks and PeriodicalsBusy Infotech Pvt. Ltd.Capital EquipmentsCashCentral Sales TaxCharity and DonationsCommission on SalesComputersConveyance ExpensesCustomer Entertainment ExpensesDepreciation AccountDevelopment TaxEarnest MoneyEdu. Cess on ExciseEdu. Cess on Service TaxEdu. Cess on TDSExcise Duty
Unit 5 - Masters 69
Freight and Forwarding ChargesFurniture and FixtureLegal ExpensesLocal Sales Tax / VATMiscellaneous ExpensesOffice EquipmentsOffice Maintenance ExpensesOffice RentPlant & MachineryPostal ExpensesPrinting and StationeryProfit & LossPurchaseRounded OffSalarySalary & Bonus PayableSalesSales Promotion ExpensesService Charges PaidService Charges ReceiptService TaxSHE Cess on ExciseSHE Cess on Service TaxSHE Cess on TDSStaff Welfare ExpensesStockTDS (Advertisement)TDS (Commission)TDS (Contractor)TDS (Interest)TDS (Rent)TDS (Salary)Telephone ExpensesTraveling ExpensesWater & Electricity Expenses
Out of the 56 default Account masters, following five are pre-defined Account masters:
70
CashProfit & LossPurchaseSalesStock
Predefined Account masters are those accounts, which are necessary
for maintaining books of accounts. Without these accounts, you cannotmaintain accounting aspect of business. In BUSY, names of Pre-definedAccount masters are reserved names i.e. these names cannot be used tocreate a new Account master or to rename an existing master. Forexample, Cash is a pre-defined Account master. You can rename theaccount to Cash-in-Hand but you cannot create a new Account masterwith the name Cash or rename any existing Account master to Cash.Thus, you can only rename the pre-defined Account masters. You cannotdelete predefined Account masters. For other default Account masters,you can modify or delete them as per your convenience.
Let us now start creating an Account master. To create an Account master, you need to click the Administration
Masters
Accounts
Add option. On clicking the Add option, an
Account Master- Add window appears. In the window, you can enter name of the account to be
created and can specify other related details. Given here is a screenshot of Account Master – Add window.
Image on next Page
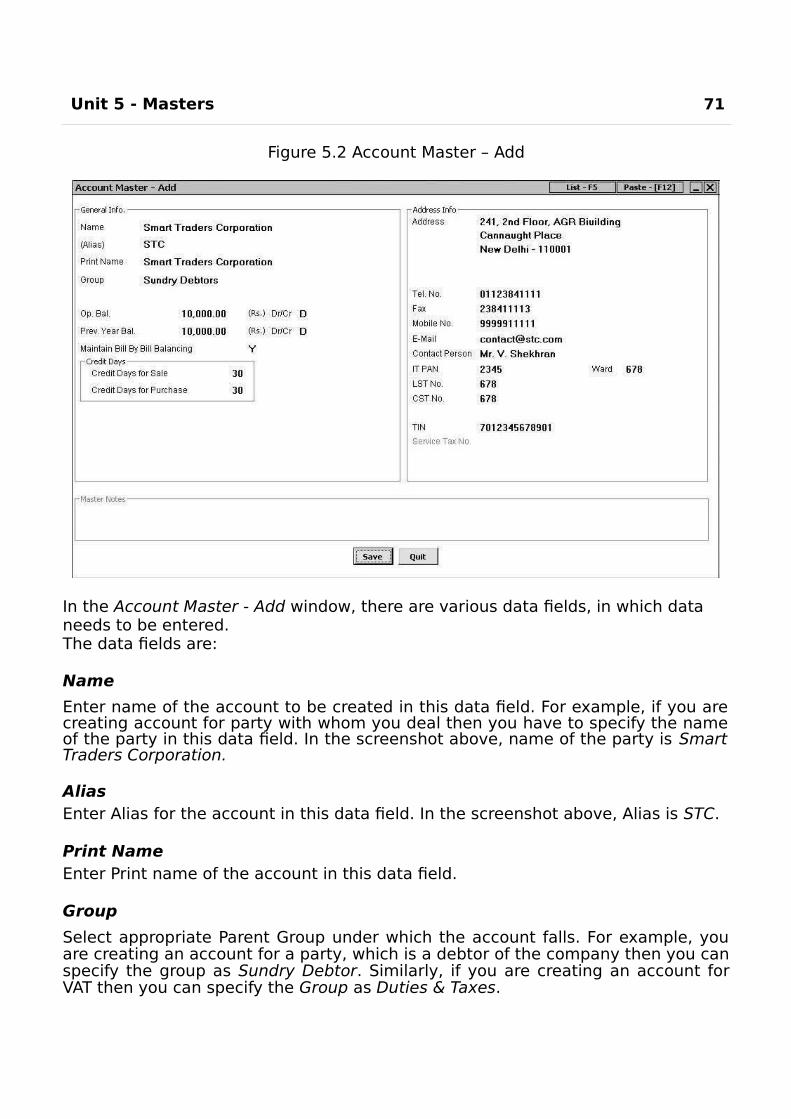
Unit 5 - Masters 71
Figure 5.2 Account Master – Add
In the Account Master - Add window, there are various data fields, in which data needs to be entered.The data fields are:
Name
Enter name of the account to be created in this data field. For example, if you arecreating account for party with whom you deal then you have to specify the nameof the party in this data field. In the screenshot above, name of the party is SmartTraders Corporation.
AliasEnter Alias for the account in this data field. In the screenshot above, Alias is STC.
Print NameEnter Print name of the account in this data field.
Group
Select appropriate Parent Group under which the account falls. For example, youare creating an account for a party, which is a debtor of the company then you canspecify the group as Sundry Debtor. Similarly, if you are creating an account forVAT then you can specify the Group as Duties & Taxes.
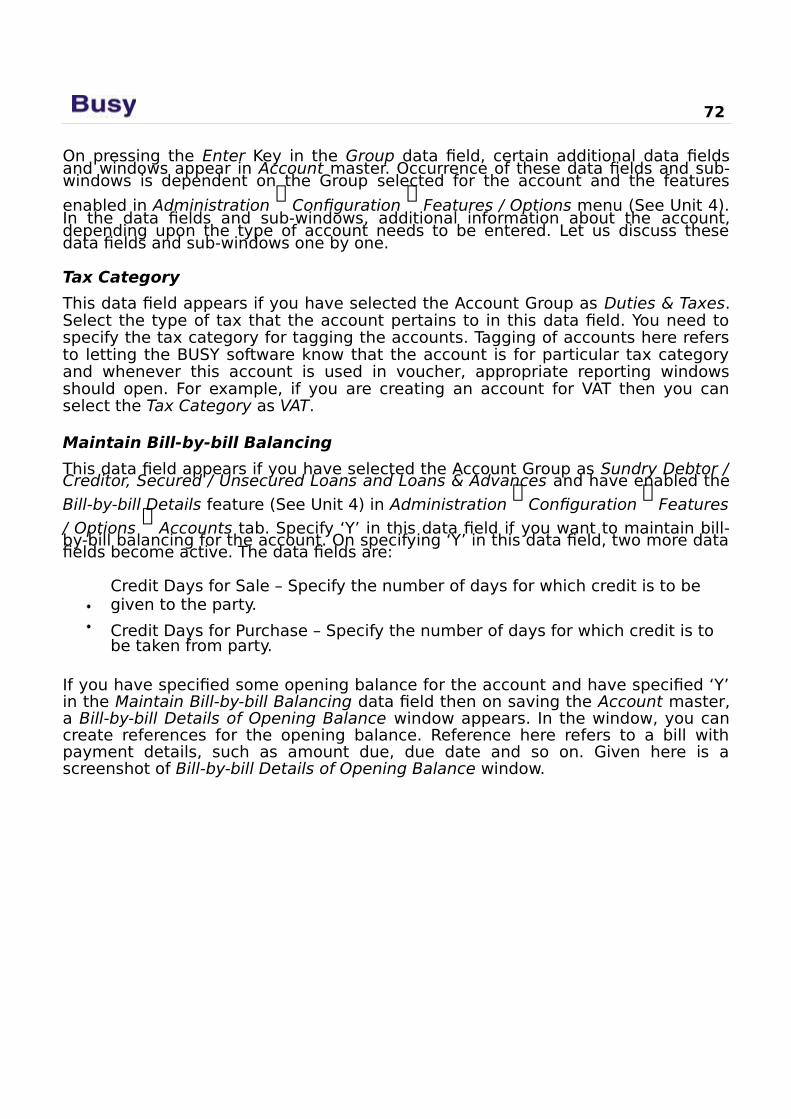
72
On pressing the Enter Key in the Group data field, certain additional data fieldsand windows appear in Account master. Occurrence of these data fields and sub-windows is dependent on the Group selected for the account and the features
enabled in Administration
Configuration
Features / Options menu (See Unit 4).In the data fields and sub-windows, additional information about the account,depending upon the type of account needs to be entered. Let us discuss thesedata fields and sub-windows one by one.
Tax Category
This data field appears if you have selected the Account Group as Duties & Taxes.Select the type of tax that the account pertains to in this data field. You need tospecify the tax category for tagging the accounts. Tagging of accounts here refersto letting the BUSY software know that the account is for particular tax categoryand whenever this account is used in voucher, appropriate reporting windowsshould open. For example, if you are creating an account for VAT then you canselect the Tax Category as VAT.
Maintain Bill-by-bill Balancing
This data field appears if you have selected the Account Group as Sundry Debtor /Creditor, Secured / Unsecured Loans and Loans & Advances and have enabled the
Bill-by-bill Details feature (See Unit 4) in Administration
Configuration
Features
/ Options
Accounts tab. Specify ‘Y’ in this data field if you want to maintain bill-by-bill balancing for the account. On specifying ‘Y’ in this data field, two more datafields become active. The data fields are:
Credit Days for Sale – Specify the number of days for which credit is to be given to the party.
Credit Days for Purchase – Specify the number of days for which credit is to be taken from party.
If you have specified some opening balance for the account and have specified ‘Y’in the Maintain Bill-by-bill Balancing data field then on saving the Account master,a Bill-by-bill Details of Opening Balance window appears. In the window, you cancreate references for the opening balance. Reference here refers to a bill withpayment details, such as amount due, due date and so on. Given here is ascreenshot of Bill-by-bill Details of Opening Balance window.
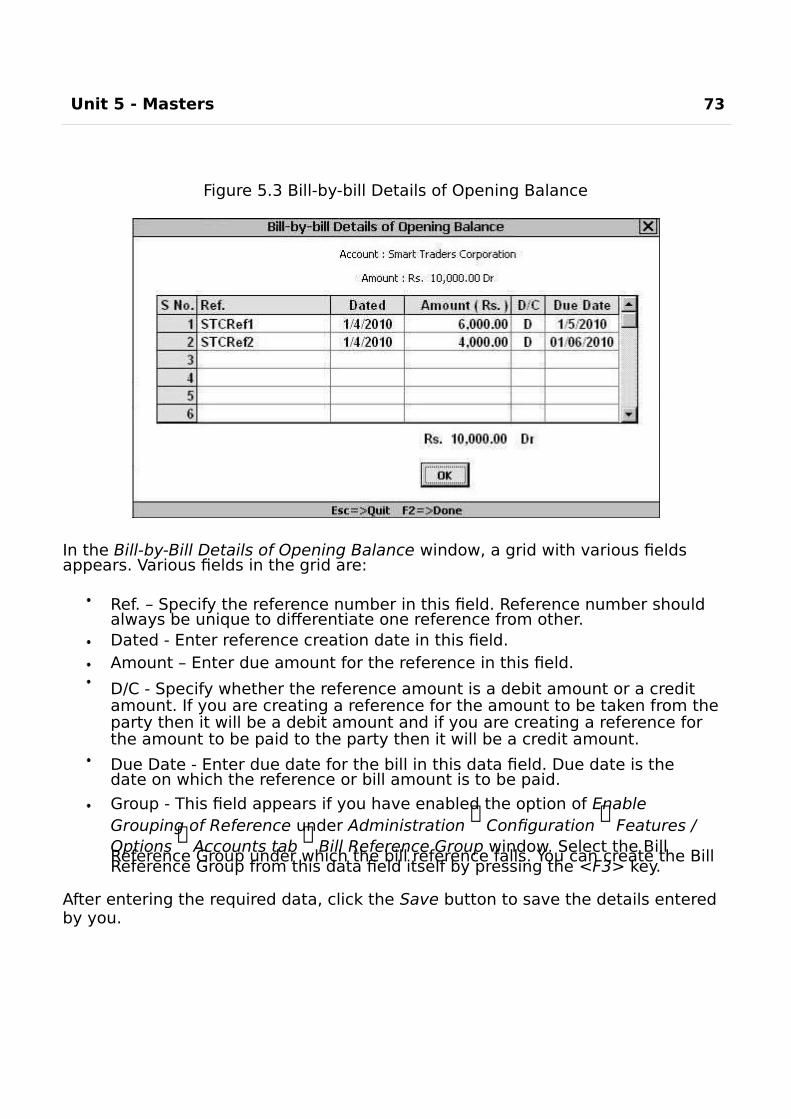
Unit 5 - Masters 73
Figure 5.3 Bill-by-bill Details of Opening Balance
In the Bill-by-Bill Details of Opening Balance window, a grid with various fields appears. Various fields in the grid are:
Ref. – Specify the reference number in this field. Reference number should always be unique to differentiate one reference from other.Dated - Enter reference creation date in this field.Amount – Enter due amount for the reference in this field.
D/C - Specify whether the reference amount is a debit amount or a credit amount. If you are creating a reference for the amount to be taken from the party then it will be a debit amount and if you are creating a reference for the amount to be paid to the party then it will be a credit amount.
Due Date - Enter due date for the bill in this data field. Due date is the date on which the reference or bill amount is to be paid.
Group - This field appears if you have enabled the option of Enable Grouping of Reference under Administration
Configuration
Features /
Options
Accounts tab
Bill Reference Group window. Select the Bill Reference Group under which the bill reference falls. You can create the Bill Reference Group from this data field itself by pressing the <F3> key.
After entering the required data, click the Save button to save the details entered by you.
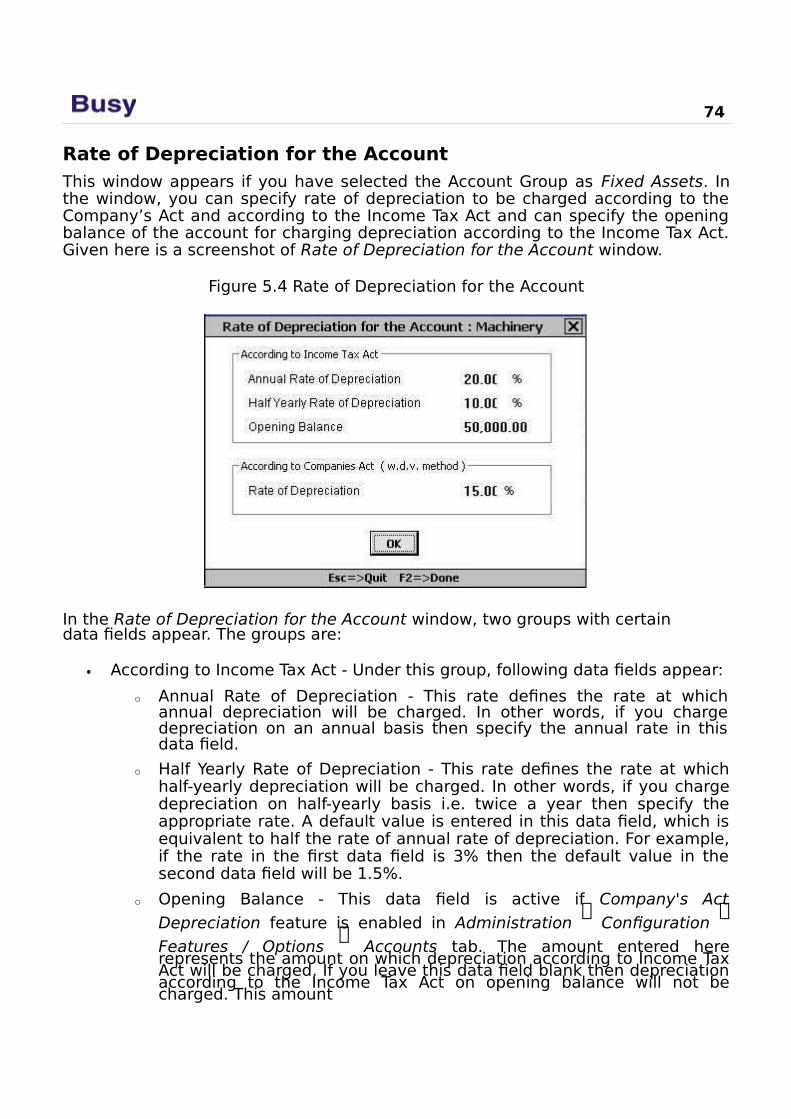
74
Rate of Depreciation for the AccountThis window appears if you have selected the Account Group as Fixed Assets. Inthe window, you can specify rate of depreciation to be charged according to theCompany’s Act and according to the Income Tax Act and can specify the openingbalance of the account for charging depreciation according to the Income Tax Act.Given here is a screenshot of Rate of Depreciation for the Account window.
Figure 5.4 Rate of Depreciation for the Account
In the Rate of Depreciation for the Account window, two groups with certain data fields appear. The groups are:
According to Income Tax Act - Under this group, following data fields appear:
o Annual Rate of Depreciation - This rate defines the rate at whichannual depreciation will be charged. In other words, if you chargedepreciation on an annual basis then specify the annual rate in thisdata field.
o Half Yearly Rate of Depreciation - This rate defines the rate at whichhalf-yearly depreciation will be charged. In other words, if you chargedepreciation on half-yearly basis i.e. twice a year then specify theappropriate rate. A default value is entered in this data field, which isequivalent to half the rate of annual rate of depreciation. For example,if the rate in the first data field is 3% then the default value in thesecond data field will be 1.5%.
o Opening Balance - This data field is active if Company's Act
Depreciation feature is enabled in Administration
Configuration
Features / Options
Accounts tab. The amount entered hererepresents the amount on which depreciation according to Income TaxAct will be charged. If you leave this data field blank then depreciationaccording to the Income Tax Act on opening balance will not becharged. This amount
Unit 5 - Masters 75
can be different from the opening balance amount specified in the Op. Bal. data field of Account master.
According to Company's Act – This group appears if Company's Act Depreciationfeature is enabled in Administration
Configuration
Features / Options
Accounts tab. Under this group, following data field appear:
o Rate of Depreciation - This rate defines the rate at which depreciationwill be charged according to Company’s Act on the fixed asset. Thisrate will be applied to the opening balance specified in the Op. Bal.data field of Account master.
Companies that need to maintain books of accounts, according to
both the Company’s Act and Income Tax Act, need to enableCompany's Act Depreciation feature. The need for this feature ariseson two counts. Firstly, there is a requirement that depreciationshould be charged in books of accounts, according to Company’s Act.Secondly, depreciation according to the Income Tax Act should bereflected in the books of account for tax calculation purpose.
Let us understand with the help of an example. There is a fixed assetworth Rs. 1,00,000. According to the Company’s Act, depreciation isRs. 20,000, while, according to the Income Tax Act, depreciation is Rs.25,000. Now in the books of account, journal entry for depreciation ofRs. 20,000 will be entered. According to the Income Tax Act,depreciation of Rs. 25,000 will be reflected in the Balance Sheetmanually for tax calculation purpose. Thus, when the balances arecarried forward to next financial year, the opening balance for thefixed asset will be Rs. 80,000 as per the Company’s Act whereasopening balance according to the Income Tax Act will be Rs. 75,000.This amount of Rs. 75,000 will be entered in Opening Balance datafield in Rate of Depreciation window explained above.
Uncleared Entries – Cheque Issued / DepositedThis sub-window appears if you have selected the Account Group as Bank
Accounts and have enabled Bank Reconciliation feature in Administration
Configuration
Features / Options
Accounts tab. This window appears on savingthe Account master. Two windows, one for un-cleared entries for cheques issuedand one for un-cleared entries for cheques deposited appear. For example, youhave deposited a cheque in Bank on 31st March 2009. Now it takes two days for acheque to be cleared. Hence, on 1st of April, you can show this cheque as un-cleared cheque of previous financial year. In the window, you can specify detailsabout the cheques issued / deposited in the previous year and that are yet to becleared. Given here is a screenshot of Uncleared Entries - Cheque Issued window.
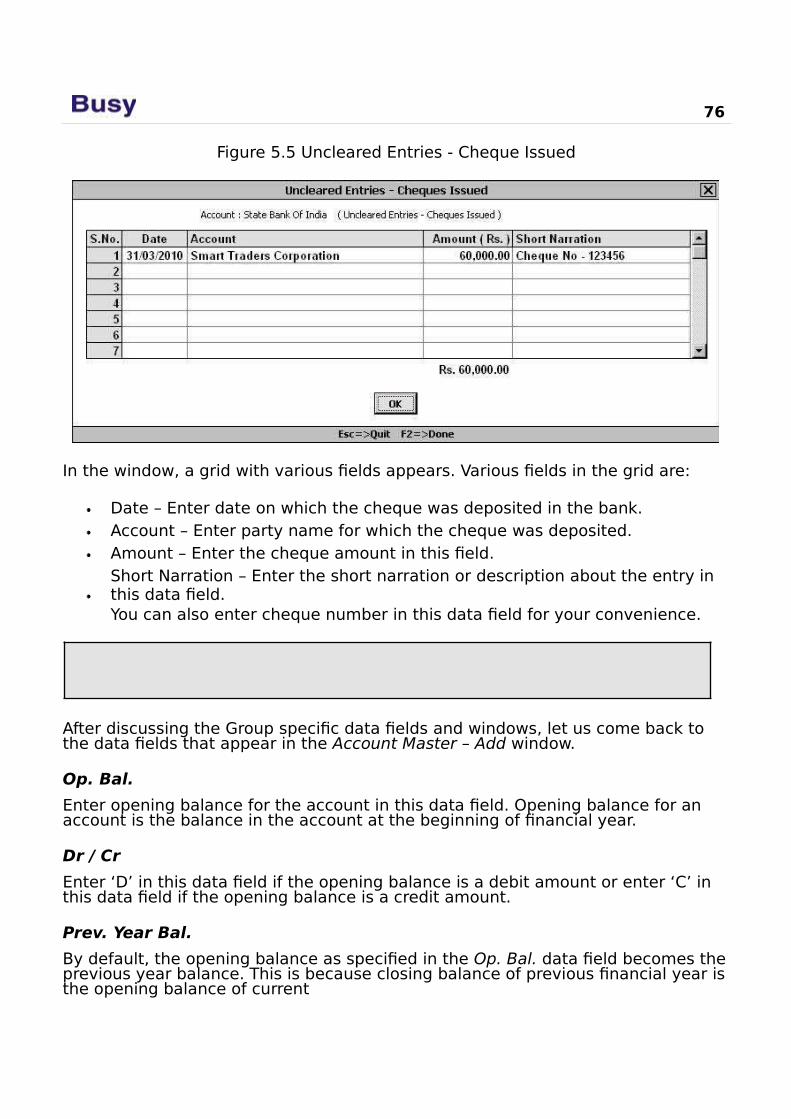
76
Figure 5.5 Uncleared Entries - Cheque Issued
In the window, a grid with various fields appears. Various fields in the grid are:
Date – Enter date on which the cheque was deposited in the bank.Account – Enter party name for which the cheque was deposited.Amount – Enter the cheque amount in this field.Short Narration – Enter the short narration or description about the entry in this data field.You can also enter cheque number in this data field for your convenience.
Uncleared Entries – Cheque Issued / Deposited window helps in preparing
Bank Reconciliation statement.
After discussing the Group specific data fields and windows, let us come back to the data fields that appear in the Account Master – Add window.
Op. Bal.
Enter opening balance for the account in this data field. Opening balance for an account is the balance in the account at the beginning of financial year.
Dr / Cr
Enter ‘D’ in this data field if the opening balance is a debit amount or enter ‘C’ in this data field if the opening balance is a credit amount.
Prev. Year Bal.
By default, the opening balance as specified in the Op. Bal. data field becomes theprevious year balance. This is because closing balance of previous financial year isthe opening balance of current
Unit 5 - Masters 77
financial year. However, in case of Revenue Account Group, you can have differentprevious year closing balance and current year opening balance. This is becausethe balances of revenue accounts are not carried forward to the next financialyear. Thus, the opening balances of all revenue accounts are zero. Moreover, youare required to enter the previous year's closing balance of revenue accounts asper Schedule IV of the Companies Act along with the current year's balances.
Dr / Cr
Enter ‘D’ in this data field if the previous year balance is a debit amount or enter‘C’ in this data field if the previous year balance is a credit amount.
Address
Enter address of the account in this data field. Four lines are provided for enteringaccount’s address. You can enter address for the parties and banks. For rest of theaccounts, you can leave these data fields blank.
Tel. No.Enter telephone number in this data field.
FaxEnter fax number in this data field.
Mobile No.Enter mobile number in this data field.
EmailEnter Email address in this data field.
Contact PersonEnter name of contact person of the party or bank for which you are creating account.
IT PANEnter IT PAN of the party for which you are creating account.
WardEnter ward in this data field under which the party falls.
LST No.Enter Local Sales Tax Number of the party for which you are creating account.
CST No.Enter Central Sales Tax Number of the party for which you are creating account.
78
TINEnter TIN of the party for which you are creating account.
After entering appropriate details in the data fields, click the Save button to save the Account master.
5.1.2 Account GroupAn Account Group is a broad level categorization under which similar type ofaccounts are grouped under one Account Group. All accounts are classified underAccount Groups. Account Group specifies the type of account you are using. Allfurther entries of accounts are dependent on the Account Group. By looking atAccount Group of an account, you can easily figure out which type of account it isi.e. it is an account for Sundry Debtor / Creditor, Bank Account, Fixed Asset and soon.
In BUSY, Account Groups can be created using the Account Group master. Whenyou create a new company, 29 Account Group masters are created by default foryour convenience. The default Account Group masters are:
Bank AccountsBank O / D AccountsCapital AccountCash-in-HandCurrent AssetsCurrent LiabilitiesDuties & TaxesExpenses (Direct / Mfg.)Expenses (Indirect / Admn.)Fixed AssetsIncome (Direct / Opr.)Income (Indirect)InvestmentsLoans & Advances (Assets)Loans (Liability)Pre-operative ExpensesProfit & LossProvisions / Expenses PayablePurchaseReserves & SurplusRevenue AccountsSaleSecured Loans
Unit 5 - Masters 79
Securities & Deposits (Assets)Stock-in-HandSundry CreditorsSundry DebtorsSuspense AccountUnsecured Loans
All the 29 default Account Group masters are pre-defined (See topic 5.1.1)Account Group masters. Pre-defined Account Groups in BUSY, are based on thecommon requirements of the Indian Accounting System.
Classification of Account GroupsPre-defined Account Groups are classified in primarily two categories:
Primary - These Account Groups represent the top-most level in the hierarchy of Account Groups.
Secondary - These Accounts Groups are grouped under the Primary Groups. For example, Cash-in-Hand is a secondary group under the Current Assets Primary Group.
Importance of Classifying Account GroupsThe flexibility of creating sub-groups under the groups according to yourrequirements helps in organizing large number of accounts in a systematicmanner. This in turn enhances the information system in the organisation. Forexample, you can divide your sundry debtors according to the region where theiroffice is located. Thus, you can create various Account Groups as North DelhiDebtors, East Delhi Debtors, South Delhi Debtors and West Delhi Debtors underthe Account Group Sundry Debtors. This will help you in viewing report for a singledebtor, for all the debtors of East, West, North or South Delhi and for all thedebtors of Delhi region.
Classification of Account Groups should be governed by the needs of yourorganization. Use
this facility of grouping various Account Groups judiciously. Do not create unnecessary
Key Points while classifying Account Groupshierarchy in account groups since it can lead to confusion.
Given here are the key points to be kept in mind when you are creating Account Groups.
Create accounts for income or expenditure under the Revenue AccountsAccount Group only. The reason is that only the Revenue Accounts AccountGroup and Stock-in-Hand Account Group affect the Profit & Loss account ofthe company.
Create tax related accounts under the Duties & Taxes Account Group. Thebasic functionality of Duties & Taxes Account Group is to maintain accountsfor Sales Tax, VAT and other such liabilities of the company towards thegovernment.

80
Create a Sundry Debtor or Sundry Creditor account based on the type and the frequency of transactions that you carry out with the party.
BUSY does not distinguish between Sundry Debtors and Sundry Creditorswhile entering the Sales or Purchase vouchers. Thus, you can enter bothSales and Purchase voucher for Sundry Debtors and Sundry Creditors.
Given here is a diagram of the hierarchical representation of the Account Groups.
Image on next PageUnit 5 - Masters 81
Figure 5.6 Hierarchy of Account Groups
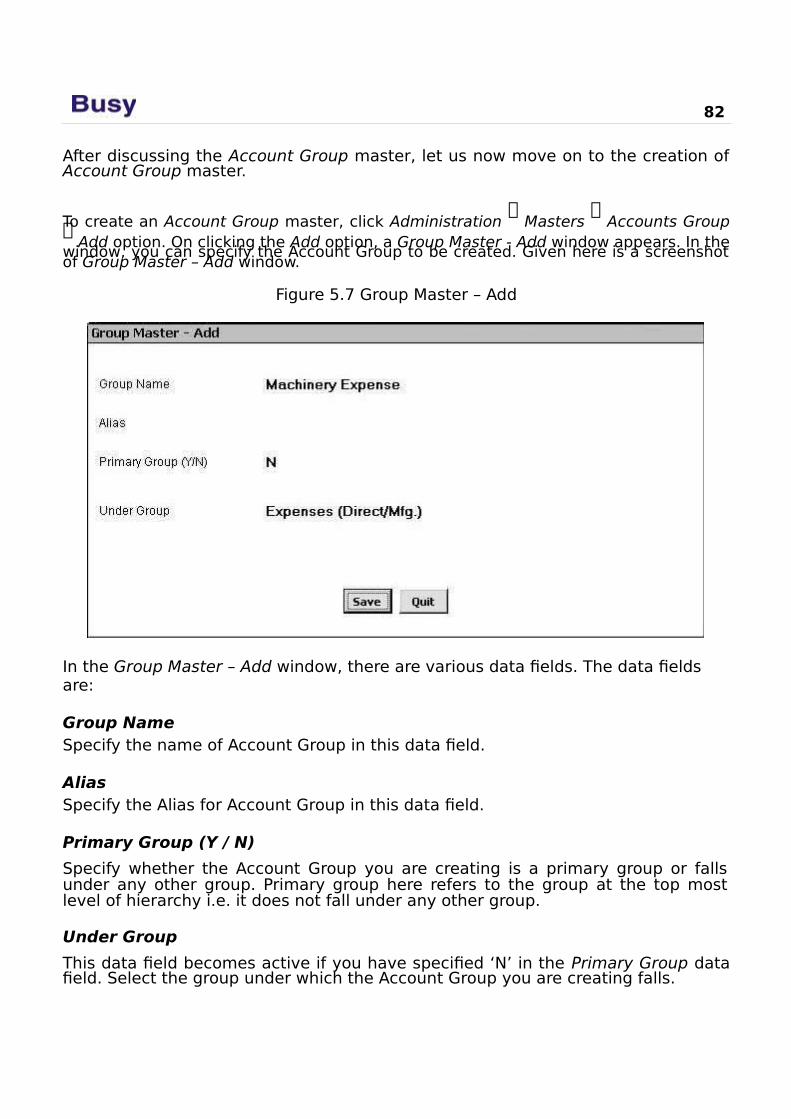
82
After discussing the Account Group master, let us now move on to the creation ofAccount Group master.
To create an Account Group master, click Administration
Masters
Accounts Group Add option. On clicking the Add option, a Group Master - Add window appears. In the
window, you can specify the Account Group to be created. Given here is a screenshotof Group Master – Add window.
Figure 5.7 Group Master – Add
In the Group Master – Add window, there are various data fields. The data fields are:
Group NameSpecify the name of Account Group in this data field.
AliasSpecify the Alias for Account Group in this data field.
Primary Group (Y / N)
Specify whether the Account Group you are creating is a primary group or fallsunder any other group. Primary group here refers to the group at the top mostlevel of hierarchy i.e. it does not fall under any other group.
Under Group
This data field becomes active if you have specified ‘N’ in the Primary Group datafield. Select the group under which the Account Group you are creating falls.
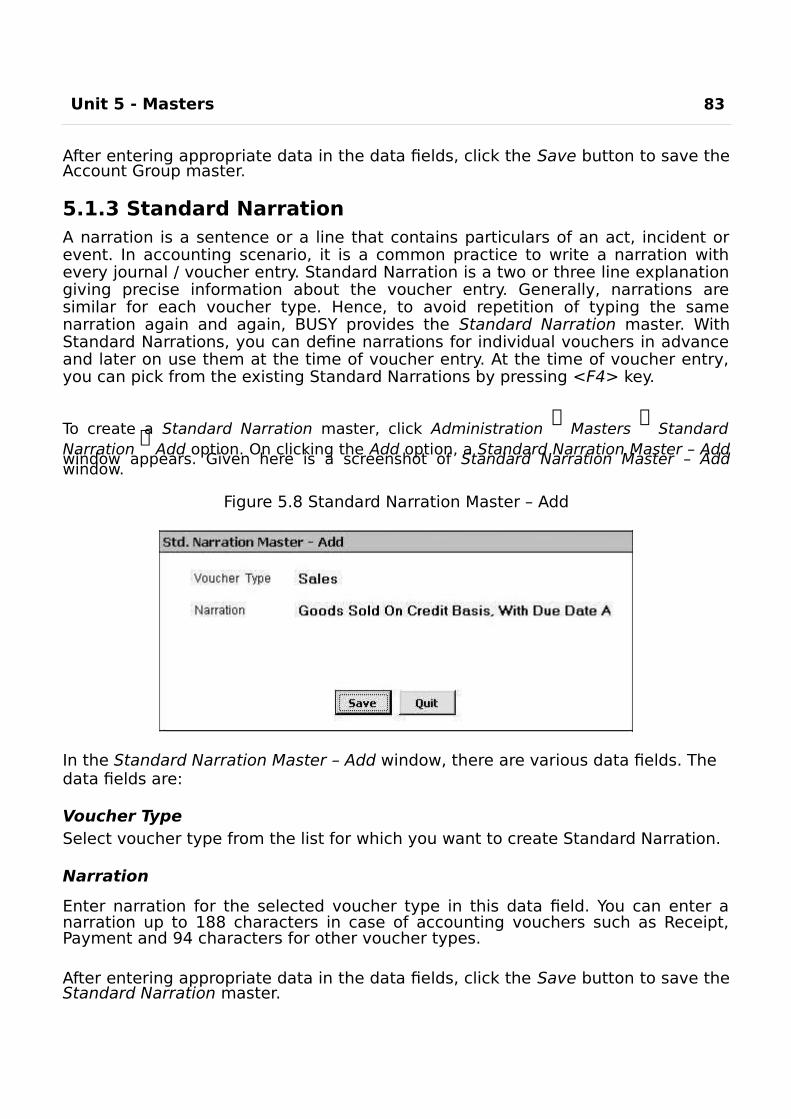
Unit 5 - Masters 83
After entering appropriate data in the data fields, click the Save button to save theAccount Group master.
5.1.3 Standard NarrationA narration is a sentence or a line that contains particulars of an act, incident orevent. In accounting scenario, it is a common practice to write a narration withevery journal / voucher entry. Standard Narration is a two or three line explanationgiving precise information about the voucher entry. Generally, narrations aresimilar for each voucher type. Hence, to avoid repetition of typing the samenarration again and again, BUSY provides the Standard Narration master. WithStandard Narrations, you can define narrations for individual vouchers in advanceand later on use them at the time of voucher entry. At the time of voucher entry,you can pick from the existing Standard Narrations by pressing <F4> key.
To create a Standard Narration master, click Administration
Masters
StandardNarration
Add option. On clicking the Add option, a Standard Narration Master – Add
window appears. Given here is a screenshot of Standard Narration Master – Addwindow.
Figure 5.8 Standard Narration Master – Add
In the Standard Narration Master – Add window, there are various data fields. The data fields are:
Voucher TypeSelect voucher type from the list for which you want to create Standard Narration.
Narration
Enter narration for the selected voucher type in this data field. You can enter anarration up to 188 characters in case of accounting vouchers such as Receipt,Payment and 94 characters for other voucher types.
After entering appropriate data in the data fields, click the Save button to save theStandard Narration master.
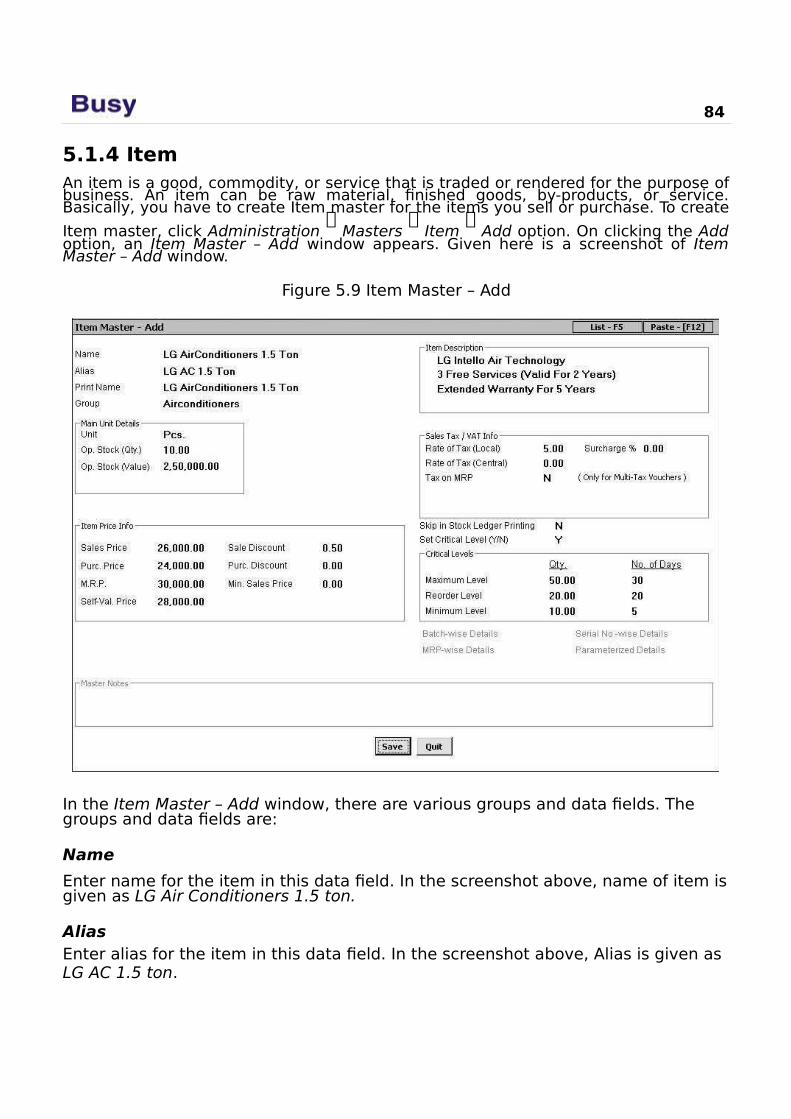
84
5.1.4 ItemAn item is a good, commodity, or service that is traded or rendered for the purpose ofbusiness. An item can be raw material, finished goods, by-products, or service.Basically, you have to create Item master for the items you sell or purchase. To create
Item master, click Administration
Masters
Item
Add option. On clicking the Addoption, an Item Master – Add window appears. Given here is a screenshot of ItemMaster – Add window.
Figure 5.9 Item Master – Add
In the Item Master – Add window, there are various groups and data fields. The groups and data fields are:
Name
Enter name for the item in this data field. In the screenshot above, name of item isgiven as LG Air Conditioners 1.5 ton.
AliasEnter alias for the item in this data field. In the screenshot above, Alias is given as LG AC 1.5 ton.
Unit 5 - Masters 85
Print NameEnter print name for the item in this data field.
Group
Select the Item group under which the item falls. For example, for item LG AC 1.5ton, you can specify Group as Air Conditioners. If you want to use an Item Group,which is not yet created then you can create Item Group from Group data fielditself by pressing <F3> key.
Main Unit Details
Under this group, you can specify details about the Main unit of the item. Variousdata fields under this group are:
Unit
Select the unit in which the item will be measured. For example, unit for item LGAC 1.5 ton can be Pieces, for item Speakers unit can be Pair or Set and so on.
Op. Stock (Qty)
Specify the opening stock of the item in this data field. If you have some pendingstock of item in the previous financial year then you can specify that stockquantity in this data field.
Op. Stock (Value)
This data field gets active if you enter a value greater than zero in Op. Stock (Qty.)data field. Specify value of opening stock in this data field. For example, cost ofone AC is Rs. 25,000 and you have opening stock of 10 pieces then you canspecify value as Rs. 2,50,000.
Item Price InfoUnder this group, you can specify various item prices such as Sales Price, PurchasePrice and so on.Various data fields under this group are:
Sales Price
Enter sale price of the item in this data field. By default, this price will bedisplayed as sales price in the Sales voucher.
Sales DiscountEnter rate of discount to be given on sale of the item.
Purchase Price
Enter purchase price of the item in this data field. By default, this price will bedisplayed as purchase price in the Purchase voucher.
Purchase DiscountEnter rate of discount to be received on purchase of the item.
86
M.R.P.Enter maximum retail price of the item in this data field.
Minimum Sale Price
Enter minimum sale price of item in this data field. The relevance of this data fieldis with the Warning Alarm option (See Unit 4) of the Configuration menu. If youhave set Warning Alarm for Minimum Sale Price then in Sales voucher, on enteringa sale price less than the value specified in this data field, a message box askingyou to enter a higher price will be displayed.
Self Val. Price
Enter price to be used for valuation of closing stock of this item. This option is usefulonly when you have specified the stock valuation method as Self-Evaluation inAdministration
Configuration
Features / Options
Inventory tab.
Item Description
Under this group, four lines appear for entering a description about the item. Youcan enter item description regarding the manufacturing, warranty, size, color orany other description in the data fields.
Sales Tax / VAT Info.
This group is active only if Sales Tax / VAT is enabled for the company. Under thisgroup, you can provide various Sales Tax / VAT related details. Various data fieldsunder this group are:
Rate of Tax (Local)Specify rate of tax to be charged / paid when the item is sold / purchased locally.
Taxation Type
This data field gets active if you have specified tax rate as zero in Rate of Tax(Local) data field. Select the type of taxation from the list. Basically, you have toselect the reason for zero percent tax rate. In the list, three options are providedi.e. Tax Free, Exempted and Tax Paid.
Surcharge %
This data field appears if you have enabled Additional Tax / Surcharge for thecompany and have specified a tax rate other than ‘0’ in the Rate of Tax (Local)data field. Specify local rate of Additional Tax / Surcharge applicable for the item.
Rate of Tax (Central)
Specify rate of tax to be charged / paid when the item is sold / purchased centrallyi.e. from some other state.
Unit 5 - Masters 87
Surcharge %
This data field appears if you have enabled Additional Tax / Surcharge for thecompany and have specified a tax rate other than ‘0’ in the Rate of Tax (Central)data field. Specify the central rate of Additional Tax / Surcharge applicable for theitem.
Tax on MRPSpecify 'Y' in this data field if you want to calculate tax on item MRP.
If the state selected is Uttar Pradesh then two additional data fields Typeof Item and Entry Tax Rate appear. Entry Tax Rate data field appears onlyif you have specified 'Y' in the Enable Entry Tax Rate option inAdministration
Configuration
Features / Options
Sales Tax / VAT /
GST tab. Specify the type of item i.e. VAT, Non VAT and Entry Tax rateapplicable for the item in the data fields respectively.
Skip in Stock Ledger PrintingSpecify ‘Y’ in this data field, if you do not want the item to be printed in Stock Ledger.
Set Critical Levels
Specify ‘Y’ in this data field, if you want to enter critical levels for the item. Criticallevels imply setting the minimum / maximum / re-order stock level for an item.Setting critical levels for different items will help in generating Critical Levelreports and Warning Alarms whenever the quantity of the item reaches its criticallevel. On specifying ‘Y’ in this data field, a Critical Levels group gets active. Let usdiscuss this group in detail.
Critical Level
Under Critical Level group, you can specify the maximum, minimum and re-orderstock of the item. In the Critical Level group, you can specify the quantity andnumber of days for maximum, minimum and re-order level of item.
After entering appropriate data in the data fields, click the Save button to saveItem master. On clicking the Save button, a Material Centre wise Opening Stockwindow appears. This window appears if you have specified some opening stockfor the item and have created more than one Material Centre master (See subtopic 5.1.9). In the Material Centre wise Opening Stock Details window, you canspecify details of item opening stock kept at various Material Centres. Given hereis a screenshot of Material Centre wise Opening Stock Details window.
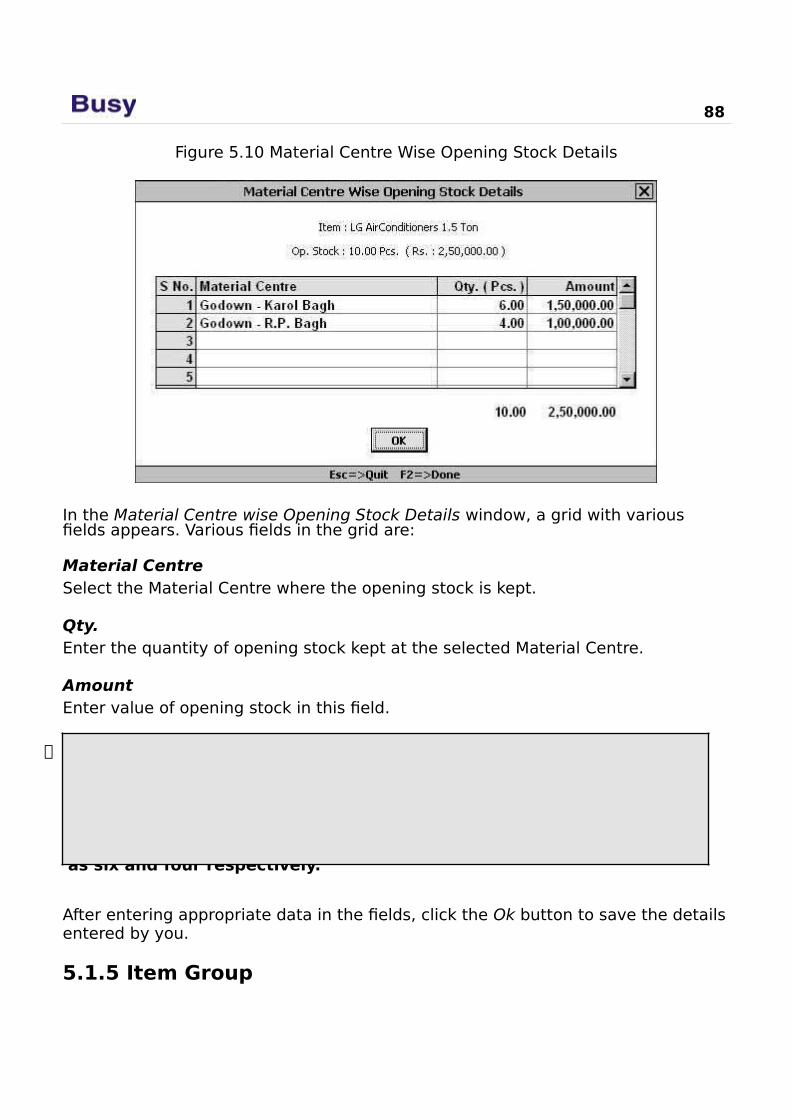
88
Figure 5.10 Material Centre Wise Opening Stock Details
In the Material Centre wise Opening Stock Details window, a grid with various fields appears. Various fields in the grid are:
Material CentreSelect the Material Centre where the opening stock is kept.
Qty.Enter the quantity of opening stock kept at the selected Material Centre.
AmountEnter value of opening stock in this field.
You can select more than one Material Centre master as it is possiblethat opening stock is kept at more than one Material Centres. Forexample, there is an opening stock of ten pieces of item LG AC 1.5ton. Out of these ten pieces, six pieces are at Karol Bagh Godown andfour pieces are at R.P. Bagh Godown. Hence in Material Centre WiseOpening Stock Details window, you can select Material Centres asGodown - Karol Bagh and Godown - R.P. Bagh and specify the quantityas six and four respectively.
After entering appropriate data in the fields, click the Ok button to save the detailsentered by you.
5.1.5 Item Group

An Item Group is a broad level categorization under which various item falls. All items in BUSY falls under an Item Group. Creating an Item Group helps in classifying similar items under one Item Group.
Unit 5 - Masters 89
For example, Star Electronics Company sells Air Conditioners of different brandssuch as LG, Voltas, Hitachi and so on. It creates item with the name LG AC 1.5 ton,LG AC 2 ton, Voltas Intello Cool 1 ton and so on. Hence, it can create all theseitems under the Item Group Air Conditioner. This will help the company to viewreports for single AC sold or to view overall sales of the ACs.
When you create a new company then by default BUSY create a General group foryour convenience. To create an Item Group master, click Administration
Masters
Item Group
Add option. On clicking the Add option, a Group Master – Addwindow appears. This window is similar to the Group Master – Add window thatappears for creating Account Group.
For detailed help on Group Master – Add window, please refer to sub topic 5.1.2.
5.1.6 Material CentreA Material Centre is a place where stock is kept. A Material Centre can be agodown, showroom, almirah, locker or any other such place where you keep yourstock. Material Centre master appears in the list of Masters menu only if you have
enabled the option of Enable Multi Godown Inventory in Administration
Configuration
Features / Options
Inventory tab (See Unit 4). Further if you havecreated more than one Material Centre master then at the time of voucher entry itis necessary to specify the Material Centre from where the goods are dispatched orwhere the goods are received. To create a Material Centre master, click
Administration
Masters
Material Centre
Add option. On clicking the Addoption, a Material Centre Master – Add window appears. Given here is a screenshotof Material Centre Master – Add window.
Image on next Page
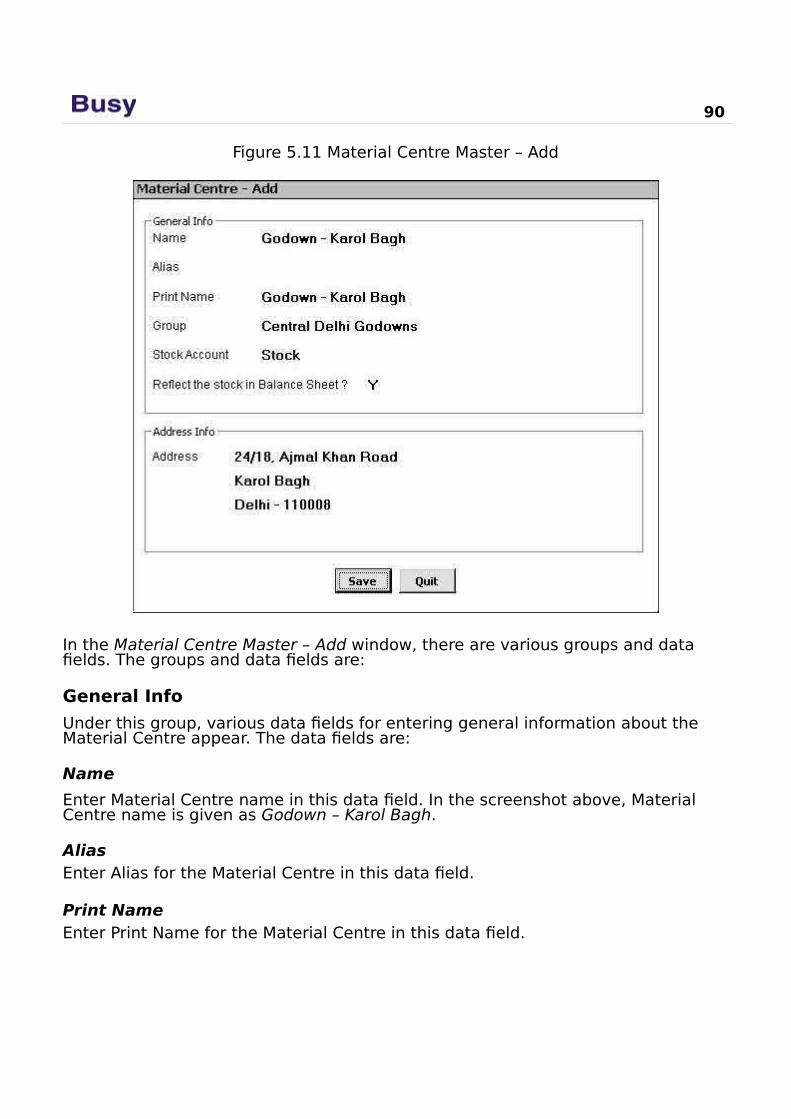
90
Figure 5.11 Material Centre Master – Add
In the Material Centre Master – Add window, there are various groups and data fields. The groups and data fields are:
General Info
Under this group, various data fields for entering general information about the Material Centre appear. The data fields are:
Name
Enter Material Centre name in this data field. In the screenshot above, Material Centre name is given as Godown – Karol Bagh.
AliasEnter Alias for the Material Centre in this data field.
Print NameEnter Print Name for the Material Centre in this data field.
Unit 5 - Masters 91
Group
Select Material Centre Group under which, the Material Centre falls. In thescreenshot given above Group is taken as Central Delhi Godowns.
Stock Account
Select account under which stock value of Material Centre will be recorded.Generally, companies use Stock Account to record stock of Material Centre,however, you can use some other account also such as Stock in Hand and so on.
Reflect the Stock in Balance Sheet
Specify ‘Y’ in this data field if you want to reflect stock of Material Center in theBalance Sheet. Otherwise, specify ‘N’ in this data field if you do not want to reflectstock of Material Centre in the Balance Sheet. For example, at a particular MaterialCentre, you keep only scrap, hence you would not like the stock of that MaterialCentre to be displayed in Balance sheet.
Address Info.
Under this group, various lines for entering Material Centre address appear. EnterMaterial Centre address in the address lines.
After entering appropriate data in the data fields, click the Save button to save theMaterial Centre master.
5.1.7 Material Centre GroupA Material Centre Group is a broad level categorization under which similar typesof Material Centres are grouped. All Material Centres are classified under MaterialCentre Groups. For example, Star Electronics Company has various godowns inDelhi. It treats all the godowns as Material Centres for the company and wants toclassify Material Centres falling under same region of Delhi into one group. For thispurpose it create Material Centre group with the name East Delhi Godown, CentralDelhi Godown, North Delhi Godown and West Delhi Godown. Star Electronicsfurther classifies all these Material Centre Groups under the Group Delhi Godowns.By making, this hierarchy, Star Electronics can anytime check the availability ofstock in all the godowns of Delhi, all the godowns of particular region of Delhi suchas North Delhi, Central Delhi, West Delhi, and East Delhi or for a particular MaterialCentre.
To create a Material Centre Group master, click Administration
Master
MaterialCentre Group
Add option. On clicking the Add option, a Group Master – Add window
appears. This window is similar to the Group Master – Add window that appears forcreating Account Group.
For detailed help on Group Master – Add window, please refer to the sub topic 5.1.2.
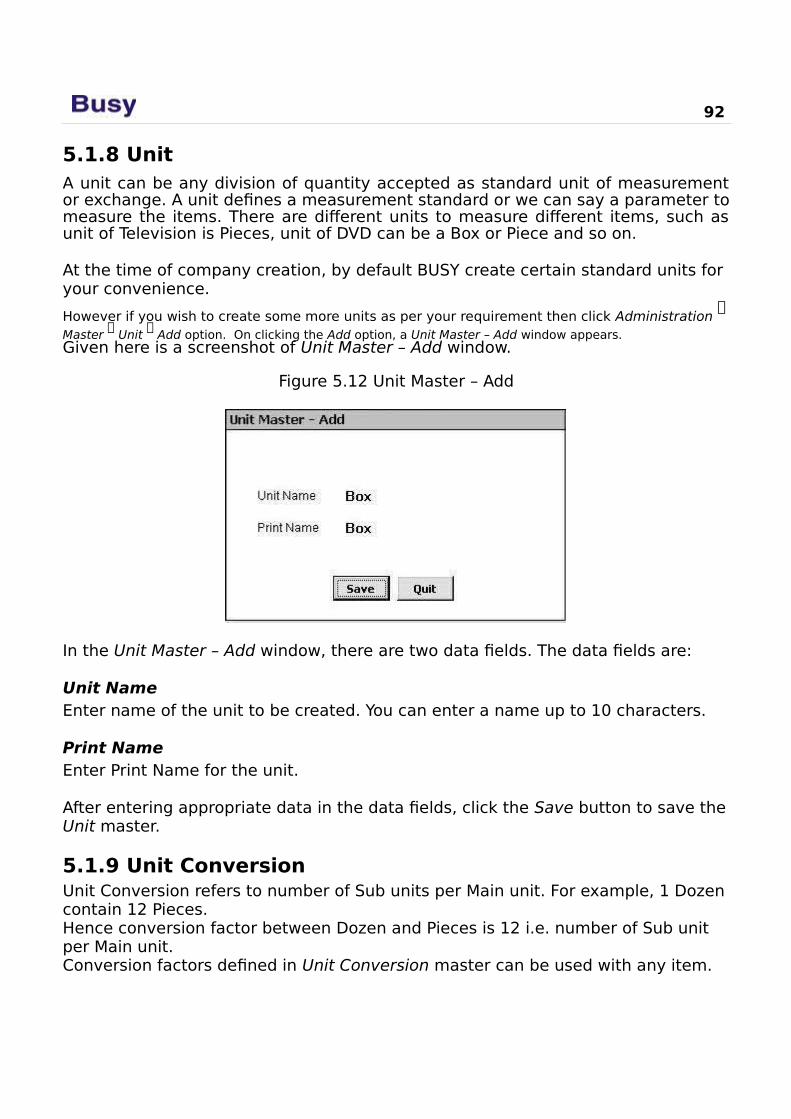
92
5.1.8 UnitA unit can be any division of quantity accepted as standard unit of measurementor exchange. A unit defines a measurement standard or we can say a parameter tomeasure the items. There are different units to measure different items, such asunit of Television is Pieces, unit of DVD can be a Box or Piece and so on.
At the time of company creation, by default BUSY create certain standard units for your convenience.
However if you wish to create some more units as per your requirement then click Administration
Master Unit
Add option. On clicking the Add option, a Unit Master – Add window appears.
Given here is a screenshot of Unit Master – Add window.
Figure 5.12 Unit Master – Add
In the Unit Master – Add window, there are two data fields. The data fields are:
Unit NameEnter name of the unit to be created. You can enter a name up to 10 characters.
Print NameEnter Print Name for the unit.
After entering appropriate data in the data fields, click the Save button to save theUnit master.
5.1.9 Unit ConversionUnit Conversion refers to number of Sub units per Main unit. For example, 1 Dozencontain 12 Pieces.Hence conversion factor between Dozen and Pieces is 12 i.e. number of Sub unit per Main unit.Conversion factors defined in Unit Conversion master can be used with any item.

Let us discuss the relevance of Unit Conversion master with the help of anexample. A Shopkeeper purchases boxes of DVDs wherein each box contain 50pieces of DVD. Further when he sells DVDs to customer then he sells it in pieces.Hence he requires doing transactions of item DVDs in both Boxes

Unit 5 - Masters 93
and Pieces. For this purpose the shopkeeper creates a Unit Conversion master withMain unit as Box and Sub unit as Piece and specifies conversion factor betweenthem as 50. By creating a Unit Conversion master between Box and Pieces,shopkeeper can now use both units with the item and can sell / purchase item ineither of the units.
To create a Unit Conversion master, click Administration
Masters
Unit Conversion Add option. On clicking the Add option, a Unit Conversion Master – Add window
appears. Given here is a screenshot of Unit Conversion Master – Add window.
Figure 5.13 Unit Conversion Master – Add
In the Unit Conversion Master – Add window, there are various data fields. The data fields are:
Main UnitSelect unit which is to be treated as Main unit in the Unit Conversion master you are creating.
Sub UnitSelect unit which is to be treated as Sub unit in the Unit Conversion master you are creating.
Conversion FactorEnter conversion factor i.e. number of Sub units per Main unit for the Unit Conversion master.
After entering appropriate data in the data fields, click the Save button to save theUnit Conversion master.
5.1.10 Bill Sundry

Bill Sundry is an entity that is used to record extra income / expense over andabove the sale / purchase amount. Bill Sundries are used in invoice and otherdocuments. Let us understand the concept of Bill Sundry with the help of aninvoice format. An Invoice can be classified into three sections. First section isHeader that consists of Date, Bill No., Party Name. Second section is Body
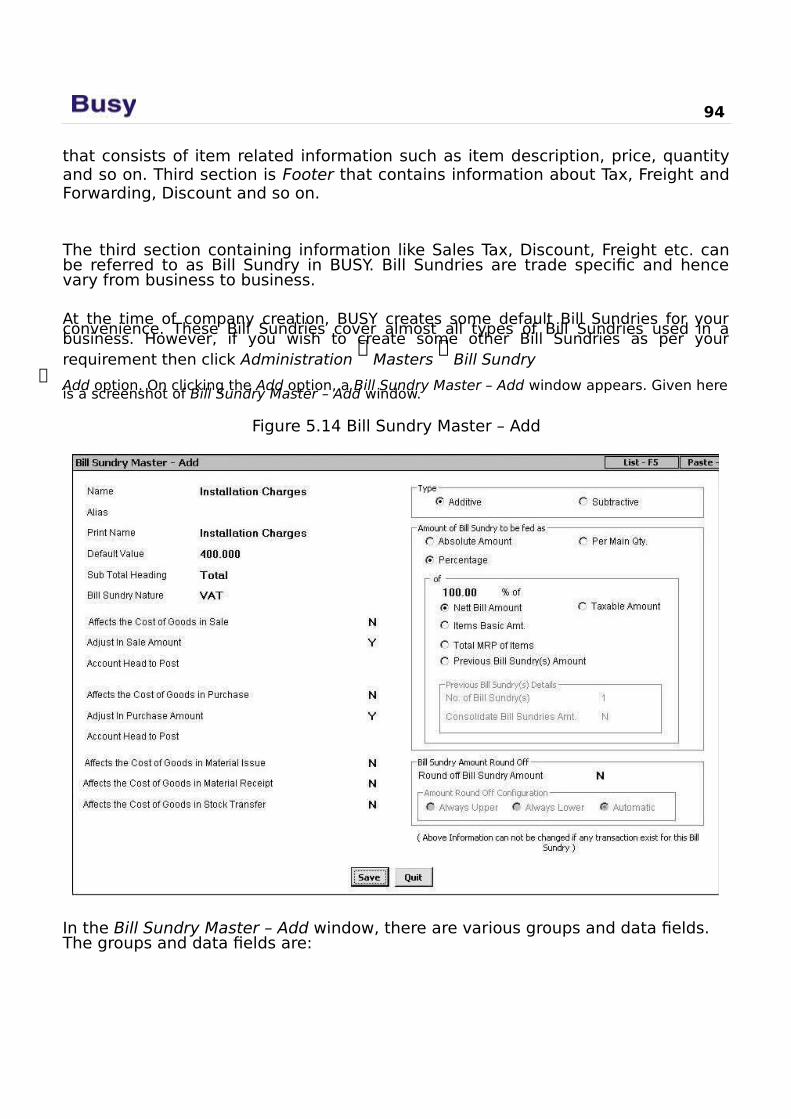
94
that consists of item related information such as item description, price, quantityand so on. Third section is Footer that contains information about Tax, Freight andForwarding, Discount and so on.
The third section containing information like Sales Tax, Discount, Freight etc. canbe referred to as Bill Sundry in BUSY. Bill Sundries are trade specific and hencevary from business to business.
At the time of company creation, BUSY creates some default Bill Sundries for yourconvenience. These Bill Sundries cover almost all types of Bill Sundries used in abusiness. However, if you wish to create some other Bill Sundries as per yourrequirement then click Administration
Masters
Bill Sundry
Add option. On clicking the Add option, a Bill Sundry Master – Add window appears. Given hereis a screenshot of Bill Sundry Master – Add window.
Figure 5.14 Bill Sundry Master – Add
In the Bill Sundry Master – Add window, there are various groups and data fields. The groups and data fields are:
Unit 5 - Masters 95
Name
Enter name of the Bill Sundry in this data field. In the screenshot given above,name is given as Installation Charges.
AliasEnter Alias for the Bill Sundry in this data field.
Print NameEnter Print Name of the Bill Sundry in this data field.
Default Value
Enter default value for the Bill Sundry you are creating. The value specified here isused as a default amount or percentage to be charged as Bill Sundry in voucher.
Sub Total Heading
The default value in this data field is Total. The value specified in this data field actas heading for the sub total to be printed on the invoice. Here sub total refers tothe amount of bill before charging the Bill Sundry you are creating. For example,you are creating Bill Sundry for Installation Charges then sub total means amountof bill before charging Installation Charges Bill Sundry.
Bill Sundry Nature
Select nature or type of Bill Sundry you are creating. For example, if you arecreating Bill Sundry for Surcharge then you can select the Add. Tax / Surcharge onVAT option or if you are creating a Bill Sundry for Installation Charges then you canselect the Others option.
Affects the Cost of Goods in Sale
Specify ‘Y’ in this data field if you want to add or deduct amount of Bill Sundry youare creating in the cost of goods sold. This option only affects the inventoryreports and has nothing to do with the accounting reports. For example, you haveentered a Sales voucher for four pieces of item LG AC 1.5 Ton costing Rs 20,000each on which Installation Charges Bill Sundry of Rs. 1600 is levied. Now if youspecify ‘Y’ in this data field then the cost of item LG AC 1.5 Ton will be displayedinclusive of installation charges i.e. Rs. 81,600 otherwise it will be displayedexclusive of installation charges i.e. Rs. 80,000.
Adjust in Sale Amount
If you specify 'Y' in this data field then the amount corresponding to this BillSundry in invoice will be posted in Sales account. If you specify 'N' in this data fieldthen Account Head to Post data field gets activated in which you can select someother ledger account to which the amount will be posted.
Account Head to Post

This data field gets activated only when you have specified 'N' in the Adjust in SaleAmount data field. Select the ledger account from the list in which the amount ofBill Sundry is to be posted. For example

96
if you want to post amount of Bill Sundry in Miscellaneous Income account then you can select the Miscellaneous Income account from the list.
Similar three data fields appear for Purchase vouchers. The data fields are, Affect the Cost of Goods in Purchase, Adjust in Purchase Amount and Account Head to Post. These data fields are similar to the before-mentioned three data fields with only difference is that the value you specify in these data fields will be applicable for Purchase vouchers.
Affects the Cost of Goods in Stock Transfer
Specify ‘Y’ in this data field if you want to add or deduct amount of Bill Sundry tothe cost of goods transferred.
Type
Under this group, you have to specify the type of Bill Sundry i.e. whether BillSundry is to be added / subtracted in / from the bill. Under this group, followingtwo options appear:
Additive – Select this option if value of Bill Sundry is to be added in bill value.Subtractive – Select this option if value of Bill Sundry is to be subtracted from bill value.
Amount of Bill Sundry to be Fed As
Under this group, you have to select the option according to which Bill Sundryvalue will be entered in the voucher. There are five options provided under thisgroup. The options are:
Absolute Amount
Select this option if you want to enter Bill Sundry as an absolute amount. It meansthat if you select this option then you can directly enter the Bill Sundry amountwithout any calculation. For example, Star Electronics Company takes fix deliverycharges i.e. Rs. 200 to deliver goods to any part of Delhi. Hence, it can create a BillSundry named Goods Delivery Amount, specify its Default Value as 200 and selectthe Absolute Amount option. Now whenever the company will use Goods DeliveryAmount Bill Sundry in the voucher then Rs. 200 will be displayed automatically asBill Sundry amount.
Per Main Qty.
Select this option if you want to calculate Bill Sundry amount as per the number ofitem units sold / purchased. For example, Star Electronics Company charges Rs.400 as installation charges on every unit of AC sold. In this case, company cancreate a Bill Sundry named Installation Charges, specify its Default Value as Rs.400 and select the Per Main Qty. option. Now, whenever it will use this Bill Sundryin the voucher then installation charges of Rs. 400 per piece will appear as BillSundry value. For example, Star Electronics Company enter a Sales voucher forfour pieces of AC and specify the Bill Sundry as Installation Charges then BillSundry amount would be Rs. 1600 (400*4).
Unit 5 - Masters 97
Percentage
Select this option if you want to calculate Bill Sundry amount as a certainpercentage of items sold / purchased. For example, Star Electronics Companycharges 5% as VAT on all the items it sells. It can then create a Bill Sundry namedVAT 5%, specify its Default Value as ‘5’ and select the Percentage option. Nowwhenever the company will use this Bill Sundry, 5% of item’s amount will be takenas Bill Sundry amount.
On selecting the Percentage option, a sub group with the name ‘of’ gets activated.Under this group, you have to specify an amount on which Bill Sundry value is tobe calculated. This amount can be net bill amount, Item MRP and so on. Variousoptions under this group are:
Percentage of
Specify the percentage of item value on which Bill Sundry amount is to becalculated. For example, if you want to charge Bill Sundry on 80% value of itemthen you can specify 80 in this data field. Otherwise, if you want to calculate BillSundry amount on full item value then you can specify 100 in this data field.
Nett Bill Amount
Select this option if you want to calculate the amount of Bill Sundry on Nett billamount. Nett bill amount implies the bill amount inclusive of Bill Sundries charged.For example, an item of Rs. 10,000 is taxable at the rate of 5 % then nett billamount will be Rs. 10,500 (10,000 + 5% of 10,000).
Taxable Amount
Select this option if you want to calculate Bill Sundry on taxable amount. Taxableamount refers to the item amount on which tax is to be charged. Continuing withabove example, taxable amount will be Rs. 10,000.
Item Basic Amount
Select this option if you want to calculate amount of Bill Sundry on the actual costof goods excluding any Bill Sundry charged. For example, you are selling an itemof Rs. 10,000 on which you have applied a Discount Bill Sundry @1% amounting toRs. 100. In this case, item basic amount will be Rs. 10,000 only and not Rs. 9,900,as item basic amount does not include any Bill Sundry value.
Total MRP of Items
Select this option if you want to calculate Bill Sundry amount on MRP of itementered in the Item master.
Previous Bill Sundry Amount
Select this option if you want to calculate Bill Sundry amount according to aprevious Bill Sundry in the voucher. If you select this option then a Previous BillSundry Detail group gets activated. In the group following two data fields appear:
98
No. of Bill Sundry(s) - Enter the number of previous Bill Sundries to be takeninto account when the Bill Sundry amount is to be calculated. You can takeinto account maximum of nine Bill Sundries.
Consolidate Bill Sundries Amount - This data field gets active only if youhave specified a number other than 1 and 0 in the above data field. If youspecify 'Y' in this data field then consolidated amount of previous BillSundries will be taken into account. Number of previous Bill Sundries to betaken into account for calculation purpose will be equivalent to the numberspecified in the No. of Bill Sundry data field.
For example, you have entered a Sales voucher and charged three BillSundries amounting Rs. 10, Rs. 20 and Rs. 30 respectively. At the fourthposition you charge a Bill Sundry in which you have specified 'Y' in theConsolidate Bill Sundry Amount data field and '2' in the No. of Bill Sundry(s)data field. In this case, value of the two Bill Sundries counting back from thecurrent Bill Sundry (two Bill Sundry from the current Bill Sundry) will beconsolidated i.e. 30+20 = 50. Value of Bill Sundry at the fourth position willbe calculated on Rs. 50. Bill Sundries are picked by doing back counting fromthe current position. In other words, since the current Bill Sundry is at fourthposition thus Bill Sundries lying at third and second position will beconsolidated to calculate the amount of fourth Bill Sundry.
In the same scenario, if you have specified 'N' in the Consolidate Bill SundryAmount data field then it will take into account the amount of Bill Sundrylying at the position mentioned in the No. of Bill Sundry(s) data fieldcounting back from the current Bill Sundry. Bill Sundry lying at secondposition counting back from the current Bill Sundry is of Rs. 20. Hence, valueof Bill Sundry lying at fourth position will be calculated on Rs. 20.
Values in Amount to be Fed As group cannot be changed if the Bill Sundryis used in any voucher.
Round Off Bill Sundry AmountSpecify 'Y' in this data field if you want to round off the Bill Sundry amount in the voucher entry.
Bill Sundry Amount Round Off
In the Amount Round Off Configuration sub group, you can specify the method according to which Bill Sundry amount will be round off. In the sub group, there arethree options. The options are:
Always Upper - Select this option if you want to round off the value in a voucher to the upper limit.
Always Lower - Select this option if you want to round off the value in a voucher to the lower limit.

Automatic - Select this option if you want to round off the value to upper / lower limit in a voucher automatically.

Unit 5 - Masters 99
After entering appropriate data in the data fields, click the Save button to save theBill Sundry master.
5.1.11 ST FormST Forms are Sales Tax declaration forms used by registered dealers. Sales Taxdepartment issues ST forms to only those dealers who are registered with theSales Tax department. The issuer (registered dealer) of this form does not pay thetax directly but takes on the responsibility of collecting tax on further sale ofgoods. There are different ST forms for Central and Local Sales tax. For example, ifan inter-state sale is made to a registered dealer then ST Form C is required, iflocal sale is made to a registered dealer then ST Form D is required. ST Formmaster appears in Masters menu, only if you have enabled Sales Tax / VAT / GSTfor the company.
To create ST Form master, click Administration
Masters
ST Forms
Add option. Onclicking the Add option, a Form Master – Add window appears. Given here is ascreenshot of Form Master – Add window.
Figure 5.15 Form Master – Add
In the Form Master – Add window various data fields appear. The data fields are:
NameEnter ST Form name in this data field.
Print NameEnter Print name for ST Form in this data field.
ST Reg. Type
Select the type of registration that is applicable on the form from the list displayedin the data field. There are two options in the list, Local and Central. Select Localoption if the form is used in local (within state) transactions otherwise selectCentral option for central (inter-state) transactions.

After entering appropriate data in the data fields, click the Save button to save theST Form master.
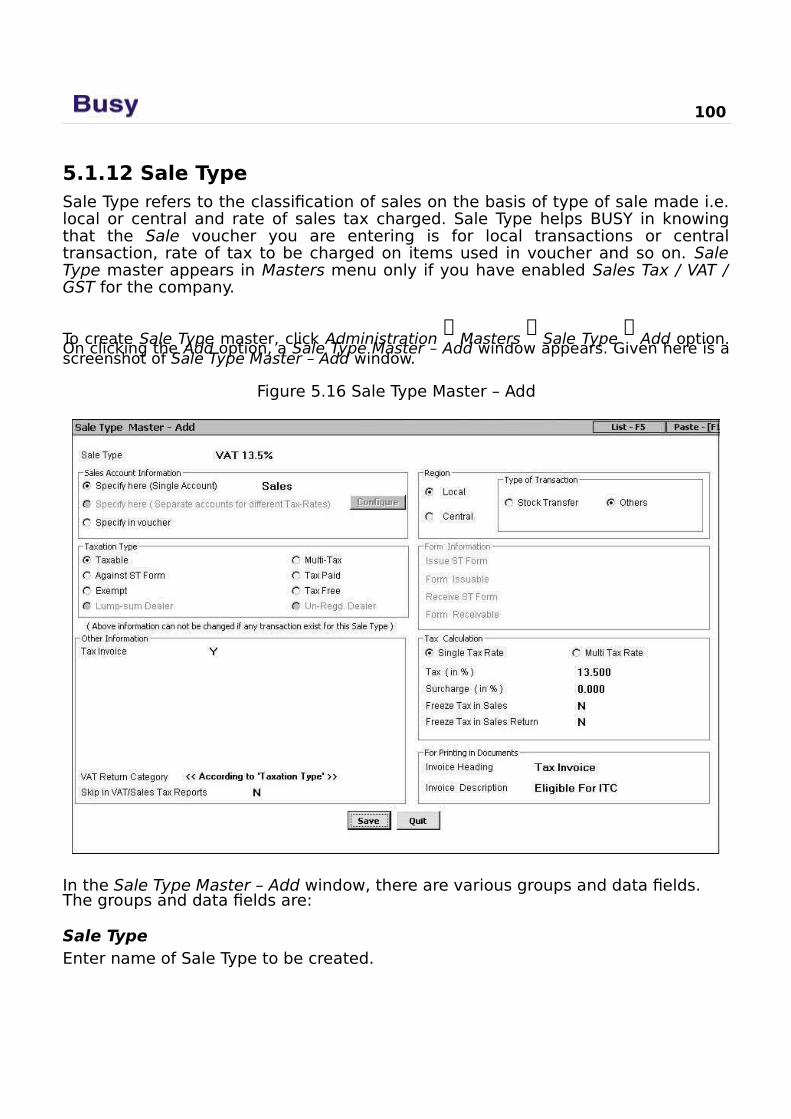
100
5.1.12 Sale TypeSale Type refers to the classification of sales on the basis of type of sale made i.e.local or central and rate of sales tax charged. Sale Type helps BUSY in knowingthat the Sale voucher you are entering is for local transactions or centraltransaction, rate of tax to be charged on items used in voucher and so on. SaleType master appears in Masters menu only if you have enabled Sales Tax / VAT /GST for the company.
To create Sale Type master, click Administration
Masters
Sale Type
Add option.On clicking the Add option, a Sale Type Master – Add window appears. Given here is ascreenshot of Sale Type Master – Add window.
Figure 5.16 Sale Type Master – Add
In the Sale Type Master – Add window, there are various groups and data fields. The groups and data fields are:
Sale TypeEnter name of Sale Type to be created.
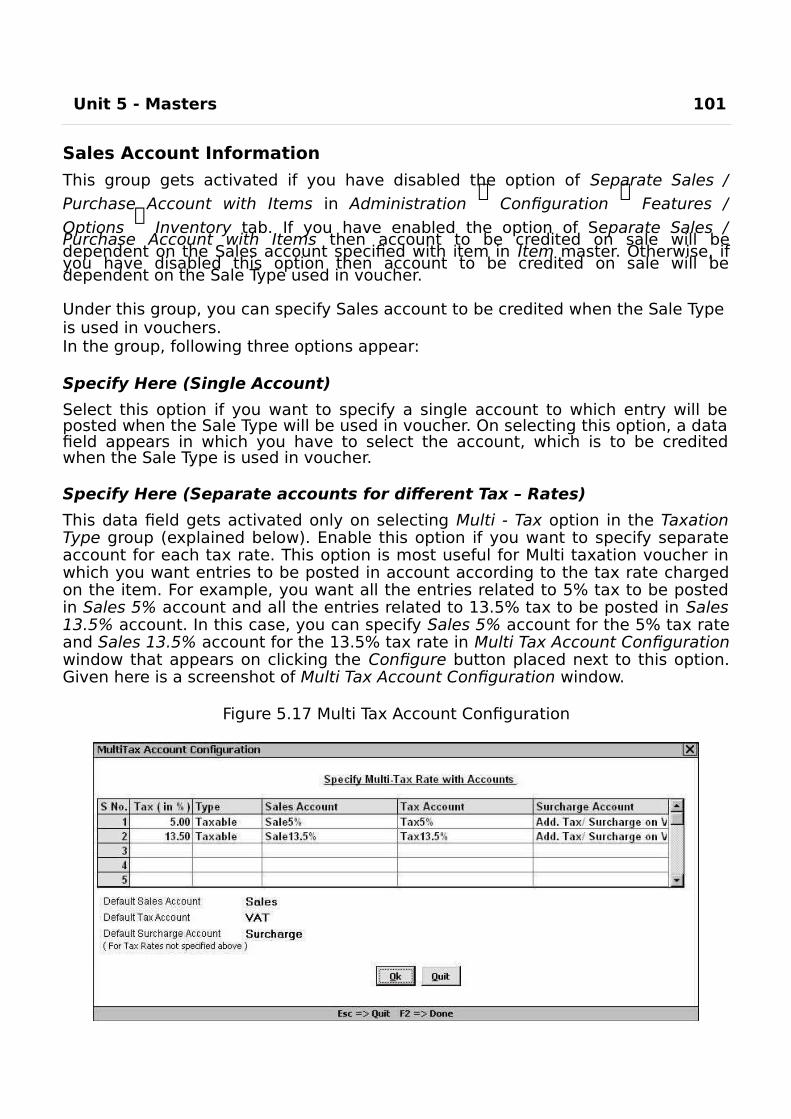
Unit 5 - Masters 101
Sales Account Information
This group gets activated if you have disabled the option of Separate Sales /
Purchase Account with Items in Administration
Configuration
Features /
Options
Inventory tab. If you have enabled the option of Separate Sales /Purchase Account with Items then account to be credited on sale will bedependent on the Sales account specified with item in Item master. Otherwise, ifyou have disabled this option then account to be credited on sale will bedependent on the Sale Type used in voucher.
Under this group, you can specify Sales account to be credited when the Sale Type is used in vouchers.In the group, following three options appear:
Specify Here (Single Account)
Select this option if you want to specify a single account to which entry will beposted when the Sale Type will be used in voucher. On selecting this option, a datafield appears in which you have to select the account, which is to be creditedwhen the Sale Type is used in voucher.
Specify Here (Separate accounts for different Tax – Rates)
This data field gets activated only on selecting Multi - Tax option in the TaxationType group (explained below). Enable this option if you want to specify separateaccount for each tax rate. This option is most useful for Multi taxation voucher inwhich you want entries to be posted in account according to the tax rate chargedon the item. For example, you want all the entries related to 5% tax to be postedin Sales 5% account and all the entries related to 13.5% tax to be posted in Sales13.5% account. In this case, you can specify Sales 5% account for the 5% tax rateand Sales 13.5% account for the 13.5% tax rate in Multi Tax Account Configurationwindow that appears on clicking the Configure button placed next to this option.Given here is a screenshot of Multi Tax Account Configuration window.
Figure 5.17 Multi Tax Account Configuration

102
In the Multi Tax Account Configuration window, a grid and various data fields appear. The grid and data fields are:
Tax Details grid - Various fields in the grid are:o Tax (in %) - Specify the rate of tax in this field.
o Type - Focus comes to this field only if you specify ‘0’ in the Tax (in %) field. Select from the list the type of taxation.
o Sales Accounts - Select the sale account to which entry will be posted when the specified tax rate will be charged.
o Tax Account - Select the tax account to which entry will be posted when the specified tax rate will be charged.
o Surcharge Account - This field appears if you have enabled surcharge forthe company. Select the surcharge account to which entry will be postedwhen the specified tax rate will be charged.
Default Sales Account - Select the default sale account to which entry will be posted for tax rate not specified in the Tax Details grid.
Default Tax Account - Select the default tax account to which entry will be posted for tax rate not specified in the Tax Details grid.
Default Surcharge Account - Select the default surcharge account to which the entry will be posted for tax rate not specified in the Tax Details grid.
Specify in Voucher
Select this option if you want to specify Sale account to which entry will be postedin the voucher itself. In Sales voucher, a Sales Account data field appears in whichyou can select the account to be credited on selecting a Sales Type in which thisoption is enabled.
Taxation TypeUnder this group, you can specify the type of tax to be used with the items of voucher in which theSale Type you are creating will be used. Various options under this group are:
TaxableSelect this option if the item is taxable i.e. tax is to be paid on sale of the item.
Multi Tax
Select this option if different tax rates are to be levied on different items in asingle Sales Invoice. If there are different items of different tax rates in a Saleinvoice then this option provides the facility of charging different tax rates toindividual items. In a Sales voucher with Sale Type having this option enabled, anItem wise VAT window appears with each item in which you can specify the taxrate applicable for the item.
Unit 5 - Masters 103
Against ST Form
Select this option if you make sales against ST Form. In Sales voucher in which youselect a Sale Type with this option enabled, a Form Issuable / Receivable windowappears in which you can specify the amount issued / received against ST Form.
Tax Paid
Select this option if you deal in items for which tax is already paid and you issuetax paid bills to your customers.
Exempt
Select this option if the Sale Type is to be used for exempted items. Exempteditems are those items that are exempted from tax under certain conditions. Forexample, glass industry is exempted from tax in Himachal Pradesh while it maynot be exempted from tax in other states.
Tax Free
Select this option if Sale Type is to be used for tax free items. For example, salt isa tax free item all over India irrespective of any state in which your companyexists.
Lump-sum Dealer
This option does not get activated in the Sale Type because you do not need tocreate a separate Sale Type for lump-sum dealers since sale to lump-sum dealersis treated as sale to a customer. Thus, for such sales you will use the Sale Type asdefined for sale to a customer.
Un-registered Dealer
This option is not active for Sale Type because you do not need to create aseparate Sale Type for un-registered dealers since sale to un-registered dealers istreated as sale to a customer. Thus, for such sales you will use the Sale Type asdefined for sale to a customer.
Other Information
Under this group, various data fields appear. Many of the data fields in the groupare dependent on the option selected in the Taxation Type group. Let us discussthe data fields that appear under this group.
Tax Invoice
This data field appears if you have selected Taxable or Multi-Tax option in theTaxation Type group. Specify ‘Y’ in this data field if you want to make an invoice asTax Invoice in which the Sale Type you are creating will be used. Benefit of makingan invoice, as Tax invoice is that Tax Invoice will be printed on the invoice, which inturn will allow the buyer to claim Input Tax Credit on it.
Calculate Tax on Item MRP
This data field appears if you have selected Multi-Tax option in the Taxation Typegroup. Specify ‘Y’ in this data field if you want to calculate tax on item MRP.
104
Tax Inclusive Item Price
This data field appears if you have selected Multi-Tax option in the Taxation Typegroup. Specify ‘Y’ in this data field if you want to enter item price inclusive of tax.BUSY will perform a reverse calculation for calculating the amount of tax leviedand the actual price of item without tax. This option is useful when the User ismaking a sale to a person who is not concerned about the tax rate applied or priceof item without tax and simply wants to know the final price of the item. Inaddition, some items are sold with tax included in their price but the shopkeeperneeds to maintain the tax amount separately as he has to deposit the tax to thegovernment. Hence, for this purpose, one can specify ‘Y’ in this option.
Hide Item Tax Rate window
This option appears if you have specified ‘Y’ in the Tax Inclusive Item Price datafield. This data field is useful at the time of voucher entry. With this data field setto 'N' an Item Tax Rate window appears at the time of voucher entry in which youcan enter the tax rates for individual items. However, if you have specified taxrates with each item separately in the Item master then you can set this data fieldto 'Y'. By setting, this data field to 'Y', Item Tax Rate window will not appear at thetime of voucher entry and the tax rate specified with the item in Item master willbe considered for calculating the tax in item amount.
Calculated Tax on 100% of Amount
This data field appears on specifying 'N' in the Tax Inclusive Item Price data field.You can specify the percentage of item amount on which tax is to be calculated.This option is useful if the tax rate is fixed at a certain percentage of the itemamount. For example, if you specify 80 in this data field then tax will be calculatedon 80% of item value.
Adjust Tax / Schg. in Sales Account
This data field appears if you have selected Multi-Tax option in the Taxation Typesub-group. Specify 'Y' in this data field if you want to adjust tax / surchargeamount in the Sales account itself.
Tax AccountThis data field appears if you have specified ‘N’ in the Adjust Tax / Schg. in Sales Account data field.Select the account in which tax amount is to be adjusted.
Surcharge AccountThis data field appears if you have specified ‘N’ in the Adjust Tax / Schg. in Sales Account data field.Select the account in which surcharge amount is to be adjusted.
VAT Return Category

Select the type of VAT Return Category from the list. Values in the list are statespecific. For example, if you have selected the state as Delhi then Work ContractAct option appears in the list.
Unit 5 - Masters 105
Skip in VAT / Sales Tax Reports
Specify 'Y' in this data field if you want that transactions in which this Sale Typewill be used should not be considered for generating VAT / Sales Tax reports. Inother words, if you specify 'Y' in this data field then Sales vouchers having SaleType with this option enabled will not be reflected in tax reports.
Region
Under this group, you can select whether the Sale type you are making, is forcentral transactions or for local transaction. Various options under this group are:
o Local - Select this option if the Sale Type is used for local transactions.o Central - Select this option if the Sale Type is used for central transactions.
On selecting any of the above option, a Type of Transaction sub-window appears. Various data fields that appear in this sub-window are:
o Stock Transfer - Select this option if the Sale Type is meant for transfer of stock.
o Others - Select this option if the Sale Type is meant for inter-state or intra-state sale of goods.
o Export (Normal) - This option appears if you have selected the Central option. Select this option if the Sale Type is meant for normal export of goods.
o Export (High Sea) - This option appears if you have selected the Central option. Select this option if the Sale Type is meant for High Sea export of goods.
o Sale in Transit - This option appears if you have selected the Central option.Select this option if you make purchase from one party and sell it to anotherparty without goods being delivered at your Material Centre. In other words,stock will be directly sent to the party to whom the sale has been made;from the party from whom the goods have been purchased.
Tax Invoice data field that appears under Other Information group
gets deactivated on selecting the Central option in the Region group.This is because you cannot issue a Tax Invoice for Centraltransactions.
Form Information
This group gets activated on selecting the Against ST Form option under TaxationType group. Under this group, you can specify details about the form to be issued /received when the Sale Type will be used in voucher. Various options under thisgroup are:
Issue ST FormSpecify ‘Y’ in this data field if ST form is issuable against the sale in the Sale Type being created.

Form Issuable
This data field gets active on specifying ‘Y’ in the Issue ST Form data field. Selectfrom the list, the type of form to be issued under the Sale Type being created.

106
Receive ST FormSpecify ‘Y’ in this data field if ST Form is receivable against the sale in the Sale Type being created.
Form Receivable
This data field gets active on specifying ‘Y’ in the Receive ST Form data field.Select from the list, the type of form to be received under the Sale Type.
Tax Calculation
This group gets active on selecting the Taxable or Against ST Form option underTaxation Type group. Under this group, you can specify the tax rates to be chargedon items, whether tax rates are to be freeze and so on. Various options under thisgroup are:
Single Tax Rate
Select this option if single tax rate is to be charged on all the items of voucher inwhich the Sale Type will be used.
Multi Tax Rate
Select this option if different tax rates are to be charged on different items in aSales voucher in which the Sale Type will be used. Difference between Multi TaxRate option and Multi-Tax option that appears in Taxation Type group is that withMulti-Tax option, an Item wise VAT window appears in voucher with each item inwhich you can specify tax rate for individual item and there is no need to charge aTax Bill Sundry in the voucher. However, with Multi Tax Rate option, no suchwindow appears with an item in the voucher. Instead, you have to specify variousTax Bill Sundries and BUSY will automatically apply the tax rate on the item as perthe tax rate specified in the Item master. For example, in a Sales voucher there areten items with certain items having 5% tax rate and certain items with 13.5% VATrate. Now you have to specify the VAT 5% and VAT 13.5% Bill Sundry in thevoucher. BUSY will then charge 5% tax on the items in which tax rate is specifiedas 5% in Item master and will charge 13.5% tax on the items in which 13.5% taxrate is specified in Item master.
Tax (in %)
This option gets active only if you have selected the Single Tax Rate option. Enterthe percentage to be charged as tax under the Sale Type.
Surcharge (in %)This data field is active only if you have specified, 'Y', in the Enable Add. Tax / Schg. option in
Administration Configuration
Features / Options
Sales Tax / VAT / GST tab. Enter rate of surcharge
to be charged under the Sale Type.
Freeze Tax in Sales
Specify ‘Y’ in this data field if you want to freeze tax rate for the Sales voucher inwhich the Sale Type you are creating will be used. In other words, in Sales voucher

when you use a Sale Type in which this option is enabled, you necessarily have toapply tax rate as specified in the Tax (in %) data field of the
Unit 5 - Masters 107
Sale Type. For example, you have created a Sale Type in which this option isenabled and have specified ‘5’ in the Tax (in %) data field. Now whenever you usethis Sale Type in voucher then it is necessary to specify a Bill Sundry of 5% tax inthe voucher.
Freeze Tax in Sales Return
Specify ‘Y’ in this data field if you want to freeze tax rate for the Sales Returnvoucher in which the Sale Type you are creating will be used. In other words, if youhave specified ‘Y’ in this data field then in the Sales Return voucher with this SaleType, you cannot select a tax rate, other than the one specified in Tax (in %) datafield.
For Printing in DocumentsUnder this group, you can specify the heading and description to be printed on thebill in which theSale Type you are creating will be used. Under this group, following two data fields appear:
Invoice HeadingEnter text to be displayed as heading of the bill.
Invoice Description
Enter description to be printed in the bill. For example, if you are making a SaleType as Retail Invoice then you can enter invoice description as No Input TaxCredit.
After entering appropriate data in the data fields, click the Save button to save theSale Type master.
5.1.13 Purchase TypePurchase Type refers to the classification of purchase on the basis of type ofpurchase made i.e. local, central and rate of sales tax paid. Purchase Type helpsBUSY in knowing that the Purchase voucher you are entering is for localtransactions or central transactions, rate of tax to be paid on items used invoucher and so on. Purchase Type master appears in Masters menu only if youhave enabled Sales Tax
/ VAT / GST for the company. To create Purchase Type master, click Administration
Masters
Purchase Type
Add option. On clicking the Add option, a Purchase Type Master – Add windowappears. This window is totally similar to Sale Type Master – Add window.
For detailed help on Purchase Type Master – Add window, please refer to Sale TypeMaster – Add window (sub topic 5.1.12) as both the windows are totally similar.
5.2 Configuring Masters

Masters can be configured with respect to Optional Fields, Print Name and thecomponents to be displayed with them while showing Masters in a dropdown list.Let us first discuss the concept of Optional Fields, Print Name and Additionalcomponents in Dropdown list.
108
Optional FieldsOptional Fields are User-Defined fields that vary from User to User. Each User cancreate customized Optional Fields as per his requirement. Every company has itsown set of requirement and it is very difficult to cater to the needs of each & everycompany. For example, an electronic goods company may need to specify thewarranty, installation charges, security measure and other such features with itemwhereas a garment manufacturing company may need to specify the designername, fabric, washing & ironing details with the item. Therefore BUSY introducedthe concept of Optional Fields in its software. Data fields that are generic and arerelevant for all types of business are given in Masters itself whereas data fieldsthat are company or business specific are left with the User. User can create tenOptional Fields of his choice for a Master type.
Print NamePrint Name refers to the name that will be printed in the reports. BUSY providesthe facility to generate Print Name automatically for the Masters. For example, acompany follows a particular method for entering Print Name. According to themethod, in an Item Print Name, first three characters are for Item name and nextthree characters are for Item Group. Hence, User can specify this configuration inadvance and then generate Print Name automatically at the time of creatingmasters.
Additional Components in Dropdown ListAdditional components in dropdown list refer to the components to be shown inthe list displaying Master Name / Alias. For example, while entering a Salesvoucher, a list of items appears wherein you can select the required item. Youwant that along with item name, its MRP and current stock should also appear inthe list. Thus with Master Configuration, you can specify the components to bedisplayed in the dropdown list.
After discussing these concepts, let us move on to configure Masters. To configureMasters, click Administration
Configuration
Masters Configuration option. On
clicking the Masters Configuration option, a Masters Configuration windowappears. Given here is a screenshot of Masters Configuration window.
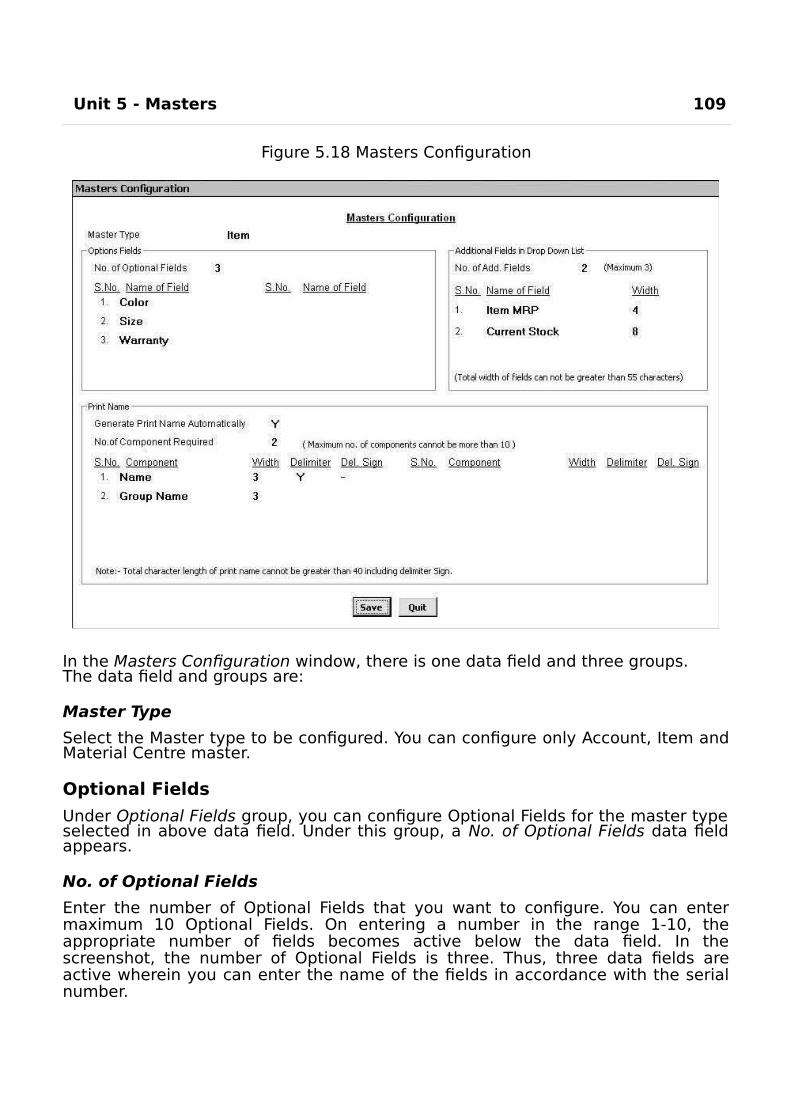
Unit 5 - Masters 109
Figure 5.18 Masters Configuration
In the Masters Configuration window, there is one data field and three groups. The data field and groups are:
Master Type
Select the Master type to be configured. You can configure only Account, Item andMaterial Centre master.
Optional Fields
Under Optional Fields group, you can configure Optional Fields for the master typeselected in above data field. Under this group, a No. of Optional Fields data fieldappears.
No. of Optional Fields
Enter the number of Optional Fields that you want to configure. You can entermaximum 10 Optional Fields. On entering a number in the range 1-10, theappropriate number of fields becomes active below the data field. In thescreenshot, the number of Optional Fields is three. Thus, three data fields areactive wherein you can enter the name of the fields in accordance with the serialnumber.
110
You can enter additional information for specific master in the Optional Fields thatappear at the time of creating / modifying the respective master. For example, ifyou have configured Optional Fields for Item master then while creating /modifying Item master an Optional Fields window will appear in which you canenter the value for Optional Field. Further elaborating the example, you havecreated three Optional Fields with name Color, Size and Warranty. Now when youcreate an Item master and press Enter key in the Group data field then anOptional Fields window will appear with these three data fields. You can then enterthe relevant information in these data fields about the item you are creating.
Additional Fields in Dropdown List
Under this group, you can select additional fields or components to be displayed inthe dropdown list of Masters. You can specify additional fields only for Account andItem master. Under this group a No. of Additional Fields data fields appear. Specifythe number of additional fields to be displayed in the list. You can specifymaximum three additional fields for the list. On specifying a number from 1 to 3 inthis data field, equivalent number of following data fields get activated in thegroup:
Name of Field - Select name of the field to be displayed in the Item / Accountlist.Width - Specify the number of characters to be used for the selected field.
After selecting the fields and specifying width for them, these fields will start appearing in the Masters list.
It is necessary to run Regenerate Help File command provided in Housekeeping menu of BUSY after making any changes in configuration of Dropdown list.
Print Name
Under Print Name group, you can specify that whether you want to generate PrintName automatically for the selected Master. In addition, you can specify theconfiguration for generating Print Name automatically. Under this group, variousdata fields appear. The data fields are:
Generate Print Name AutomaticallySpecify 'Y' in this data field if you want to generate Print Name automatically for the selected Master.
No. of Components Required
Specify the number of components required for generating the Print Name. Youcan specify a number between 1 and 10.
On specifying a value in the No. of Components Required data field, equivalentnumber of following data fields get activated in the group:
Component - Select the required component, which is to be used while generating the Print Name.
Unit 5 - Masters 111
Width - Specify the number of characters to be used for the selected component.
Delimiter - Specify 'Y' in this data field if you want a delimiter sign after thecomponent. Delimiter sign refers to a symbol to be used as a separatorbetween two components. For example, while generating Print Name, youwant that first three characters should be for Item Name and next threecharacters for Item Group. However, at the same time you want that afterfirst three characters a hyphen (-) sign should be placed to differentiatebetween Item Name and Item Group. Hence, for this purpose, you canspecify ‘Y’ in this data field. This data field does not appear for the lastcomponent, as there is no need to give a delimiter sign at the end of thePrint Name.
Del Sign - This data field gets activated if you have if you have specified 'Y'in the Delimiter data field. Specify the delimiter sign to be used after thecomponent.
After entering appropriate data in the data fields, click the Save button to save theMasters Configuration.
Review
You cannot create two Master with same Name but can create two Masters with same Print Name.
On creating a company, by default BUSY creates 56 Account masters and 29 Account Group masters for your convenience.
All the 29 Account Group masters and five Account masters created at the time of company creation are Predefined Masters.
Current year opening balance and previous year closing balance can be different only incase of Revenue Account Groups.
Primary Groups are at the top most level of hierarchy and does not fall under any other Group.
You can create infinite number of Standard Narrations for a voucher type. In the voucher, Standard Narrations can be picked by pressing <F4> key.
Unit Conversion refers to number of Sub units per Main unit.
Bill Sundry is an entity used to record extra income / expense over and above the itemssale / purchase price.
It is up to you to include the Bill Sundry amount in the cost of goods. You can also specify the account in which the amount of Bill Sundry is to be posted.
Bill Sundries can be additive or subtractive in nature.
In a voucher, Taxable amount refers to the amount on which tax is to becharged, Items Basic amount refers to the value of item excluding any Bill
Sundry charged and Nett Bill Amount refers to the value of item including theamount of Bill Sundry charged.
A Material Centre is a place where stock of item is kept.
112
ST Forms are sales tax declaration forms used by registered dealer. The issuer(registered dealer) of this form does not pay tax directly but takes on theresponsibility of collecting tax on further sale of goods.
Sale Type refers to the classification of sales on the basis of type of sale made.
You can specify different sales account to be credited for different tax rates.
With Multi-Tax option in Sale Type master, you can specify tax rate with each item of voucher.
With Tax Inclusive Item Price option, BUSY does a reverse calculation to separate the item amount and tax amount.
On selecting Tax Invoice option in Sale Type master, Tax invoice will be printed on the bill and the buyer will be entitled for Input Tax Credit.
You can freeze the tax rates to be used in voucher for different Sale Types.
Optional Fields are User-Defined fields. You can create ten Optional Fields for a master type.
You can generate Print Name of Account and Item master automatically by specifying the components to be used for generating Print name.
Exercise1 . Two masters can have:
a) Same Alias c) Same Nameb) Same Print Name d) None of the above
2 . New Account Master cannot be created under Group:a) Sundry Debtors c) Duties and Taxesb) Sundry Creditors d) Revenue Account
3 . Balance of Account Master can be entered in:a) Debit c) Either Debit or Creditb) Credit d) By & To
4 . Different Current Year Opening balance and Previous Year Closing balance in Account Master can be entered for:
a) Current Assets Group c) Fixed Assets Groupb) Revenue Account Group d) Current Liabilities
5 . List of masters cannot be exported to:a) MS-Excel c) MS-Wordb) Text File d) PDF file
6 . Standard Narration master can be created for:a) Sale Voucher c) Journal Voucherb) Purchase Voucher d) All of the above
Unit 5 - Masters 113
7 . Maximum character length for Master Name is:a) 40 Characters c) 50 Charactersb) 25 Characters d) 35 Characters
8 . Which of these taxes can be defined in Item Master:a) Local Sales Tax c) Surchargeb) Central Sales Tax d) All of the above
9 . While creating Item Master, mandatory fields are:a) Name c) Unitb) Group d) All of the above
10. Critical levels can be defined for:
a) Minimum Level c) Reorder Levelb) Maximum Level d) All of the above
11. Conversion Factor cannot be:
a) Zero c) In Decimalsb) Negative d) Both a & b
12. Bill Sundry can be:
a) Only Additive in naturec) Either Additive or Subtractive
b) Only Subtractive in Nature d) None of the Above13. Bill Sundry cannot be configured on:
a) Item Basic Amountc) Previous Item Basic Amount
b) Item MRPd) Previous Bill Sundry Amount
14. A Bill Sundry cannot be deleted ifit is :
a) Used in a Voucher c) Subtractive in Natureb) Created for Taxation purpose d) None of the above
15. Material Centre and Material Centre Group Master can be created with:
a) Same Name c) Same Parent Groupb) Same Alias d) All of the Above
1 6 . ST Form can be created for:a) Local Sale / Purchaseb) Central Sale / Purchase
c) Either Local or Central Sale / Purchased) Neither Local nor Central Sale / Purchase
1 7 . Purchase Type master cannot be created for Taxation Type:a) Taxable c) Export

b) Lump-Sum Dealer d) Tax Free

114
18. We can freeze tax in Sale Type for:
a) Sales Voucher c) Journal Voucher
b) Sales Return Voucherd) Both a & b
19. Optional Fields can be defined for:
a) Account master c) Material Centre masterb) Item master d) All of the above
20. Maximum Optional Fields defined with a Master are:
a) Ten c) Hundredb) One d) Three
21. What are Predefined Accounts?22. What are Bill Sundries?
23. What is the difference between Multi - Tax and Tax Inclusive Item Price option provided in Sale
/ Purchase Type master?
24. What is the difference between Multi – Tax and Multi Tax Rate option under Sale / Purchase
Type master?25. Open Company Star Electronics (created in Unit 3) and create following masters:
Account masters
Account Name Parent GroupDebit Bal.
CreditBal.
AmitCapital Account
5,00,000.00
AnkitCapital Account
5,00,000.00
Car-DL4C AA 1308 Fixed Assets1,66,000.00
Cash Cash-in-hand2,72,000.00
Galaxy International
Sundry Debtors
2,35,000.00
HDFC-015401507152 Bank Accounts
3,12,000.00
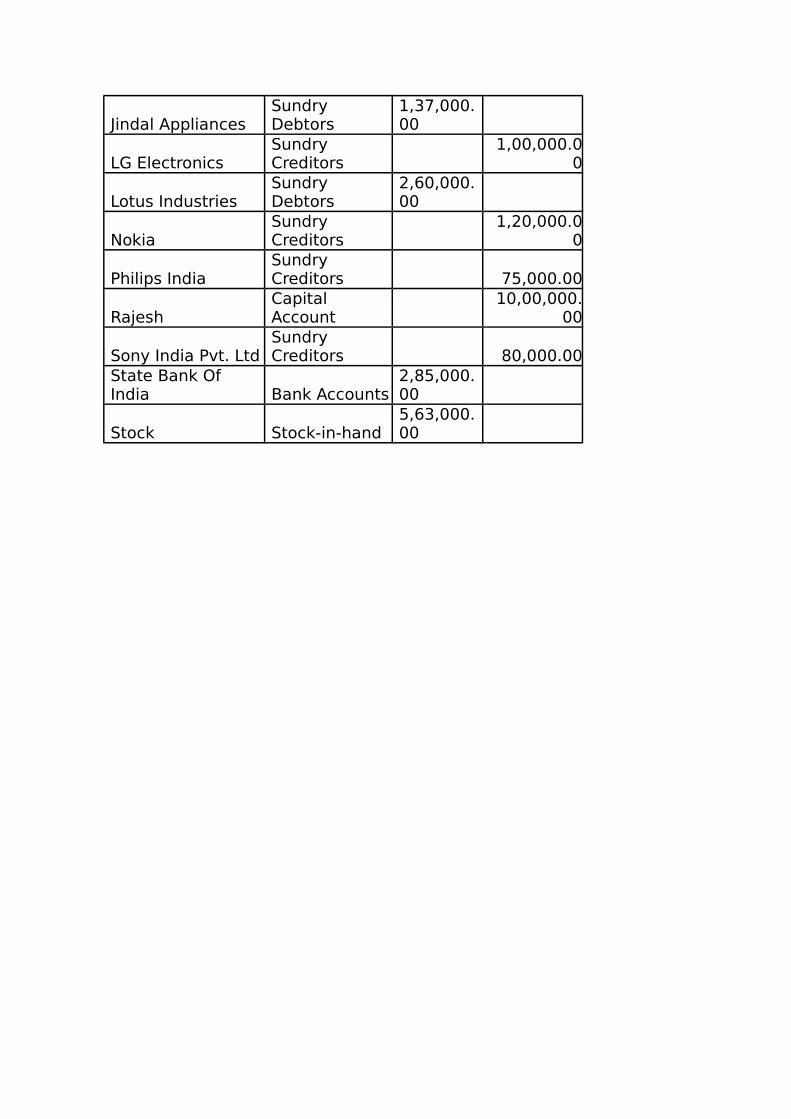
Jindal AppliancesSundry Debtors
1,37,000.00
LG ElectronicsSundry Creditors
1,00,000.00
Lotus IndustriesSundry Debtors
2,60,000.00
NokiaSundry Creditors
1,20,000.00
Philips IndiaSundry Creditors 75,000.00
RajeshCapital Account
10,00,000.00
Sony India Pvt. LtdSundry Creditors 80,000.00
State Bank Of India Bank Accounts
2,85,000.00
Stock Stock-in-hand5,63,000.00
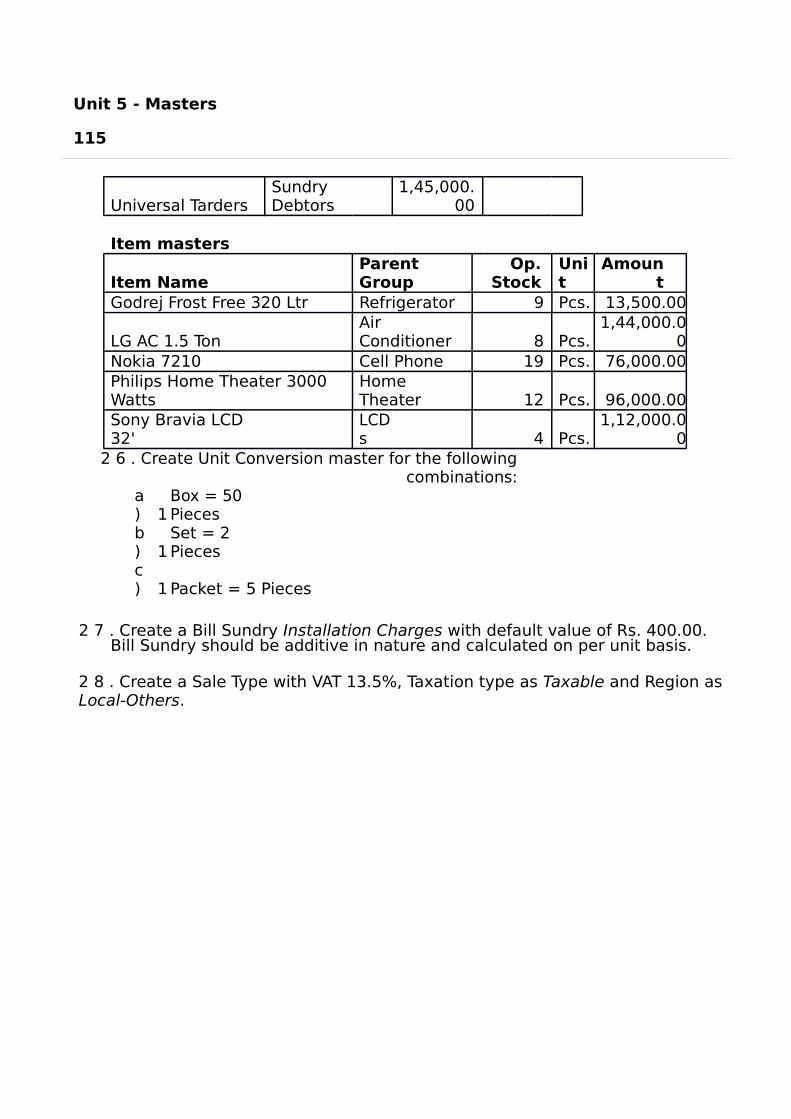
Unit 5 - Masters
115
Universal TardersSundry Debtors
1,45,000.00
Item masters
Item NameParent Group
Op.Stock
Unit
Amount
Godrej Frost Free 320 Ltr Refrigerator 9 Pcs. 13,500.00
LG AC 1.5 TonAir Conditioner 8 Pcs.
1,44,000.00
Nokia 7210 Cell Phone 19 Pcs. 76,000.00Philips Home Theater 3000 Watts
Home Theater 12 Pcs. 96,000.00
Sony Bravia LCD 32'
LCDs 4 Pcs.
1,12,000.00
2 6 . Create Unit Conversion master for the followingcombinations:
a ) 1
Box = 50 Pieces
b ) 1
Set = 2 Pieces
c ) 1 Packet = 5 Pieces
2 7 . Create a Bill Sundry Installation Charges with default value of Rs. 400.00. Bill Sundry should be additive in nature and calculated on per unit basis.
2 8 . Create a Sale Type with VAT 13.5%, Taxation type as Taxable and Region asLocal-Others.

The Beautiful thing about
Learning is that no one can
take it away from You.

Unit 6Transactions
The main objective of this unit is to help User in entering day-to-day entries of hisbusiness in BUSY. Once the Masters have been created and configured the nextstep in an accounting software is to record the transactions. Transactions are day-to-day entries and have a great deal of activity in them. Transaction entries requirefrequent posting of records and need regular insertion and updation. Enteringtransactions means recording of transactions in vouchers such as Sales / Purchase,Payment / Receipt and so on. BUSY classifies various transactions according totheir type and provides various vouchers to make your work easier. For example, ifyou have made a sale of goods then you can record this transaction in Salesvoucher, similarly if you have received a payment from the party then you canrecord this transaction in a Receipt voucher and so on.
Topics covered under this unit:
Voucher Numbering
Entering Vouchers
Configuring Vouchers
6.1 Voucher NumberingVoucher numbering is one of the essential components of voucher entry. Vouchernumbering provides a unique way of differentiating various vouchers and helps inknowing the sequence in which they were entered. Each company follows adifferent pattern for entering voucher numbers. For example, some companiesappend date with voucher numbers while some companies append register orpage number with voucher numbers and so on. To cater to the needs of all thecompanies, BUSY provides configurable voucher numbering. With configurablevoucher numbering, different voucher numbering pattern can be set for differentvoucher types and even for a single voucher type.
To configure voucher numbering for various voucher types, click Administration
Configuration
Vouchers Configuration option. On clicking the VoucherConfiguration option, a Voucher Configuration window appears. On the left handside of the Voucher Configuration window, a list of voucher types is provided. Youcan select the voucher type for which you want to configure the vouchernumbering. On clicking the plus (+) sign next to a voucher type, a Main optionappears. This is actually a default voucher series created by BUSY. You can createdifferent voucher series for a voucher type (see topic 6.3) and can set differentvoucher numberings for various series created by you.

On selecting a series, various buttons get activated on the right hand side. ClickVoucher Numbering button to set voucher numbering for a voucher type. Onclicking the Voucher Numbering button, a
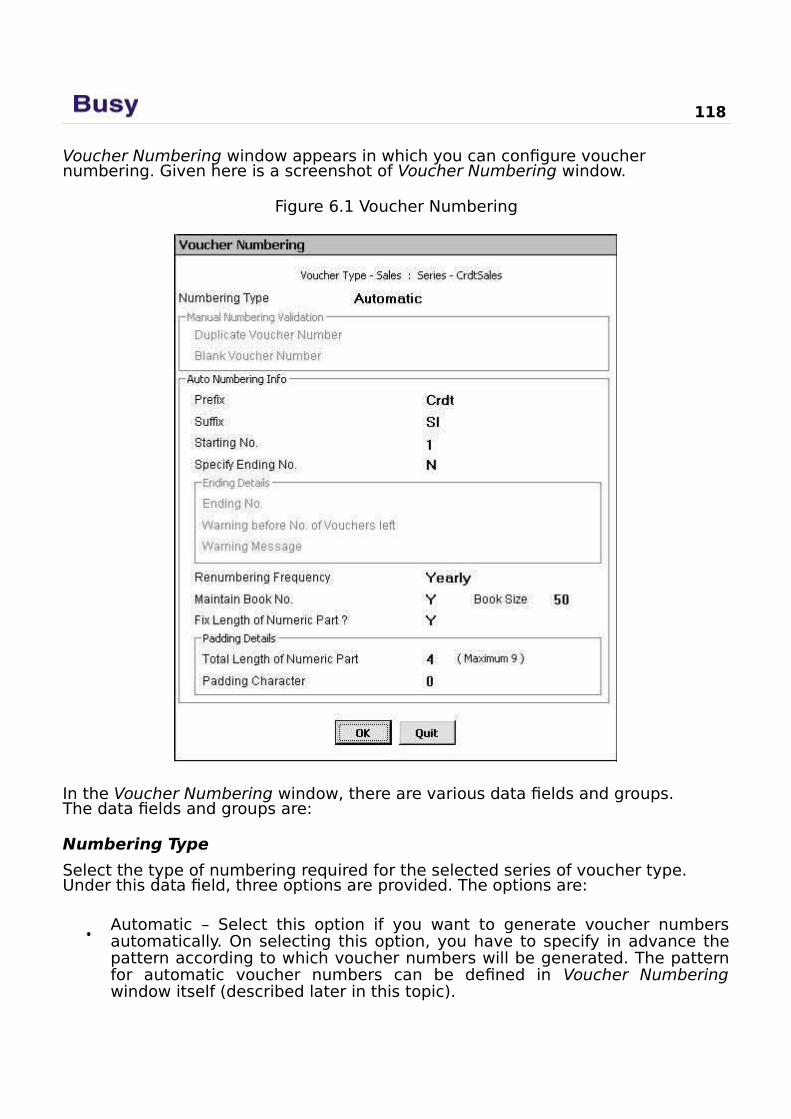
118
Voucher Numbering window appears in which you can configure voucher numbering. Given here is a screenshot of Voucher Numbering window.
Figure 6.1 Voucher Numbering
In the Voucher Numbering window, there are various data fields and groups. The data fields and groups are:
Numbering Type
Select the type of numbering required for the selected series of voucher type. Under this data field, three options are provided. The options are:
Automatic – Select this option if you want to generate voucher numbersautomatically. On selecting this option, you have to specify in advance thepattern according to which voucher numbers will be generated. The patternfor automatic voucher numbers can be defined in Voucher Numberingwindow itself (described later in this topic).
Unit 6 - Transactions 119
Manual – Select this option if you want to enter voucher number manually atthe time of voucher entry.
Not Required – Select this option if you do not want to maintain vouchernumbering for the selected series of voucher type. If you select this optionthen no data field for entering voucher number will appear in the voucher.For example, if you select this option for Main series of Sales voucher thenwhile entering Sales voucher for Main series, you will not be able to enterthe voucher date.
Manual Numbering Validation
This group gets activated only if you have selected Manual option in theNumbering Type data field. In this group, you can set validations for enteringvoucher numbers, since you are entering voucher numbers manually there is morescope of entering wrong voucher number or duplicate voucher number. Under thisgroup, two data fields appear. The data fields are:
Duplicate Voucher Number
Select the action to be taken on entering a duplicate voucher number. You canchoose to display a warning message only or can totally disallow entering ofduplicate voucher number. You can also choose to not to take an action onentering a duplicate voucher number.
Blank Voucher Number
Select the action to be taken on entering a blank voucher number i.e. not enteringa voucher number at all. You can choose to display a warning message only or cantotally disallow blank voucher number. You can also choose to not to take an actionon leaving voucher number blank.
Auto Numbering Info
Under this group, you can specify the configuration for generating automaticvoucher numbers. This group gets active only if you have selected Automaticoption in the Numbering Type data field. Various data fields and sub group thatappear under this group for configuring voucher number are:
Prefix
Specify prefix for the voucher number in this data field. Prefix refers to the stringthat will be added in front of voucher number or you can say the string with whichvoucher number will begin.
Suffix
Specify suffix for the voucher number in this data field. Suffix refers to the stringthat will be added at the end of the voucher number or you can say the string withwhich voucher number will end.
Starting No.
Specify the number for the first voucher number. For example, you want to startfirst voucher number with ‘1’ then you can specify ‘1’ in this data field.
120
Specify Ending No.
Specify ‘Y’ in this data field if you want to have limited number of vouchers for theselected series of voucher type.
Ending Details
This group gets active only if you have specified ‘Y’ in the Specify Ending No. datafield. Various data fields that appear under this group are:
Ending No.
Specify the maximum number of vouchers that can be entered for the vouchertype. For example, you want to enter only 1000 vouchers for the Main series ofSales voucher type then you can specify 1000 in this data field. BUSY will not allowyou to enter more than 1000 voucher for the Main series of Sales voucher type.
Warning before number of vouchers left
Specify the number of vouchers left before which a warning message is to begenerated at the time of voucher entry. For example, you have entered 1000 inabove data field and 10 in this data field then after entering 990th voucher, awarning will start appearing on saving the voucher that you can enter only 10more vouchers.
Warning Message
Specify warning message to be displayed when the specified number of vouchersare left for the voucher type. The message you specify here will be appended withdefault warning message provided by BUSY.
Renumbering Frequency
Specify the time duration after which the voucher numbers are to be regeneratedor to be started again. For example, if you select Monthly option from the list thenafter every month, voucher numbering will start from the beginning (i.e. from thevoucher number specified in the Starting No. data field). If you select Yearly optionthen after every year voucher numbering will start from the beginning.
Maintain Book No.Specify ‘Y’ in this data field if you want to maintain book number for the voucher.
Book Size
This data field appears on specifying ‘Y’ in the Maintain Book No. data field.Specify the size of the book in this data field. For example, each book in whichvoucher details are maintained, has 50 pages or can have entry of 50 vouchersonly then you can specify the book size as 50.
Unit 6 - Transactions 121
Fix Length of Numeric Part
Specify ‘Y’ in this data field if you want to fix length of the numeric part of thevoucher. For example, you want that size of voucher numbers for all the vouchersshould always be same, whether it is the first voucher or the hundredth voucher.For this purpose, you can fix the numeric part of the voucher and can specify thecharacter to be added to the numeric part to make it equal in size to othervoucher numbers.
Padding Details
This group gets active only on specifying ‘Y’ in the Fix Length of Numeric Part datafield. Under this group, you can specify the details about fixing the length ofnumeric part of the voucher number. Various data fields under this group are:
Total Length of Numeric Part
Specify total length of the numeric part of voucher number in this data field. Forexample, you want numeric part of voucher number to be of four digits alwaysthen you can specify ‘4’ in this data field.
Padding Character
Specify the character to be added to the numeric part of the voucher number tomake it equivalent to the value specified in the Total Length of Numeric Part datafield. For example, if you specify ‘0’ in this data field and ‘4’ in previous data fieldthen first voucher number will appear as 0001, tenth voucher number will appearas 0010, hundredth voucher number will appear as 0100 and thousandth vouchernumber will appear as 1000.
After entering appropriate details in the data fields, click the Save button to savethe Voucher Numbering configuration.
6.2 Entering VouchersEntering Voucher means recording of day-to-day activities or transactions ofbusiness in a specified format according to the type of transaction made. All thereports in BUSY are based on the data entered in the vouchers. To record varioustransactions, BUSY provides a classified menu of different voucher types. To viewlist of various vouchers provided by BUSY, click Transactions menu. On clicking theTransactions menu, a list displaying all the voucher types appears. Given here is ascreenshot of Transactions menu displaying all the voucher types provided inBUSY.
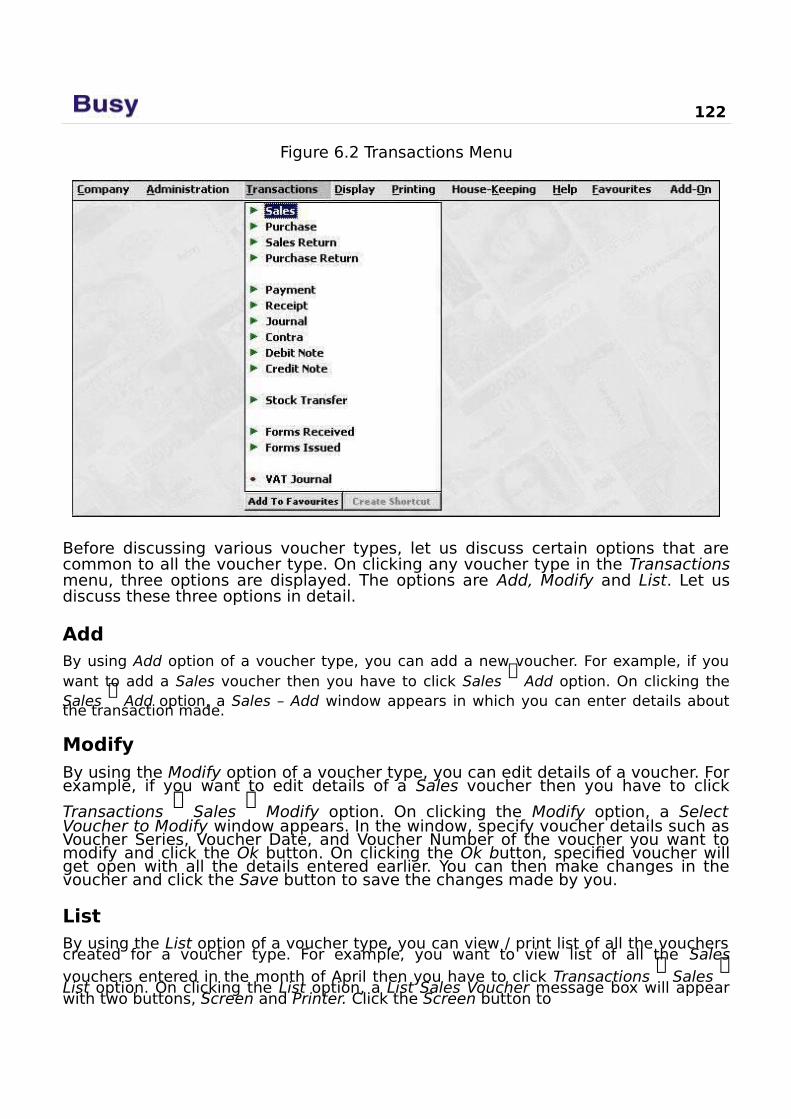
122
Figure 6.2 Transactions Menu
Before discussing various voucher types, let us discuss certain options that arecommon to all the voucher type. On clicking any voucher type in the Transactionsmenu, three options are displayed. The options are Add, Modify and List. Let usdiscuss these three options in detail.
AddBy using Add option of a voucher type, you can add a new voucher. For example, if youwant to add a Sales voucher then you have to click Sales
Add option. On clicking the
Sales
Add option, a Sales – Add window appears in which you can enter details aboutthe transaction made.
ModifyBy using the Modify option of a voucher type, you can edit details of a voucher. Forexample, if you want to edit details of a Sales voucher then you have to click
Transactions
Sales
Modify option. On clicking the Modify option, a SelectVoucher to Modify window appears. In the window, specify voucher details such asVoucher Series, Voucher Date, and Voucher Number of the voucher you want tomodify and click the Ok button. On clicking the Ok button, specified voucher willget open with all the details entered earlier. You can then make changes in thevoucher and click the Save button to save the changes made by you.
ListBy using the List option of a voucher type, you can view / print list of all the voucherscreated for a voucher type. For example, you want to view list of all the Salesvouchers entered in the month of April then you have to click Transactions
Sales
List option. On clicking the List option, a List Sales Voucher message box will appearwith two buttons, Screen and Printer. Click the Screen button to
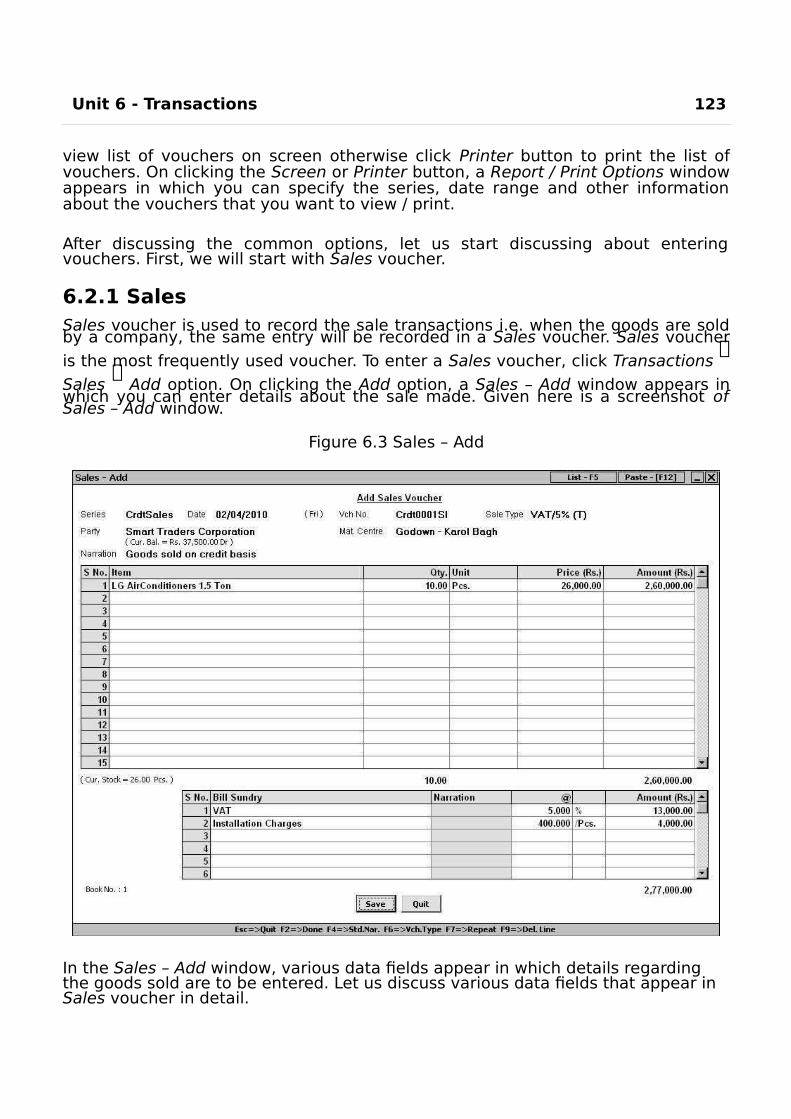
Unit 6 - Transactions 123
view list of vouchers on screen otherwise click Printer button to print the list ofvouchers. On clicking the Screen or Printer button, a Report / Print Options windowappears in which you can specify the series, date range and other informationabout the vouchers that you want to view / print.
After discussing the common options, let us start discussing about enteringvouchers. First, we will start with Sales voucher.
6.2.1 SalesSales voucher is used to record the sale transactions i.e. when the goods are soldby a company, the same entry will be recorded in a Sales voucher. Sales voucher
is the most frequently used voucher. To enter a Sales voucher, click Transactions
Sales
Add option. On clicking the Add option, a Sales – Add window appears inwhich you can enter details about the sale made. Given here is a screenshot ofSales – Add window.
Figure 6.3 Sales – Add
In the Sales – Add window, various data fields appear in which details regarding the goods sold are to be entered. Let us discuss various data fields that appear inSales voucher in detail.
124
SeriesSelect the voucher series in which you want to record the sale entry.
Date
Enter date for which you are entering the voucher. On pressing the Enter key inthis data field, a Stock Updation Date window appears. This window appears if youhave enabled the option of Separate Stock Updation Date in Dual Vouchers in
Administration
Configuration
Features / Option
Inventory tab (see Unit 4,topic 4.1 – Features / Options, sub topic - 4.1.3 Inventory). Enter date on whichstock is updated or goods are moved out.
Vch No.
Enter the voucher number in this data field. If you have set the voucher numberingas Automatic in Voucher Configuration then voucher number will be generatedautomatically and you cannot change value in it. If you have set the vouchernumbering as Not Required then this field will be disabled and you are not allowedto enter voucher number. By default, voucher numbering is set to Automatic forSales voucher.
Sale Type
This data field appears if you have enabled Sales Tax / VAT / GST for the company.Select required Sale Type from the list. For example, if you are entering a voucherin which VAT @ 5% will be levied on all the items then you can select VAT / 5% (T /R) Sale Type. Similarly, if you are entering a voucher in which different tax rate willbe levied on various items of the bill then you can select VAT / Multi Tax (T / R)option.
Party
Select the party to which you are selling the goods. The list will display all theAccount masters whose Parent Group is Sundry Debtor / Creditor, Cash or Bank. Ifyou are selling goods on cash basis then you can select the Cash account. If youare selling goods on credit basis then you can select the name of the party towhom you are selling the goods.
Material Centre
This data field appears if you have created more than one Material Centremasters. Select the Material Centre from where the goods have been dispatchedor moved out.
Sales Acc.
This data field appears if you have selected Specify in Voucher option in the SaleType master selected in the Sale Type data field of the voucher. Select the accountto which the sale entry will be posted or the account which is to be credited onsaving the Sales voucher.
Narration
Enter narration for the voucher in this data field. You can also pick from theexisting Standard Narrations by pressing <F4> key.
Unit 6 - Transactions 125
Item Details Grid
Although no name is given to this grid in voucher, we have given it a name in theCourseware for your convenience. In the Item Details grid, you can specify detailsabout the items sold. Various fields in the Item Details grid are:
ItemSelect required item from the list. The list will display name / alias of all the Item masters.
Qty.Enter quantity of item sold.
Unit
By default, the unit as specified in the selected item will appear in this field. Youcan change it to any other unit if the conversion factor exists between the mainunit as specified in the Item master and the unit you are selecting in this field.
PriceEnter the price in this field at which you are selling the item.
Amount
By default, the amount calculated by multiplying the quantity and price isdisplayed in this field. You can change the amount as per your requirement. If youchange the amount then the price will be adjusted automatically. On pressing theEnter key, after entering the amount in the Amount field, an Item-Wise Sales Taxwindow or Item–Wise Tax Information window appears.
Let us discuss both these windows one by one.
Item-Wise Sales Tax window appears if the option of Multi-Tax is enabled in theSale Type master selected in the Sale Type data field. The window will appear witheach item in the Item Details grid. Given here is a screenshot of Item-Wise SalesTax window.
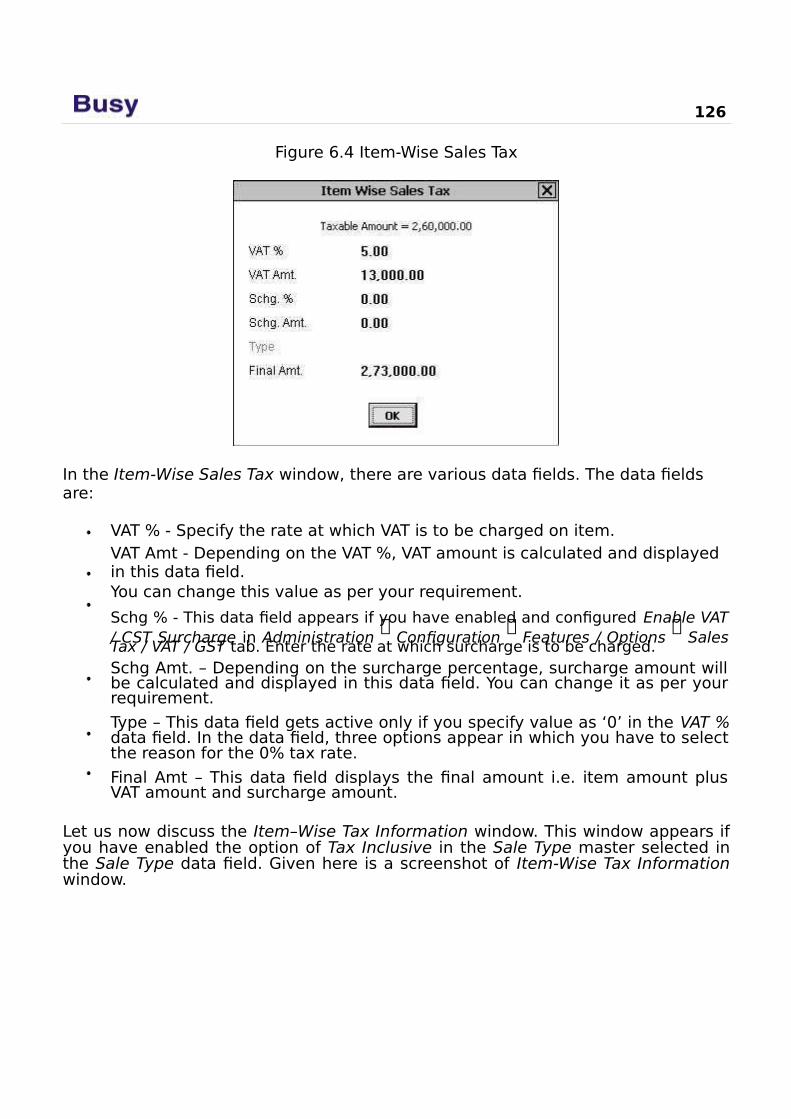
126
Figure 6.4 Item-Wise Sales Tax
In the Item-Wise Sales Tax window, there are various data fields. The data fields are:
VAT % - Specify the rate at which VAT is to be charged on item.VAT Amt - Depending on the VAT %, VAT amount is calculated and displayed in this data field.You can change this value as per your requirement.
Schg % - This data field appears if you have enabled and configured Enable VAT/ CST Surcharge in Administration
Configuration
Features / Options
Sales
Tax / VAT / GST tab. Enter the rate at which surcharge is to be charged.Schg Amt. – Depending on the surcharge percentage, surcharge amount willbe calculated and displayed in this data field. You can change it as per yourrequirement.
Type – This data field gets active only if you specify value as ‘0’ in the VAT %data field. In the data field, three options appear in which you have to selectthe reason for the 0% tax rate.
Final Amt – This data field displays the final amount i.e. item amount plusVAT amount and surcharge amount.
Let us now discuss the Item–Wise Tax Information window. This window appears ifyou have enabled the option of Tax Inclusive in the Sale Type master selected inthe Sale Type data field. Given here is a screenshot of Item-Wise Tax Informationwindow.
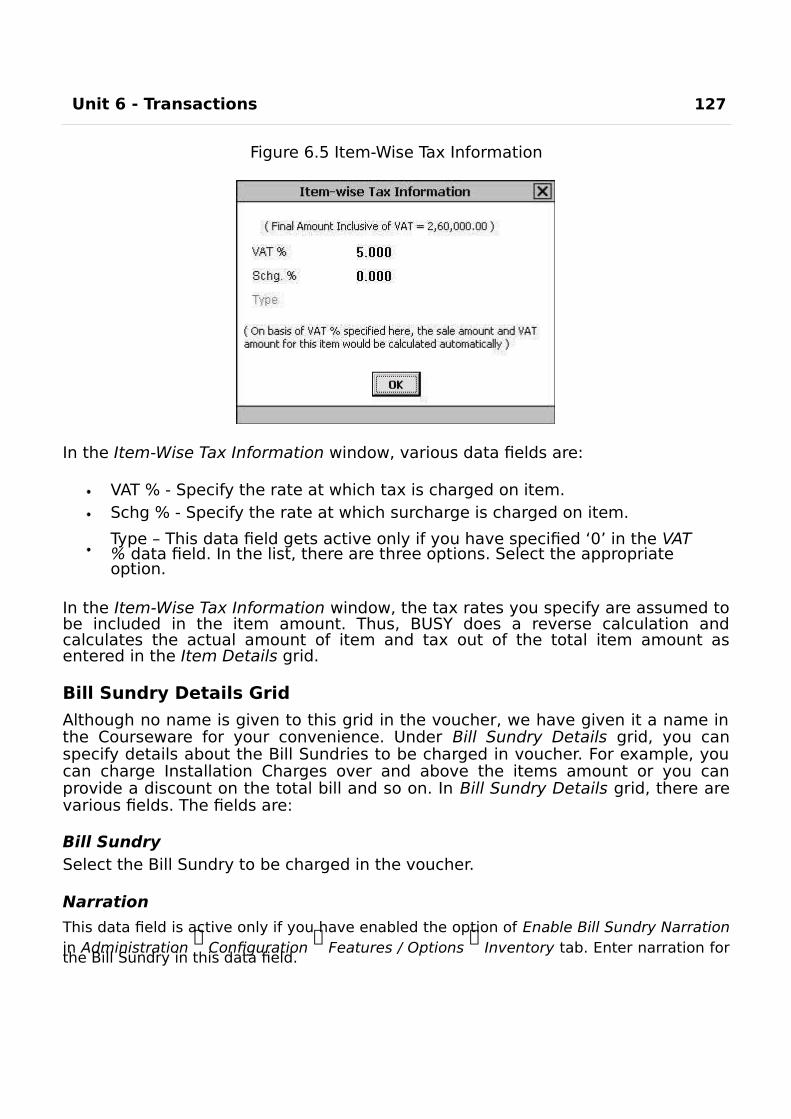
Unit 6 - Transactions 127
Figure 6.5 Item-Wise Tax Information
In the Item-Wise Tax Information window, various data fields are:
VAT % - Specify the rate at which tax is charged on item.Schg % - Specify the rate at which surcharge is charged on item.
Type – This data field gets active only if you have specified ‘0’ in the VAT % data field. In the list, there are three options. Select the appropriate option.
In the Item-Wise Tax Information window, the tax rates you specify are assumed tobe included in the item amount. Thus, BUSY does a reverse calculation andcalculates the actual amount of item and tax out of the total item amount asentered in the Item Details grid.
Bill Sundry Details Grid
Although no name is given to this grid in the voucher, we have given it a name inthe Courseware for your convenience. Under Bill Sundry Details grid, you canspecify details about the Bill Sundries to be charged in voucher. For example, youcan charge Installation Charges over and above the items amount or you canprovide a discount on the total bill and so on. In Bill Sundry Details grid, there arevarious fields. The fields are:
Bill SundrySelect the Bill Sundry to be charged in the voucher.
Narration
This data field is active only if you have enabled the option of Enable Bill Sundry Narrationin Administration
Configuration
Features / Options
Inventory tab. Enter narration for
the Bill Sundry in this data field.
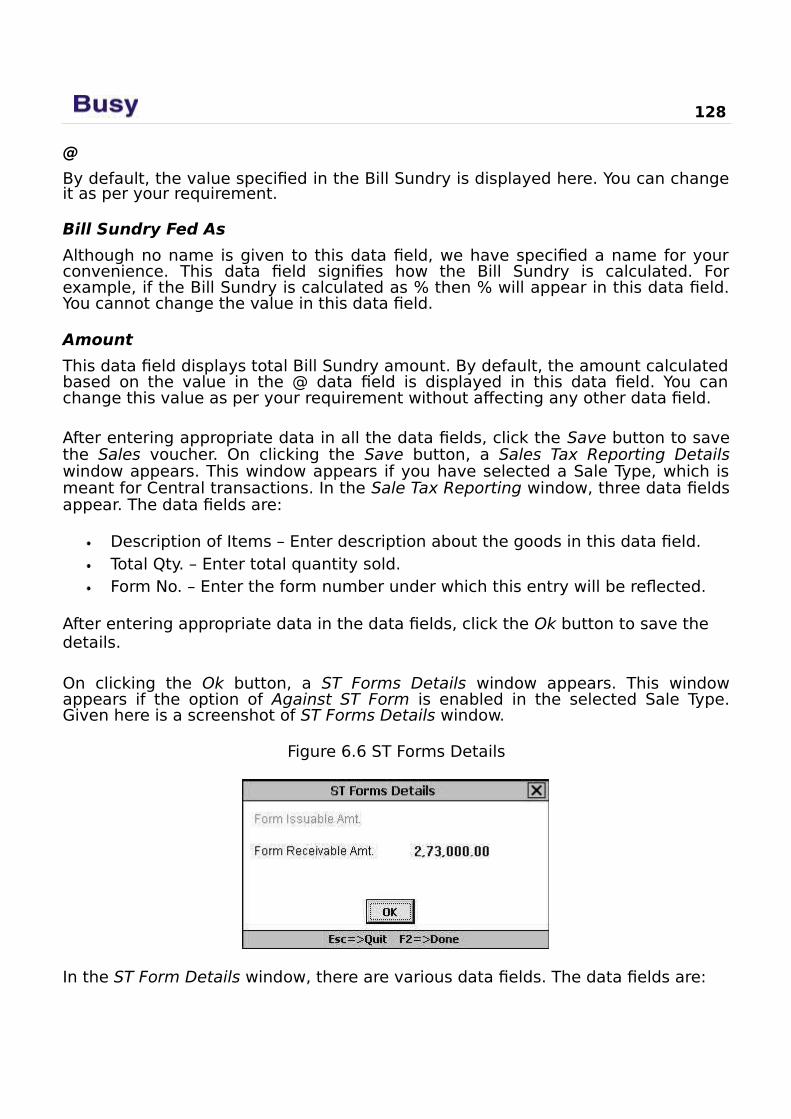
128
@
By default, the value specified in the Bill Sundry is displayed here. You can changeit as per your requirement.
Bill Sundry Fed As
Although no name is given to this data field, we have specified a name for yourconvenience. This data field signifies how the Bill Sundry is calculated. Forexample, if the Bill Sundry is calculated as % then % will appear in this data field.You cannot change the value in this data field.
Amount
This data field displays total Bill Sundry amount. By default, the amount calculatedbased on the value in the @ data field is displayed in this data field. You canchange this value as per your requirement without affecting any other data field.
After entering appropriate data in all the data fields, click the Save button to savethe Sales voucher. On clicking the Save button, a Sales Tax Reporting Detailswindow appears. This window appears if you have selected a Sale Type, which ismeant for Central transactions. In the Sale Tax Reporting window, three data fieldsappear. The data fields are:
Description of Items – Enter description about the goods in this data field.Total Qty. – Enter total quantity sold.Form No. – Enter the form number under which this entry will be reflected.
After entering appropriate data in the data fields, click the Ok button to save the details.
On clicking the Ok button, a ST Forms Details window appears. This windowappears if the option of Against ST Form is enabled in the selected Sale Type.Given here is a screenshot of ST Forms Details window.
Figure 6.6 ST Forms Details
In the ST Form Details window, there are various data fields. The data fields are:
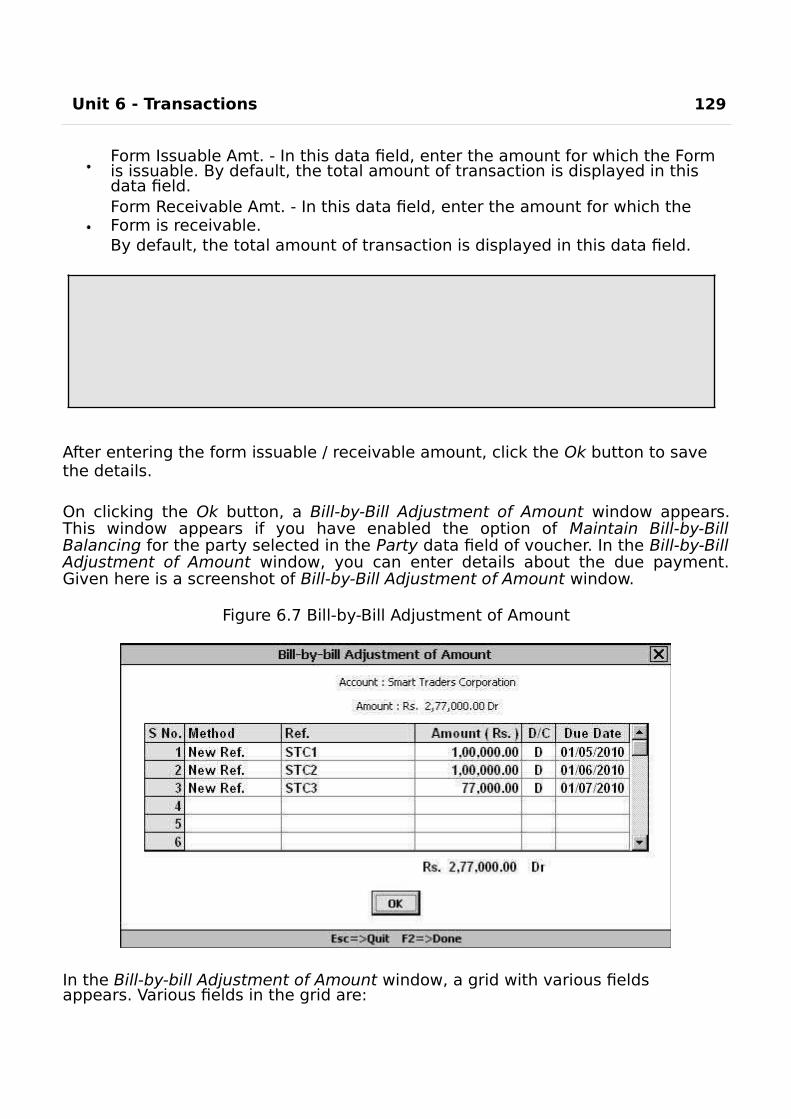
Unit 6 - Transactions 129
Form Issuable Amt. - In this data field, enter the amount for which the Form is issuable. By default, the total amount of transaction is displayed in this data field.Form Receivable Amt. - In this data field, enter the amount for which the Form is receivable.By default, the total amount of transaction is displayed in this data field.
Depending on the configuration in Sale Type under Form Information group
either Form Issuable Amount or Form Receivable Amount or both the data fields will be active.
Typically speaking, Form Issuable Amount data field will be active for Purchase transactions and Form Receivable Amount data field will be active for Sales transactions.
After entering the form issuable / receivable amount, click the Ok button to save the details.
On clicking the Ok button, a Bill-by-Bill Adjustment of Amount window appears.This window appears if you have enabled the option of Maintain Bill-by-BillBalancing for the party selected in the Party data field of voucher. In the Bill-by-BillAdjustment of Amount window, you can enter details about the due payment.Given here is a screenshot of Bill-by-Bill Adjustment of Amount window.
Figure 6.7 Bill-by-Bill Adjustment of Amount
In the Bill-by-bill Adjustment of Amount window, a grid with various fields appears. Various fields in the grid are:

MethodUnder this data field, three options are provided. The options are:
130
New Ref. – Select this option if you want to create a new bill reference for theparty.
Adjust – Select this option if you want to adjust the current bill amount withany other reference already created for the party. This option will appearonly if there is a pending bill of the party with which the current bill amountcan be adjusted. For example, Star Electronics Company has sold 10 piecesof item LG AC 1.5 ton worth Rs. 2,60,000 to Smart Traders Corporation oncredit basis. Smart Traders Corporation had earlier made some advancepayment of Rs. 60,000 for which a bill reference has already been created.Now Star Electronics Company can adjust Rs. 60,000 with the existing billreference and for the rest Rs. 2, 00,000 it can create new bill reference.
Append – Select this option if you want to append or add the current billamount to any existing bill reference. This option appears only if there is apending bill to which the reference can be appended. For example, StarElectronics Company has sold 10 pieces of item LG AC 1.5 ton worth Rs.2,00,000 to Smart Traders Corporation on credit basis. Smart TradersCorporation decided to make payment in four installments of Rs. 50,000each due on 1st April, 1st May, 1st June and 1st July. However, there is alreadya pending bill of Rs. 20,000 due on 1st April which the Smart TradersCorporation has to pay to the Star Electronics Company. Now instead ofmaking a new bill of Rs. 50,000 for 1st April, Star Electronics Company canappend this amount to existing bill reference which is due on 1st April.Hence, total amount in a single bill reference to be paid by Smart TradersCorporation on 1st April will be Rs. 70,000.
Ref
Enter bill reference number if you are creating new reference or select the existingreference to which the amount is to be adjusted / appended.
AmountEnter the amount for bill reference.
D / CEnter ‘D’ if it is a debit amount or ‘C’ if is a credit amount.
Due Date
Enter due date for the reference in this field. You can enter due date only for newreferences. If you have selected the New Ref. method then by default, the date ofthe voucher appears in the field. If you have specified credit days in the Accountmaster for party / account then depending on the number of credit days specifiedin Account master, the due date is displayed in the field. If you have selected theAdjustment / Append method then depending on the reference selected in the Ref.data field the due date is displayed in the field.
Group
This field appears if you have enabled the option of Enable Grouping of Reference underAdministration
Configuration
Features / Options
Accounts tab
Bill Reference Group window.
If you have selected the New Ref. method then you have to select the Reference Group
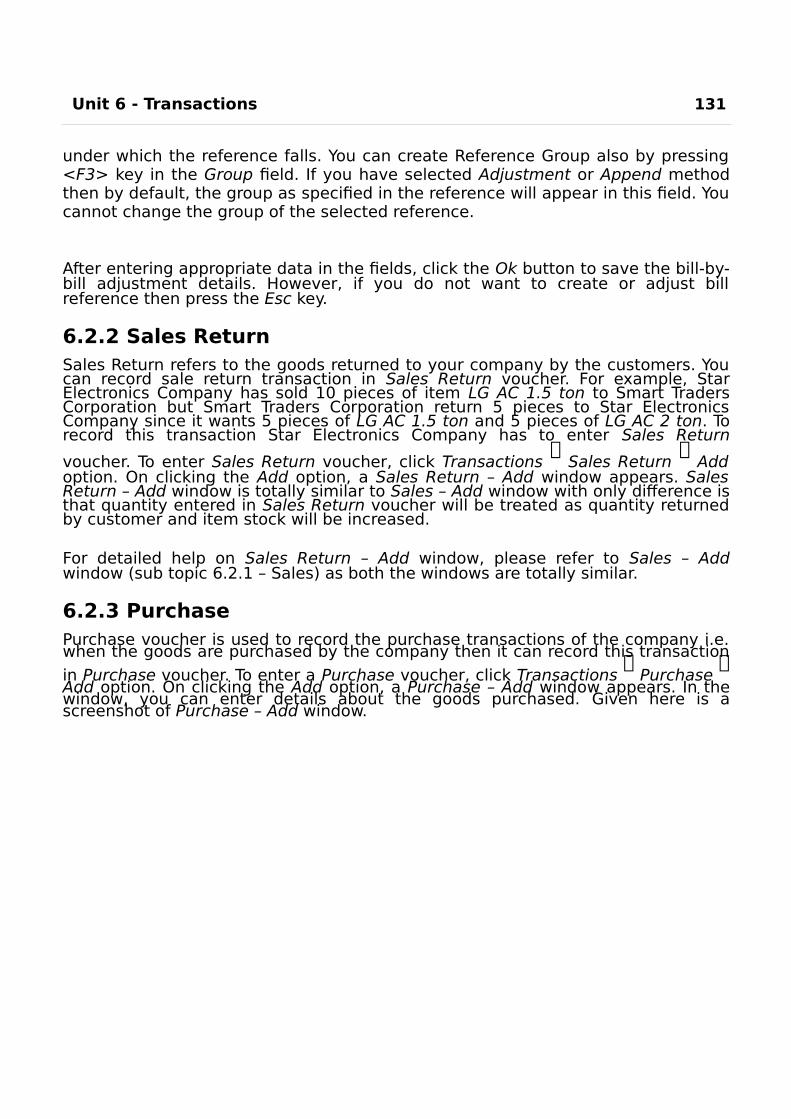
Unit 6 - Transactions 131
under which the reference falls. You can create Reference Group also by pressing<F3> key in the Group field. If you have selected Adjustment or Append methodthen by default, the group as specified in the reference will appear in this field. Youcannot change the group of the selected reference.
After entering appropriate data in the fields, click the Ok button to save the bill-by-bill adjustment details. However, if you do not want to create or adjust billreference then press the Esc key.
6.2.2 Sales ReturnSales Return refers to the goods returned to your company by the customers. Youcan record sale return transaction in Sales Return voucher. For example, StarElectronics Company has sold 10 pieces of item LG AC 1.5 ton to Smart TradersCorporation but Smart Traders Corporation return 5 pieces to Star ElectronicsCompany since it wants 5 pieces of LG AC 1.5 ton and 5 pieces of LG AC 2 ton. Torecord this transaction Star Electronics Company has to enter Sales Return
voucher. To enter Sales Return voucher, click Transactions
Sales Return
Addoption. On clicking the Add option, a Sales Return – Add window appears. SalesReturn – Add window is totally similar to Sales – Add window with only difference isthat quantity entered in Sales Return voucher will be treated as quantity returnedby customer and item stock will be increased.
For detailed help on Sales Return – Add window, please refer to Sales – Addwindow (sub topic 6.2.1 – Sales) as both the windows are totally similar.
6.2.3 PurchasePurchase voucher is used to record the purchase transactions of the company i.e.when the goods are purchased by the company then it can record this transaction
in Purchase voucher. To enter a Purchase voucher, click Transactions
Purchase
Add option. On clicking the Add option, a Purchase – Add window appears. In thewindow, you can enter details about the goods purchased. Given here is ascreenshot of Purchase – Add window.

132
Figure 6.8 Purchase – Add
In the Purchase – Add window, various data fields appear. The data fields are:
SeriesSelect the voucher series in this data field.
Date
Enter date for which you are entering the voucher. On pressing the Enter key inthis data field, a Stock Updation Date window appears. This window appears if youhave enabled the Separate Stock Updation Date option in Administration
Configuration
Features / Options
Inventory tab. Enter date on which stock isreceived from the party.
Vch No.
Enter the voucher number in this data field. If you have set voucher numbering asAutomatic in Vouchers Configuration then voucher number will be generatedautomatically and you cannot change value in it. If you have set vouchernumbering as Not Required in Vouchers Configuration then this
Unit 6 - Transactions 133
field will be disabled and you are not allowed to enter voucher number. By default,voucher numbering is set to Manual for Purchase vouchers.
Purchase Type
This data field appears if you have enabled Sales Tax / VAT / GST for the company.Select required Purchase Type from the list.
Party
Select party from whom you are purchasing the goods. You can also select theCash or Bank account if you have purchased goods in cash or through cheque.
Material Centre
This data field appears if you have created more than one Material Centre master.Select the Material Centre in this data field where the goods have been received orwhere the purchased goods are kept.
Purc Acc.
This data field appears if you have enabled the Specify in Voucher option in theselected Purchase Type. Select the account in which purchase entry will be postedor select the account that is to be debited for the purchase transaction you areentering.
Narration
Enter narration for the purchase transaction in this data field. You can pick fromalready created Standard Narrations also by pressing <F4> key.
Item Details Grid
Although no name is given to this grid in the voucher, we have given a name to itin the Courseware for your convenience. Under Item Details grid, you can enterdetails about the items you have purchased. In the Item Details grid, there arevarious fields. The fields are:
ItemSelect required item from the list. The list will display name / alias of all the Item masters.
Qty.Enter quantity of item purchased.
Unit
By default, the unit as specified in the selected Item master will appear in thisfield. You can change it to any other unit if the conversion factor exists betweenthe main unit as specified in the Item master and the unit selected in this field.
PriceEnter the price in this field at which the item is purchased.
134
Amount
By default, the amount calculated by multiplying the quantity and price isdisplayed in this field. You can change the amount as per your requirement. If youchange the amount then the price will be adjusted automatically. On pressing theEnter key after entering the amount in the Amount field, an Item-Wise Sales Taxwindow or Item–Wise Tax Information window appears. For detailed help on thesewindows, please refer to sub topic 6.2.1 - Sales.
Bill Sundry Details grid
Although no name is given to this grid in the voucher, we have given it a name inthe Courseware for your convenience. Under Bill Sundry Details grid, you canspecify details about the Bill Sundries to be used in voucher. For example, you canenter Bill Sundry for freight & forwarding charges paid on receipt of goods. In BillSundry Details grid, there are various fields. The fields are:
Bill SundrySelect required Bill Sundry from the list.
Narration
This data field is active only if you have enabled the option of Enable Bill Sundry Narrationin Administration
Configuration
Features / Options
Inventory tab. Enter narration for
the Bill Sundry in this data field.
@
By default, the value specified in the Bill Sundry is displayed here. You can changeit as per your requirement.
Bill Sundry Fed As
Although no name is given to this data field, we have given it a name for yourconvenience. This field signifies how the Bill Sundry is calculated. For example, ifthe Bill Sundry is calculated on percentage basis then ‘%’ sign will appear in thisfield. You cannot change the value in this field.
Amount
This data field displays total Bill Sundry amount. By default, the amount calculatedbased on the value in the @ data field is displayed in this data field. You canchange this value as per your requirement without affecting any other data field.
After entering appropriate data in the data fields, click the Save button to save thePurchase voucher. On clicking the Save button, a Sales Tax Reporting Detailswindow appears. In the window, you can specify original purchase bill number anddate. This is useful when you maintain your own purchase voucher number otherthan the one that is printed on the bill issued by the party from whom you havepurchased the goods. You can maintain your own purchase bill number to follow aparticular sequence for voucher numbers. However, for sales tax and reportingpurposes, you require the original purchase number that is printed on the bill.Hence, you can enter the original purchase bill
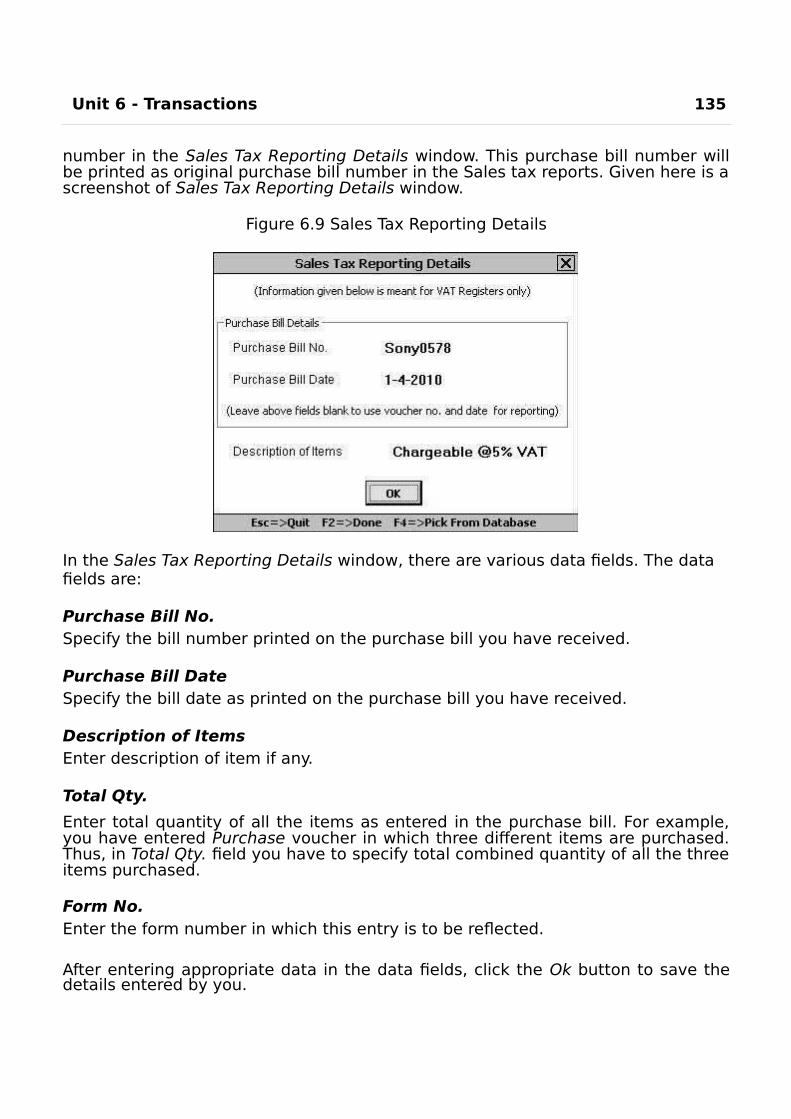
Unit 6 - Transactions 135
number in the Sales Tax Reporting Details window. This purchase bill number willbe printed as original purchase bill number in the Sales tax reports. Given here is ascreenshot of Sales Tax Reporting Details window.
Figure 6.9 Sales Tax Reporting Details
In the Sales Tax Reporting Details window, there are various data fields. The data fields are:
Purchase Bill No.Specify the bill number printed on the purchase bill you have received.
Purchase Bill DateSpecify the bill date as printed on the purchase bill you have received.
Description of ItemsEnter description of item if any.
Total Qty.
Enter total quantity of all the items as entered in the purchase bill. For example,you have entered Purchase voucher in which three different items are purchased.Thus, in Total Qty. field you have to specify total combined quantity of all the threeitems purchased.
Form No.Enter the form number in which this entry is to be reflected.
After entering appropriate data in the data fields, click the Ok button to save thedetails entered by you.
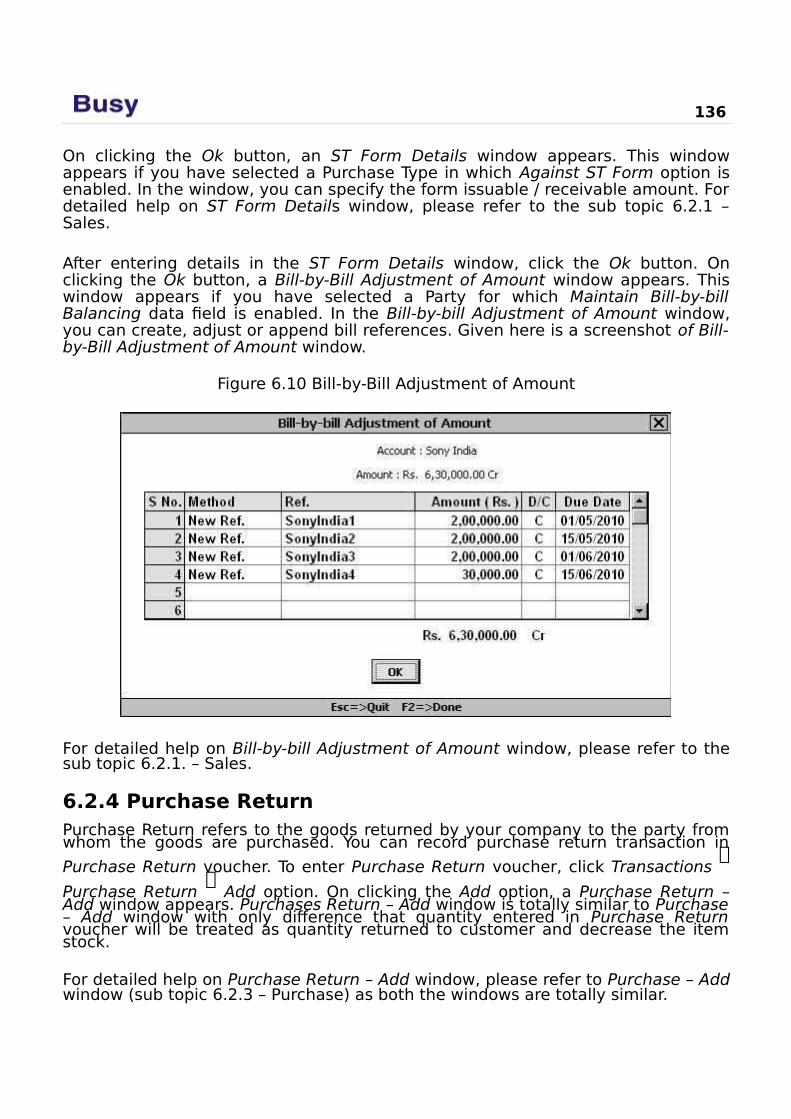
136
On clicking the Ok button, an ST Form Details window appears. This windowappears if you have selected a Purchase Type in which Against ST Form option isenabled. In the window, you can specify the form issuable / receivable amount. Fordetailed help on ST Form Details window, please refer to the sub topic 6.2.1 –Sales.
After entering details in the ST Form Details window, click the Ok button. Onclicking the Ok button, a Bill-by-Bill Adjustment of Amount window appears. Thiswindow appears if you have selected a Party for which Maintain Bill-by-billBalancing data field is enabled. In the Bill-by-bill Adjustment of Amount window,you can create, adjust or append bill references. Given here is a screenshot of Bill-by-Bill Adjustment of Amount window.
Figure 6.10 Bill-by-Bill Adjustment of Amount
For detailed help on Bill-by-bill Adjustment of Amount window, please refer to thesub topic 6.2.1. – Sales.
6.2.4 Purchase ReturnPurchase Return refers to the goods returned by your company to the party fromwhom the goods are purchased. You can record purchase return transaction in
Purchase Return voucher. To enter Purchase Return voucher, click Transactions
Purchase Return
Add option. On clicking the Add option, a Purchase Return –Add window appears. Purchases Return – Add window is totally similar to Purchase– Add window with only difference that quantity entered in Purchase Returnvoucher will be treated as quantity returned to customer and decrease the itemstock.
For detailed help on Purchase Return – Add window, please refer to Purchase – Addwindow (sub topic 6.2.3 – Purchase) as both the windows are totally similar.

Unit 6 - Transactions 137
6.2.5 PaymentPayment voucher is used to enter the payment transactions i.e. when the paymentis made to a party or any other person or company then you can record thistransaction in a Payment voucher. To enter a Payment voucher, click Transactions
Payment
Add option. On clicking the Add option, a Payment – Add windowappears. If you have enabled the option of Double Entry System for Payment
& Receipt voucher in Administration
Configuration
Features / Options
Accountstab then you can enter Payment voucher in double entry system otherwise if youhave disabled this option then you can enter Payment voucher in single entrysystem. Hence, different Payment – Add window appears for making entry indouble entry system and single entry system.
We will discuss both the systems of entering Payment voucher one by one startingwith Double Entry System.
In the Double Entry System, you need to enter Payment voucher in the traditionalway. In other words, you need to specify at least two accounts and the debit /credit aspect of the accounts. Thus, you need to remember the debit / creditaspect of the transaction. For example, Star Electronics Company made paymentto all its suppliers in cash in one go. In such a case, the supplier accounts will bedebited while the cash account will be credited. We can represent this transactionin the form of a journal entry given here:
Dr. Philips India (Supplier)
Dr. Sony India (Supplier)
Cr. Cash Account
To enter a Payment voucher, click Transactions
Payment
Add option. On clickingthe Add option, a Payment Voucher – Add window appears. Given here is a screenshotof Payment Voucher – Add window.
Image on next Page
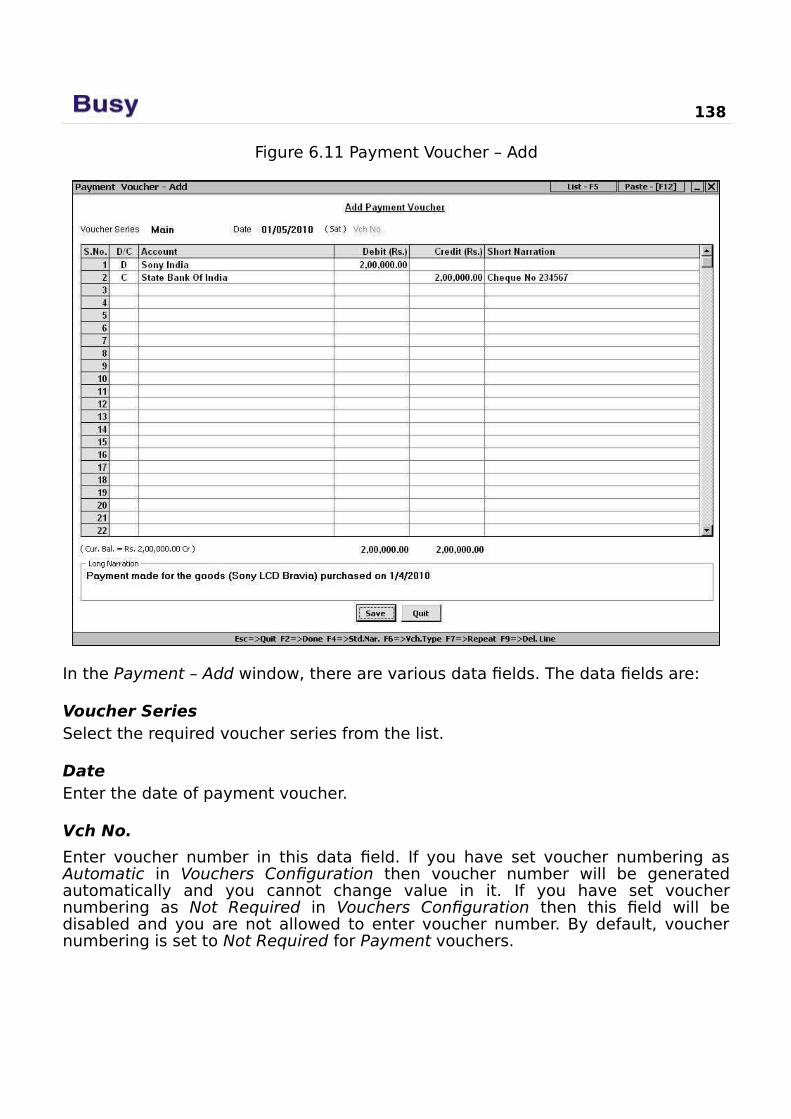
138
Figure 6.11 Payment Voucher – Add
In the Payment – Add window, there are various data fields. The data fields are:
Voucher SeriesSelect the required voucher series from the list.
DateEnter the date of payment voucher.
Vch No.
Enter voucher number in this data field. If you have set voucher numbering asAutomatic in Vouchers Configuration then voucher number will be generatedautomatically and you cannot change value in it. If you have set vouchernumbering as Not Required in Vouchers Configuration then this field will bedisabled and you are not allowed to enter voucher number. By default, vouchernumbering is set to Not Required for Payment vouchers.
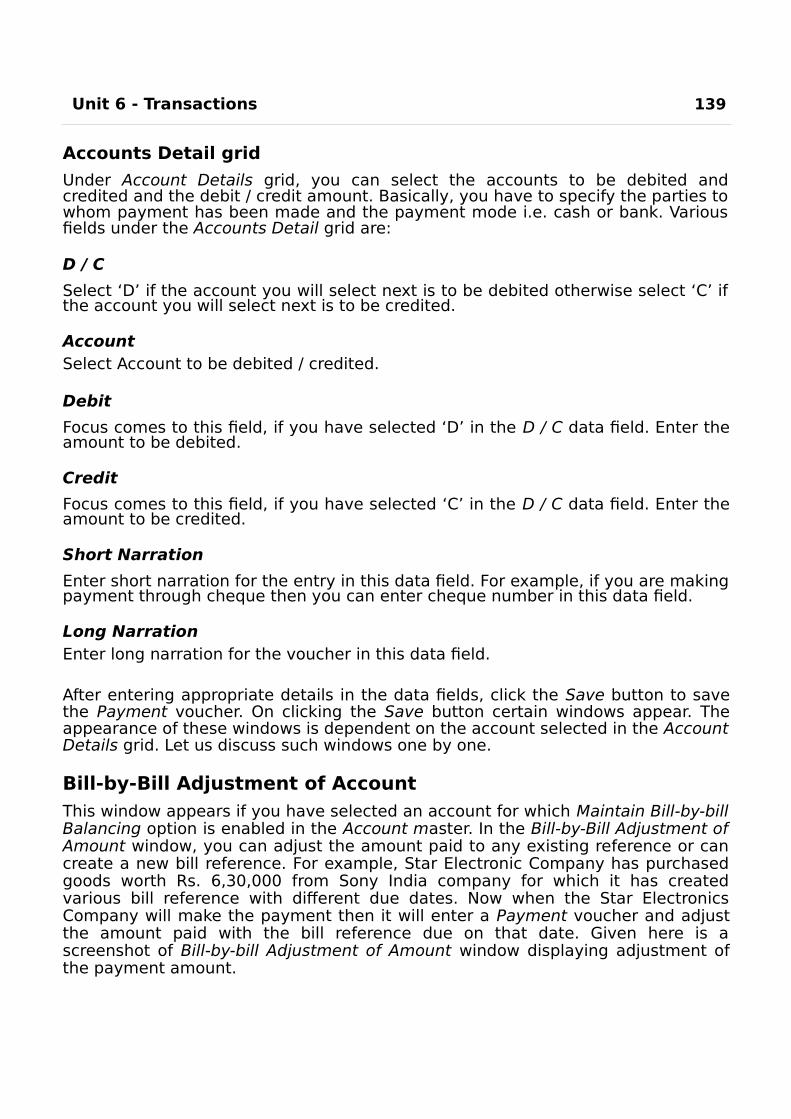
Unit 6 - Transactions 139
Accounts Detail grid
Under Account Details grid, you can select the accounts to be debited andcredited and the debit / credit amount. Basically, you have to specify the parties towhom payment has been made and the payment mode i.e. cash or bank. Variousfields under the Accounts Detail grid are:
D / C
Select ‘D’ if the account you will select next is to be debited otherwise select ‘C’ ifthe account you will select next is to be credited.
AccountSelect Account to be debited / credited.
Debit
Focus comes to this field, if you have selected ‘D’ in the D / C data field. Enter theamount to be debited.
Credit
Focus comes to this field, if you have selected ‘C’ in the D / C data field. Enter theamount to be credited.
Short Narration
Enter short narration for the entry in this data field. For example, if you are makingpayment through cheque then you can enter cheque number in this data field.
Long NarrationEnter long narration for the voucher in this data field.
After entering appropriate details in the data fields, click the Save button to savethe Payment voucher. On clicking the Save button certain windows appear. Theappearance of these windows is dependent on the account selected in the AccountDetails grid. Let us discuss such windows one by one.
Bill-by-Bill Adjustment of AccountThis window appears if you have selected an account for which Maintain Bill-by-billBalancing option is enabled in the Account master. In the Bill-by-Bill Adjustment ofAmount window, you can adjust the amount paid to any existing reference or cancreate a new bill reference. For example, Star Electronic Company has purchasedgoods worth Rs. 6,30,000 from Sony India company for which it has createdvarious bill reference with different due dates. Now when the Star ElectronicsCompany will make the payment then it will enter a Payment voucher and adjustthe amount paid with the bill reference due on that date. Given here is ascreenshot of Bill-by-bill Adjustment of Amount window displaying adjustment ofthe payment amount.
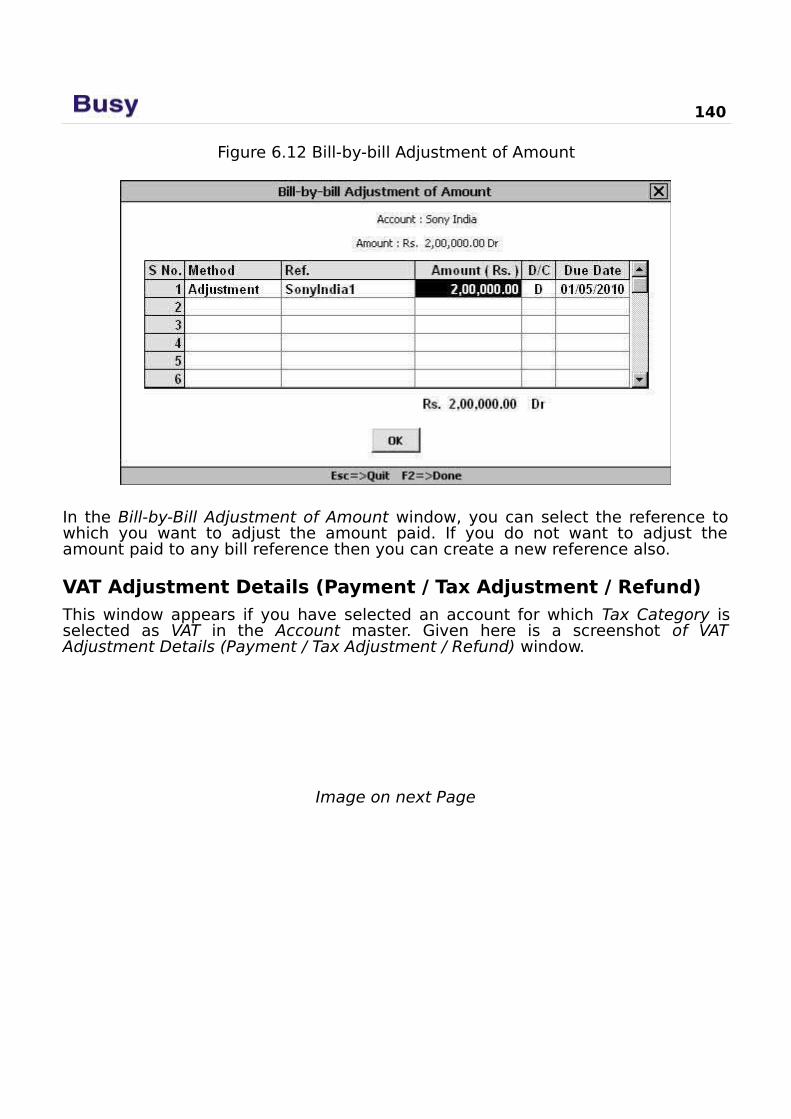
140
Figure 6.12 Bill-by-bill Adjustment of Amount
In the Bill-by-Bill Adjustment of Amount window, you can select the reference towhich you want to adjust the amount paid. If you do not want to adjust theamount paid to any bill reference then you can create a new reference also.
VAT Adjustment Details (Payment / Tax Adjustment / Refund)This window appears if you have selected an account for which Tax Category isselected as VAT in the Account master. Given here is a screenshot of VATAdjustment Details (Payment / Tax Adjustment / Refund) window.
Image on next Page
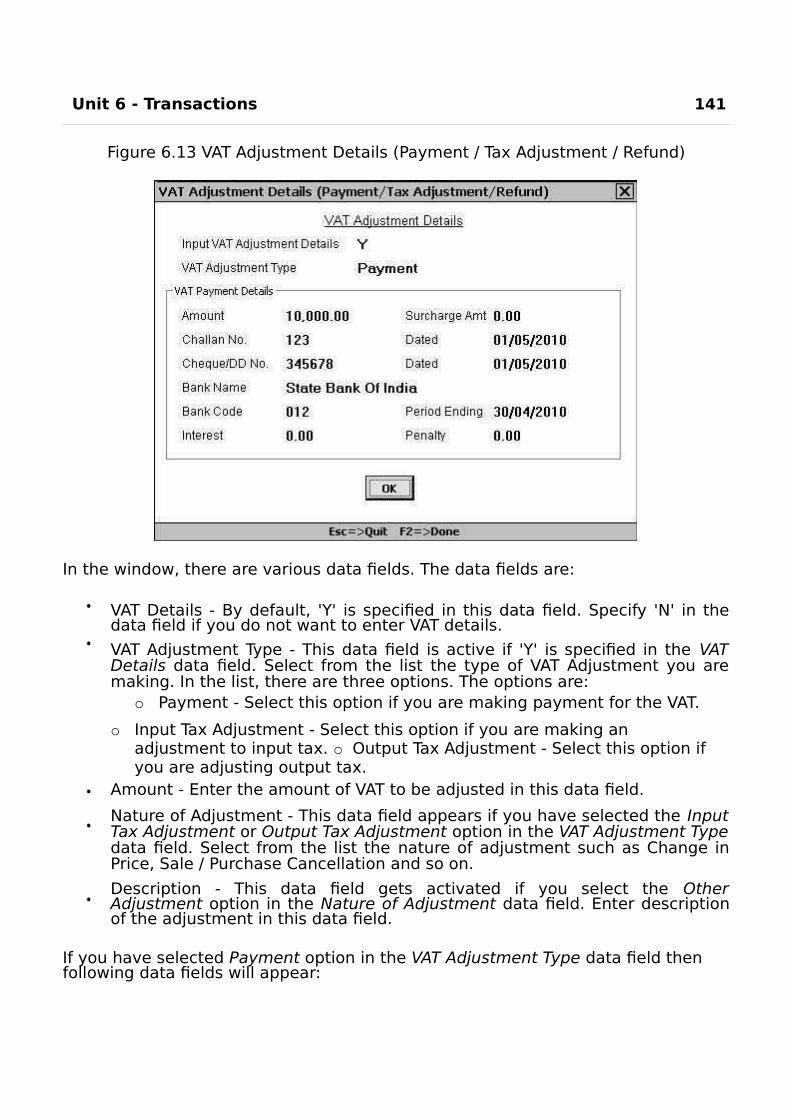
Unit 6 - Transactions 141
Figure 6.13 VAT Adjustment Details (Payment / Tax Adjustment / Refund)
In the window, there are various data fields. The data fields are:
VAT Details - By default, 'Y' is specified in this data field. Specify 'N' in thedata field if you do not want to enter VAT details.
VAT Adjustment Type - This data field is active if 'Y' is specified in the VATDetails data field. Select from the list the type of VAT Adjustment you aremaking. In the list, there are three options. The options are:
o Payment - Select this option if you are making payment for the VAT.
o Input Tax Adjustment - Select this option if you are making an adjustment to input tax. o Output Tax Adjustment - Select this option if you are adjusting output tax.
Amount - Enter the amount of VAT to be adjusted in this data field.
Nature of Adjustment - This data field appears if you have selected the InputTax Adjustment or Output Tax Adjustment option in the VAT Adjustment Typedata field. Select from the list the nature of adjustment such as Change inPrice, Sale / Purchase Cancellation and so on.
Description - This data field gets activated if you select the OtherAdjustment option in the Nature of Adjustment data field. Enter descriptionof the adjustment in this data field.
If you have selected Payment option in the VAT Adjustment Type data field then following data fields will appear:
142
Challan No - Enter the number of challan, which is deposited in the Bank such as DVAT20 in case of Delhi and so on.Dated - Enter the date when the challan is deposited.Cheque / DD No. - Enter the cheque or Demand Draft number through which VAT is paid.Dated - Enter the cheque date in this data field.Bank Name - Enter the name of the bank where VAT is to be deposited.Bank Code - Enter the Bank code in this data field.Period Ending - Specify the period ending for which you are paying the VAT.Interest - Enter the amount of interest paid if any.Penalty - Enter the amount of penalty paid if any.
After entering appropriate data in the data fields, click the Ok button to save the details entered by you.
CST Adjustment Details (Payment)This window appears if you have selected an account in which Tax Category is specified as CST in theAccount master. In the window, there are various data fields. The data fields are:
Input CST Adjustment Details - Specify 'Y' in this data field if you want to adjust input CST details.
CST Adjustment Type - Select the type of CST adjustment. Only CST Paymentoption appears in this data field.Amount - Specify the amount of CST to be adjusted in this data field.Challan No. - Enter the challan number, which is deposited in the bank.Dated - Enter the date on which challan is deposited.Cheque / DD No. - Enter the Cheque / Demand Draft number through which the CST is paid.Dated - Enter the cheque date in this data field.Bank Name - Enter the name of the bank where CST is to be deposited.Bank Code - Enter the Bank code in this data field.Period Ending - Specify the period ending for which you are paying the CST.Interest - Enter the amount of interest paid if any.Penalty - Enter the amount of penalty paid if any.
After entering appropriate data in the data fields, click the Ok button to save the details entered by you.
Let us now discuss the Single Entry System for entering Payment voucher.

In Single Entry system, while entering a Payment voucher you only need to select the payment mode and specify the affected accounts. You do not need to remember and specify the debit / credit aspect
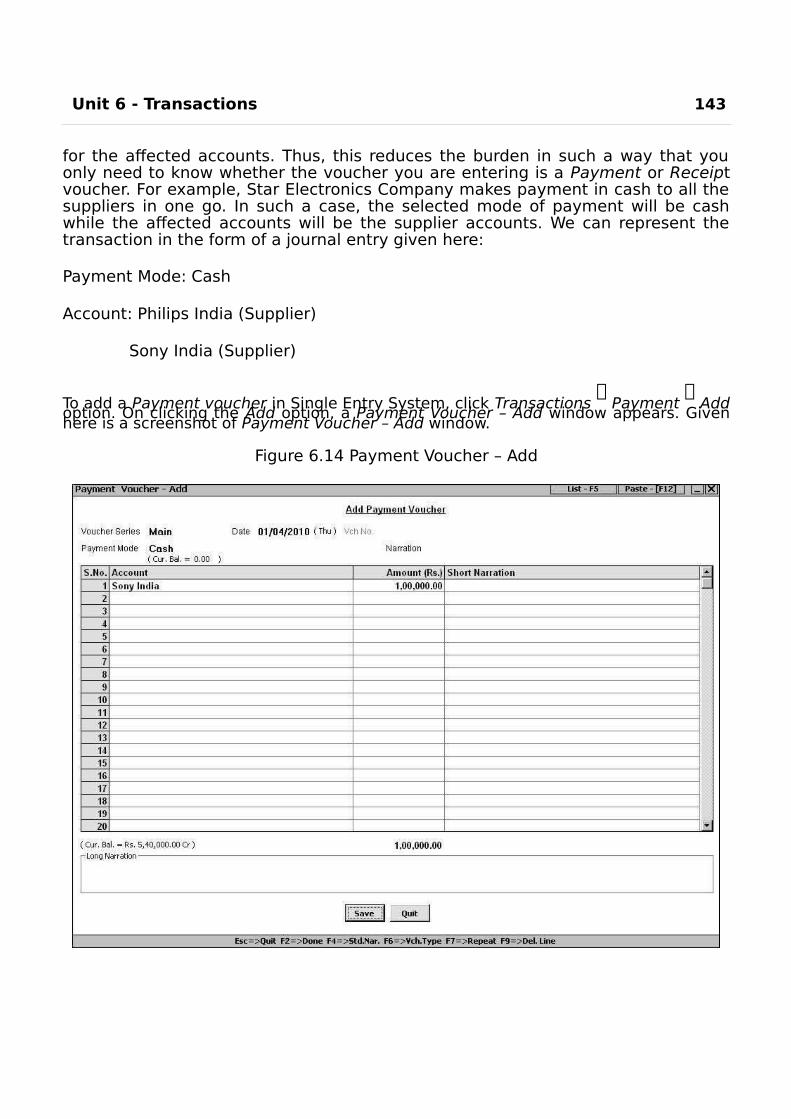
Unit 6 - Transactions 143
for the affected accounts. Thus, this reduces the burden in such a way that youonly need to know whether the voucher you are entering is a Payment or Receiptvoucher. For example, Star Electronics Company makes payment in cash to all thesuppliers in one go. In such a case, the selected mode of payment will be cashwhile the affected accounts will be the supplier accounts. We can represent thetransaction in the form of a journal entry given here:
Payment Mode: Cash
Account: Philips India (Supplier)
Sony India (Supplier)
To add a Payment voucher in Single Entry System, click Transactions
Payment
Addoption. On clicking the Add option, a Payment Voucher – Add window appears. Givenhere is a screenshot of Payment Voucher – Add window.
Figure 6.14 Payment Voucher – Add
144
With the exception of certain data fields, most of the data fields and windows aresame as the ones that appear when Double Entry System is followed. The commondata fields and windows are explained in Double Entry System while the data fieldsspecific to Single Entry System are explained here.
Single Entry Mode is available for Payment & Receipt vouchers only.
Payment Mode
Select the mode from the list displayed in the data field. Mode refers to themethod by which payment is made i.e. cash or bank.
NarrationSpecify the narration for the payment transaction.
Account Details
Under Account Details grid, you need to specify the accounts to be debited andthe amount to be debited. In the Account Details grid, following fields appear:
AccountSelect the account to be debited.
AmountSpecify the amount to be debited to the selected account.
Short NarrationSpecify a short narration for the entry.
After entering appropriate data in the data fields, click the Save button to save thePayment voucher.
6.2.6 ReceiptReceipt voucher is used to record receipt transactions i.e. payment received byyou from your customers or parties. To enter a receipt transaction, click
Transactions
Receipt
Add option. On clicking the Add option, a Receipt – Addwindow appears. For detailed help on entering Receipt transaction, please refer tothe sub topic 6.2.5 – Payment, as Payment – Add window and Receipt – Addwindow are totally similar.
6.2.7 JournalJournal voucher is used to record entries that cannot be classified as Sale /Purchase, Sales Return / Purchase Return or Payment / Receipt. For example, torecord entry of depreciation charged on fixed assets you can enter a Journal
voucher. To enter a Journal voucher, click Transactions
Journal
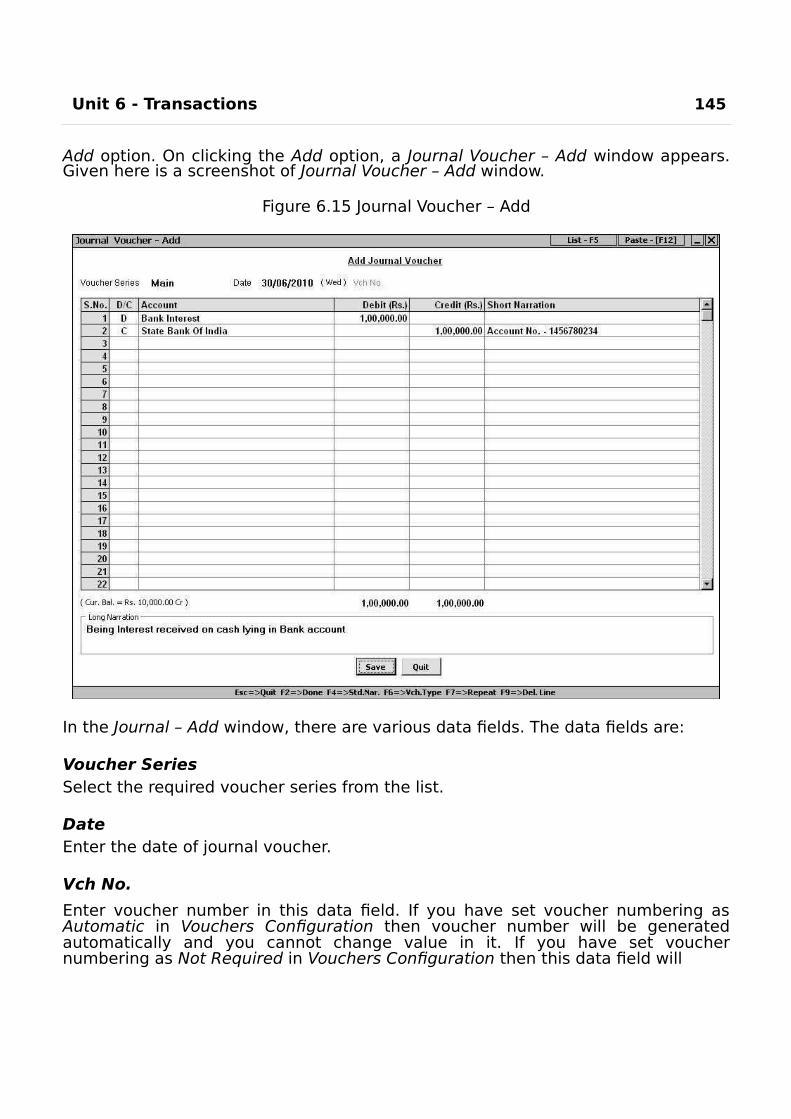
Unit 6 - Transactions 145
Add option. On clicking the Add option, a Journal Voucher – Add window appears.Given here is a screenshot of Journal Voucher – Add window.
Figure 6.15 Journal Voucher – Add
In the Journal – Add window, there are various data fields. The data fields are:
Voucher SeriesSelect the required voucher series from the list.
DateEnter the date of journal voucher.
Vch No.
Enter voucher number in this data field. If you have set voucher numbering asAutomatic in Vouchers Configuration then voucher number will be generatedautomatically and you cannot change value in it. If you have set vouchernumbering as Not Required in Vouchers Configuration then this data field will
146
be disabled and you are not allowed to enter voucher number. By default, vouchernumbering is set to Not Required for Journal vouchers.
Accounts Detail Grid
Under Account Details grid, you can select the accounts to be debited andcredited and the debit / credit amount. Various fields under the Accounts Detailgrid are:
D / C
Select ‘D’ if the account you will select next is to be debited otherwise select ‘C’ ifthe account you will select next is to be credited.
AccountSelect account to be debited / credited.
Debit
Focus comes to this field, if you have selected ‘D’ in the D / C data field. Select theamount to be debited.
Credit
Focus comes to this field, if you have selected ‘C’ in the D / C data field. Select theamount to be credited.
Short NarrationEnter short narration for the entry in this data field.
Long NarrationEnter long narration for the voucher in this data field.
After entering appropriate data in the data fields, click the Save button to save theJournal voucher. On clicking the Save button certain windows appear. The windowsare Bill-bill Adjustment of Amount, VAT Adjustment (Payment / Tax Adjustment /Refund) and CST Adjustment Details (Payment). For detailed help on thesewindows, please refer to the subtopic 6.2.5 – Payment.
6.2.8 ContraContra entries are those entries that involve only Bank and Cash accounts. Forexample, cash deposited in bank, cash withdrawn from bank, bank to bank depositand so on. To enter a Contra voucher, click Transactions
Contra
Add option. On
clicking the Add option, a Contra Voucher – Add window appears. Given here is ascreenshot of Contra Voucher – Add window.
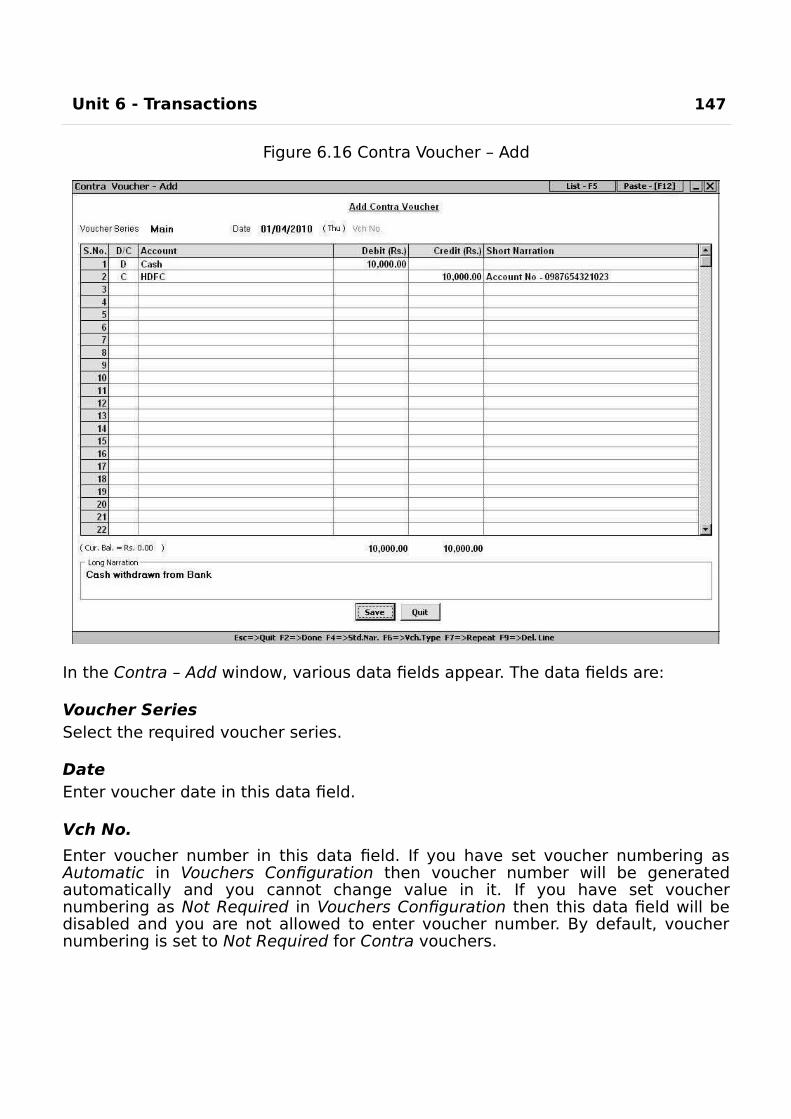
Unit 6 - Transactions 147
Figure 6.16 Contra Voucher – Add
In the Contra – Add window, various data fields appear. The data fields are:
Voucher SeriesSelect the required voucher series.
DateEnter voucher date in this data field.
Vch No.
Enter voucher number in this data field. If you have set voucher numbering asAutomatic in Vouchers Configuration then voucher number will be generatedautomatically and you cannot change value in it. If you have set vouchernumbering as Not Required in Vouchers Configuration then this data field will bedisabled and you are not allowed to enter voucher number. By default, vouchernumbering is set to Not Required for Contra vouchers.
148
Account Details grid
In the Account Details grid, you can select the accounts to be debited / credited.Various fields in the grid are:
D / C
Select ‘D’ if the account you will select next is to be debited otherwise select ‘C’ ifthe account you will select next is to be credited.
Account
Select account to be debited / credited. The list will display only those accountswhose Parent Group is Cash or Bank.
Debit
Focus comes to this field, if you have selected ‘D’ in the D / C data field. Select theamount to be debited.
Credit
Focus comes to this field, if you have selected ‘C’ in the D / C data field. Select theamount to be credited.
Short NarrationEnter short narration for the entry in this data field.
Long NarrationEnter long narration for the voucher in this data field.
After entering appropriate data in the data fields, click the Save button to save theContra voucher.
6.2.9 Debit NoteDebit Note is a document for a debit to be raised against a party for reasons otherthan the invoice sent to the party. For example, Star Electronics Company has soldgoods worth Rs. 1,00,000 to Smart Traders Corporation. Later on, it discovers thatthe goods were actually worth Rs. 1,10,000. Hence, the company will raise a DebitNote for the Smart Traders Corporation for the amount that is receivable fromthem. In BUSY you can enter Debit Note related details by using the Debit Notevoucher.
To enter a Debit Note voucher, click Transactions
Debit Note
Add option. Onclicking the Add option, a Debit Note – Add window appears. In the Debit Note – Addwindow, there are various data fields. The data fields are:
SeriesSelect the required voucher series from the list.

Unit 6 - Transactions 149
DateEnter voucher date in this data field.
Vch No.
Enter voucher number in this data field. If you have set voucher numbering asAutomatic in Vouchers Configuration then voucher number will be generatedautomatically and you cannot change value in it. If you have set vouchernumbering as Not Required in Vouchers Configuration then this data field will bedisabled and you are not allowed to enter voucher number. By default, vouchernumbering is set to Automatic for Debit Note vouchers.
Account Details grid
In the Account Details grid, you can select the accounts to be debited / credited.Various fields in the grid are:
D / C
Select ‘D’ if the account you will select next is to be debited otherwise select ‘C’ ifthe account you will select next is to be credited.
Account
Select Account to be debited / credited. The list will display only those accountswhose Parent Group is Cash or Bank.
Debit
Focus comes to this field, if you have selected ‘D’ in the D / C data field. Select theamount to be debited.
Credit
Focus comes to this field, if you have selected ‘C’ in the D / C data field. Select theamount to be credited.
Short Narration
Enter short narration for the entry in this data field. For example, you can enterthe original sale bill number in this data field against which you are entering adebit note.
Long NarrationEnter long narration for the voucher in this data field.
After entering appropriate data in the data fields, click the Save button to save theDebit Note voucher.
150
6.2.10 Credit NoteCredit Note is a document for credit to be raised for a party for reasons other thanthe bill already received from that party. For example, Star Electronics Companydecided to give additional trade discount of Rs. 10,000 to its customer UniversalTraders. For this purpose, it will raise a credit note for Universal Traders for thediscount amount. In BUSY you can enter Credit Note related details by using theCredit Note voucher.
To enter a Credit Note voucher, click Transactions
Credit Note
Add option. Onclicking the Add option, a Credit Note – Add window appears. You can enter credit noterelated details in the Credit Note – Add window. For detailed help on Credit Note – Addwindow please refer to the sub topic 6.2.9– Debit Note as Credit Note – Add window and Debit Note – Add window are totally similar.
6.2.11 Stock TransferStock transfer refers to movement of goods from one Material Centre to other. Forexample, Star Electronics Company sends stock of item LG AC 1.5 ton from itsKarol Bagh Godown to R.P. Bagh Godown. Now to record this transaction, it willenter a Stock Transfer voucher. Stock Transfer voucher appears in Transactionsmenu only if you have enabled the Enable Multi-Godown Inventory feature under
Administration
Configuration
Features / Options
Inventory tab.
To enter a Stock Transfer voucher, click Transactions
Stock Transfer
Add option.On clicking the Add option, a Stock Transfer – Add window appears. Given here is ascreenshot of Stock Transfer – Add window.
Image on next Page
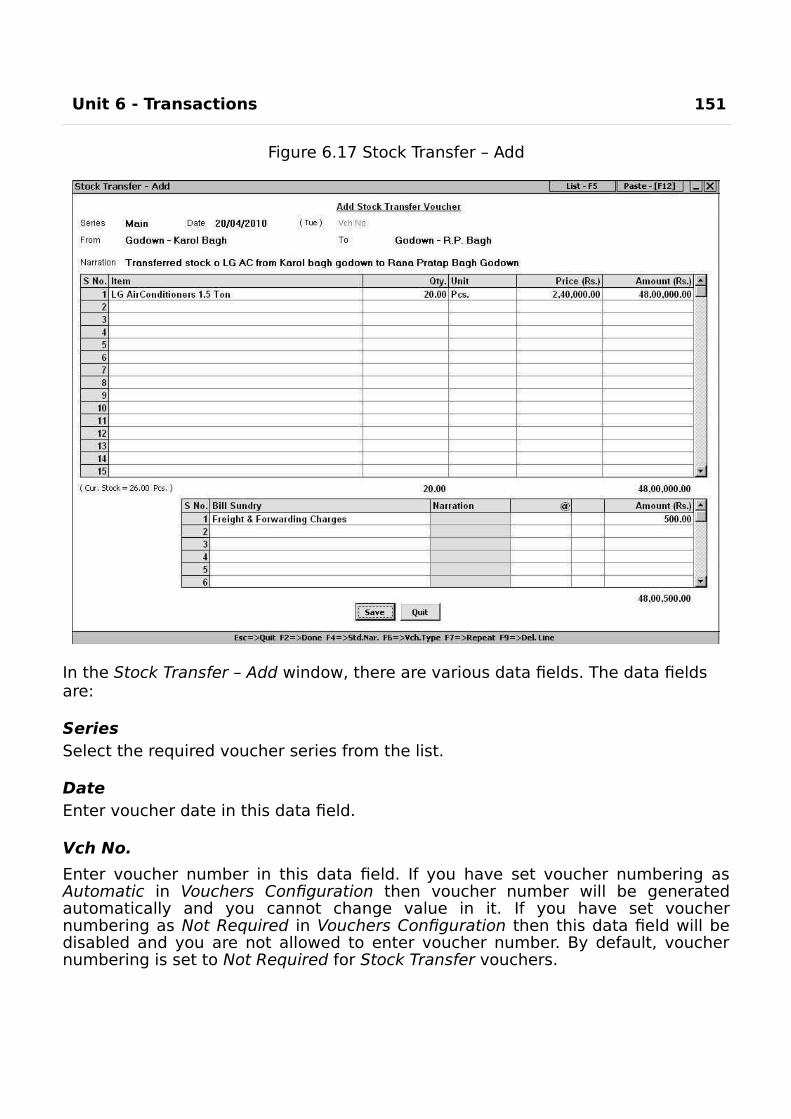
Unit 6 - Transactions 151
Figure 6.17 Stock Transfer – Add
In the Stock Transfer – Add window, there are various data fields. The data fields are:
SeriesSelect the required voucher series from the list.
DateEnter voucher date in this data field.
Vch No.
Enter voucher number in this data field. If you have set voucher numbering asAutomatic in Vouchers Configuration then voucher number will be generatedautomatically and you cannot change value in it. If you have set vouchernumbering as Not Required in Vouchers Configuration then this data field will bedisabled and you are not allowed to enter voucher number. By default, vouchernumbering is set to Not Required for Stock Transfer vouchers.
152
FromSelect the Material Centre from where the goods have been dispatched or transferred.
ToSelect the Material Center where the goods have been received or transferred.
Narration
Enter narration for the voucher in this data field. You can select from the alreadycreated Short Narrations by pressing <F4> key.
Item Details Grid
Under Item Details grid, you can enter details about the item stock transferred.Various fields under this grid are:
ItemSelect item from the list whose stock is transferred.
Qty.Enter quantity of item transferred.
Unit
By default, the Main unit specified in the Item master is displayed in this datafield. You can select any other unit if the conversion factor exists between theMain unit and the unit selected in this data field.
PriceEnter price of the item in this data field.
Amount
By default, the product of price and quantity is displayed in this data field.However, you can change the amount as per your requirement. If you make anychanges in the Amount data field then Price data field will be updatedautomatically.
Bill Sundry Details Grid
Under Bill Sundry Details grid, you can specify details about the Bill Sundriescharged in the bill. For example, you have paid freight & forwarding or conveyancecharges for delivering goods from Karol Bagh Material Centre to R.P. Bagh MaterialCentre then you can enter Freight & Forwarding Bill Sundry in the voucher. Variousdata fields that appear in the Bill Sundry Details grid are:
Bill SundrySelect the Bill Sundry to be charged in the voucher.
Unit 6 - Transactions 153
Narration
This data field is active only if you have enabled the option of Enable Bill Sundry Narrationin Administration
Configuration
Features / Options
Inventory tab. Enter narration for
the Bill Sundry in this data field.
@
By default, the value specified in the Bill Sundry is displayed here. You can changeit as per your requirement.
Bill Sundry Fed As
Although no name is given to this data field, we have specified a name for yourconvenience. This data field signifies how the Bill Sundry is calculated. Forexample, if the Bill Sundry is calculated as % then % will appears in this data field.You cannot change the value in this data field.
Amount
This data field displays total Bill Sundry amount. By default, the amount calculatedbased on the value in the @ data field is displayed in this data field. You canchange this value as per your requirement without affecting any other data field.
After entering appropriate data in the data fields, click the Save button to save theStock Transfer voucher.
6.2.12 Forms ReceivedForm Received voucher appears in Transactions menu only if you have enabledSales Tax / VAT / GST for the company. This voucher is used to enter records ofsales tax declaration forms received from parties at the time of sale or purchase.Generally, Sales Tax Declaration forms are received at the time of making sales. Toenter details about the form received from the party you can enter the Form
Received voucher. To enter a Form Received voucher, click Transactions
Form
Received
Add option. On clicking the Add option, a Form Received – Add windowappears. Given here is a screenshot of Form Received – Add window.
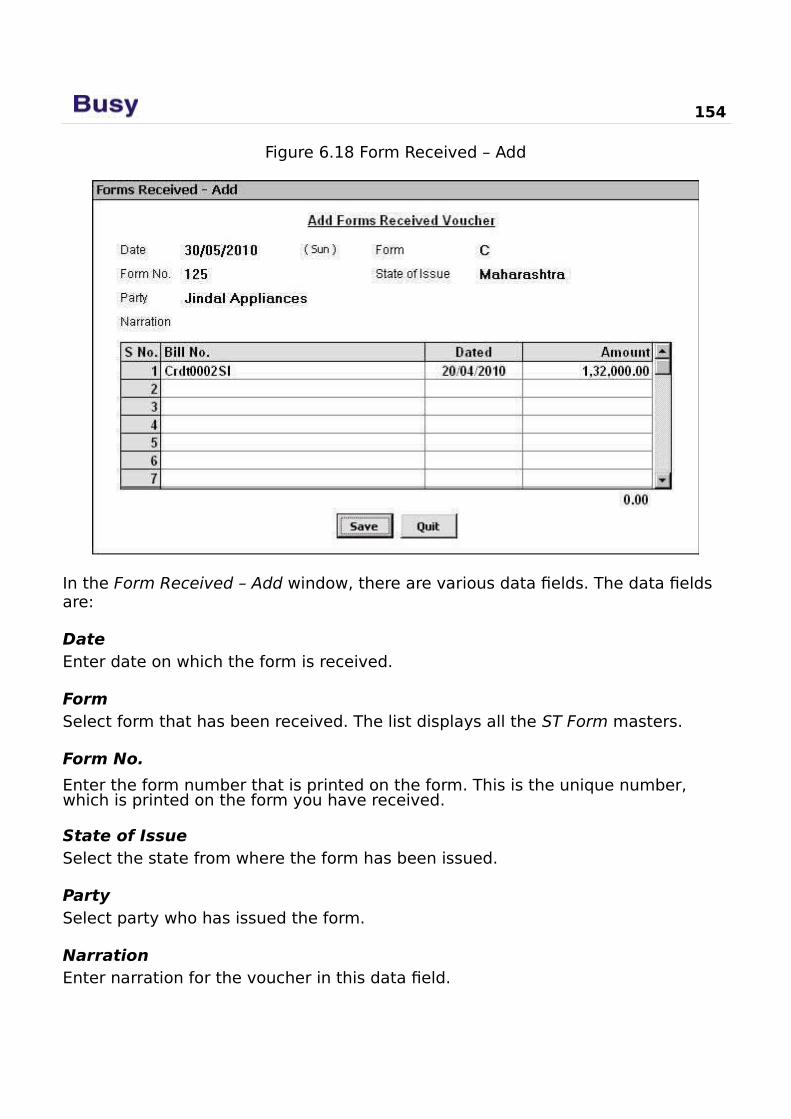
154
Figure 6.18 Form Received – Add
In the Form Received – Add window, there are various data fields. The data fields are:
DateEnter date on which the form is received.
FormSelect form that has been received. The list displays all the ST Form masters.
Form No.
Enter the form number that is printed on the form. This is the unique number, which is printed on the form you have received.
State of IssueSelect the state from where the form has been issued.
PartySelect party who has issued the form.
NarrationEnter narration for the voucher in this data field.

Unit 6 - Transactions 155
Bill Details Grid
Although no name is given to this grid in the voucher, we have given it a name inthe Courseware for your convenience. Under this grid, you have to specify the billor voucher against which you have received the form. Various fields under this gridare:
Bill No.
Select the bill / voucher number against which you have received the form. The billnumber is actually the voucher number. If no number was given to the voucherthen this data field will remain blank. The bill numbers are displayed for thosevouchers for which Form Receivable amount is entered in the ST Forms Detailswindow in the relevant vouchers. For example, you have entered a Sales voucherwith the Sale Type as C / C-Form. Further, you entered the Form Receivableamount in the ST Forms Details window that appears at the time of saving thevoucher. Thus, only those vouchers will appear in the list in which you haveentered a Form Receivable amount
Date
The voucher creation date of the selected Bill No. will be displayed in this datafield. You cannot modify value in this data field.
Amount
The form receivable amount of the selected Bill No. will be displayed in this datafield. Form Receivable amount is the amount that is entered in the ST FormsDetails window that appears when you enter the relevant voucher. However, youcan make modifications in the amount as per your requirement.
After entering appropriate data in the data fields, click the Save button to save theForm Received voucher.
6.2.13 Forms IssuedForms Issued voucher appears in Transactions menu only if you have enabledSales Tax / VAT / GST for the company. This voucher is used to enter records ofsales tax declaration issued to parties at the time of sale or purchase. Generally,Sales Tax Declaration forms are issued at the time of purchase. To enter detailsabout the form issued to party you can enter the Form Issued voucher. To enter a
Form Issued voucher, click Transactions
Form Issued
Add option. On clickingthe Add option, a Form Issued – Add window appears. With the exception of fewdata fields, all the data fields that appear in Form Issued – Add window are totallysimilar to Form Received – Add window. The data field that is not common in boththe windows is:
Rcvd from Authority onEnter date on which you have received the Sales Tax Declaration Form from the Sales Tax authority.

Enter appropriate data in the data fields and click the Save button to save the Form Issued voucher.
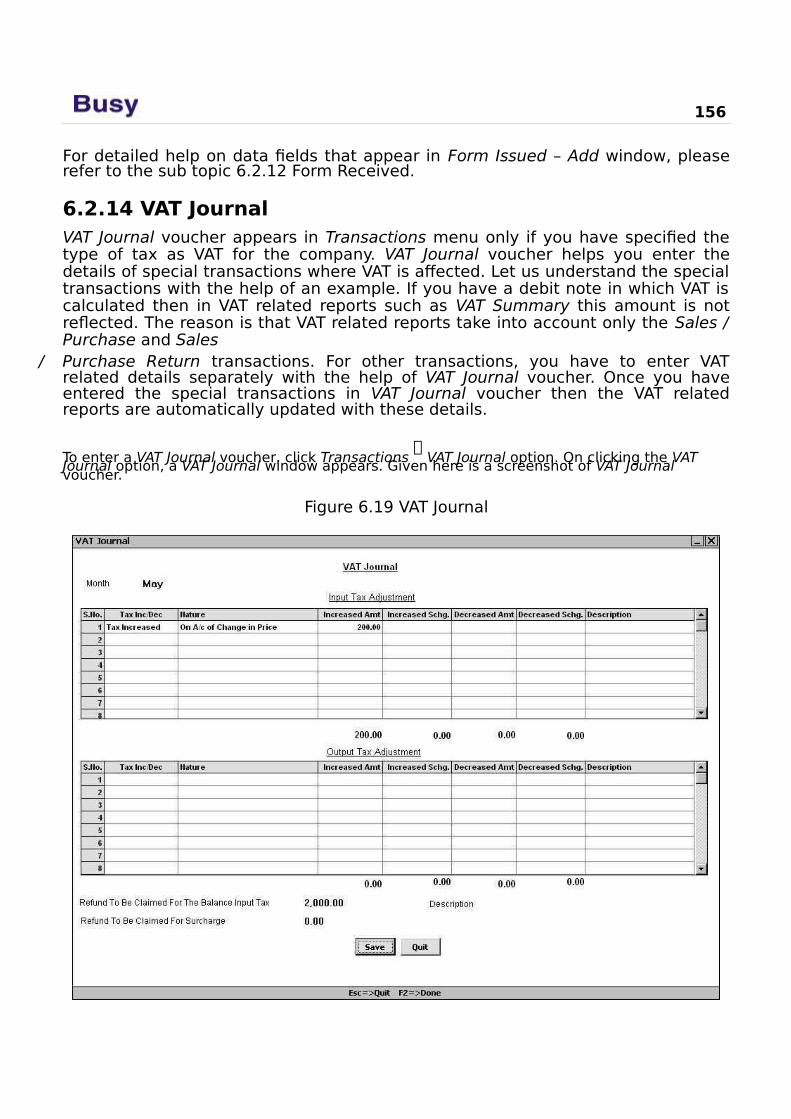
156
For detailed help on data fields that appear in Form Issued – Add window, pleaserefer to the sub topic 6.2.12 Form Received.
6.2.14 VAT JournalVAT Journal voucher appears in Transactions menu only if you have specified thetype of tax as VAT for the company. VAT Journal voucher helps you enter thedetails of special transactions where VAT is affected. Let us understand the specialtransactions with the help of an example. If you have a debit note in which VAT iscalculated then in VAT related reports such as VAT Summary this amount is notreflected. The reason is that VAT related reports take into account only the Sales /Purchase and Sales
/ Purchase Return transactions. For other transactions, you have to enter VATrelated details separately with the help of VAT Journal voucher. Once you haveentered the special transactions in VAT Journal voucher then the VAT relatedreports are automatically updated with these details.
To enter a VAT Journal voucher, click Transactions
VAT Journal option. On clicking the VAT Journal option, a VAT Journal window appears. Given here is a screenshot of VAT Journal voucher.
Figure 6.19 VAT Journal

In the VAT Journal window, various data fields and grids appear. The data fields and grids are:
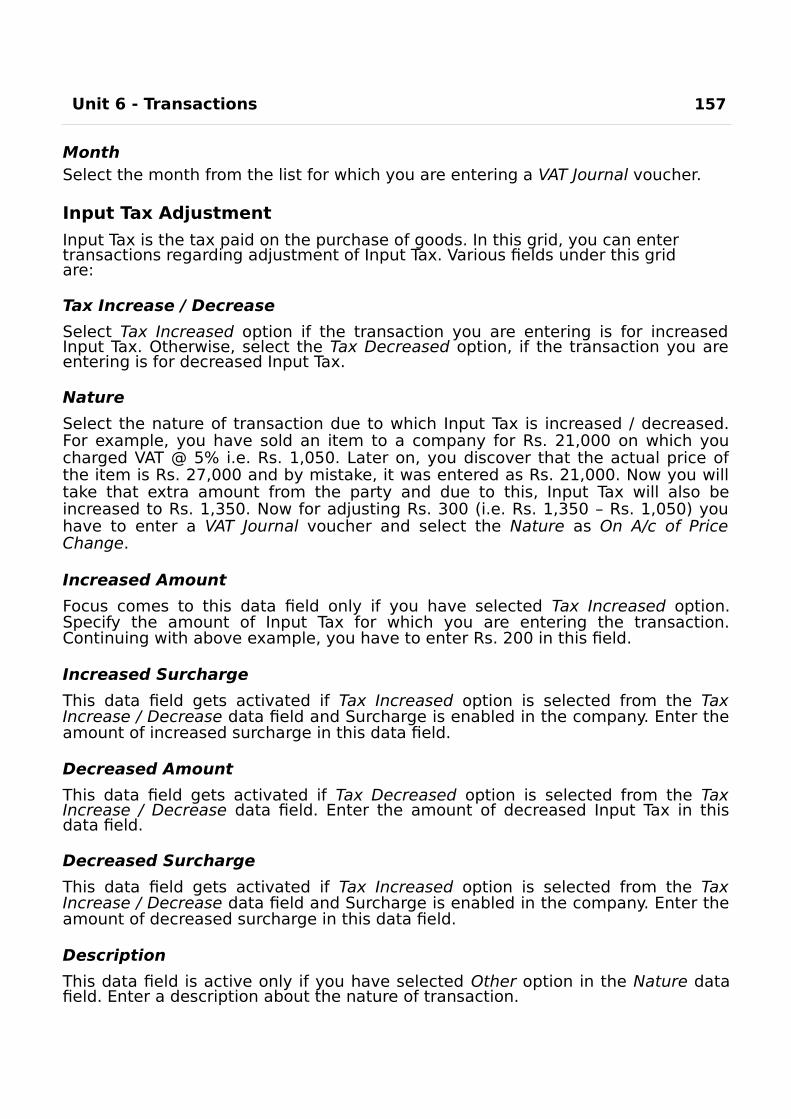
Unit 6 - Transactions 157
MonthSelect the month from the list for which you are entering a VAT Journal voucher.
Input Tax Adjustment
Input Tax is the tax paid on the purchase of goods. In this grid, you can enter transactions regarding adjustment of Input Tax. Various fields under this grid are:
Tax Increase / Decrease
Select Tax Increased option if the transaction you are entering is for increasedInput Tax. Otherwise, select the Tax Decreased option, if the transaction you areentering is for decreased Input Tax.
Nature
Select the nature of transaction due to which Input Tax is increased / decreased.For example, you have sold an item to a company for Rs. 21,000 on which youcharged VAT @ 5% i.e. Rs. 1,050. Later on, you discover that the actual price ofthe item is Rs. 27,000 and by mistake, it was entered as Rs. 21,000. Now you willtake that extra amount from the party and due to this, Input Tax will also beincreased to Rs. 1,350. Now for adjusting Rs. 300 (i.e. Rs. 1,350 – Rs. 1,050) youhave to enter a VAT Journal voucher and select the Nature as On A/c of PriceChange.
Increased Amount
Focus comes to this data field only if you have selected Tax Increased option.Specify the amount of Input Tax for which you are entering the transaction.Continuing with above example, you have to enter Rs. 200 in this field.
Increased Surcharge
This data field gets activated if Tax Increased option is selected from the TaxIncrease / Decrease data field and Surcharge is enabled in the company. Enter theamount of increased surcharge in this data field.
Decreased Amount
This data field gets activated if Tax Decreased option is selected from the TaxIncrease / Decrease data field. Enter the amount of decreased Input Tax in thisdata field.
Decreased Surcharge
This data field gets activated if Tax Increased option is selected from the TaxIncrease / Decrease data field and Surcharge is enabled in the company. Enter theamount of decreased surcharge in this data field.
Description
This data field is active only if you have selected Other option in the Nature datafield. Enter a description about the nature of transaction.
158
Output Tax Adjustment
Output Tax is the tax charged on sale of goods. In this grid, you can entertransactions regarding adjustment of Output Tax. All the fields in this grid aresimilar to the one that appear for Input Tax with only difference that data enteredin these fields will be for adjusting output tax.
Refund to be Claimed for the Balance Input Tax
Enter the amount of Input Tax that is to be claimed from the government. Forexample, Star Electronics Company purchases ten computers with Bar Codes forits billing counters on which it paid Rs. 5,000 as VAT to the government. Since thegoods i.e. computers are purchased for use in business, the Company can claimRs. 5,000 from the government. Further Star Electronics makes a sale transactionand charges Rs. 3,000 as VAT, which is to be deposited to the government. In thiscase company can adjust Rs. 3,000 with the amount to be claimed from thegovernment i.e. Rs. 5,000. After adjustment, Rs. 2,000 balance remains with thegovernment, which the company can claim later on. This balance of Rs. 2,000 isthe refund amount to be claimed from the government.
Refund to be Claimed for Surcharge
This data field appears if you have enabled Surcharge for the company. Specifythe surcharge amount to be claimed from the government.
After entering appropriate data in the data fields, click the Save button to save theJournal voucher.
6.3 Configuring VouchersConfiguring Vouchers refer to setting various features and options to be displayedand used in voucher as per User’s requirement. To configure various vouchers,BUSY provides Vouchers Configuration option under Administration
Configuration menu. In Vouchers Configuration, a lot of options are provided whichyou can enable as per your requirement. For example, you can enable OptionalFields for voucher, enable automatic rounding off of bill amount and many moresuch features. To use Vouchers Configuration option, click Administration
Configuration
Vouchers Configuration option. On clicking the VouchersConfiguration option, a Voucher Configuration window appears. Given here is ascreenshot of Voucher Configuration window.
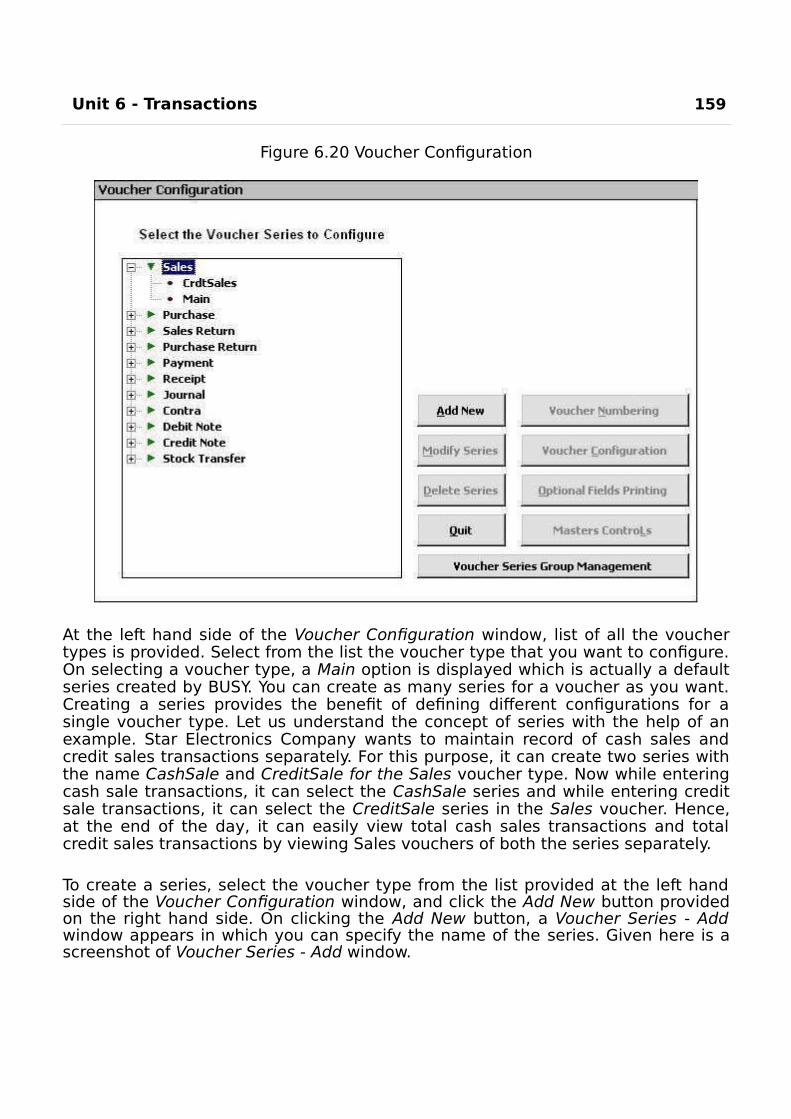
Unit 6 - Transactions 159
Figure 6.20 Voucher Configuration
At the left hand side of the Voucher Configuration window, list of all the vouchertypes is provided. Select from the list the voucher type that you want to configure.On selecting a voucher type, a Main option is displayed which is actually a defaultseries created by BUSY. You can create as many series for a voucher as you want.Creating a series provides the benefit of defining different configurations for asingle voucher type. Let us understand the concept of series with the help of anexample. Star Electronics Company wants to maintain record of cash sales andcredit sales transactions separately. For this purpose, it can create two series withthe name CashSale and CreditSale for the Sales voucher type. Now while enteringcash sale transactions, it can select the CashSale series and while entering creditsale transactions, it can select the CreditSale series in the Sales voucher. Hence,at the end of the day, it can easily view total cash sales transactions and totalcredit sales transactions by viewing Sales vouchers of both the series separately.
To create a series, select the voucher type from the list provided at the left handside of the Voucher Configuration window, and click the Add New button providedon the right hand side. On clicking the Add New button, a Voucher Series - Addwindow appears in which you can specify the name of the series. Given here is ascreenshot of Voucher Series - Add window.

160
Figure 6.21 Voucher Series – Add
In the Voucher Series – Add window, specify name of series in the Series data fieldand click the Save button. On clicking the Save button, the series will startappearing in the list of series created for the selected voucher type.
Once a series is created, next step is to configure the series as per yourrequirement. To configure a voucher series, select the required voucher series andclick the Voucher Configuration button provided on the right hand side of theVoucher Configuration window. On clicking the Voucher Configuration button, aVoucher Configuration window appears. Given here is a screenshot of VoucherConfiguration window.
Image on next PageUnit 6 - Transactions 161
Figure 6.22 Voucher Configuration
In Voucher Configuration window, you can configure voucher series as per your requirement.
The configuration you specify in the Voucher Configuration window willbe applicable only for the series selected for the voucher type. Forexample, you are configuring Cash Sales series of Sales voucher typethen the settings you define for Cash Sales series of Sales voucher typewill be applicable only when you select Cash Sales series in Salesvoucher.
You have to specify configuration for each voucher series separately.
Data fields that appear in Voucher Configuration window aredependent on the voucher type for which you are defining theconfiguration. For example, certain data fields that are active forSales voucher may not be active for Payment voucher. To explainvarious data fields of Voucher Configuration window, we are takingexample of Sales voucher type.
Various data fields that appear in Voucher Configuration window are:
162
No of Optional Fields
Optional Fields are the User-Defined fields that vary from User to User. Each Usercan create Optional Fields as per his requirement. Maximum ten Optional Fieldscan be defined for a series. We have also discussed Master Optional Fields in Unit5, which can be configured for various Masters. Master Optional Fields are used todescribe additional characteristics or details about a Master whereas VoucherOptional Fields are used to describe any additional information or detail about thevoucher.
Enter the number of Optional Fields for which you want to enter the data at thetime of entering a voucher. You cannot enter a number more than 10 in this datafield.
On entering a number in the range 1-10, the appropriate number of fieldsbecomes active below the data field. In the screenshot (Figure 6.22, VoucherConfiguration), the number of Optional Fields is two. Thus, two data fields areactive wherein you can enter name of the fields in accordance with the serialnumber.
Add. Field with Item
Specify ‘Y’ in this data field if you want to create an additional field with item inwhich you can specify any extra information about the item at the time of voucherentry.
Name
This data field gets active only if you have specified ‘Y’ in the Add. Field with Itemdata field. Enter name for the additional field in this data field. Let us understandthe relevance of Additional Field with the help of an example. Star ElectronicsCompany wants to print Serial number of each item in the bill. For this purpose, itcreates an additional field with the name Serial No. Now, whenever, it will selectan item in the voucher and press <Enter> key, an Additional Field window willappear with Serial No. data field in which User can enter serial number of the itemhe is selling / buying.
Item-Wise Description
Specify ‘Y’ in this data field if you want to enter description about an item at thetime of voucher entry. On specifying ‘Y’ in this data field, a Configure buttonappears. Click the Configure button to specify the number of description linesrequired with item at the time of voucher entry and the title for the descriptionlines. On clicking the Configure button, an Item-Wise Description Configurationwindow appears. Given here is a screenshot of Item-Wise DescriptionConfiguration window.
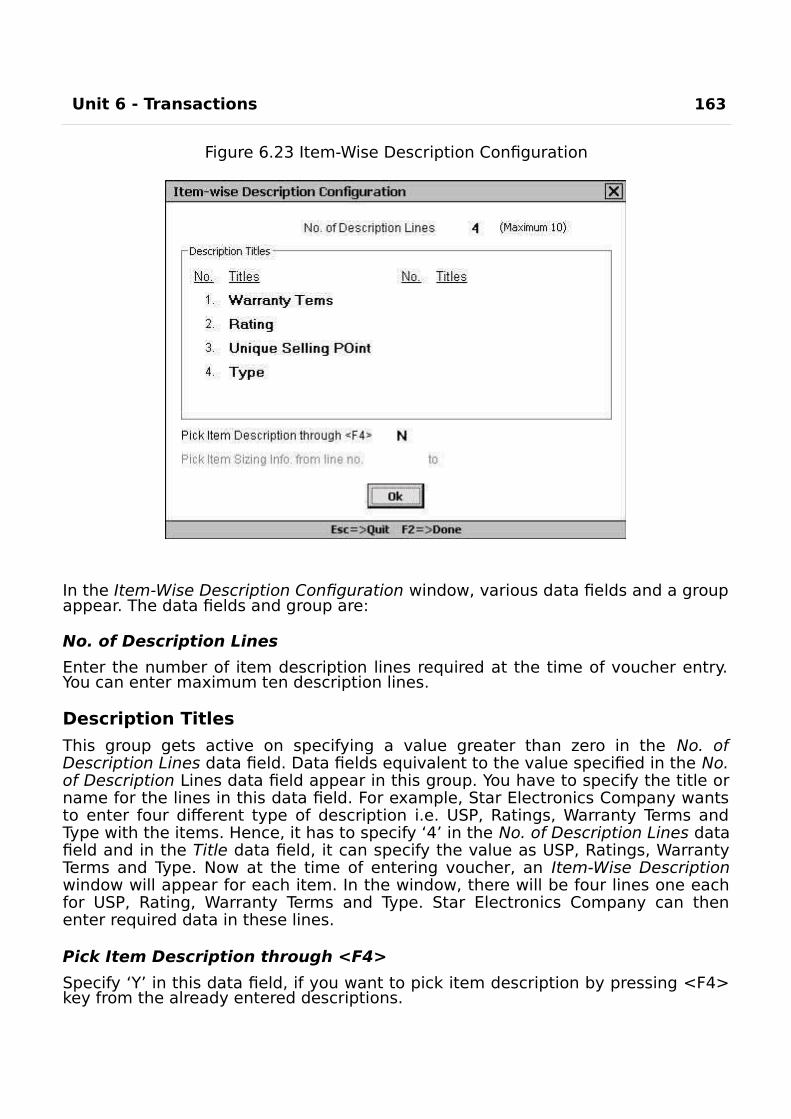
Unit 6 - Transactions 163
Figure 6.23 Item-Wise Description Configuration
In the Item-Wise Description Configuration window, various data fields and a groupappear. The data fields and group are:
No. of Description Lines
Enter the number of item description lines required at the time of voucher entry.You can enter maximum ten description lines.
Description Titles
This group gets active on specifying a value greater than zero in the No. ofDescription Lines data field. Data fields equivalent to the value specified in the No.of Description Lines data field appear in this group. You have to specify the title orname for the lines in this data field. For example, Star Electronics Company wantsto enter four different type of description i.e. USP, Ratings, Warranty Terms andType with the items. Hence, it has to specify ‘4’ in the No. of Description Lines datafield and in the Title data field, it can specify the value as USP, Ratings, WarrantyTerms and Type. Now at the time of entering voucher, an Item-Wise Descriptionwindow will appear for each item. In the window, there will be four lines one eachfor USP, Rating, Warranty Terms and Type. Star Electronics Company can thenenter required data in these lines.
Pick Item Description through <F4>
Specify ‘Y’ in this data field, if you want to pick item description by pressing <F4>key from the already entered descriptions.
164
Item-Wise Discount
Specify ‘Y’ in this data field if you want to enter discount with each item at thetime of voucher entry. On specifying ‘Y’ in this data field, an Item-Wise Discountwindow will appear with each item at the time of voucher entry in which you canenter the discount to be given / taken on item. On specifying ‘Y’ in this data field, aConfigure button appears. On clicking the Configure button, a Calculation of Item-Wise Discount window appears. In the Calculation of Item-Wise Discount window,following two groups appear:
Discount TypeIn this group, there is only one option. The option is:
Simple Discount - Select this option if you want to enter simple discount.
Amount of Discount to be Fed AsIn this group, you can configure item-wise discount based on four options. The options are:
Absolute Amount - Select this option if you want to enter an absoluteamount of discount for an item. For example, Star Electronics Companywants to give Rs. 1,000 discount on a bill of Rs. 10,000 and above. For thispurpose, it can select this option.Percentage - Select this option if you want to give discount at a specified rate on the item price
/ amount / MRP. On selecting this option, you have to specify the item valuei.e. price, amount or MRP on which you want to calculate the discountpercentage. On selecting this option, following options appear:
o Item Price – Select this option if you want to calculate the discount onitem price. For example, Star Electronics Company wants to give 5%discount on the price of item LG AC 1.5 ton. Hence, it will select thisoption and enter the discount percentage as ‘5’ in the Item Price &Discount window that appears at the time of voucher entry. Now if thecost of LG AC 1.5 ton is Rs. 25,000 then discount will be Rs. 1,250 andthe price of the item after discount will be Rs. 23,750.
o Item MRP – Select this option if you want to calculate discount percentage on Item MRP.
o Item Amount – Select this option if you want to calculate discount percentage on total item amount.
Per Main Qty. - Select this option if you want to give discount as per mainquantity. For example, Star Electronics Company wants to give flat Rs. 2,000as discount on each unit of item LG AC 1.5 ton. For this purpose, it canselect this option and specify the rate of discount for each unit of item at thetime of voucher entry.
Separate Billing Details

Specify ‘Y’ in this data field if you want to maintain party’s billing addressseparately. On specifying ‘Y’ in this data field, a Separate Billing Details windowwill appear on selecting a party at in the voucher. In the Separate Billing Detailswindow, you can enter the Name, TIN and address of the party. This
Unit 6 - Transactions 165
field is useful if you want to print some other address of the party as it is enteredin the Account master. For example, Star Electronics Company has sold goods toSmart Traders Corporation but Smart Traders Corporation wants the goods to bedelivered at one of their branch office instead of head office and wants the branchoffice address to be printed on the bill. In the Account master of Smart TradersCorporation, address of the head office exists. Now for this purpose StarElectronics Company can enter the branch office address of Smart Traders in theSeparate Billing Details window.
The address and other details specified in the Separate Billing
Details window will be printed in the bill. If you do not enter anydetails in the Separate Billing Details window then party name,address and TIN will be picked from Account master and the same willbe printed in the bill.
Input Item MRP
Specify ‘Y’ in this data field if you want to enter MRP of the item at the time ofvoucher entry. On specifying ‘Y’ in this data field, an Input Item MRP window willappear with each item at the time of voucher entry.
Skip Item Qty / Unit / Price
Specify 'Y' in this data field if you want to skip Quantity, Unit and Price fields in theItem Details grid at the time of voucher entry. On specifying 'Y' in this data field,Quantity, Unit and Price fields of Item Details grid will be de-activated at the timeof voucher entry. This feature is useful for companies falling under Service TaxCategory in which the services rendered cannot be measured in terms of quantity,unit or price per unit.
Items Sorting While Saving
Select from the list the type of sorting to be applied on the items at the time ofvoucher saving. In the list, there are three options. The options are:
None - Select this option if you do not want to sort voucher items at the timeof voucher saving. On selecting this option, order of the items as specified inthe voucher will not be changed at the time of voucher saving.
Alphabetically Item-Wise - Select this option if you want to sort itemsalphabetically at the time of voucher saving. On selecting this option all theitems used in the voucher will be sorted alphabetically.
Alphabetically Item Group-Wise - Select this option if you want to sort items,group-wise at the time of voucher saving. On selecting this option, all theitems will be sorted according to their Parent Group. For example, there arethree items in a voucher, LG AC 1.5 ton, Sony LCD Bravia and Voltas AC 1.5ton. Out of these three items, LG AC 1.5 ton and Voltas AC 1.5 ton belongs toAir Conditioner Parent Group and Sony LCD Bravia item belongs to TelevisionParent Group. In this case, with this option selected, first, items of AirConditioner Parent Group will be sorted and then items of Television ParentGroup will be sorted on saving the voucher. Hence, at the
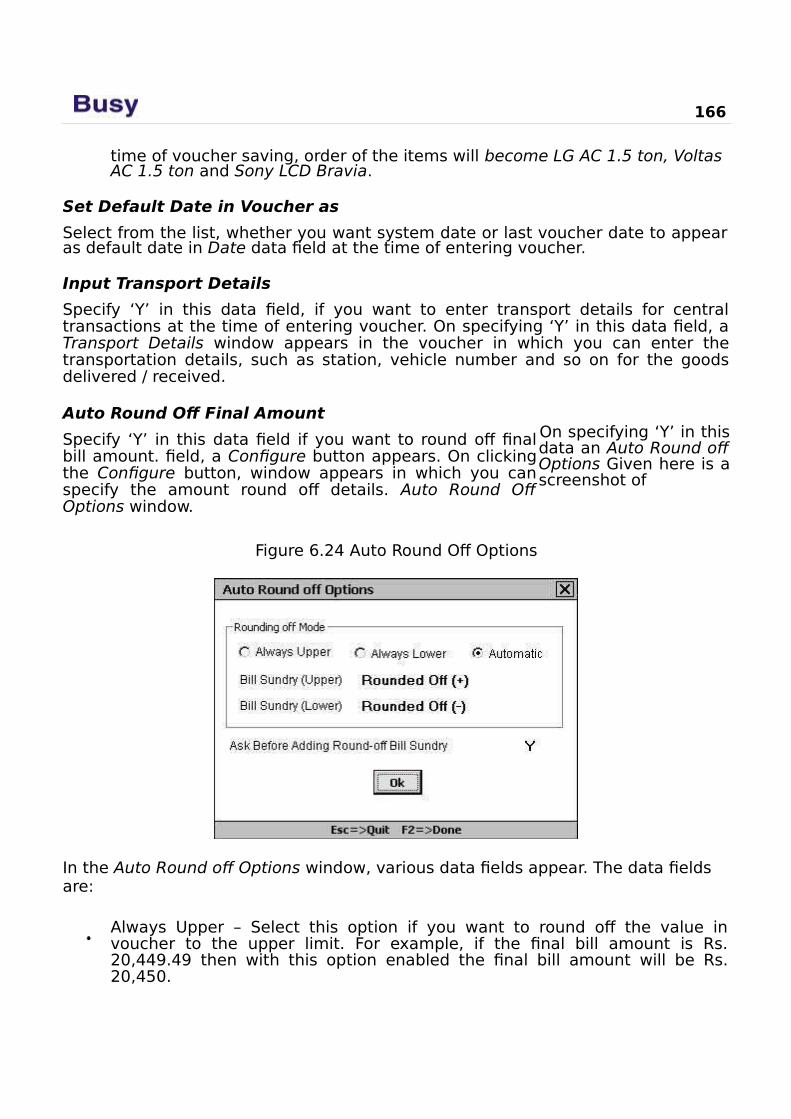
166
time of voucher saving, order of the items will become LG AC 1.5 ton, Voltas AC 1.5 ton and Sony LCD Bravia.
Set Default Date in Voucher as
Select from the list, whether you want system date or last voucher date to appearas default date in Date data field at the time of entering voucher.
Input Transport Details
Specify ‘Y’ in this data field, if you want to enter transport details for centraltransactions at the time of entering voucher. On specifying ‘Y’ in this data field, aTransport Details window appears in the voucher in which you can enter thetransportation details, such as station, vehicle number and so on for the goodsdelivered / received.
Auto Round Off Final Amount
Specify ‘Y’ in this data field if you want to round off finalbill amount. field, a Configure button appears. On clickingthe Configure button, window appears in which you canspecify the amount round off details. Auto Round OffOptions window.
On specifying ‘Y’ in thisdata an Auto Round offOptions Given here is ascreenshot of
Figure 6.24 Auto Round Off Options
In the Auto Round off Options window, various data fields appear. The data fields are:
Always Upper – Select this option if you want to round off the value invoucher to the upper limit. For example, if the final bill amount is Rs.20,449.49 then with this option enabled the final bill amount will be Rs.20,450.

Always Lower – Select this option if you want to round off the value invoucher to the lower limit. For example, if the final bill amount is Rs.20,449.49 then with this option enabled the final bill amount will be Rs.20,449.
Unit 6 - Transactions 167
Automatic - Select this option if you want to round off the value in voucherautomatically. If the amount is less than .50 then it will be rounded off to thelower limit and if the amount is equal to or greater than .50 then it will berounded off to the upper limit.
Bill Sundry (Upper) – Specify the Bill Sundry to be added in voucher to adjustthe round off amount. You can select only those Bill Sundries that areadditive in nature.
Bill Sundry (Lower) – Specify the Bill Sundry to be added in voucher to adjustthe round off amount. You can select only those Bill Sundries that aresubtractive in nature.
Ask before Rounding off Bill Sundry – Specify ‘Y’ in this data field if you wantto ask before rounding off the bill amount at the time of voucher saving. Onspecifying ‘Y’ in this data field, a message box will appear on saving thevoucher asking you whether you want to add round off Bill Sundry. If youclick Yes button in the message box then only the bill amount will be roundoff.
Print Account Voucher After Saving
Specify ‘Y’ in this data field if you want to print accounting aspect of the voucherafter saving the voucher. On specifying ‘Y’ in this data field, a Print AccountVoucher message box appears on saving the voucher. Click the Yes button in themessage box to print the accounting aspect of the transaction. If you print onlyaccounting aspect of a voucher then in the bill only the debit and credit aspect ofthe transaction will be printed. For example, Star Electronics Company has sold 10pieces of item LG AC 1.5 ton to Smart Traders Corporation amounting to Rs.2,60,000. If the Star Electronics Company prints the account bill for thistransaction then the following details will be printed:
Debit: Smart Traders Corporation 2,60,000
Credit: Sales Account 2,60,000
No details of item sold will be printed in the bill, if you are printing only accountingvoucher.
On specifying ‘Y’ in this data field, a Configure button appears. On clicking theConfigure button, a Printing Details window appears in which you can define thesettings for printing accounting part of a voucher. Various data fields in thePrinting Details window are:
Prompt for Printing After Saving – On specifying 'Y' in this data field, amessage box asking to print accounts voucher will appear at the time ofsaving the voucher.
Show Print Options - Specify 'Y' in this data field if you want Printing Optionsform to appear at the time of accounts voucher printing. In Printing Optionforms, you can specify the printing details plus various criteria for printingthe bill.
Specify Default No. of Copies - Specify 'Y' in this data field if you want tospecify the default number of copies to be printed for the accounts voucher.
No. of Copies - This data field is activated if you have specified 'Y' in theSpecify Default No. of Copies data field. Specify the number of copies thatyou want to print for the accounts voucher.

168
Can Change No. of Copies - This data field gets activated if you havespecified 'Y' in the Specify Default No. of Copies data field. Specify 'Y' in thisdata field if you want to change the number of copies to print for theaccounts voucher at the time of printing the accounts voucher.
Print Inventory Voucher After Saving
Specify ‘Y’ in this data field if you want to print inventory part of the transaction inthe bill. On specifying ‘Y’ in this data field, a Print Inventory Voucher message boxappears on saving the voucher. Click the Yes button in the message box to printthe inventory aspect of the transaction. If you print only the inventory aspect thenthe inventory details will be printed in the bill. For example, Star ElectronicsCompany has sold 10 pieces of item LG AC 1.5 ton to Smart Traders Corporationamounting to Rs. 2,60,000. If the Star Electronics Company prints the inventory billfor this transaction then the following details will be printed:
Party: Smart Traders Corporation
S. No. Item Description Qty. Unit Price DiscountAmount
1. LG AC 1.5 ton 10 Pcs 26,000 0% 2,60,000
On specifying ‘Y’ in this data field, a Configure button appears. On clicking theConfigure button, a Printing Details window appear in which you can set theprinting details for printing inventory part of transaction. This window is similar tothe Printing Details window explained for accounting part above.
Print Invoice After Saving
Specify ‘Y’ in this data field, if you want to print full invoice i.e. both the accountingand the inventory aspect of the voucher. On specifying ‘Y’ in this data field, aConfigure button appears. On clicking the Configure button, a Printing Detailswindow appears. This window is similar to the Printing Details window that appearsfor printing accounting aspect of voucher. However, in the Printing Details windowthat appears for full invoice printing, you can create four different formats andspecify the settings for each format. Hence, you can print the full invoice in fourdifferent formats.
If you specify ‘Y’ in this data field then a Print Invoice message box appears on saving the voucher.Click the Yes button in the message box to print the full transaction.
Enable Settlement Details
Specify ‘Y’ in this data field if you want to enter settlement details in the voucher.Settlement details refer to the details about the adjustment of bill amount givenby / to the customer. On specifying ‘Y’ in this data field, a Configure buttonappears. On clicking the Configure button, a Voucher Settlement Configuration
window appears. Given here is a screenshot of Voucher Settlement Configurationwindow.
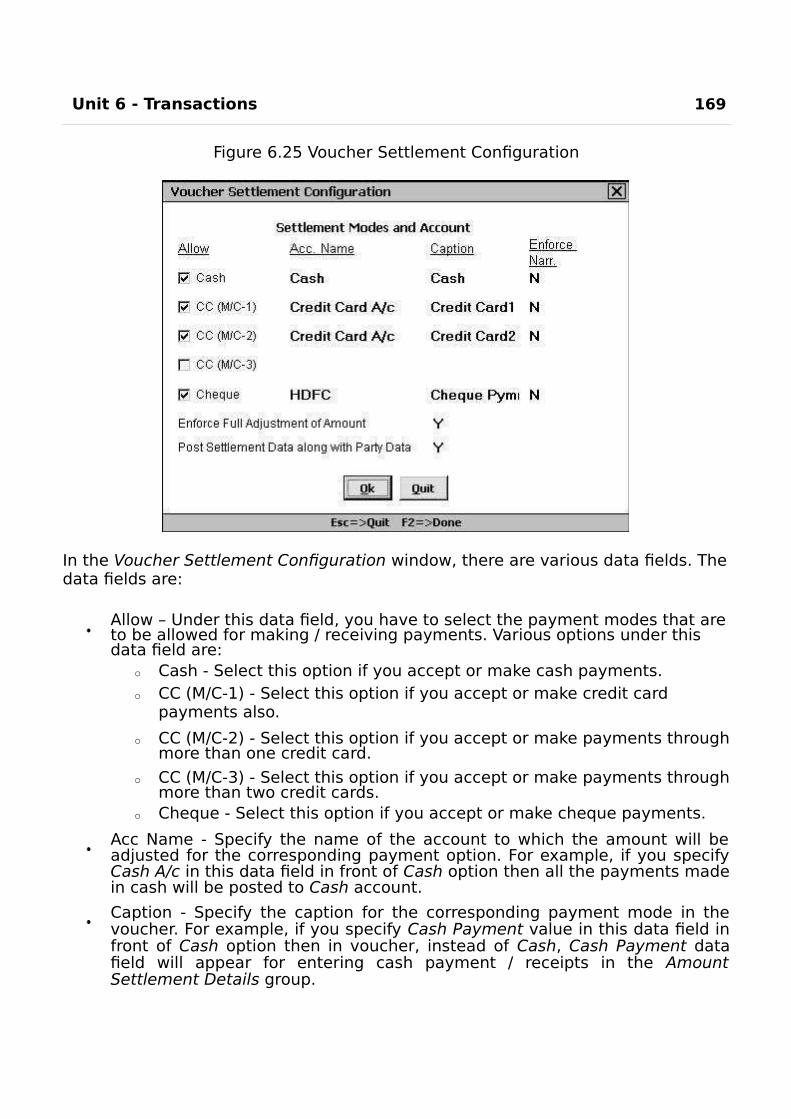
Unit 6 - Transactions 169
Figure 6.25 Voucher Settlement Configuration
In the Voucher Settlement Configuration window, there are various data fields. Thedata fields are:
Allow – Under this data field, you have to select the payment modes that areto be allowed for making / receiving payments. Various options under this data field are:
o Cash - Select this option if you accept or make cash payments.o CC (M/C-1) - Select this option if you accept or make credit card
payments also.
o CC (M/C-2) - Select this option if you accept or make payments throughmore than one credit card.
o CC (M/C-3) - Select this option if you accept or make payments throughmore than two credit cards.
o Cheque - Select this option if you accept or make cheque payments.
Acc Name - Specify the name of the account to which the amount will beadjusted for the corresponding payment option. For example, if you specifyCash A/c in this data field in front of Cash option then all the payments madein cash will be posted to Cash account.
Caption - Specify the caption for the corresponding payment mode in thevoucher. For example, if you specify Cash Payment value in this data field infront of Cash option then in voucher, instead of Cash, Cash Payment datafield will appear for entering cash payment / receipts in the AmountSettlement Details group.

Enforce Narr. - Specify 'Y' in this data field if you do not want a voucher to besaved unless a narration is entered in the corresponding field.
170
Enforce Full Adjustment of Amount - Specify 'Y' in this data field if you wantthat at the time of voucher entry full amount of voucher should be adjustedin the Amount Settlement Details group. If you specify 'Y' in this data field,then at the time of voucher entry, you have to adjust full bill amountmanually in the various payment modes available in the voucher. BUSY willnot allow you to save the voucher unless you adjust the full bill amount. Onthe other hand, if you specify 'N' in this data field and do not adjust full billamount in the various payment modes available in the voucher then thebalance bill amount will be debited / credited to the party (as selected in thevoucher) account. A label will appear in the voucher displaying the balanceamount debited / credited to the party.
Post Settlement Data along with Party Data – Specify ‘Y’ in this data field ifyou want to post party details also along with the settlement details. Forexample, Star Electronics Company made a sale to Smart TradersCorporation for Rs. 25,000 and Smart Traders Corporation paid Rs. 5,000 byCash and Rs. 20,000 by Credit Card. Now if this option is enabled thenfollowing entries for this transaction will be posted:
Debit: Smart Traders Corporation
25,000
Credit: Sales A/c25,000
Debit: Cash A/c5,000
Debit: Credit Card A/c20,000
Credit: Smart Traders Corporation
25,000
If this option is disabled then following entry will be posted:
Debit: Cash A/c5,000
Debit: Credit Card A/c20,000
Credit: Sales A/c25,000
This option is useful only if you want to maintain details of the party with whom the transaction has been made.
After entering appropriate data in the data fields, click the Save button to save theVoucher Configuration details.
Review
In BUSY, voucher numbers can be generated automatically by defining the configuration (prefix, suffix, numeric number) in advance.
You can fix length of numeric part of the voucher number and specify the character to be added to numeric part to make it equal in length with the higher numbers.
You can set maximum number or limit for vouchers that can be entered in a voucher series.

Unit 6 - Transactions 171
Sale / Purchase Account data field appears in Sale / Purchase voucher only if the Sale / Purchase Type selected in voucher has Specify in Voucher option enabled in it.
With Item-Wise Sales Tax and Item-Wise Tax Information window, you can specify the tax rate individually with each item used in voucher.
You can specify the Form Issued / Received Amount in the ST Form Details window that appears in various vouchers.
Journal voucher is basically entered for the entries that cannot be classified assale / purchase, payment / receipt and so on. For example, entry forDepreciation charged on fixed assets, entry for salary paid to the employeesand so on.
Contra voucher is entered for entries that involve only cash or bank accounts.
Debit / Credit Note vouchers are raised for a party for reasons other thaninvoice sent to the party or received from the party. It denotes the amount to betaken / given from / to the party for various reasons.
Stock Transfer voucher records the movement of goods from one Material Centre toanother.
Form Issued / Received vouchers are entered when the ST Form is issued / receivedto / from the party.
By creating different voucher series for a voucher type, you can set different voucher settings for a single voucher type.
Using Vouchers Configuration option, you can define the settings for automatic round off of the bill amount in advance.
Exercise1 . Voucher Numbering for a series can be:
a) Automatic c) Not Requiredb) Manual d) All of the above
2 . We can add prefix or suffix to a voucher number if numbering type is:a) Automatic c) Not Requiredb) Manual d) All of the above
3 . Sale Type used for entering separate tax rate with each item is:a) VAT Multi Tax c) VAT 1% (R)b) VAT 5% (T) d) VAT Exempt
4 . In a voucher, existing Short Narrations can be picked by pressing:a) F4 key c) F3 keyb) F12 key d) Enter Key
5 . Occurrence of Form Receivable / Issuable window in a voucher is dependent on:
172
a) Party c) Sale / Purchase Typeb) Series d) Material Centre
6 . Occurrence of Bill-by-Bill Adjustment of Amount window in a voucher is dependent on:
a) Party c) Sale / Purchase Typeb) Series d) Material Centre
7 . Three methods used in Bill-by-Bill Adjustment of Amount window are:a) Create / Adjust/Append c) New Ref / Adjust / Concatenateb) NewRef / Adjust / Append d) Enter / AutoAdjust / Append
8 . Data Entry of Payment / Receipt voucher can be done using:a) Single Entry System c) Both Double and Single Entry Systemb) Double Entry System d) Depends upon Features and Options
9 . In Single Entry System of entering Payment voucher, you need to specify:
a) Cash & Bank accounts c) Payment Mode and affected accountsb) Accounts debited / credited d) All of the above
10. Debit and Credit amount in a Payment voucher should:
a) Always Match c) Not be less than 1b) Not be in Decimal d) Both a & b
11. In the Payment voucher, VAT Adjustment Details window appears, if:
a) VAT account is debitedc) Name of the account debited is VAT
b) VAT is enabled in the Company d) All of the above
12. Which of the following is a Contra entry?
a) Cash deposited in Bank c) Cash withdrawal from Bankb) Bank to Bank transfer d) All of the above
13. If goods are purchased against C form then:
a) C form is receivedc) Can be received / issued based upon Purchase Type
b) C form is issued d) None of the above14. Number of Material Centres specified in Stock Transfer Voucher are:
a) Twoc) Four
b) Three d)

One15. Stock Updation Date can be entered for:
a) Account Voucher c) Dual Vouchersb) Inventory Voucher d) Both a & b
16. VAT Journal voucher can be enteredfor:
Unit 6 - Transactions
173
a) Increase Input Taxc) Increased Output Tax
b) Decreased Input Tax d) All of the above17. Maximum number of lines used for item Description can be:
a) 10 c) 4b) 15 d) 5
18. Account Settlement details can be defined for:
a) Sales Return voucher c) Journal voucherb) Debit Note voucher d) All of the above
19. We can configure Voucher Optional Fields for:
a) Sales Voucherc) Debit Note Voucher
b) Stock Transfer Voucher d) All of the above20. A Sales voucher can be printed as:
a) Account Voucher c) Full Invoiceb) Inventory Voucher d) All of the above
2 1 . Explain with a suitable example, the use of Debit Note / Credit Note vouchers.
2 2 . Can we sort items while saving a voucher? If yes, then explain the steps.
2 3 . Open company Star Electronics Pvt. Ltd. and perform the following steps init:
a) Create a series named Retail for Sales voucher and change name of the series Main to Tax
b) Set the following configuration for Retail series:Set Voucher Numbering as Automatic.Enable Item Additional field and specify its name as Item Specification.Enable Item wise Discount feature and set the discount type as percentage.Enable Auto Round off feature and set rounding off mode as Always Upper.
c) Set the following configuration for Tax series:Set Voucher Numbering as Automatic with Prefix as T, Suffix as / 2010-11, length of numeric part – 4 and padding character as 0.

Enable Item wise Discount and specify discount type as Absolute amount.Enable Auto Round off with Rounding off mode as Automatic.Enable Account Settlement Details feature with payment mode as Cash and Credit card only.
d) In the Main series of Purchase voucher, set the Voucher Numbering as Automatic with prefix as ‘Purc’ and starting number as 1.
174
2 4 . Enter following transactions for Star Electronics Company:
a) Purchased 10 pieces of item LG AC 1.5 Ton @ Rs. 18,000 per piece fromLG India Company on 5/4/2010 and paid VAT @ 5%. Star ElectronicsCompany created a bill reference for this transaction with Bill ReferenceNo. as LG1 and due date on 15/4/2010.
b) Sold 10 pieces of item Nokia 7210 @ Rs. 4,500 per piece with 1% discount and charged VAT @ 5% on it. The transaction was made in cash.
c) Sold 5 pieces of item LG AC 1.5 ton @ Rs. 20,000 per piece and 5 piecesof item Sony LCD Bravia @ Rs. 45,000 per piece to Galaxy Internationalon 10/4/2010. The goods were actually delivered on 12/4/2010 from KarolBagh – Godown Material Centre and VAT @ 5% is charged on the items.
d) Sold 5 pieces of item Godrej Frost Free 320 Ltr @ Rs. 18,000 per piece to Jindal Appliances against Form C on 15/4/2010.
e) Received Rs. 2,00,000 from Galaxy International on 15/4/2010.f) Paid Rs. 1,89,000 to LG India on 15/4/2010 and adjusted it with LG1 bill
reference.g) Paid Telephone bill of Rs. 5,000 by cheque on 20/4/2010.h) Paid Salary amounting to Rs. 1,00,000 through cheque on 2/5/2010.
i) Received Bank Interest of Rs. 10,000 for the amount lying in the HDFC Bank account on 30/6/2010.
j) Stock of item Sony LCD Bravia of 10 pieces is transferred from R.P. Bagh Godown to Karol Bagh Godown on 20/4/2010 on which Rs. 500 is paid as conveyance charges.
k) C Form Received from Galaxy International whose form no. is 1234567890. Note: Galaxy International is located in Punjab.

You Learn something
Every Day
if you pay Attention.
Unit 7Printing Documents
This unit focuses on the printing of bill or invoice. Printing of bill or invoice is amust thing for any business. Printing of bills is a User-Specific activity as each Usermay require something different to be printed on the document apart from basictransaction. Also some Users need print of a bill as soon as they enter atransaction while some may require to print all bills for a day or week altogether.This unit will discuss all such issues that can arise at the time of printing bill andthe steps to configure a bill before printing.
Topics covered under this unit:
Configuring Documents (Standard)
Printing Documents
7.1 Configuring Documents (Standard)Configuring Document refers to the configuration settings of various bills to beprinted. You can define separate configuration setting for each voucher type. Forexample, you may want to print terms & condition of your business in the footer ofthe sale bill whereas you do not want to print any terms & conditions in Purchasebill. Hence, for this purpose, you can configure various documents i.e. bills /invoice as per your requirement.
Standard configuration of documents means configuring document for basicsdesign such as company name, address, logo, terms & conditions, item details tobe printed and so on. BUSY has set a format for printing various vouchers or bills,which is called the Standard format of printing the bill. However if you wish tomake some changes in the Standard format as created by BUSY, you can do so by
using the Document Printing
Standard option provided under Administration
Configuration menu.
On clicking the Standard option, a Select Standard Document Configurationwindow appears with list of vouchers that can be configured for standard printing.Select the required voucher and click the Select button.
On clicking the Select button, a Configure Invoice (Standard) window appears. Toexplain various data fields of the window, we will take example of Sales voucher.On selecting the Sales Invoice option in the Select Standard DocumentConfiguration window, a Configure Sales Invoice (Standard) window appears.Given here is a screenshot of Configure Sales Invoice (Standard) window.
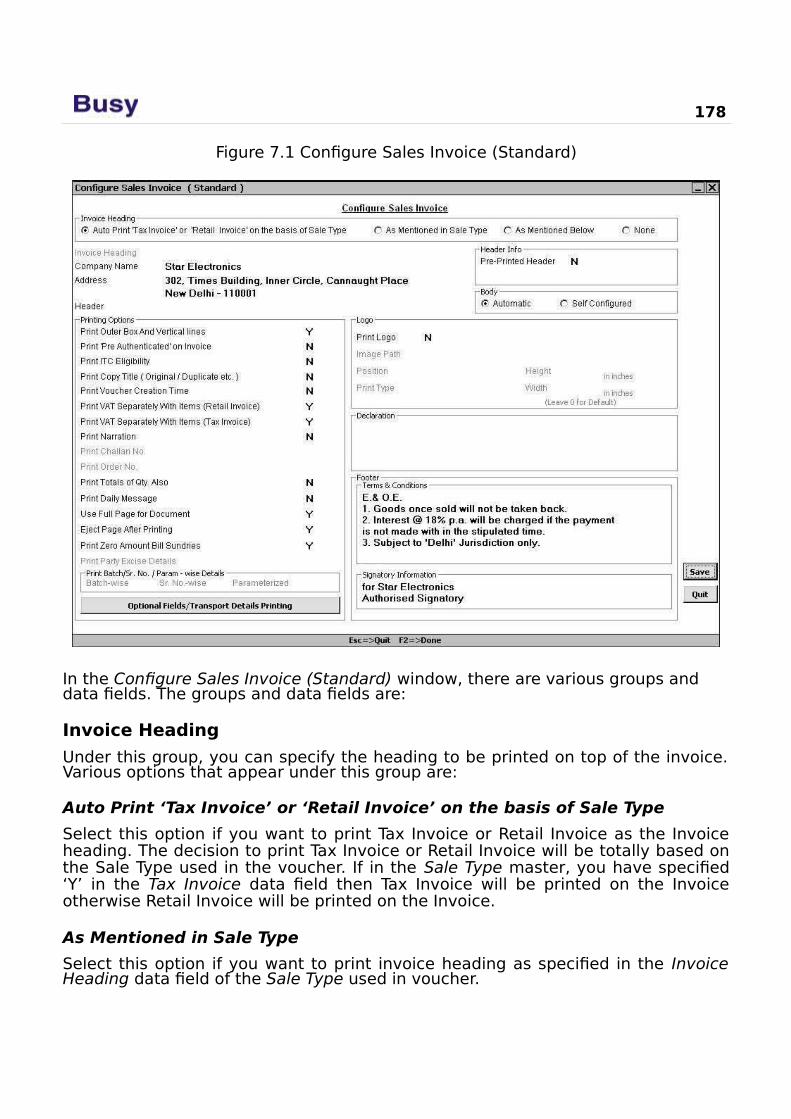
178
Figure 7.1 Configure Sales Invoice (Standard)
In the Configure Sales Invoice (Standard) window, there are various groups and data fields. The groups and data fields are:
Invoice Heading
Under this group, you can specify the heading to be printed on top of the invoice.Various options that appear under this group are:
Auto Print ‘Tax Invoice’ or ‘Retail Invoice’ on the basis of Sale Type
Select this option if you want to print Tax Invoice or Retail Invoice as the Invoiceheading. The decision to print Tax Invoice or Retail Invoice will be totally based onthe Sale Type used in the voucher. If in the Sale Type master, you have specified‘Y’ in the Tax Invoice data field then Tax Invoice will be printed on the Invoiceotherwise Retail Invoice will be printed on the Invoice.
As Mentioned in Sale Type
Select this option if you want to print invoice heading as specified in the InvoiceHeading data field of the Sale Type used in voucher.
Unit 7 – Print Utilities 179
As Mentioned Below
Select this option if you want to print Invoice heading as per your choice. Onselecting this option, an Invoice heading data field will get active below this group.The heading you enter in that field will be printed on the Invoice.
None
Select this option if you do not want a heading to be printed on the invoice. Thisoption is useful if you print invoice on a paper having pre printed header. Forexample, if you are printing a bill on a paper that already has Tax Invoice or RetailInvoice printed on it then you will not need to give a heading for it.
Invoice Heading
This data field gets active only if you have selected As Mentioned Below option inthe Invoice Heading group. Specify the heading to be printed on the invoice.
Company Name
By default, the Company’s Print name as specified at the time of companycreation appears here. You can make any changes in it to print the required name.This data field will be deactivated on specifying ‘Y’ in the Pre Printed Header datafield under Header Info group.
Address
By default, the company address as specified at the time of company creationappears here. You can change it as per your requirement. The address you specifyhere will be printed on invoice. This data field will be deactivated on specifying ‘Y’in the Pre Printed Header data field under Header Info group.
Header
Enter Header to be printed on the invoice. The value you specify in this data fieldwill be printed after the Company Name & Address in the invoice. You can specifypunch line of your business in this data field or any other such information thatyou want to print on the bill. For example, Star Electronics Company has its punchline as ‘Range of High Quality Home products’, hence it can specify this line in theHeader data field.
Header Info.
Under this group, you can specify configuration for header details of the invoice. Inthis group, there are two data fields. The data fields are:
Pre Printed Header – Specify ‘Y’ in this data field, if you print invoice on apaper on which header is already printed. For example, you are printingdocument on letterhead of the company; in this case, you need to leavesome space at the top of the page so that printing will start after a specifiedregion. For this purpose, you have to specify 'Y' in this data field. Onspecifying 'Y' in this data field, Company Name, Address, Header and Logosub group will be
180
deactivated as it will be assumed that these details will already be printedon paper and are not required to be printed again.
No. of Lines to skip – This data field gets active only if you have specified ‘Y’in the Pre Printed Header data field. Specify the number of lines to beskipped from the top of paper before printing the invoice. Approximately 1inch is equal to 6 lines, hence, you can measure printed part of the page andaccordingly specify the number of lines to be skipped.
Body
Under this group, you can specify details to be printed in the invoice body. Underthis group, two data fields appear. The data fields are:
AutomaticSelect this option if you want to print invoice body in the format as created by BUSY.
Self Configured
Select this option if you want to print invoice body in the format as specified byyou. On selecting this option, a Configurable Body Items window appears in whichyou can specify the total character length to be used for each item component andthe caption or heading to be used for it in the report. If you do not want to printany item component then specify the character length as zero for it.
Printing Options
Under this group, you can select various options or components to be printed inthe invoice. Various options that appear under this group are:
Print Outer Box and Vertical Lines – Specify ‘Y’ in this data field if you wantto print outer box and vertical lines in the document. On specifying ‘Y’ in thisdata field, a box and various lines will be printed in the invoice otherwise,dotted lines will be printed.
Print 'Pre Authenticated on Invoice' - Specify 'Y' in this data field to print 'PreAuthenticated' word on the Invoice.
Print ITC Eligibility - Specify 'Y' in this data field if you want to display thestatus of ITC (Input Tax Credit) Eligibility in the document.Print Copy Title (Original / Duplicate etc.) - Specify 'Y' if you want to print copy title. Thecopy title information is picked from the Copy Title Configuration under Administration
Configuration
Document Printing
Copy Title Configuration option.Print Voucher Creation Time - Specify 'Y' in this data field, if you want todisplay the time at which voucher is entered in the document.
Print VAT Separately with Items (Retail Invoice) - Specify 'Y' if you want toprint the VAT amount separately with items in Retail Invoice bills. This isuseful in case of Multi Tax or Tax Inclusive Sale Types. For example, in case ofMulti Tax if you want the tax amount to be printed separately with all theitems then specify 'Y' in this data field. Similarly, in case of Tax Inclusive ifyou want the tax amount to be reflected along with the items (by reverse
Unit 7 – Print Utilities 181
calculation) then specify 'Y' in this data field. On specifying ‘Y’ in this datafield, in front of each Item, its price, tax amount and total amount includingtax will be displayed.
Print VAT Separately with Items (Tax Invoice) - Specify 'Y' if you want to printVAT amount separately with items in the Tax Invoice bills. This is useful incase of Multi Tax or Tax Inclusive Sale Types.Print Narration - Specify 'Y' in this data field if you want to print narration in the document.
Print Totals of Qty. Also - Specify 'Y' in this data field if you want to displaythe totals of the quantity of multiple items. For example, if you have made asingle invoice for five items and you specify 'Y' in this data field then thesum of the quantity sold for all the items will be displayed as total quantity.
Print Daily Message – Specify ‘Y’ in this data field if you want to print dailymessage as specified for the voucher in the Input Daily Message option that
appears under Administration
Utilities
Miscellaneous Data Entry menu.Use Full Page for Document - Specify 'Y' in this data field, if you want to usethe full page for the document. For example, you are printing two invoicessimultaneously and when the first invoice is printed on a paper, almost halfof the paper is left blank. Now if you have specified ‘Y’ in this data field thenthe printing of second invoice will start from the same page otherwise it willstart from the second page.
Eject Page After Printing - Specify 'Y' in this data field if you want to eject thepage after printing.
Print Zero Amount Bill Sundries – Specify ‘Y’ in this data field if you want toprint those Bill Sundries also that have a zero amount in voucher.
Optional Fields / Transport Details Printing - Click this button to configureprinting of Optional Fields and Transport details. On clicking this button, anOptional Fields / Transport Details window appears. In the Optional Fields /Transport Details window, select As Specified in Voucher SeriesConfiguration, if you want to pick printing configuration of Optional Fields &Transport Details from the Vouchers Configuration. On selecting this option,printing of Optional Fields & Transport details will be dependent on theconfiguration settings in Vouchers Configuration. If you want to configureOptional Fields & Transport details printing then select the As MentionedBelow option. On selecting this option, all the further data fields getsactivated and you can specify which of the Optional Fields and Transportfields should be printed in the documents. To specify the same, you need toselect the checkbox against the Optional / Transport Detail field under Printin Documents column.
Logo
Under this group, you can specify whether you want logo to be printed in the document and can further specify different characteristics of the logo. Various data fields under this group are:
Print Logo - Specify 'Y' in this data field if you want to print a logo in the document.

Image Path - Specify the path of the logo to be printed in the document.Position - Select the position at which the logo is to be printed in the document.
182
Print Type - Select the print type from the list. In the list, there are two options. The options are:
o Superimpose - Select this option if you want to superimpose the logo.If you select this option then logo will be printed at the specifiedposition and can overlap any text or image placed at that position.
o Create Space - Select this option to create space for the logo. If youselect this option then first some space will be created for the logo atthe specified position and then the logo will be printed. In this caselogo will not overlap any existing text or image.
Height - Specify the height of the image. Specify 0 in this data field if you want to print default height of the logo.Width - Specify the width of the image. Specify 0 in this data field if you wantto print default width of the logo.
DeclarationSpecify declaration if any to be printed on the document.
Footer
Under this group, you can specify details or text to be printed in the footer or atthe bottom of the invoice. Under this group, various data fields appear. The datafields are:
Terms & Conditions
Specify the terms and conditions to be printed at the bottom of the invoice. Bydefault, terms and conditions commonly stated are displayed in the data field. Youcan change them as per your requirement.
Signatory Information
There are two data fields under Signatory Information group. You can specify anyinformation that you would like to display as signatory information in these datafields. By default, in the first data field, the name of the company is displayedwhile in the second data field 'Authorized Signatory' is displayed.
After entering appropriate data in the data fields, click the Save button to save thedocument configuration.
7.2 Printing DocumentsThere are two ways of printing a document, first is the online printing and secondis the offline printing. Online printing refers to the printing of the document / bill atthe time of saving the voucher and offline printing refers to printing of document /bill later on whenever required. For online printing, you can print the vouchers byclicking Yes button in the message box that appear for printing
Unit 7 – Print Utilities 183
the document at the time of voucher saving and for offline printing, you can usethe Print Utilities option provided in the Printing menu. Let us discuss both theseconcepts in detail.
7.2.1 Online PrintingOnline printing refers to the printing of the bill as soon as the voucher is saved.When you save a voucher, a message box, asking you to print the bill appears. Onclicking the Yes button in the message box, you can print the bill for the voucherentered. Depending on the voucher type and its configuration, the number ofmessage boxes appears for printing of bill. For example, after saving a Salesvoucher, you can either want to print details of the stock moved out or the detailsof the party to whom the sale is made or both. Details to be printed in the bills areconfigurable and can be configured using the Vouchers Configuration option.
In the Vouchers Configuration, different printing configuration for each vouchertype appears. For example in dual voucher i.e. the vouchers in which both theinventory and accounting aspects are affected, you can specify whether you wantto print inventory aspect, accounting aspect or both. In this section, we willdiscuss the concept of online printing by taking example of Sales voucher.
In Administration
Configuration
Vouchers Configuration option, select theVoucher type as Sales and select the required series. On selecting the requiredseries, click the Vouchers Configuration option. On clicking the VouchersConfiguration option, a Voucher Configuration window appears. In the window,there are three options provided by BUSY. The options are, Print Accounts VoucherAfter Saving, Print Inventory Voucher After Saving and Print Sales Invoice AfterSaving. Configure these options as per your requirement. For detailed explanation,please refer to Vouchers Configuration topic in Unit 6.
Once you have configured the Vouchers Configuration for printing, the appropriatenumber of message box will appear for printing the bill on saving the Salesvoucher. Click the Yes button in the required message box. On clicking the Yesbutton, a Printing Options window appears in which you can specify the printerdetails, number of copies to be printed and so on. Click the Print button to printthe bill.
7.2.2 Print UtilitiesPrint Utilities option is used for bulk printing of vouchers. This option is useful forthe companies that do not print the bill at the time of voucher saving but takeprint of all the vouchers of a day or week together. Print Utilities option is providedunder the Printing menu. On clicking the Print Utilities option, various options aredisplayed. In the Courseware, we will discuss only the Documents, InventoryVouchers and Accounts Vouchers option. Rest of the options will be covered in theAdvanced Courseware.
DocumentDocument option is used to print full invoice details as per your requirement. You cancreate different formats for printing documents using Administration
Configuration

Document Printing
Advanced option (covered in Advanced Courseware) or can
make changes in the Standard format
184
created by BUSY for printing various documents (explained in topic 7.1 ConfiguringDocument (Standard)). For dual vouchers such as Sales / Purchase, Sale Return /Purchase Return, you can use Document option to print both accounting andinventory aspect of the voucher. On selecting the Document option under Printing
Print Utilities menu, a Select Document for Printing window appears. The windowdisplays the list of various documents that can be printed using this option. Onselecting any of the document or voucher, a Print Basis message box appears. Inthe message box, there are two options. The options are:
Date-Wise - Select this option if you want to print documents for a specified date range.
Voucher No.-Wise - Select this option if you want to print documents for aspecified range of vouchers.
On selecting any of the option, a Document Printing message box appears. In the message box, there are three options. The options are:
All Parties - Select this option if you want to print report for all the parties.Group of Parties - Select this option if you want to print report for a particularParty Group.One Party - Select this option if you want to print report for a particular party.
On selecting any of the option, a Printing Options window appears. Given here are the data fields that appear in the Printing Options window.
Party Name - This data field appears if you have selected the One Partyoption in the Document Printing message box. Select the required party fromthe list.
Group Name - This data field appears if you have selected the Group ofParties option in the Document Printing message box. Select the requiredParty Group from the list.
Voucher Series - Select the voucher series for which you want to print thedocument. In other words, vouchers entered using the specified series willbe considered for printing.
Starting Vch No. - This data field appears only if you have selected VoucherNo.-Wise option in Print Basis message box. Specify the starting vouchernumbers, vouchers entered after which will be considered for printing.
Ending Vch No. - This data field appears only if you have selected VoucherNo.-Wise option in Print Basis message box. Specify the ending vouchernumber, vouchers entered up to which will be considered for printing.
Starting Date - This data field appears only if you have selected Date-Wiseoption in Print Basis message box. Specify the date, vouchers entered on orafter which will be considered for printing.
Ending Date - This data field appears only if you have selected Date-Wiseoption in Print Basis message box. Specify the date, vouchers entered on orbefore which will be considered for printing.No. of Copies - Specify the number of copies to be printed for the report.
Unit 7 – Print Utilities 185
Default Printing Options – Under this group, you can specify the printer related details. By default, the details specified using the Hardware Configuration option appears here.
After entering appropriate data in the data fields, click the Ok button to print the documents.
Inventory VouchersInventory vouchers option provides the facility to print inventory / stock relateddetails of the vouchers. For example, if you print the report for Sales voucher usingthe Inventory Voucher option then all the details regarding the items sold will be
printed in the report. On clicking the Inventory Voucher option under Printing
Print Utilities option, a Select Voucher Type for Printing window appears. Thewindow displays list of various vouchers that can be printed using this option. Youcan print Inventory vouchers only in the format as defined by BUSY. You cannotcreate separate format for printing inventory aspect of voucher.
On selecting any of the vouchers, a Print Basis message box appears. In themessage box, there are two options. The options are:
Date-Wise - Select this option if you want to print the vouchers date wise.
Voucher No.-Wise - Select this option if you want to print the vouchersaccording to voucher number.
On selecting any of the option, a Printing Options window appears. Given here are the data fields that appear in the Printing Options window.
Printing OptionsVoucher Series – Select the voucher series for which you want to print the inventory voucher.In other words, vouchers entered using the specified series will only be printed.
Starting Vch No. - This data field appears only if you have selected VoucherNo.-Wise option in Print Basis message box. Specify the starting vouchernumbers, vouchers entered after which will be considered for printing.
Ending Vch No. - This data field appears only if you have selected VoucherNo.-Wise option in Print Basis message box. Specify the ending vouchernumber, vouchers entered up to which will be considered for printing.
Starting Date - This data field appears only if you have selected Date-Wiseoption in Print Basis message box. Specify the date, vouchers entered on orafter which will be considered for printing.
Ending Date - This data field appears only if you have selected Date-Wiseoption in Print Basis message box. Specify the date, vouchers entered on orbefore which will be considered for printing.No. of Copies - Specify the number of copies to be printed for the report.

Default Printing Options – Under this group, you can specify the printerrelated details. By default, the details specified using the HardwareConfiguration option appears here.
186
After entering data in the data fields, click the Ok button to print the documents.
Accounts VouchersAccounts vouchers option provides the facility to print accounts related details ofthe vouchers. For example, if you print the report for a Sales voucher using theAccounts Vouchers option then the accounts debited and credited along with theamount will be printed in the report. On clicking the Accounts Voucher option
under Printing
Print Utilities menu, a Select Voucher Type for Printing windowappears. The window displays list of various vouchers that can be printed underthis option. For detailed explanation, please refer to the Inventory Vouchers optionabove.
Review
In BUSY, printing can be of two type, online printing and offline printing.
Online printing refers to printing a bill as soon as it is saved. While offline printing refersto taking pint of all the bills of a day / week / month together.
Standard configuration of documents refers to configuring a bill for basic design such asCompany name, terms & conditions, signatory details and so on.
You can print Logo of your company on the bill by specifying its path and other characteristics in Standard document configuration.
Print button is provided in the vouchers while opening them in Modify mode to printthe bill details.
Bulk Printing in BUSY can be done by using Print Utilities option under Printing menu.
You can create different formats for printing various documents. You can also make
changes in the Standard format created by BUSY, by using the Document Printing
Standard option under Administration
Configuration option.
Exercise1 . Which of the following options appear under Print Utilities menu:
a) Documents c) Inventory Vouchersb) Accounts Vouchers d) All of the Above
2 . Under Logo option, you can specify:a) Image Path c) Print Typeb) Height & Width of Image d) All of the above
3 . A Bill can be printed:a) At the time of saving voucher c) By using Print Utilities optionb) By opening it in modify mode d) All of the above

Unit 7 – Print Utilities 187
4 . Information specified in the Header data field in Document Configuration is displayed after:
a) Company’s Name & Address c) Invoice Headingb) Company’s Terms & Conditions d) Signatory’s Information
5 .
Maximum width specified for Item details can be:a) 80 / 96 / 136 characters c) 80 / 94 / 132 charactersb) 80 / 90 / 132 characters d) 80 / 94 / 136 characters
6 .
In a Sales invoice, Invoice Heading can be:
a) As specified in the Sale Typeb) As mentioned in Document Configuration
c) Automatically as Tax or Retail Invoice d) All of the above
7 . To print Logo with its default height and width, you should specify its height /width as:
a) 1c) None
b) 0 d) 68 . What is the difference between super impose and create space option while printing Logo?9 . What is the use of Pre Printed Header option?
1 0 . Open company Star Electronics and perform the following steps in it:
a) Configure a Sales document and make the following provisions in it: Paste a logo with its default height and width.VAT Rates should not be printed separately with the items in Retail Invoice Specify Declaration as “Goods once sold will not be taken back after fifteen days of delivery”.
b) Specify Terms & Conditions for the Payment voucher as “Cheque subject to Realization”.
Module 4
Displaying & Printing Reports
Unit 8 – Accounting Reports
Unit 9 – Inventory Reports
Unit 10 – Sales Tax & VAT Reports

Education’s Purpose is to
replace an Empty Mind
with an Open one.
Unit 8Accounting Reports
The objective of this Unit is to make User familiar with the accounting reportsprovided in BUSY. Accounting reports provides details of all the accounting entriesand transactions of the company. With the Accounting reports, User can depict thefinancial position of the company, the amount receivable / payable from / tovarious parties and so on. Based on the details shown in the Accounting reports,User can take decision regarding the growth and future prospects of the company.Accounting reports play a pivotal role in shaping the decision of the User.
Topics covered under this unit:
Balance Sheet
Trial Balance
Account Books
Account Summaries
Outstanding Analysis
8.1 Balance SheetBalance Sheet is a financial statement depicting the financial position of thebusiness by listing the assets and liabilities as on a certain date. It depicts whatthe business owes and what it owns on a certain date. It is prepared from theaccounts listed in the Trial Balance. The balances of the accounts are grouped asassets and liabilities and are arranged in a proper manner in the Balance Sheet.Further, the net profit or net loss calculated in the Profit & Loss account is postedin the Balance Sheet.
To view the Balance Sheet report, click Display
Balance Sheet option. On clicking theBalance Sheet option, two options appear. The options are:
Horizontal - Select this option if you want to view balance sheet horizontally i.e. allthe liabilities are listed on the left hand side and assets are listed on the right hand side.
Vertical - Select this option if you want to view balance sheet vertically i.e. first all the liabilities are listed and below them, all the assets are listed.
On selecting any of the above option, a Balance Sheet message box appears with following two options:

Month End – Select this option to view Balance Sheet at the end of a month.
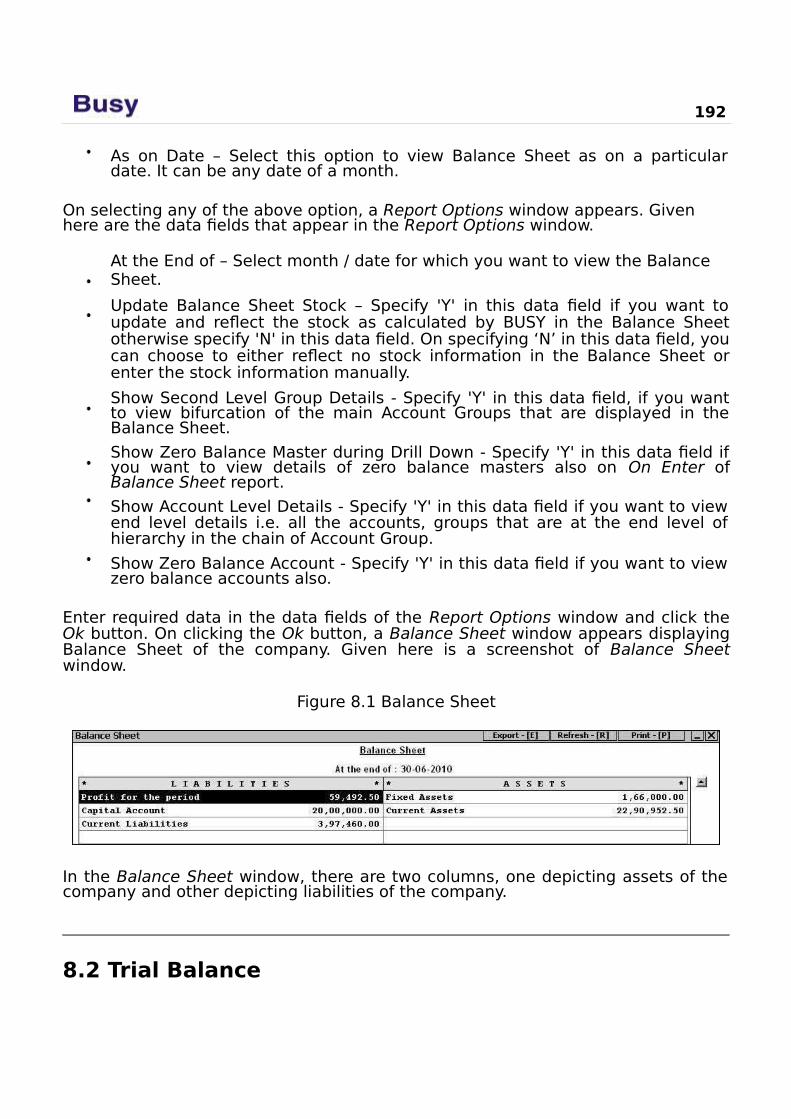
192
As on Date – Select this option to view Balance Sheet as on a particulardate. It can be any date of a month.
On selecting any of the above option, a Report Options window appears. Given here are the data fields that appear in the Report Options window.
At the End of – Select month / date for which you want to view the Balance Sheet.
Update Balance Sheet Stock – Specify 'Y' in this data field if you want toupdate and reflect the stock as calculated by BUSY in the Balance Sheetotherwise specify 'N' in this data field. On specifying ‘N’ in this data field, youcan choose to either reflect no stock information in the Balance Sheet orenter the stock information manually.
Show Second Level Group Details - Specify 'Y' in this data field, if you wantto view bifurcation of the main Account Groups that are displayed in theBalance Sheet.
Show Zero Balance Master during Drill Down - Specify 'Y' in this data field ifyou want to view details of zero balance masters also on On Enter ofBalance Sheet report.
Show Account Level Details - Specify 'Y' in this data field if you want to viewend level details i.e. all the accounts, groups that are at the end level ofhierarchy in the chain of Account Group.
Show Zero Balance Account - Specify 'Y' in this data field if you want to viewzero balance accounts also.
Enter required data in the data fields of the Report Options window and click theOk button. On clicking the Ok button, a Balance Sheet window appears displayingBalance Sheet of the company. Given here is a screenshot of Balance Sheetwindow.
Figure 8.1 Balance Sheet
In the Balance Sheet window, there are two columns, one depicting assets of thecompany and other depicting liabilities of the company.
8.2 Trial Balance

Trial Balance is a statement prepared to check arithmetic accuracy of theaccounting records. It shows the debit and credit balances of the accounts in twodifferent columns. Matching of the debit and
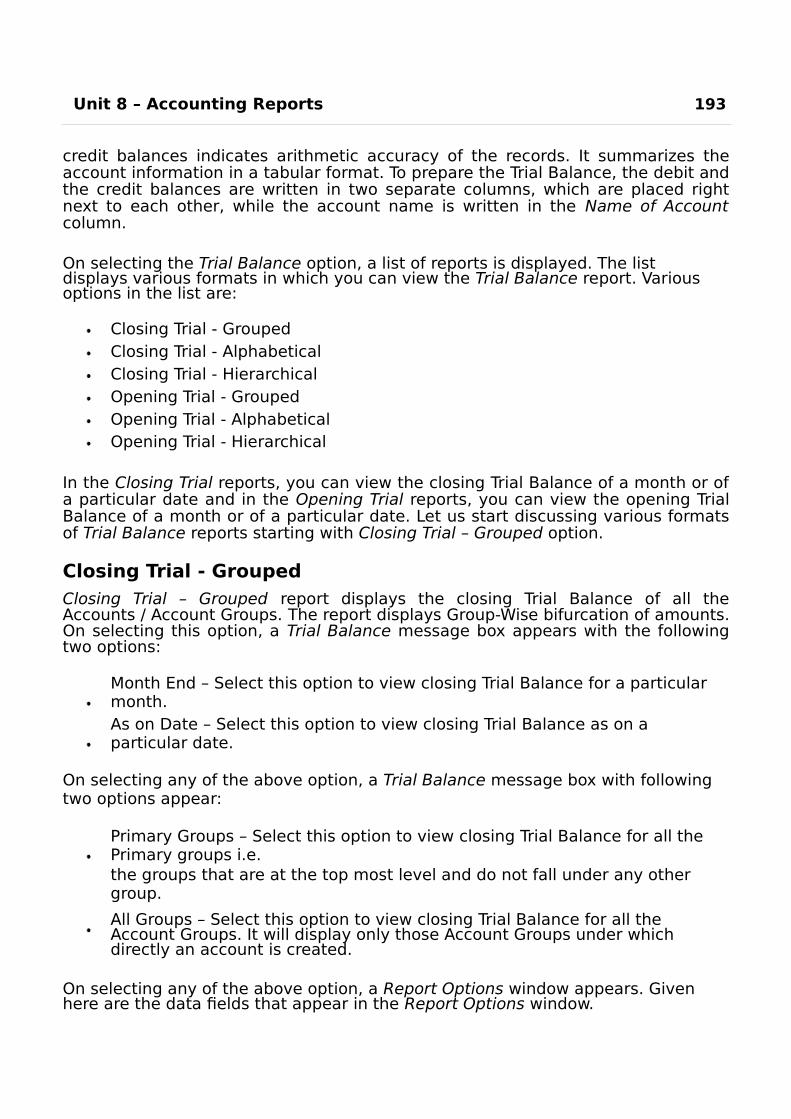
Unit 8 – Accounting Reports 193
credit balances indicates arithmetic accuracy of the records. It summarizes theaccount information in a tabular format. To prepare the Trial Balance, the debit andthe credit balances are written in two separate columns, which are placed rightnext to each other, while the account name is written in the Name of Accountcolumn.
On selecting the Trial Balance option, a list of reports is displayed. The list displays various formats in which you can view the Trial Balance report. Various options in the list are:
Closing Trial - GroupedClosing Trial - AlphabeticalClosing Trial - HierarchicalOpening Trial - GroupedOpening Trial - AlphabeticalOpening Trial - Hierarchical
In the Closing Trial reports, you can view the closing Trial Balance of a month or ofa particular date and in the Opening Trial reports, you can view the opening TrialBalance of a month or of a particular date. Let us start discussing various formatsof Trial Balance reports starting with Closing Trial – Grouped option.
Closing Trial - GroupedClosing Trial – Grouped report displays the closing Trial Balance of all theAccounts / Account Groups. The report displays Group-Wise bifurcation of amounts.On selecting this option, a Trial Balance message box appears with the followingtwo options:
Month End – Select this option to view closing Trial Balance for a particular month.As on Date – Select this option to view closing Trial Balance as on a particular date.
On selecting any of the above option, a Trial Balance message box with following two options appear:
Primary Groups – Select this option to view closing Trial Balance for all the Primary groups i.e.the groups that are at the top most level and do not fall under any other group.
All Groups – Select this option to view closing Trial Balance for all the Account Groups. It will display only those Account Groups under which directly an account is created.
On selecting any of the above option, a Report Options window appears. Given here are the data fields that appear in the Report Options window.

At End of – Select the month or specify the date for which you want to view the closing Trial Balance.
Show Zero Balance Groups – Specify ‘Y’ in this data field if you want to view those groups also that have a zero balance in them.
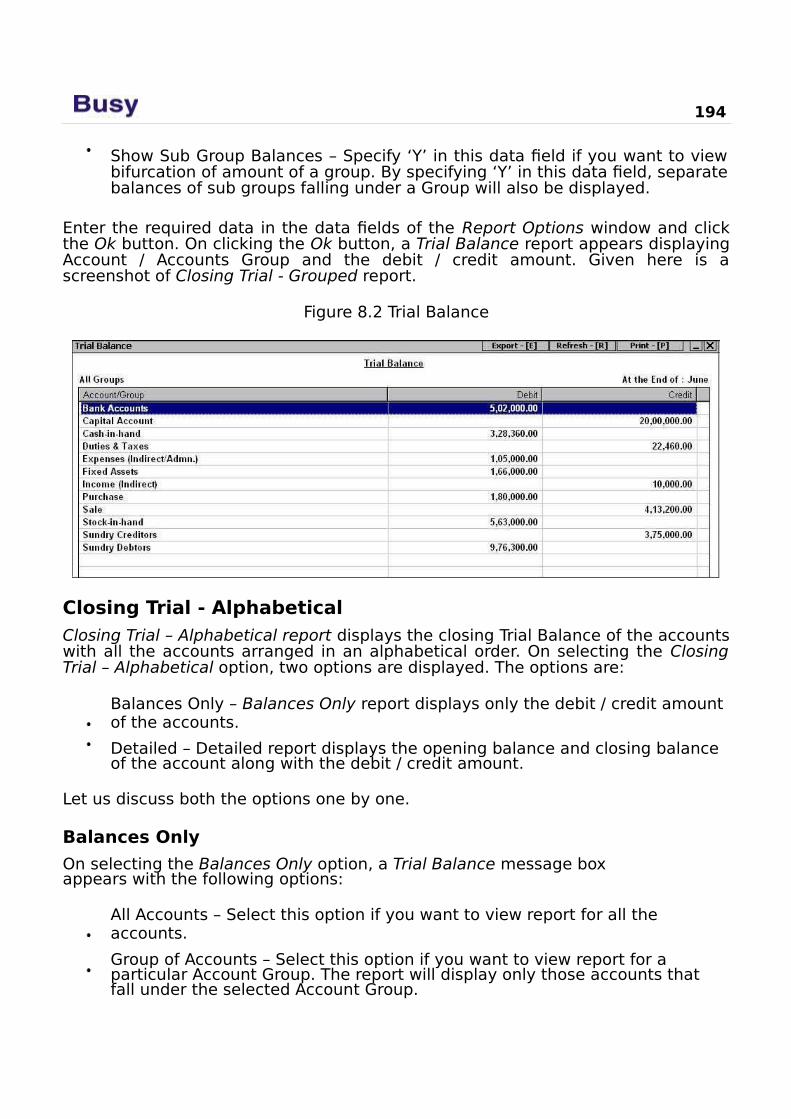
194
Show Sub Group Balances – Specify ‘Y’ in this data field if you want to viewbifurcation of amount of a group. By specifying ‘Y’ in this data field, separatebalances of sub groups falling under a Group will also be displayed.
Enter the required data in the data fields of the Report Options window and clickthe Ok button. On clicking the Ok button, a Trial Balance report appears displayingAccount / Accounts Group and the debit / credit amount. Given here is ascreenshot of Closing Trial - Grouped report.
Figure 8.2 Trial Balance
Closing Trial - AlphabeticalClosing Trial – Alphabetical report displays the closing Trial Balance of the accountswith all the accounts arranged in an alphabetical order. On selecting the ClosingTrial – Alphabetical option, two options are displayed. The options are:
Balances Only – Balances Only report displays only the debit / credit amount of the accounts.
Detailed – Detailed report displays the opening balance and closing balance of the account along with the debit / credit amount.
Let us discuss both the options one by one.
Balances Only
On selecting the Balances Only option, a Trial Balance message box appears with the following options:
All Accounts – Select this option if you want to view report for all the accounts.
Group of Accounts – Select this option if you want to view report for a particular Account Group. The report will display only those accounts that fall under the selected Account Group.
Unit 8 – Accounting Reports 195
On selecting any of the above option, a Report Options window appears. Given here are the data fields that appear in the Report Options window.
Specify the Group Name – Select the Account Group for which you want to view the report.Report Date – Specify the date on which you want to view the closing Trial Balance report.
Account to be shown by – Select from the list, whether Accounts Name, Aliasor Print Name is to be displayed in the report.
Show Zero Balance Accounts – Specify ‘Y’ in this data field if you want toview those accounts also that have a zero balance in them.
Show Parent Group – Specify ‘Y’ in this data field if you want to view ParentGroup of the account in the report. By specifying ‘Y’ in this data field, aParent Group column will appear in the report. The column will display thename of the Parent Group of the corresponding account.
Enter the required data in the data fields and click the Ok button. On clicking the Ok button, a Trial Balance window appears displaying the Accounts and their debit / credit amount.
DetailedOn selecting the Detailed option, a Trial Balance message box with following three options appears:
All Accounts – Select this option if you want to view closing Trial Balance of all the accounts.
Group of Accounts – Select this option if you want to view closing TrialBalance of a particular Account Group. On selecting this option, report willdisplay only those accounts that fall under the selected Account Group.
Selected Account – Select this option if you want to view closing TrialBalance for selected accounts. On selecting this option, a List of Accountswindow appears in which you can select the accounts for which you want toview the report.
On selecting any of the above option, a Report Options window appears. Given here are the data fields that appear in the Report Options window.
Specify Parent Group – Select the Account Group for which you want to view the closing Trial Balance.
Starting Date – Enter the starting date from which the account balances are to be picked for generating the report.
Ending Date – Enter the ending date up to which the account balances are tobe picked for generating the report.
Account to be shown by – Select from the list whether the Account Name, Alias or Print Name is to be displayed in the report.Masters to be Picked – In the list there are three options. The options are:

o All - Select this option if you want to pick all the masters for the report.
196
o Moved - Select this option if you want to pick only those masters for the report that are used in any transaction.
o Moved / Closing Bal - Select this option if you want to pick those masters for the report that are either used in any transaction or have some closing balance.
Split Dr / Cr of Opening / Closing Balances – Specify ‘Y’ in this data field if you want to view debit and credit aspect of opening and closing balances in separate columns.
Show Parent Group – Specify ‘Y’ in this data field if you want to view Parent Group of the account.
Enter required data in all the data fields of the Report Options window and clickthe Ok button. On clicking the Ok button, a Trial Balance window appearsdisplaying Opening Balance (debit / credit), Debit amount, Credit amount andClosing Balance (debit / credit).
Closing Trial - HierarchicalClosing Trial – Hierarchical report displays the closing Trial Balance of the accountswith all the accounts arranged as per their hierarchy. First, all the Primary AccountGroups are sorted alphabetically and then all the Groups and parties that fallsunder the Primary group will be sorted alphabetically. On selecting the ClosingTrial – Hierarchical option, a Trial Balance message box appears with following twooptions:
Balances Only – Balances Only report displays only the debit / credit amount of the accounts.
Detailed – Detailed report displays the opening balance and closing balance of the account along with the debit / credit amount.
For detailed help on the above two options, please refer to the Closing Trial –Alphabetical option above.
Till now, we have discussed all the Closing Trial reports. After this, all the OpeningTrial reports appear in the list. Opening Trial reports display the opening TrialBalance of the accounts. All the Opening Trial Balance reports are similar to theirrespective closing Trial Balance reports. Hence, for detailed explanation onOpening Trial - Grouped, Opening Trial – Alphabetical and Opening Trial –Hierarchical reports, please refer to the corresponding Closing Trial reports.
8.3 Account BooksIn a general business scenario, numerous transactions take place such as sales /purchase of goods or receipt / payment of cash. Generally, these transactions arerecorded in a single register, Journal Register. The maintenance of thesetransactions becomes a tedious process when the business expands and thenumber of transactions increases multiple times. In such a case, there is a need to
categorise the transactions and record them in different registers depending onthe type of transaction. This will help in knowing the exact position of the businessbased on the transactions.
Unit 8 – Accounting Reports 197
For example, a company wants to know the status of the cash / bank balance for aparticular period. For this purpose, it can view the Cash / Bank Book in which allthe transactions that affect the cash and bank accounts are listed. These accountsbooks or registers are the Books of Original Entry / Subsidiary Books. On the basisof these books, the Principal Books of Accounts, i.e. Ledger Accounts are prepared.
On clicking the Accounts Books option, a list of following reports is displayed:
Day BookLedgerCash / Bank BooksAccounts Registers (Standard)Account Activity Report
Let us discuss these reports in detail.
Day BookDay Book report displays all the accounting transactions of the businesssequentially within a specified date range. The report displays the voucher typeand its debit / credit affect. On selecting the Day Book option, a Day Bookmessage box appears asking you to show Cash Balances also. Click the Yes / Nobutton as per your requirement. If you click the Yes button in the message boxthen in the Report, two columns, one displaying transactions for amount debitedand other displaying transactions for amount credited will appear. If you click theNo button then all the transactions will be displayed in the sequence in which theywere entered irrespective of their debit / credit effect.
On clicking either of the option, a Report Options window appears. Given here arethe data fields that appear in the Report Options window.
Starting Date – Enter the starting date from which the vouchers are to be picked for the report.Ending Date – Enter the ending date up to which the vouchers are to be picked for the report.
Accounts to be Shown By – Select from the list, whether Account Name, Aliasor Print Name is to be displayed in the report.
Show Long Narration – Specify ‘Y’ in this data field to view long narration asentered in the voucher.
Show Opt. Fields / Transport Details – Specify ‘Y’ in this data field to viewdata as entered in the Optional Fields and Transport Details window.
Show Item Details – Specify ‘Y’ in this data field to view details of the itemsused in voucher. On specifying ‘Y’ in this data field, a button appears next toit. Click the button to configure the item details that are to be displayed inthe report.

Show Bill References – Specify ‘Y’ in this data field if you want to view billreference details also in the report.
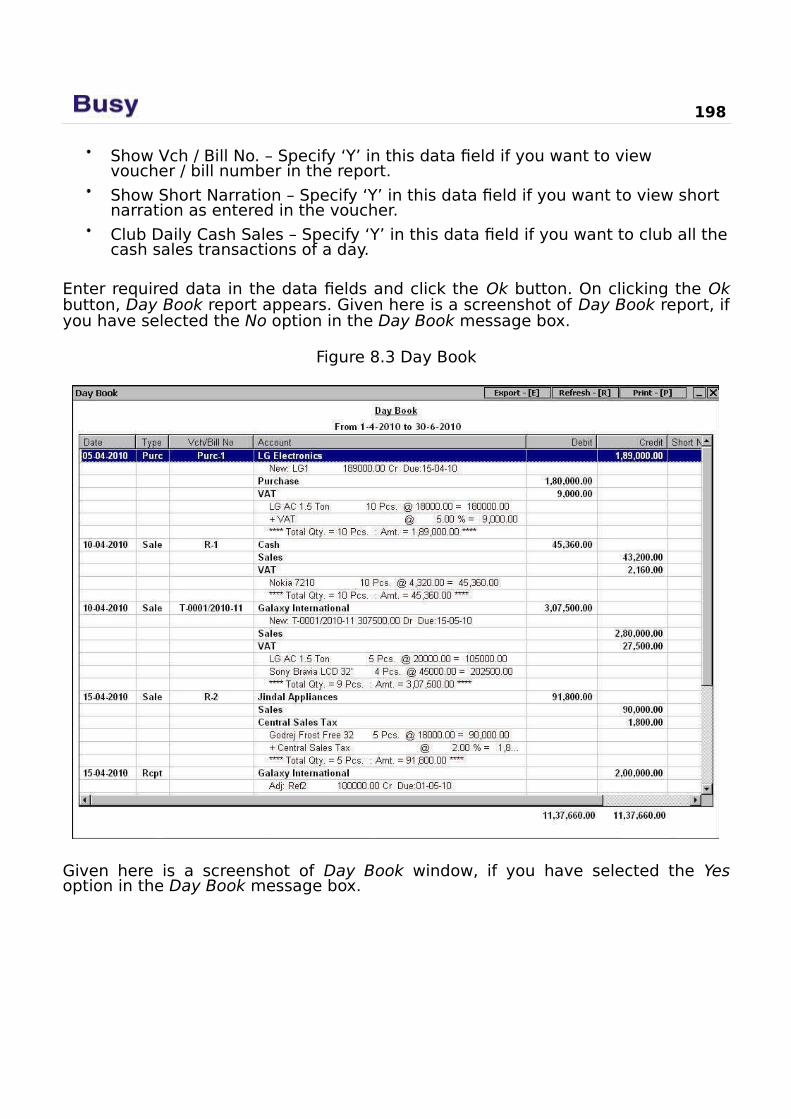
198
Show Vch / Bill No. – Specify ‘Y’ in this data field if you want to view voucher / bill number in the report.
Show Short Narration – Specify ‘Y’ in this data field if you want to view short narration as entered in the voucher.
Club Daily Cash Sales – Specify ‘Y’ in this data field if you want to club all thecash sales transactions of a day.
Enter required data in the data fields and click the Ok button. On clicking the Okbutton, Day Book report appears. Given here is a screenshot of Day Book report, ifyou have selected the No option in the Day Book message box.
Figure 8.3 Day Book
Given here is a screenshot of Day Book window, if you have selected the Yesoption in the Day Book message box.
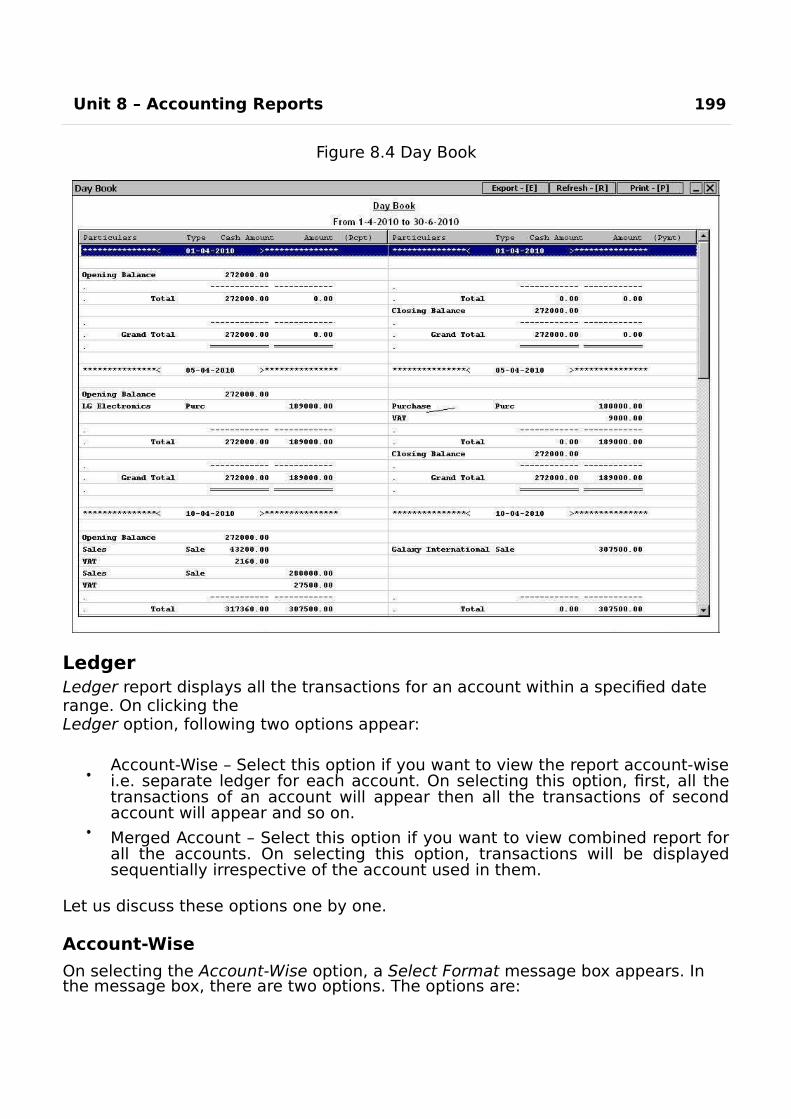
Unit 8 – Accounting Reports 199
Figure 8.4 Day Book
LedgerLedger report displays all the transactions for an account within a specified date range. On clicking theLedger option, following two options appear:
Account-Wise – Select this option if you want to view the report account-wisei.e. separate ledger for each account. On selecting this option, first, all thetransactions of an account will appear then all the transactions of secondaccount will appear and so on.
Merged Account – Select this option if you want to view combined report forall the accounts. On selecting this option, transactions will be displayedsequentially irrespective of the account used in them.
Let us discuss these options one by one.
Account-Wise
On selecting the Account-Wise option, a Select Format message box appears. In the message box, there are two options. The options are:

200
Standard – Select this option if you want to view report in the standardformat i.e. it will simply display all the transactions irrespective of their debit/ credit effect on the account.
T Format – Select this option if you want to view report in T format i.e. all thedebit transactions of the account on the one side and all the credittransactions of the account on another side.
On selecting the Standard option, an Account Ledger message box appears withfour options. Select the required option.
On selecting any option from the Account Ledger message box or selecting the TFormat option, a Report Options window appears. Given here are the data fieldsthat appear in the Report Options window.
Select Account / Account Group – Select the required Account / Account Group for which you want to view the report.
Starting Date – Enter the starting date from which the transactions are to be displayed in the report.
Ending Date – Enter the ending date up to which the transactions are to be displayed in the report.
Account to Be Shown By – Select from the list whether you want Account Name, Alias or Print Name to be displayed in the report.
Show Full Voucher Details – Specify ‘Y’ in this data field to view complete voucher details in the report.
Show Long Narration – Specify ‘Y’ in this data field to view long narration as entered in the voucher.
Show Short Narration – Specify ‘Y’ in this data field to view short narration asentered in the voucher.
Balances to be Shown As – Select from the list that total balance is to be shown after transactions of each day or each month or for all the transactions.
Enter the required data in the data fields and click the Ok button. On clicking theOk button, an Account Ledger window appears. Given here is a screenshot ofAccount Ledger in the Standard format.
Figure 8.5 Account Ledger – Standard Format
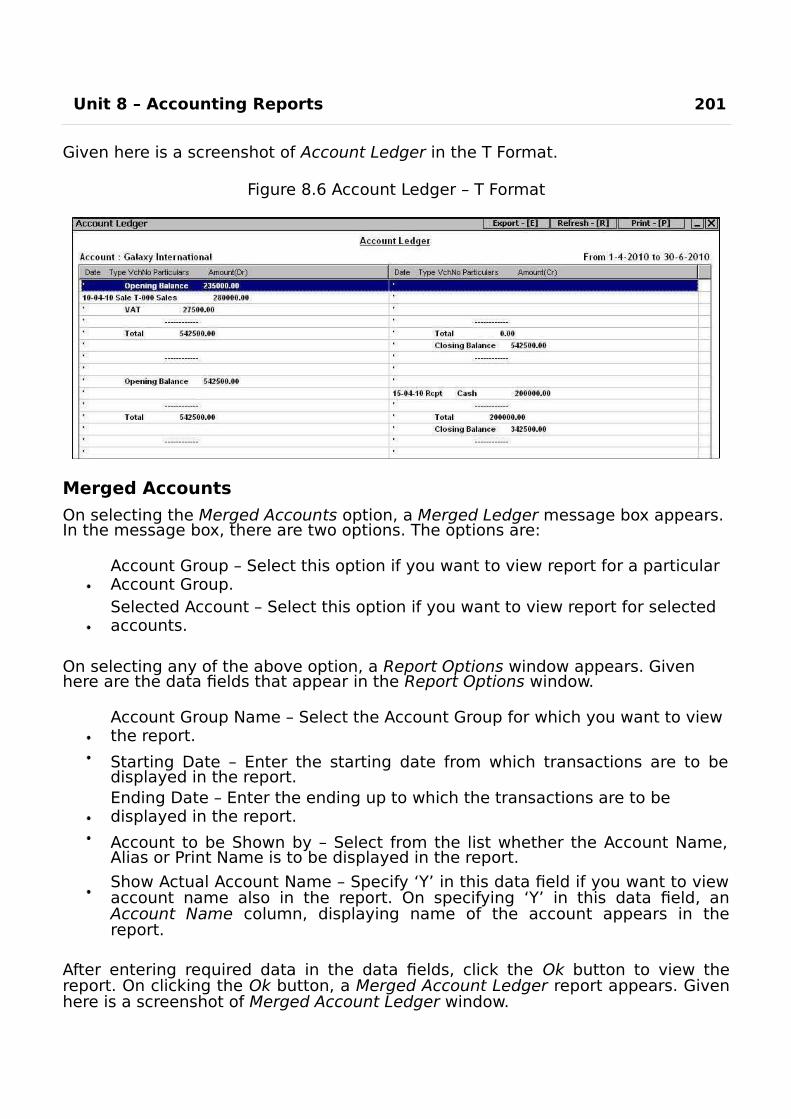
Unit 8 – Accounting Reports 201
Given here is a screenshot of Account Ledger in the T Format.
Figure 8.6 Account Ledger – T Format
Merged Accounts
On selecting the Merged Accounts option, a Merged Ledger message box appears. In the message box, there are two options. The options are:
Account Group – Select this option if you want to view report for a particular Account Group.Selected Account – Select this option if you want to view report for selected accounts.
On selecting any of the above option, a Report Options window appears. Given here are the data fields that appear in the Report Options window.
Account Group Name – Select the Account Group for which you want to view the report.
Starting Date – Enter the starting date from which transactions are to bedisplayed in the report.Ending Date – Enter the ending up to which the transactions are to be displayed in the report.
Account to be Shown by – Select from the list whether the Account Name,Alias or Print Name is to be displayed in the report.
Show Actual Account Name – Specify ‘Y’ in this data field if you want to viewaccount name also in the report. On specifying ‘Y’ in this data field, anAccount Name column, displaying name of the account appears in thereport.
After entering required data in the data fields, click the Ok button to view thereport. On clicking the Ok button, a Merged Account Ledger report appears. Givenhere is a screenshot of Merged Account Ledger window.
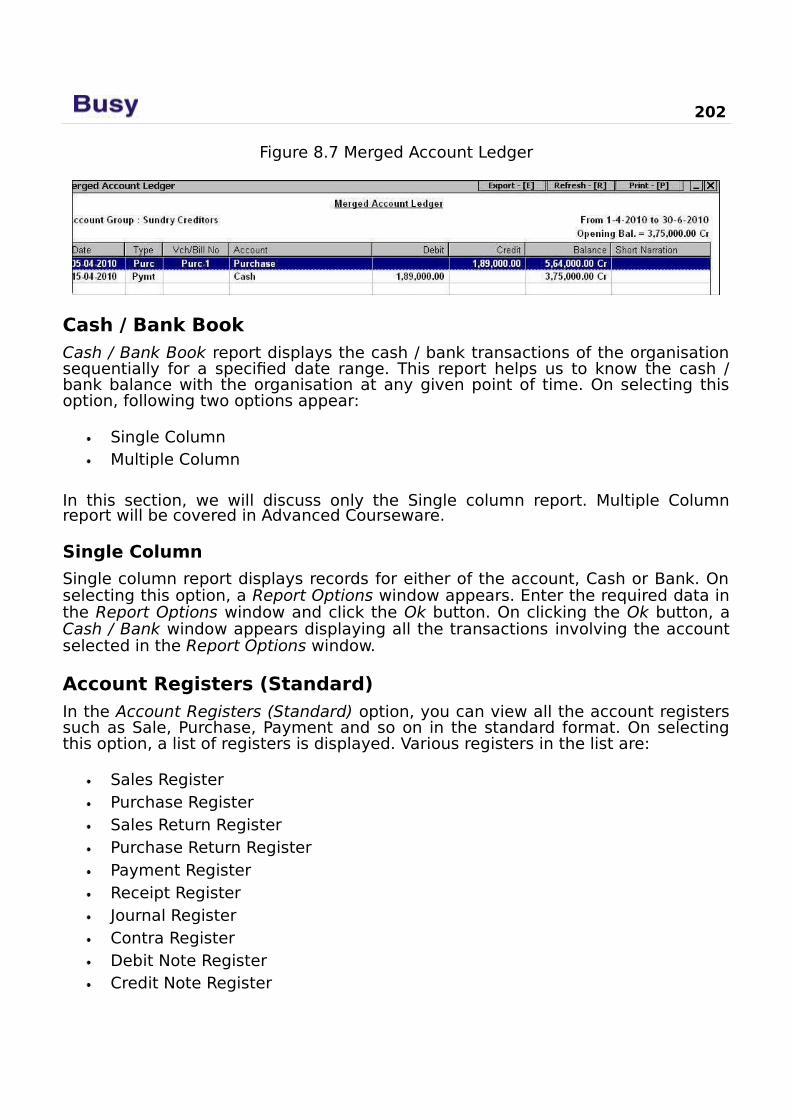
202
Figure 8.7 Merged Account Ledger
Cash / Bank BookCash / Bank Book report displays the cash / bank transactions of the organisationsequentially for a specified date range. This report helps us to know the cash /bank balance with the organisation at any given point of time. On selecting thisoption, following two options appear:
Single ColumnMultiple Column
In this section, we will discuss only the Single column report. Multiple Columnreport will be covered in Advanced Courseware.
Single Column
Single column report displays records for either of the account, Cash or Bank. Onselecting this option, a Report Options window appears. Enter the required data inthe Report Options window and click the Ok button. On clicking the Ok button, aCash / Bank window appears displaying all the transactions involving the accountselected in the Report Options window.
Account Registers (Standard)In the Account Registers (Standard) option, you can view all the account registerssuch as Sale, Purchase, Payment and so on in the standard format. On selectingthis option, a list of registers is displayed. Various registers in the list are:
Sales RegisterPurchase RegisterSales Return RegisterPurchase Return RegisterPayment RegisterReceipt RegisterJournal RegisterContra RegisterDebit Note RegisterCredit Note Register

Unit 8 – Accounting Reports 203
Sales Register
Sales Register report displays both the cash and credit sales transactions. Itcontains information regarding the bill number, date, party, amount and so on ofall the sales transaction. On clicking the Sales Register option, a Sales Registermessage box appears. In the message box, there are two options. The options are:
All Sale Type – Select this option if you want to view sales transactionsentered for any Sale Type.
One Sale Type – Select this option if you want to view sales transactionsentered for a single Sale Type.
On selecting any of the above option, a Sales Register message box appears. In the message box, there are four options. The options are:
All Parties – Select this option if you want to view sales transactions for all the parties.One Party – Select this option if you want to view sales transactions for a single party.
Group of Parties – Select this option if you want to view sales transactionsfor a particular group of parties.
Selected Parties – Select this option if you want to view sales transactions forselected parties. On selecting this option, a List of Accounts window appearsin which you can select the parties for which you want to view the report.
On selecting any of the above option, a Report Options window appears. Given here are the data fields that appear in the Report Options window.
Sale Type – Select the Sale Type for which you want to view the sales transactions.
Select Account / Group – Select the Party / Party Group for which you want toview the sales transactions.
Voucher Series – Select the voucher series whose vouchers are to bedisplayed. If you want to view all the vouchers then select All option fromthe list.
Starting Date – Enter the starting date from which Sales vouchers are to bepicked for generating the report.
Ending Date – Enter the ending date up to which Sales vouchers are to bepicked for generating the report.
Account to be Shown By – Select from the list whether the Account Name,Alias or Print Name is to be displayed in the report.
Show Bifurcation of Amount – Specify ‘Y’ in this data field if you want to viewbifurcation of the bill amount in the report. On specifying ‘Y’ in this column,separate columns for displaying sale amount, tax amount, surchargeamount and any other amount will appear in the report.
Show Mobile No. of Parties – Specify ‘Y’ in this data field if you want to viewmobile number of the party in the report.

204
Enter required data in the data fields of the Report Options window and click theOk button. On clicking the Ok button, Sales Register report appears. Given here isa screenshot of Sales Register report.
Figure 8.8 Sales Register
All other Accounts Registers are totally similar to the Sales Register.For detailed help on message boxes and Report Options that appear inother Accounts Registers, please refer to Sales Register.
Account Activity ReportAccount Activity Report displays all the transactions for an account within aspecified month range. Basically, it is a ledger report designed in a differentformat. On clicking the Account Activity Report option, a Report Options windowappears. Given here are the data fields that appear in the Report Options window.
Account Name – Select the account for which you want to view the report.Month – Select the starting month from which the report is to be generated.To – Select the ending month up to which the report is to be generated.
Enter required data in all the data fields and click the Ok button. On clicking theOk button, an Account Activity Report appears. Given here is a screenshot ofAccount Activity Report.
Figure 8.9 Account Activity Report
Unit 8 – Accounting Reports 205
8.4 Account SummariesAccount Summaries reports display various summarised reports for all theaccounting transactions of the company. Account Summaries reports includevarious reports such as Daily Balances, Transactions Summary and so on. Onclicking the Account Summaries option, a list of reports is displayed. Variousreports in the list are:
Daily BalancesDaily SummaryMonthly SummaryConsolidated SummaryTransaction SummaryProfit & Loss A/cProfit & Loss SummaryMin / Max Cash BalancesAccount Ledger Comparison
Let us discuss these reports in detail.
Daily BalancesDaily Balances report displays date-wise closing balance for an account for thespecified date range. Closing balance will be calculated based on the openingbalance of the account and the vouchers that affect the account on a particulardate. On selecting the Daily Balances option, a Report Options window appears.Enter the required data in the data fields of the Report Options window and clickthe Ok button. On clicking the Ok button, a Daily Balances report appears. Thereport displays the debit / credit closing balance of the account for the dates onwhich the account has been used in any transaction.
Daily SummaryDaily Summary report displays date-wise opening balance, totals of debit entriesand credit entries and the closing balance of an account for the specified daterange. On selecting the Daily Summary option, a Report Options window appears.Given here are the data fields that appear in the Report Options window.
Account Name – Select the account for which you want to view the report.Starting Date – Enter the starting date from which the report is to be generated.Ending Date – Enter the ending date up to which the report is to be generated.

Show Unmoved Dates Also – Specify ‘Y’ in this data field if you want to view opening / closing balance of the dates on which no transaction has taken place.
206
Enter required data in the data fields of Report Options window and click the Okbutton. On clicking the Ok button, a Daily Summary report appears. The reportdisplays the opening balance, debit / credit amount and the closing balance onvarious dates.
Monthly SummaryMonthly Summary report displays month-wise opening balance, totals of debitentries and credit entries and the closing balance of an Account / All Accounts /Account Group. On clicking the Monthly Summary option, two options appear. Theoptions are:
Vertical - Click this option if you want to view the Monthly Summary reportwith the months arranged vertically. In other words, the months are listed inone column and the related information for each month is displayed in aseparate row. On selecting this option, a Monthly Summary message boxappears. In the message box there are following two options:
o One Account – Select this option if you want to view report for a single account.
o Account Group – Select this option if you want to view report for a single Account Group.
Horizontal - Click this option if you want to view the Monthly Summary reportwith the months arranged horizontally. In other words, the accounts arelisted in one row and the related information for each account is displayedmonth-wise in separate columns. On selecting this option, a MonthlySummary message box appears with following two options:
o Group of Accounts – Select this option if you want to view report for a particular Group of Accounts.
o All Accounts – Select this option if you want to view report for all the accounts.
On selecting the required options, a Report Options window appears. Given hereare the data fields that appear in the Report Options window.
Select Account – Select the account for which the report is to be generated.Select Group – Select the Account Group for which the report is to be generated.
Accounts to be Shown By – Select from the list whether the Account Name, Alias or Print Name is to be displayed in the report.
Enter required data in the data fields of Report Options window and click the Okbutton. On clicking the Ok button, a Monthly Summary window appears displayingmonth-wise debit / credit and closing balance of Account / Account Group.
Consolidated Summary

Consolidated Summary report displays consolidated opening balance, totals ofdebit entries and credit entries and the closing balance of Accounts / AccountGroup for a specified date range. On clicking the Consolidated Summary option,two options appear. The options are:
Unit 8 – Accounting Reports 207
Account-wise – Select this option if you want to view the account-wiseopening, closing, debit and credit balances. On selecting this option, aConsolidated Summary message box appears with following options:
o All Accounts – Select this option to view report for a single account.
o Group of Accounts – Select this option to view report for a single Groupof Accounts. o Selected Accounts – Select this option to view report for selected accounts.
Account Group-wise – Select this option if you want to view the Group-wiseopening, closing, debit and credit balances. On selecting this option, aConsolidated Summary message box appears with following options:
o All Account Groups – Select this option to view report for all theAccount Groups. o Group of Groups – Select this option to view reportfor particular Account Group.
On selecting any of the above option, a Report Options window appears. Enterrequired data in the data fields of Report Options window and click the Ok button.On clicking the Ok button, a Consolidated Summary report appears. The reportdisplays the consolidated opening, debit, credit and closing balance of Accounts /Account Groups for the specified date range.
Transaction SummaryTransaction Summary report displays opening balance, bifurcation of the debit,credit amounts into various accounting, and dual voucher types and the closingbalance of Accounts / Account Group for a specified date range. In other words,Transaction Summary report is an extension of the Consolidated Summary report.This report contains separate debit and credit columns for the following vouchertypes: Sales, Purchase, Payment, Receipt, Journal, Debit Note, Credit Note, SalesReturn, Purchase Return and Contra.
Profit & Loss A/cProfit & Loss A/c report displays the net profit / loss incurred by the organisationfor a specified month range. On selecting the Profit & Loss A/c option, a Profit &Loss A/c message box appears. In the message box, there are two options. Theoptions are:
Month – Select this option to view report for specified months.Date – Select this option to view report for specified date range.
On selecting any of the above option, a Report Options window appears. Givenhere are the data fields that appear in the Report Options window.
Start Month – Specify the starting month from which the report is to be generated.End Month – Specify the ending month up to which the report is to be generated.

Start Date – Specify the starting date from which the report is to be generated.End Date – Specify the ending date up to which the report is to be generated.
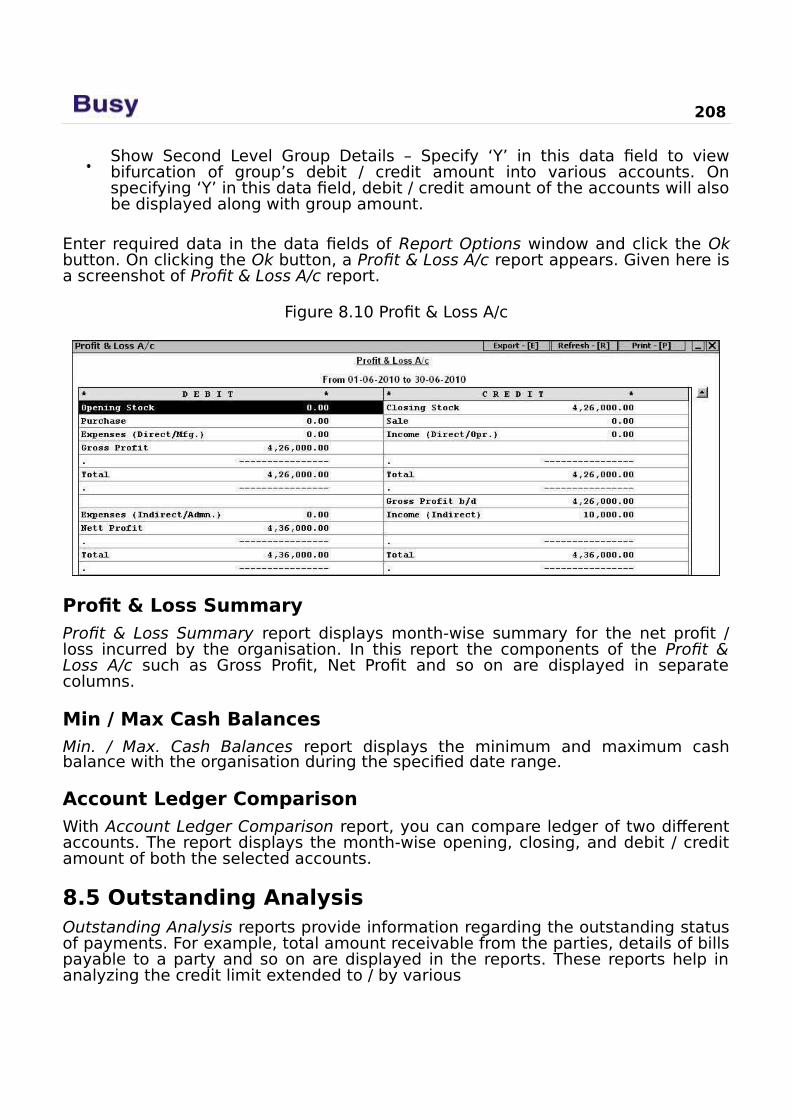
208
Show Second Level Group Details – Specify ‘Y’ in this data field to viewbifurcation of group’s debit / credit amount into various accounts. Onspecifying ‘Y’ in this data field, debit / credit amount of the accounts will alsobe displayed along with group amount.
Enter required data in the data fields of Report Options window and click the Okbutton. On clicking the Ok button, a Profit & Loss A/c report appears. Given here isa screenshot of Profit & Loss A/c report.
Figure 8.10 Profit & Loss A/c
Profit & Loss SummaryProfit & Loss Summary report displays month-wise summary for the net profit /loss incurred by the organisation. In this report the components of the Profit &Loss A/c such as Gross Profit, Net Profit and so on are displayed in separatecolumns.
Min / Max Cash BalancesMin. / Max. Cash Balances report displays the minimum and maximum cashbalance with the organisation during the specified date range.
Account Ledger ComparisonWith Account Ledger Comparison report, you can compare ledger of two differentaccounts. The report displays the month-wise opening, closing, and debit / creditamount of both the selected accounts.
8.5 Outstanding AnalysisOutstanding Analysis reports provide information regarding the outstanding statusof payments. For example, total amount receivable from the parties, details of billspayable to a party and so on are displayed in the reports. These reports help inanalyzing the credit limit extended to / by various
Unit 8 – Accounting Reports 209
parties. On selecting the Outstanding Analysis option, a list of reports is displayed.Various options in the list are:
Amount ReceivableBills ReceivableAgeing (Receivable)Amount PayableBills PayableAgeing (Payable)On Account EntriesBills SummaryBill-Wise StatementBill Reference Details
Amount ReceivableAmount Receivable report displays the debit balance of party accounts that fallunder the Sundry Debtor / Creditor Account Group as on a specified date. Ingeneral course of business, the accounts of the parties may not stand fully settledat all times. Some balance in the account generally exists. A debit balance in aparty account signifies the amount, which is receivable from the party. AmountReceivable report displays a list of all the parties having debit balance. Onselecting the Amount Receivable option, an Amount Receivable message boxappears. The options in the message box are:
All Accounts – Select this option to view report for all the parties having a debit balance.
Group of Accounts – Select this option to view report for a particular AccountGroups. All the parties that have a debit balance and that fall under theselected Account Group will appear in the report.
On selecting any of the above options, a Report Options window appears. Given here are the data fields that appear in the Report Options window.
Specify the Group Name – Select the Account Group for which you want to view the report.Report Date – Enter date for which you want to view the report.
Account to be Shown by – Select from the list whether Account Name, Aliasor Print Name is to be displayed in the report.
Show Mobile No. of Parties – Specify ‘Y’ in this data field to view mobilenumber of the parties in the report.
Apply Filter on Amount – Specify ‘Y’ in this data field to apply filter on thereport on the basis of amount due from the parties. Basically, with thisoption, you can view report for the parties having debit balance more than,less than or equal to the amount as specified by you. On specifying ‘Y’ in thisdata field, a button appears next to this data field. On clicking the button,

210
a Filter Options window appears. Specify the required filtration criteria in the Filter Options window.
Enter required data in the data fields of the Report Options window and click theOk button. On clicking the Ok button, an Amount Receivable report appears. Givenhere is a screenshot of Amount Receivable report.
Figure 8.11 Amount Receivable
Bills ReceivableBills Receivable report appears only if you have enabled the Bill-by-Bill Details
feature in Administration
Configuration
Features / Options
Accounts tab. Thereport displays the bills receivable details of an Account / Account Group / AllAccounts. On clicking the Bills Receivable option, a Bills Receivable message boxappears. In the message box, there are three options. The options are:
One Account – Select this option to view report for single party.Group of Accounts – Select this option to view report for a group of parties.All Accounts – Select this option to view report for all the parties.
On selecting any of the above option, a Report Options window appears. Givenhere are the data fields that appear in the Report Options window.
Select Account / Group – Select Party / Group of Parties for which you want toview the report.
Type of Entries to be Considered – Select from the list, the type of entries to be displayed in the report. A bill is said to be pending from the day the bill is raised to the day it is adjusted / paid
/ received. If you want to view all the Bills Receivable details then select theAll Including (Cleared) option. If you want to view, details for those bills thatare due i.e. the due date has passed and are yet to be adjusted / receivedthen select the Due option. If you want to view the pending bills, i.e. billswhose due date has not been passed then select the Pending option.
Select Reference Group - This data field appears if you have enabled the option
of Enable Grouping of Reference under Administration
Configuration
Features / Options
Accounts tab
Bill Reference Group window. Select therequired Reference group. If you want to view the report for all reference groupsthen select either All (Sorted) or All (Unsorted) option. The difference between
All (Sorted) and All (Unsorted) option is that on selecting the All (Sorted) option,the report will appear Bill Reference Group-Wise i.e. first a Reference Group
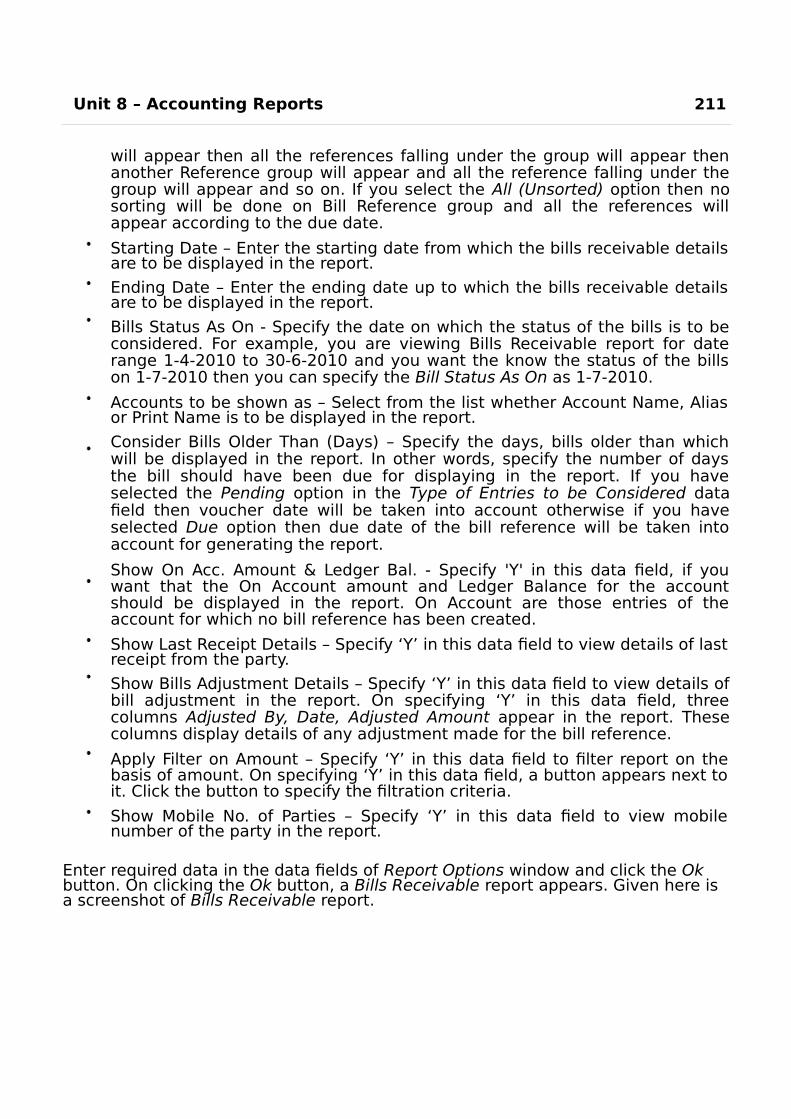
Unit 8 – Accounting Reports 211
will appear then all the references falling under the group will appear thenanother Reference group will appear and all the reference falling under thegroup will appear and so on. If you select the All (Unsorted) option then nosorting will be done on Bill Reference group and all the references willappear according to the due date.
Starting Date – Enter the starting date from which the bills receivable detailsare to be displayed in the report.
Ending Date – Enter the ending date up to which the bills receivable detailsare to be displayed in the report.
Bills Status As On - Specify the date on which the status of the bills is to beconsidered. For example, you are viewing Bills Receivable report for daterange 1-4-2010 to 30-6-2010 and you want the know the status of the billson 1-7-2010 then you can specify the Bill Status As On as 1-7-2010.
Accounts to be shown as – Select from the list whether Account Name, Aliasor Print Name is to be displayed in the report.
Consider Bills Older Than (Days) – Specify the days, bills older than whichwill be displayed in the report. In other words, specify the number of daysthe bill should have been due for displaying in the report. If you haveselected the Pending option in the Type of Entries to be Considered datafield then voucher date will be taken into account otherwise if you haveselected Due option then due date of the bill reference will be taken intoaccount for generating the report.
Show On Acc. Amount & Ledger Bal. - Specify 'Y' in this data field, if youwant that the On Account amount and Ledger Balance for the accountshould be displayed in the report. On Account are those entries of theaccount for which no bill reference has been created.
Show Last Receipt Details – Specify ‘Y’ in this data field to view details of lastreceipt from the party.
Show Bills Adjustment Details – Specify ‘Y’ in this data field to view details ofbill adjustment in the report. On specifying ‘Y’ in this data field, threecolumns Adjusted By, Date, Adjusted Amount appear in the report. Thesecolumns display details of any adjustment made for the bill reference.
Apply Filter on Amount – Specify ‘Y’ in this data field to filter report on thebasis of amount. On specifying ‘Y’ in this data field, a button appears next toit. Click the button to specify the filtration criteria.
Show Mobile No. of Parties – Specify ‘Y’ in this data field to view mobilenumber of the party in the report.
Enter required data in the data fields of Report Options window and click the Ok button. On clicking the Ok button, a Bills Receivable report appears. Given here is a screenshot of Bills Receivable report.
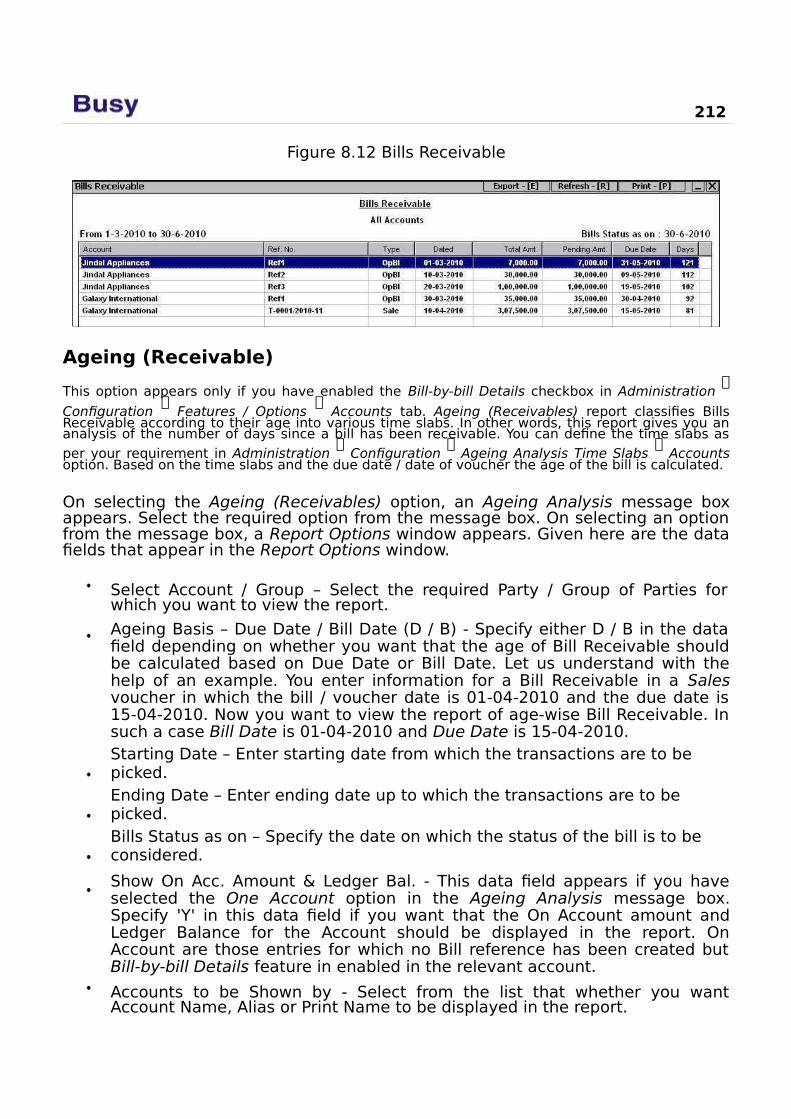
212
Figure 8.12 Bills Receivable
Ageing (Receivable)
This option appears only if you have enabled the Bill-by-bill Details checkbox in Administration
Configuration
Features / Options
Accounts tab. Ageing (Receivables) report classifies BillsReceivable according to their age into various time slabs. In other words, this report gives you ananalysis of the number of days since a bill has been receivable. You can define the time slabs as
per your requirement in Administration
Configuration
Ageing Analysis Time Slabs
Accountsoption. Based on the time slabs and the due date / date of voucher the age of the bill is calculated.
On selecting the Ageing (Receivables) option, an Ageing Analysis message boxappears. Select the required option from the message box. On selecting an optionfrom the message box, a Report Options window appears. Given here are the datafields that appear in the Report Options window.
Select Account / Group – Select the required Party / Group of Parties forwhich you want to view the report.
Ageing Basis – Due Date / Bill Date (D / B) - Specify either D / B in the datafield depending on whether you want that the age of Bill Receivable shouldbe calculated based on Due Date or Bill Date. Let us understand with thehelp of an example. You enter information for a Bill Receivable in a Salesvoucher in which the bill / voucher date is 01-04-2010 and the due date is15-04-2010. Now you want to view the report of age-wise Bill Receivable. Insuch a case Bill Date is 01-04-2010 and Due Date is 15-04-2010.Starting Date – Enter starting date from which the transactions are to be picked.Ending Date – Enter ending date up to which the transactions are to be picked.Bills Status as on – Specify the date on which the status of the bill is to be considered.
Show On Acc. Amount & Ledger Bal. - This data field appears if you haveselected the One Account option in the Ageing Analysis message box.Specify 'Y' in this data field if you want that the On Account amount andLedger Balance for the Account should be displayed in the report. OnAccount are those entries for which no Bill reference has been created butBill-by-bill Details feature in enabled in the relevant account.
Accounts to be Shown by - Select from the list that whether you wantAccount Name, Alias or Print Name to be displayed in the report.
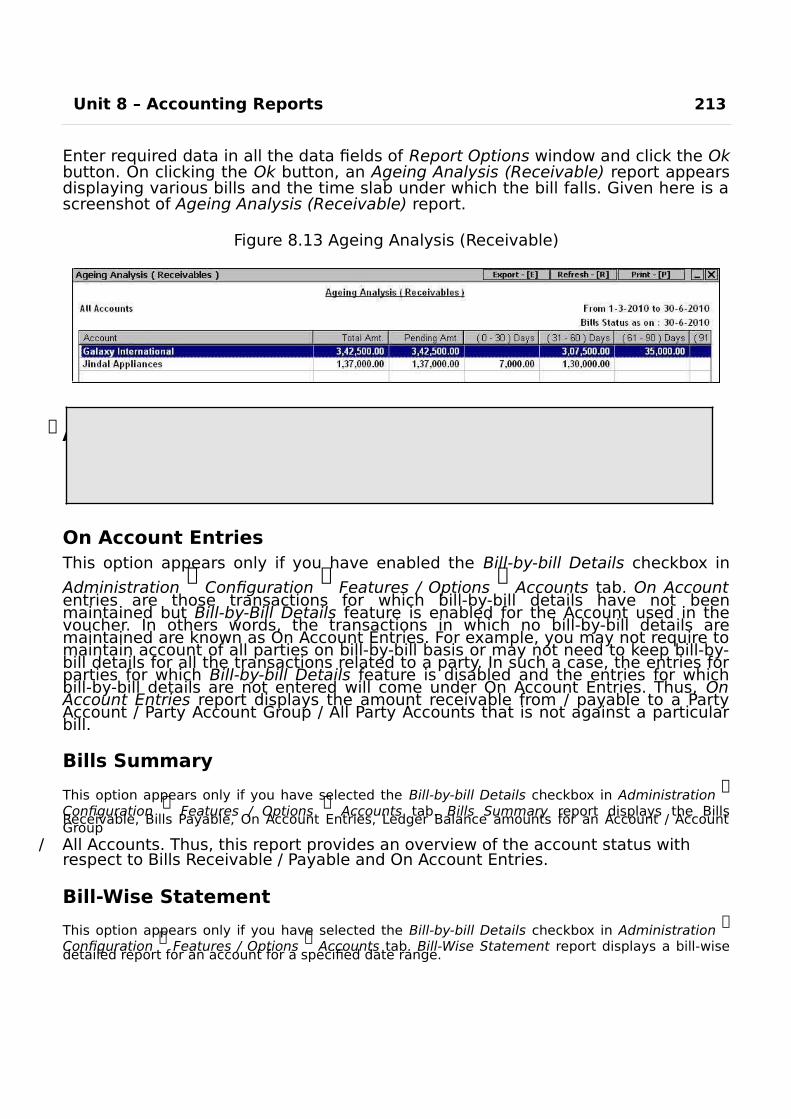
Unit 8 – Accounting Reports 213
Enter required data in all the data fields of Report Options window and click the Okbutton. On clicking the Ok button, an Ageing Analysis (Receivable) report appearsdisplaying various bills and the time slab under which the bill falls. Given here is ascreenshot of Ageing Analysis (Receivable) report.
Figure 8.13 Ageing Analysis (Receivable)
Amount Payable, Bills Payable, Ageing (Payable) reports are totallysimilar to the Amount Receivable, Bills Receivable and Ageing(Receivable) reports respectively. The only difference is that theformer reports display details about the amount / bills payable andthe later reports display the amount / bills receivable.
On Account EntriesThis option appears only if you have enabled the Bill-by-bill Details checkbox in
Administration
Configuration
Features / Options
Accounts tab. On Accountentries are those transactions for which bill-by-bill details have not beenmaintained but Bill-by-Bill Details feature is enabled for the Account used in thevoucher. In others words, the transactions in which no bill-by-bill details aremaintained are known as On Account Entries. For example, you may not require tomaintain account of all parties on bill-by-bill basis or may not need to keep bill-by-bill details for all the transactions related to a party. In such a case, the entries forparties for which Bill-by-bill Details feature is disabled and the entries for whichbill-by-bill details are not entered will come under On Account Entries. Thus, OnAccount Entries report displays the amount receivable from / payable to a PartyAccount / Party Account Group / All Party Accounts that is not against a particularbill.
Bills Summary
This option appears only if you have selected the Bill-by-bill Details checkbox in Administration
Configuration
Features / Options
Accounts tab. Bills Summary report displays the BillsReceivable, Bills Payable, On Account Entries, Ledger Balance amounts for an Account / AccountGroup
/ All Accounts. Thus, this report provides an overview of the account status with respect to Bills Receivable / Payable and On Account Entries.
Bill-Wise Statement
This option appears only if you have selected the Bill-by-bill Details checkbox in Administration
Configuration Features / Options
Accounts tab. Bill-Wise Statement report displays a bill-wise
detailed report for an account for a specified date range.
214
Bill Reference DetailsThis option appears only if you have selected the Bill-by-bill Details checkbox in
Administration
Configuration
Features / Options
Accounts tab. Bill ReferenceDetails report displays a detailed report for a particular bill reference of an account.On clicking the Bill Reference Details option, a Report Options window appears. Givenhere are the data fields that appear in the Report Options window.
Select Account – Select the account whose bill reference is to be considered.Bill-Ref. No. – Enter the bill reference number whose details you want to view.
Enter the required data in the data fields of Report Options window and click the Ok button. On clicking the Ok button, a Reference Details window appears displaying details of the bill reference.
Review
Outstanding Analysis reports provide information regarding outstanding status of payments.
Bills Receivable / Payable reports appear only if Bill-by-Bill Details feature is enabled in Features / Options. The reports display details of various bills receivable / payable from / to the party.
You can filter various reports on the basis of amount receivable / payable. Forexample, you want to view report for those parties from whom more than Rs.10,000 is due. In this case, you can use the Specify Filter on Amount data fieldprovided in the Report Options window.
On Account entries are those transactions for which bill-by-bill details have not been maintained but Bill-by-Bill Details feature is enabled in the relevant account.
Bills Summary report displays the Bills Receivable, Bills Payable, On Account Entries, Ledger Balance amounts for an Account / Account Group / All Accounts.
Bill-Wise Statement report displays a bill-wise detailed report for an account for a specified date range.
Exercise1 . Balance Sheet lists the:
a) Assets of the company c) Liabilities of the companyb) Net Profit / Loss d) All of the above
2 . Trial Balance is prepared to check:a) Debit Balances c) Arithmetic Accuracy of Recordb) Credit Balances d) All of the above

3 . Cash / Bank Book displays:Unit 8 – Accounting Reports 215
a) Only Bank transactions
c) Single transaction involving both Cash & Bank
b) Only Cash transactions d) Both Cash & Bank transactions
4 . Profit and Loss Account displays:
a) Net Increase in Cash c) Net Decrease in Outstandingb) Net Profit / Loss d) All of the above
5 . What are On Account Entries?
6 . What is the difference between Pending Bills and Due Bills?
7 . What is Ledger and what information it displays?
8 . What are the benefits of viewing Merged Account Ledger?
9 . If in Busy, Closing Trial balance is not matched then what could be the possible reason?
1 0 . Is there any report, which displays the amount to be paid to the parties on a specific date?
1 1 . Is there any report from which we can get balance of particular account on a particular date?
1 2 . Which report shows bill-wise outstanding?
1 3 . Which report shows profit or loss for a specified period?
1 4 . Which report shows movement of a particular Group of Account during a period?
1 5 . In which report we can view details of all Sales voucher entered in a specified period?

The objective of Education
is to prepare Young to
Educate themselves
throughout their Lives.
Unit 9Inventory Reports
The main objective of this Unit is to let User know about the inventory reportsprovided in BUSY. Inventory reports display stock of a particular item, movement ofgoods, and overall sale / purchase of an item in a year / month / day and so on.These reports help User to ascertain the stock of the company based on which thecompany can order goods that are comparatively less in stock. With these reports,User can also judge the items that have high volume of sales and items that havecomparatively low volume of sales.
Topics covered under this unit:
Stock Status
Inventory Books
Inventory Summaries
9.1 Stock StatusStock Status reports display the stock status of items in terms of quantity and value.To determine the quantity of the stock, transactions recorded using the Dual andInventory vouchers are taken into account and to determine the value of stock, the
Stock Val. Method specified in Administration
Configuration
Features / Options
Inventory tab or Self-Val. Price specified in the Item master is taken into account.
On selecting the Stock Status option, a list of reports is displayed. Various reports in the list are:
Closing Stock - GroupedClosing Stock - AlphabeticalClosing Stock - HierarchicalOpening Stock - GroupedOpening Stock - AlphabeticalOpening Stock - Hierarchical
Let us discuss these reports in detail.

218
Closing Stock – GroupedClosing Stock - Grouped report displays the closing balances of All Items / Group ofItems at the end of a specified month. On clicking the Closing Stock - Groupedoption, a Stock Status message box appears with following two options:
All Items – Select this option to view closing stock of all the items.
Group of Items – Select this option to view closing stock of all the itemsfalling under a particular Item Group.
On selecting any of the above option, a Report Options window appears. Given here are the data fields that appear in the Report Options window.
Specify the Group Name – Select the Item Group for which you want to view the report.
At the End of – Select the month at the end of which you want to view theclosing stock of the Item / Item Group.
Show Value of Items – Specify ‘Y’ in this data field to view value of the itemsin the report. On specifying ‘Y’ in this data field, an Amount column appearsin the report that displays the value of the closing stock of item.
Items to be Shown by – Select from the list whether Item Name, Alias orPrint Name is to be displayed in the report.
Show Zero Balance Items / Groups – Specify ‘Y’ in this data field to view Item/ Group of Items that have a zero stock.
Enter required data in all the data fields of Report Options window and click the Okbutton. On clicking the Ok button, a Group Stock Status report appears displayingclosing stock of the Items / Group of Items. Given here is a screenshot of GroupStock Status window.
Figure 9.1 Group Stock Status
Closing Stock - AlphabeticalClosing Stock – Alphabetical report displays closing stock of the Item / Item Groupwith all the items sorted in an alphabetical order as on specified date. On clickingthe Closing Stock – Alphabetical option, two options appear. The options are:
Balances Only – Balances Only report displays the closing stock of the item only.
Detailed – Detailed report displays the opening stock of the item, quantity in,quantity out and closing stock of the item.
Unit 9 – Inventory Reports 219
Let us discuss both these options one by one.
Balances Only
On clicking the Balances Only option, a Stock Status message box appears. Thismessage box appears if you have created more than one Material Centre master.In the message box, there are three options. The options are:
One MC – Select this option to view closing stock of the item at a single Material Centre.
Group of MC – Select this option to view closing stock of the item at a singleMaterial Centre Group. The stock of item at all the Material Centres fallingunder the selected Group will be taken into account for generating thereport.All MC – Select this option to view closing stock of item at all the Material Centres.
On selecting any of the above option, a Stock Status message box appears. In the message box, following options appear:
One Item – Select this option to view closing stock of a single item.
Group of Items – Select this option to view closing stock of a single ItemGroup. All the items falling under the selected Item Group will be displayedin the report.All Items – Select this option to view closing stock of all the items.
On selecting any of the above option, a Report Options window appears. Given here are the data fields that appear in the Report Options window.
Specify Item / Item Group – Select the Item / Item Group whose closing stockyou want to view.
Specify MC / MC Group – Select the Material Centre / Material Centre Groupfor which the closing stock is to be displayed.Report Date – Enter the date on which you want to view the closing stock of the item.
Show Total Stock / Book Stock Only (T / B) – Specify ‘T’ in this data field ifyou want to view total stock of the item otherwise specify ‘B’ in this datafield if you want to view book stock of the item. Difference between totalstock and book stock is that while calculating book stock, the stock lying atMaterial Centres in which Reflect stock in Balance Sheet option is set to Nowill not be taken into account whereas while calculating total stock of theitem, stock lying at such Material Centres will also be taken into account.Show Zero Stock Item – Specify ‘Y’ in this data field to view items having zero stock.
Show Parent Group – Specify ‘Y’ in this data field to view Parent Group of theitems in the report.

Item to be Shown by – Select from the list whether Item Name, Alias or PrintName is to be displayed in the report.

220
Show Value of Items – Specify ‘Y’ in this data field to view value of the closing stock in the report.
Enter required data in the data fields of Report Options window and click the Ok button. On clicking the Ok button, Stock Status report appears displaying closing stock of the Item / Item Group.
Detailed
On clicking the Detailed option, a Stock Status message box appears. In the message box, there are three options. The options are:
All Items – Select this option to view closing stock of all the items.Group of Items – Select this option to view closing stock of a single Item Group.One Item – Select this option to view closing stock of a single item.
On selecting any of the above option, a Stock Status message box appears. In the message box, there are two options. The options are:
One MC – Select this option to view closing stock of item at a single Material Centre.All MC – Select this option to view closing stock of item at all the Material Centres.
On selecting any of the above option, a Stock Status message box appears with following three options:
All Items – Select this option to view closing stock of all the items.Group of Item – Select this option to view closing stock of a single Item Group.One Item – Select this option to view closing stock of a single item.
On selecting any of the option, a Report Options window appears. Given here are the data fields that appear in the Report Options window.
Material Centre Name – Select the Material Centre for which the closing stock is to be displayed in the report.
Select Item / Item Group – Select the Item / Item Group for which the closing stock is to be displayed.
Starting Date – Enter the starting date from which the item details are to be considered for generating the report.
Ending Date – Enter the ending date up to which the item details are to be considered for generating the report.
Item to be Shown by – Select from the list whether Item Name, Alias or Print Name is to be displayed in the report.Masters to be Picked - In the list there are three options. The options are:

o All - Select this option if you want to pick all the masters for the report.
Unit 9 – Inventory Reports 221
o Moved - Select this option if you want to pick only those masters for the report that are used in any transaction.
o Moved / Closing Bal - Select this option if you want to pick those masters for the report that are either used in any transaction or have some closing balance.
Show Sales / Purchase separately – Specify ‘Y’ in this data field to view separate columns displaying sale and purchase of item.
Show Value of Items – Specify ‘Y’ in this data field to view value of closing stock in the report. Show Parent Group – Specify ‘Y’ in this data field to view Parent Group of the item in the report.
Consider Stock Transfer Entries – Specify ‘Y’ in this data field to include stocktransfer entries also while calculating the closing stock.
After entering the required data in the data fields of Report Options window, clickthe Ok button. On clicking the Ok button, a Stock Status window appearsdisplaying, opening stock, quantity in, quantity out and closing stock of item.
Closing Stock - HierarchicalClosing Stock Hierarchical report displays closing stock of the item with all theitems arranged as per their hierarchy. First, all the Primary groups are sorted inalphabetical order and then all the sub groups and items falling under Primarygroup will appear. On clicking this option, two options appear. The options are:
Balances Only – Balances Only report displays only the closing stock of the item.
Detailed – Detailed report displays the opening stock, quantity in, quantity out and closing stock of the item.
For Detailed help on the above two options, please refer to the Closing Stock –Alphabetical option above.
Till now, we have discussed all the Closing Stock reports. After this, all theOpening Stock reports appear in the list. Opening Stock reports display theopening stock of the items. All the Opening Stock reports are similar to theirrespective Closing Stock reports. Hence, for detailed explanation on OpeningStock - Grouped, Opening Stock – Alphabetical and Opening Stock – Hierarchicalreports, please refer to the corresponding Closing Stock reports.
9.2 Inventory BooksIn a general business scenario, numerous transactions take place such as sales /purchase of goods. In BUSY these transactions are recorded using variousvouchers such as Sales, Purchase, Stock Transfer and so on. From these vouchers,inventory related information is posted to Inventory Books.
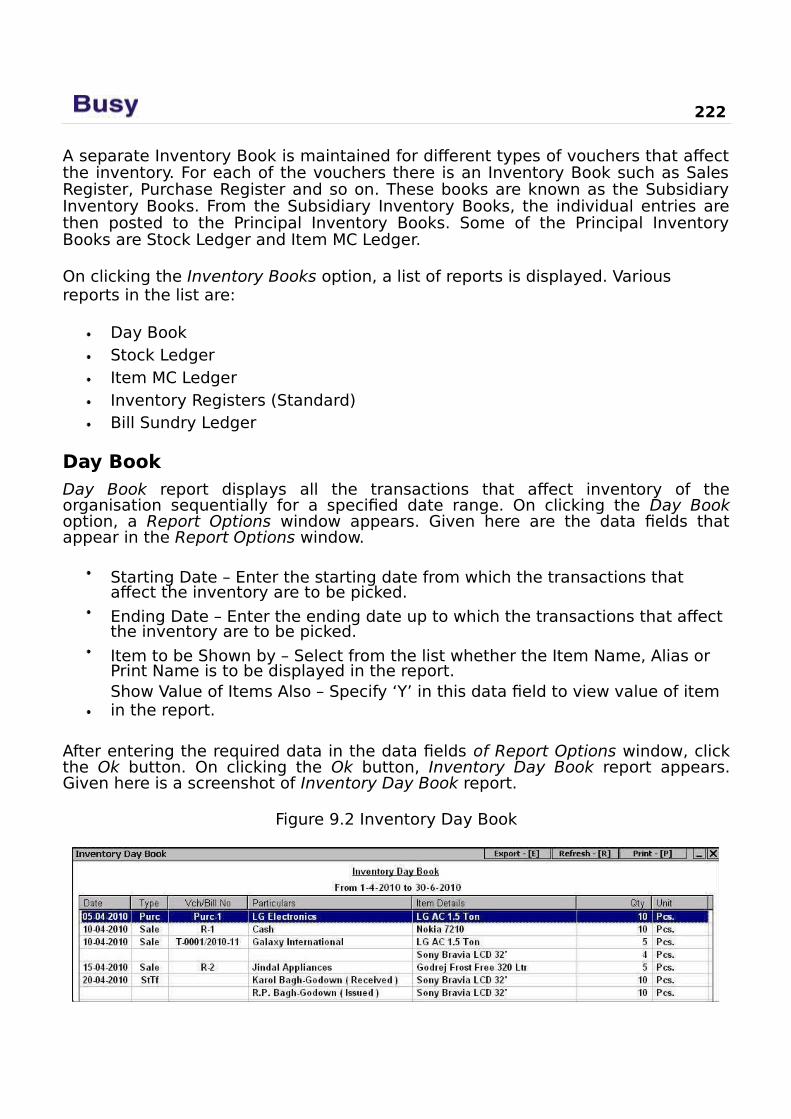
222
A separate Inventory Book is maintained for different types of vouchers that affectthe inventory. For each of the vouchers there is an Inventory Book such as SalesRegister, Purchase Register and so on. These books are known as the SubsidiaryInventory Books. From the Subsidiary Inventory Books, the individual entries arethen posted to the Principal Inventory Books. Some of the Principal InventoryBooks are Stock Ledger and Item MC Ledger.
On clicking the Inventory Books option, a list of reports is displayed. Various reports in the list are:
Day BookStock LedgerItem MC LedgerInventory Registers (Standard)Bill Sundry Ledger
Day BookDay Book report displays all the transactions that affect inventory of theorganisation sequentially for a specified date range. On clicking the Day Bookoption, a Report Options window appears. Given here are the data fields thatappear in the Report Options window.
Starting Date – Enter the starting date from which the transactions that affect the inventory are to be picked.
Ending Date – Enter the ending date up to which the transactions that affect the inventory are to be picked.
Item to be Shown by – Select from the list whether the Item Name, Alias or Print Name is to be displayed in the report.Show Value of Items Also – Specify ‘Y’ in this data field to view value of item in the report.
After entering the required data in the data fields of Report Options window, clickthe Ok button. On clicking the Ok button, Inventory Day Book report appears.Given here is a screenshot of Inventory Day Book report.
Figure 9.2 Inventory Day Book

Unit 9 – Inventory Reports 223
Stock LedgerStock Ledger displays all the transactions of an item sequentially within the specified date range. On clicking the Stock Ledger option, two options appear. Theoptions are:
Item-Wise - Select this option if you want to view the report item-wise i.e. allthe transactions involving the selected item will be displayed sequentially.
Merged Account – Select this option if you want to view combined report forall the items. On selecting this option, transactions will be displayedsequentially irrespective of the item used in them.
Let us discuss both these options one by one.
Item-Wise
On clicking the Item-Wise option, a Stock Ledger message box appears. Thismessage box appears if you have created more than one Material Centre master.In the message box, there are two options. The options are:
One MC – Select this option to view transactions involving a particular Material Centre.All MC – Select this option to view transactions for any Material Centre.
On selecting any of the above option, a Report Options window appears. Givenhere are the data fields that appear in the Report Options window.
Item Name – Select the item for which you want to view the report.
Select MC – Select the Material Centre at which the stock will be considered for generating the report.Starting Date – Enter the starting date from which transactions are to be picked.Ending Date – Enter the ending date up to which the transactions are to be picked.
Account to be Shown by – Select from the list whether Name, Alias or Print Name of the party used in voucher is displayed in the report.Show Value of Items – Specify ‘Y’ in this data field to view value of the items in the report.
Show Stock Transfer Entries – Specify ‘Y’ in this data field to pick stock transfer entries also in the report.
Enter required data in the data fields of Report Options window and click the OKbutton. On clicking the Ok button, Stock Ledger report appears displaying all thetransactions sequentially for the selected item.
Merged Items

On clicking the Merged Items option, a Merged Ledger message box appears. Inthe message box, there are two options. The options are:
224
Item Group – Select this option to view stock ledger for a single Item Group.All the items falling under the selected Item Group will be considered forgenerating the report.
Selected Item – Select this option to view stock ledger of selected items. Onselecting this option, a List of Items window appears in which you can selectthe required items.
On selecting any of the above option, a Report Options window appears. Given here are the data fields that appear in the Report Options window.
Item Group Name – Select the Item Group for which you want to view the report.
Generate Report for Single MC Only – Specify ‘Y’ in this data field, if youwant to generate stock ledger for a single Material Centre only.
Select MC – This data field gets active only if you have specified ‘Y’ in theGenerate Report for Single MC Only data field. Select the Material Centre forwhich the stock ledger is to be generated.
Starting Date – Enter the starting date from which the transactions are to bepicked for generating the report.
Ending Date – Enter the ending date up to which the transactions are to bepicked for generating the report.
Account to be Shown by – Select from the list whether Name, Alias or PrintName of the party used in the voucher is to be displayed in the report.
Show Actual Item Name – Specify ‘Y’ in this data field to view item name alsoin the report. On specifying ‘Y’ in this data field, an Item Name column,displaying name of the item used in transaction appear in the report.Show Value of Items – Specify ‘Y’ in this data field to view value of the item in the report.
Enter required data in the data fields of Report Options window and click the Okbutton. On clicking the Ok button, a Merged Stock Ledger report appears.
Item MC LedgerItem MC Ledger report displays all the transactions involving the selected Item andMaterial Centre. It is a filtered form of Stock Ledger report since it displays item-wise information of quantity in and quantity out at a particular Material Centre. Inother words, we can say that Item MC Ledger report is the Stock Ledger report of aparticular Material Centre. This report appears only if you have created more thanone Material Centre masters.
Material Centre RegisterMaterial Centre Register report displays information of all the inventory relatedtransactions at a Material Centre of the organisation sequentially for a specifieddate range. It displays information of quantity in and quantity out of all the itemsat a particular Material Centre. This report appears only if you have created morethan one Material Centre master.
Unit 9 – Inventory Reports 225
Inventory Registers (Standard)With Inventory Registers (Standard) option, you can view all the InventoryRegisters in Standard format. On clicking the Inventory Registers (Standard)option, a list of registers is displayed. Various Registers in the list are:
Sales RegisterPurchase RegisterSales Return RegisterPurchase Return RegisterStock Transfer Register
Sales Register
Sales Register displays all the sales transactions sequentially with in a specifieddate range. On clicking the Sales Register option, a Sales Register message boxappears. In the message box, there are four options. The options are:
All Parties – Select this option if you want to view sales transactions for all the parties.One Party – Select this option if you want to view sales transactions for a single party.
Group of Parties – Select this option if you want to view sales transactions fora particular group of parties.
Selected Parties – Select this option if you want to view sales transactions forselected parties. On selecting this option, a List of Accounts window appearsin which you can select the parties for which you want to view the report.
On selecting any of the above option, a Report Options window appears. Given here are the data fields that appear in the Report Options window.
Select Account / Group – Select the Party / Party Group for which you want toview the report. Voucher Series – Select the voucher series whose vouchersare to be displayed. If you want to view all the vouchers then select Alloption from the list.
Starting Date – Enter the starting date from which Sales vouchers are to bepicked for generating the report.
Ending Date – Enter the ending date up to which Sales vouchers are to bepicked for generating the report.
Account to be Shown by – Select from the list whether the Party Name, Aliasor Print Name is to be displayed in the report.
Item to be Shown By – Select from the list whether Item Name, Alias or PrintName is to be displayed in the report.Show Value of Items – Specify ‘Y’ in this data field to view value of item in the report.
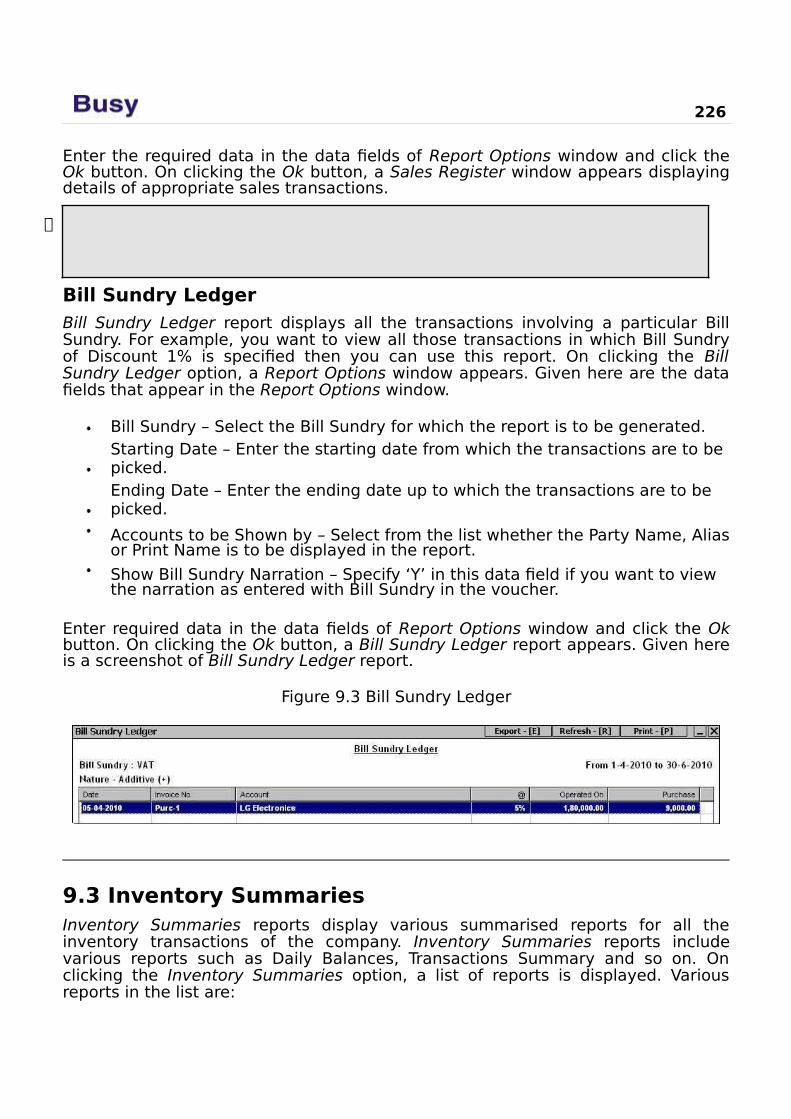
226
Enter the required data in the data fields of Report Options window and click theOk button. On clicking the Ok button, a Sales Register window appears displayingdetails of appropriate sales transactions.
All other Inventory Registers are totally similar to the Sales Register.For detailed help on message boxes and Report Options that appearin other Inventory Registers, please refer to Sales Register.
Bill Sundry LedgerBill Sundry Ledger report displays all the transactions involving a particular BillSundry. For example, you want to view all those transactions in which Bill Sundryof Discount 1% is specified then you can use this report. On clicking the BillSundry Ledger option, a Report Options window appears. Given here are the datafields that appear in the Report Options window.
Bill Sundry – Select the Bill Sundry for which the report is to be generated.Starting Date – Enter the starting date from which the transactions are to be picked.Ending Date – Enter the ending date up to which the transactions are to be picked.
Accounts to be Shown by – Select from the list whether the Party Name, Aliasor Print Name is to be displayed in the report.
Show Bill Sundry Narration – Specify ‘Y’ in this data field if you want to view the narration as entered with Bill Sundry in the voucher.
Enter required data in the data fields of Report Options window and click the Okbutton. On clicking the Ok button, a Bill Sundry Ledger report appears. Given hereis a screenshot of Bill Sundry Ledger report.
Figure 9.3 Bill Sundry Ledger
9.3 Inventory SummariesInventory Summaries reports display various summarised reports for all theinventory transactions of the company. Inventory Summaries reports includevarious reports such as Daily Balances, Transactions Summary and so on. Onclicking the Inventory Summaries option, a list of reports is displayed. Variousreports in the list are:

Unit 9 – Inventory Reports 227
Daily BalancesDaily SummaryMonthly SummaryConsolidated SummaryTransaction SummaryMin. / Max. BalancesCheck Negative StockUnmoved ItemsItem-Wise DiscountItem Critical levels
Daily BalancesDaily Balances report displays date-wise closing balance for an item for thespecified date range. Closing balance will be calculated based on the openingbalance of the item and the vouchers that affect the item on a particular date. Onselecting the Daily Balances option, a Report Options window appears. Given hereare the data fields that appear in the Report Options window.
Item Name – Select the item whose daily balance you want to view.
Generate Report for Single MC – Specify ‘Y’ in this data field if you want to view closing stock of the item at a particular Material Centre.Material Centre Name – Select the Material Centre for which the report is to be generated.
Starting Date – Enter the starting date from which you want to view closing balance of the item.
Ending Date – Enter the ending date up to which you want to view closing balance of the item Show Value of Items – Specify ‘Y’ in this data field to view value of the item in the report.
Enter required data in the data fields of Report Options window and click the Ok button. On clicking the Ok button, a Daily Balances report appears. Given here is ascreenshot of Daily Balances report.
Figure 9.4 Daily Balances
228
Daily SummaryDaily Summary report displays, date-wise opening balance, quantity in, quantityout, and the closing balance of an item for the specified date range. On clickingthe Daily Summary option, a Report Options window appears. Given here are thedata fields that appear in the Report Options window.
Item Name – Select the item whose daily summary is to be displayed.
Generate Report for single MC only – Specify ‘Y’ in this data field to viewreport for a particular Material Centre.Material Centre Name – Select Material Centre for which the report is to be displayed.
Starting Date – Enter the starting date from which you want to view the dailysummary of the item.
Ending Date – Enter the ending date up to which you want to view the dailysummary of the item.Show Value of Items – Specify ‘Y’ in this data field to view value of the items in the report.
Show Unmoved Dates Also – Specify ‘Y’ in this data field to view dailysummary for those dates also on which no transaction has taken place i.e.the dates on which no movement of stock is made.
Enter required data in the data fields of Report Options window and click the Okbutton. On clicking the Ok button, a Daily Summary report appears displayingopening stock, quantity in, quantity out and closing balance of the item.
Monthly SummaryMonthly Summary report displays, month-wise opening balance, quantity in,quantity out, and the closing balance of Item / Item Group. On clicking the MonthlySummary option, two options are displayed. The options are:
Vertical - Click this option if you want to view the Monthly Summary reportwith the months arranged vertically. In other words, the months are listed inone column and the related information for each month is displayed in aseparate row. On selecting this option, a Monthly Summary message boxappears. In the message box there are following two options:
o One Item – Select this option if you want to view report for a single item.
o Item Group – Select this option if you want to view report for a single Item Group.
Horizontal - Click this option if you want to view Monthly Summary reportwith the months arranged horizontally. In other words, the items are listed inone row and the related information for each item is displayed month-wise inseparate columns. On selecting this option, a Monthly Summary messagebox appears with following two options:
o Group of Items – Select this option if you want to view report for a particular Group of items.
o All Items – Select this option if you want to view report for all the items.
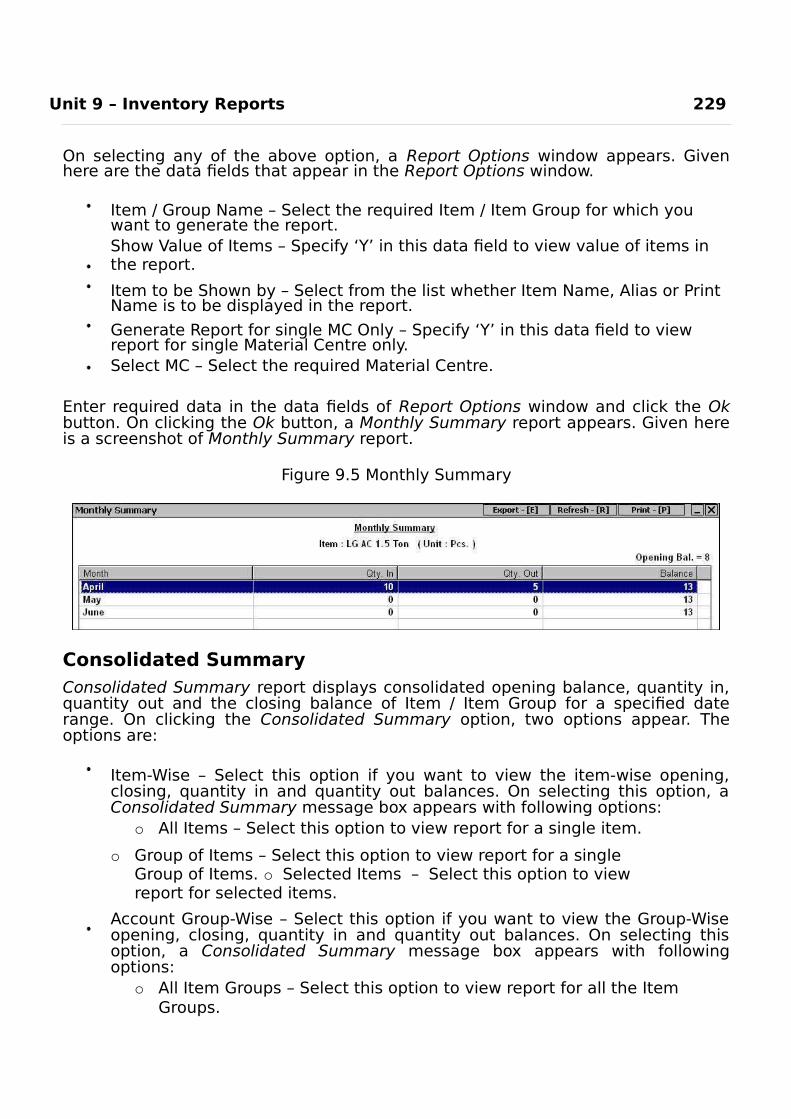
Unit 9 – Inventory Reports 229
On selecting any of the above option, a Report Options window appears. Givenhere are the data fields that appear in the Report Options window.
Item / Group Name – Select the required Item / Item Group for which you want to generate the report.Show Value of Items – Specify ‘Y’ in this data field to view value of items in the report.
Item to be Shown by – Select from the list whether Item Name, Alias or Print Name is to be displayed in the report.
Generate Report for single MC Only – Specify ‘Y’ in this data field to view report for single Material Centre only.Select MC – Select the required Material Centre.
Enter required data in the data fields of Report Options window and click the Okbutton. On clicking the Ok button, a Monthly Summary report appears. Given hereis a screenshot of Monthly Summary report.
Figure 9.5 Monthly Summary
Consolidated SummaryConsolidated Summary report displays consolidated opening balance, quantity in,quantity out and the closing balance of Item / Item Group for a specified daterange. On clicking the Consolidated Summary option, two options appear. Theoptions are:
Item-Wise – Select this option if you want to view the item-wise opening,closing, quantity in and quantity out balances. On selecting this option, aConsolidated Summary message box appears with following options:
o All Items – Select this option to view report for a single item.
o Group of Items – Select this option to view report for a single Group of Items. o Selected Items – Select this option to view report for selected items.
Account Group-Wise – Select this option if you want to view the Group-Wiseopening, closing, quantity in and quantity out balances. On selecting thisoption, a Consolidated Summary message box appears with followingoptions:
o All Item Groups – Select this option to view report for all the Item Groups.
o Group of Groups – Select this option to view report for particular Item Group.
230
On selecting any of the above option, a Report Options window appears. Enter therequired data in the data fields of Report Options window and click the Ok button.On clicking the Ok button, a Consolidated Summary report appears. The reportdisplays the consolidated opening, quantity in, quantity out and closing balance ofItems / Item Groups for the specified date range.
Transaction SummaryTransaction Summary report displays opening balance, details of quantity in andquantity out into various inventory and dual voucher types and the closing balanceof Item / Item Group for a specified date range. In other words, TransactionSummary report is an extension of the Consolidated Summary report. This reportcontains separate quantity in and quantity out columns for the following vouchertypes: Sales, Purchase, Sales Return, Purchase Return and Stock Transfer.
Min. / Max. BalanceMin. / Max. Balances report displays minimum and maximum stock level of theitems with the organisation during the specified date range. Using this report, youcan find out the minimum and maximum stock level of All Items / Item Group / OneItem at a Material Centre / All Material Centres / Material Centre Group during aspecified date range. On clicking the Min. / Max. Balances option, an Item Min. /Max. Balances message box appears. The options in the message box are:
All Items – Select this option to view minimum and maximum balance of all the items within a specified date range.
Group of Items - Select this option to view minimum and maximum balance of a Group of Items within a specified date range.
One Item - Select this option to view minimum and maximum balance of a single item within a specified date range.
On selecting any of the above option, an Item Min. / Max. Balances message boxappears. This message box appears if you have created more than one MaterialCentre master. The options in the message box are:
One MC – Select this option to consider stock level of the item at a single Material Centre.
Group of MC – Select this option to consider stock level of the item at a single Material Centre Group.All MC – Select this option to consider stock level of the item at all the Material Centres.
On selecting any of the above option, a Report Options window appears. Enter required data in the data fields of Report Options window and click the Ok button. On clicking the Ok button, an Item Min.
/ Max. Balance report appears. The report displays the dates on which the stock of the items is minimum and maximum.
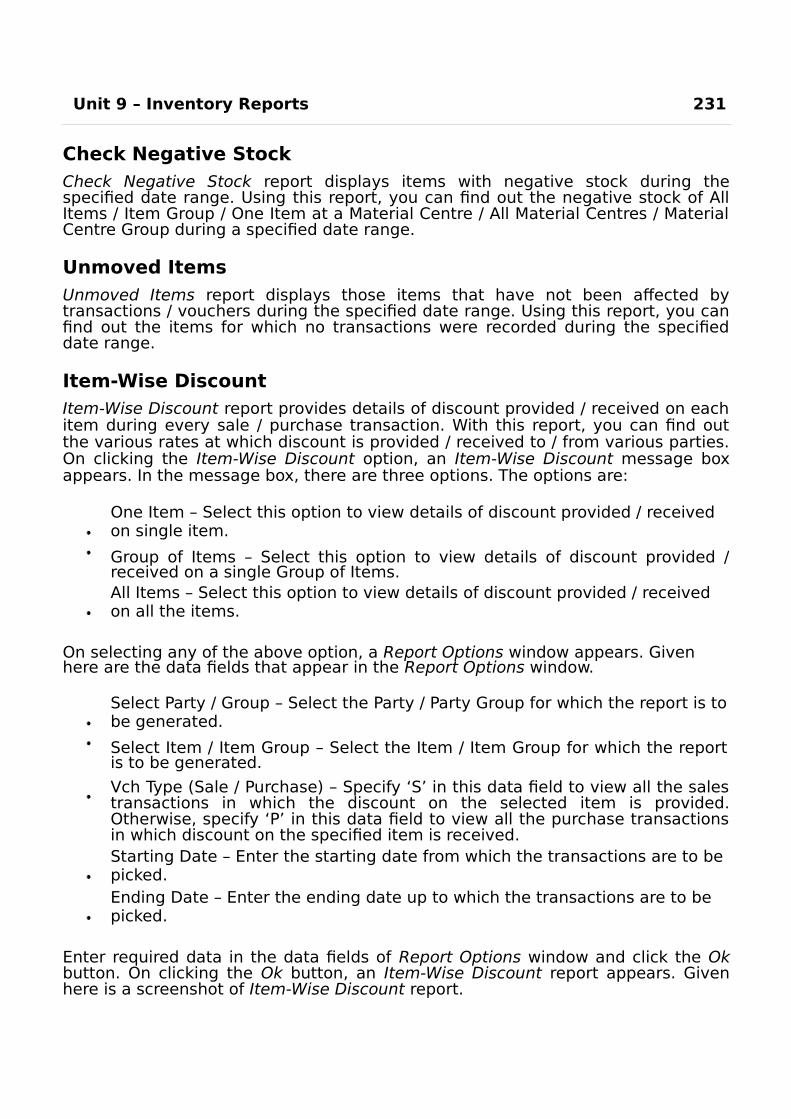
Unit 9 – Inventory Reports 231
Check Negative StockCheck Negative Stock report displays items with negative stock during thespecified date range. Using this report, you can find out the negative stock of AllItems / Item Group / One Item at a Material Centre / All Material Centres / MaterialCentre Group during a specified date range.
Unmoved ItemsUnmoved Items report displays those items that have not been affected bytransactions / vouchers during the specified date range. Using this report, you canfind out the items for which no transactions were recorded during the specifieddate range.
Item-Wise DiscountItem-Wise Discount report provides details of discount provided / received on eachitem during every sale / purchase transaction. With this report, you can find outthe various rates at which discount is provided / received to / from various parties.On clicking the Item-Wise Discount option, an Item-Wise Discount message boxappears. In the message box, there are three options. The options are:
One Item – Select this option to view details of discount provided / received on single item.
Group of Items – Select this option to view details of discount provided /received on a single Group of Items.All Items – Select this option to view details of discount provided / received on all the items.
On selecting any of the above option, a Report Options window appears. Given here are the data fields that appear in the Report Options window.
Select Party / Group – Select the Party / Party Group for which the report is tobe generated.
Select Item / Item Group – Select the Item / Item Group for which the reportis to be generated.
Vch Type (Sale / Purchase) – Specify ‘S’ in this data field to view all the salestransactions in which the discount on the selected item is provided.Otherwise, specify ‘P’ in this data field to view all the purchase transactionsin which discount on the specified item is received.Starting Date – Enter the starting date from which the transactions are to be picked.Ending Date – Enter the ending date up to which the transactions are to be picked.
Enter required data in the data fields of Report Options window and click the Okbutton. On clicking the Ok button, an Item-Wise Discount report appears. Givenhere is a screenshot of Item-Wise Discount report.
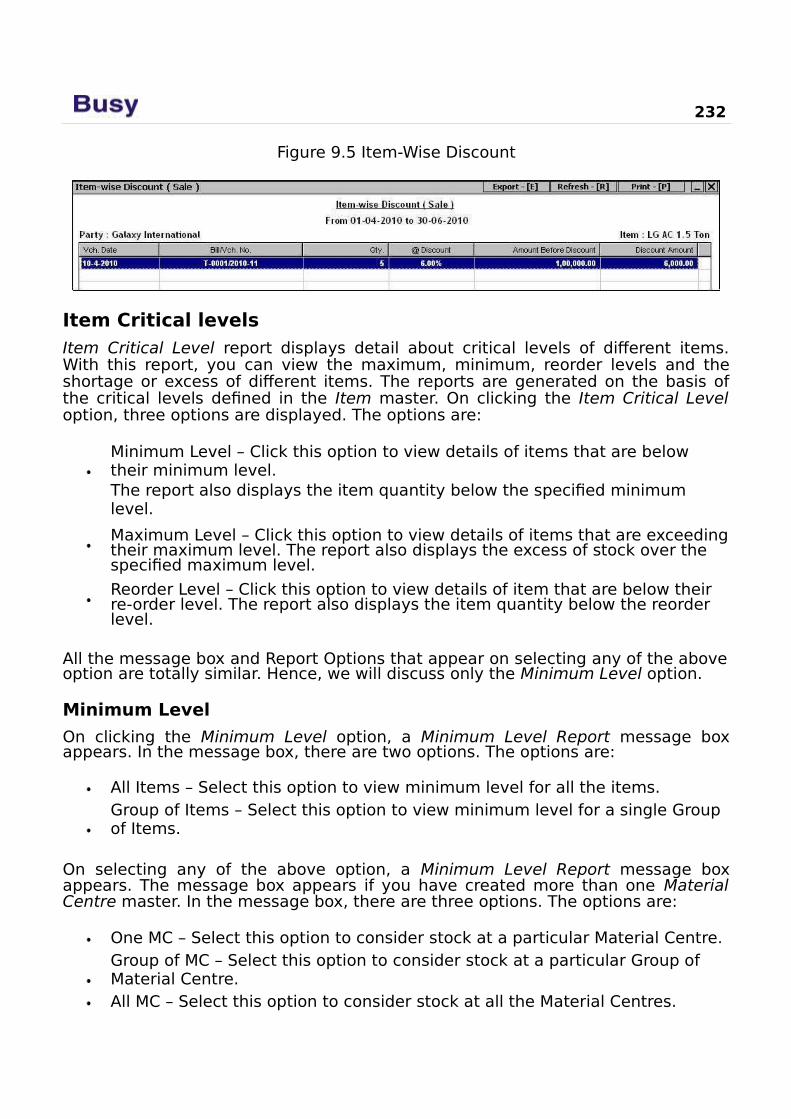
232
Figure 9.5 Item-Wise Discount
Item Critical levelsItem Critical Level report displays detail about critical levels of different items.With this report, you can view the maximum, minimum, reorder levels and theshortage or excess of different items. The reports are generated on the basis ofthe critical levels defined in the Item master. On clicking the Item Critical Leveloption, three options are displayed. The options are:
Minimum Level – Click this option to view details of items that are below their minimum level.The report also displays the item quantity below the specified minimum level.
Maximum Level – Click this option to view details of items that are exceedingtheir maximum level. The report also displays the excess of stock over the specified maximum level.
Reorder Level – Click this option to view details of item that are below their re-order level. The report also displays the item quantity below the reorder level.
All the message box and Report Options that appear on selecting any of the aboveoption are totally similar. Hence, we will discuss only the Minimum Level option.
Minimum Level
On clicking the Minimum Level option, a Minimum Level Report message boxappears. In the message box, there are two options. The options are:
All Items – Select this option to view minimum level for all the items.Group of Items – Select this option to view minimum level for a single Group of Items.
On selecting any of the above option, a Minimum Level Report message boxappears. The message box appears if you have created more than one MaterialCentre master. In the message box, there are three options. The options are:
One MC – Select this option to consider stock at a particular Material Centre.Group of MC – Select this option to consider stock at a particular Group of Material Centre.All MC – Select this option to consider stock at all the Material Centres.

On selecting any of the above option, a Report Options window appears. Given here are the data fields that appear in the Report Options window.
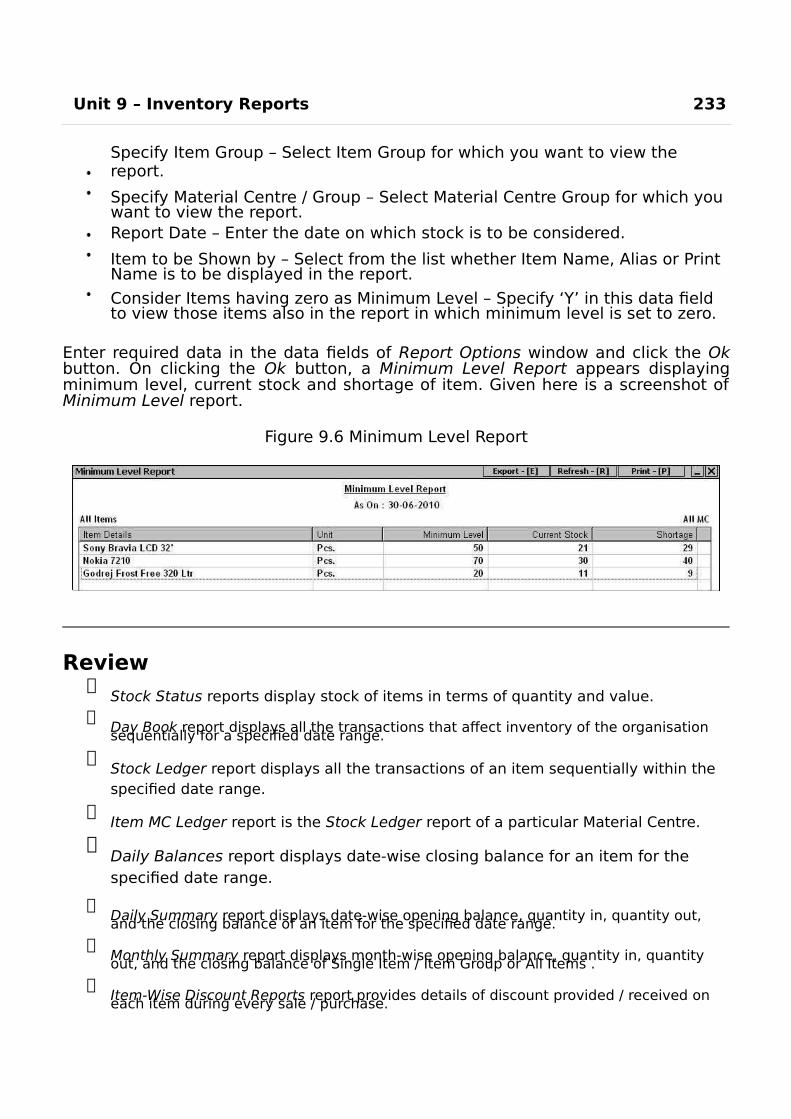
Unit 9 – Inventory Reports 233
Specify Item Group – Select Item Group for which you want to view the report.
Specify Material Centre / Group – Select Material Centre Group for which you want to view the report.Report Date – Enter the date on which stock is to be considered.
Item to be Shown by – Select from the list whether Item Name, Alias or Print Name is to be displayed in the report.
Consider Items having zero as Minimum Level – Specify ‘Y’ in this data field to view those items also in the report in which minimum level is set to zero.
Enter required data in the data fields of Report Options window and click the Okbutton. On clicking the Ok button, a Minimum Level Report appears displayingminimum level, current stock and shortage of item. Given here is a screenshot ofMinimum Level report.
Figure 9.6 Minimum Level Report
Review
Stock Status reports display stock of items in terms of quantity and value.
Day Book report displays all the transactions that affect inventory of the organisation sequentially for a specified date range.
Stock Ledger report displays all the transactions of an item sequentially within the specified date range.
Item MC Ledger report is the Stock Ledger report of a particular Material Centre.
Daily Balances report displays date-wise closing balance for an item for the specified date range.
Daily Summary report displays date-wise opening balance, quantity in, quantity out, and the closing balance of an item for the specified date range.
Monthly Summary report displays month-wise opening balance, quantity in, quantity out, and the closing balance of Single Item / Item Group or All Items .
Item-Wise Discount Reports report provides details of discount provided / received on each item during every sale / purchase.
234
Item Critical Level report displays detail about the critical levels of the differentitems. With this report, you can view the maximum, minimum, re-order levelsand the shortage or excess of different items.
Exercise1 . Stock Status report display stock in terms of:
a) Quantity c) Valueb) Quantity & Value d) Priority
2 . Item MC Ledger report appears on enabling:a) Multi Godown Feature c) Separate Stock updation date in Dual Vouchersb) Allocate Expense / Purc. to Items d) None of the above
3 . Daily Balances report display:a) Date-Wise Closing Balance c) Date-Wise Opening Balanceb) Date-Wise Cash Transactions d) Date-Wise Credit Transactions
4 . Min / Max Balances Report displays:a) Minimum Cash Balance c) Min & Max Cash Balanceb) Minimum Stock Level d) Min & Max Stock Level
5 . Unmoved Item report displays:a) Items with Negative Stock c) Item with Zero Stockb) Items not used in any transaction d) Items lying unsold
6 . What is the difference between Total Stock & Book Stock?
7 . What is the difference between Transaction Summary and Consolidated Summary report?
8 . What is the difference between Closing Stock Alphabetical and Closing Stock Hierarchical report?
9 . What is the use of Inventory Day Book?
1 0 . Which report can be used to view all sales transactions on specified date?
1 1 . What is the benefit of Item-Wise Discount report?

An Ounce of Practice,
Is Worth More Than
Tons of Preaching.
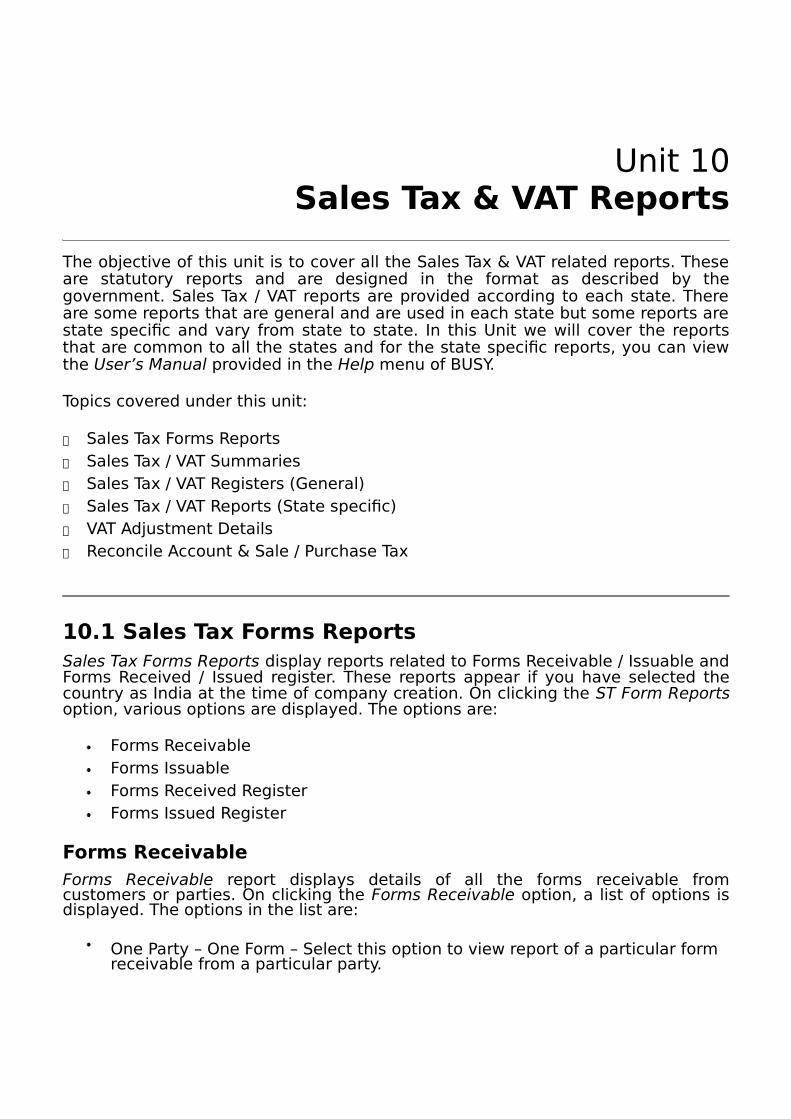
Unit 10Sales Tax & VAT Reports
The objective of this unit is to cover all the Sales Tax & VAT related reports. Theseare statutory reports and are designed in the format as described by thegovernment. Sales Tax / VAT reports are provided according to each state. Thereare some reports that are general and are used in each state but some reports arestate specific and vary from state to state. In this Unit we will cover the reportsthat are common to all the states and for the state specific reports, you can viewthe User’s Manual provided in the Help menu of BUSY.
Topics covered under this unit:
Sales Tax Forms Reports Sales Tax / VAT Summaries Sales Tax / VAT Registers (General) Sales Tax / VAT Reports (State specific) VAT Adjustment Details Reconcile Account & Sale / Purchase Tax
10.1 Sales Tax Forms ReportsSales Tax Forms Reports display reports related to Forms Receivable / Issuable andForms Received / Issued register. These reports appear if you have selected thecountry as India at the time of company creation. On clicking the ST Form Reportsoption, various options are displayed. The options are:
Forms ReceivableForms IssuableForms Received RegisterForms Issued Register
Forms ReceivableForms Receivable report displays details of all the forms receivable fromcustomers or parties. On clicking the Forms Receivable option, a list of options isdisplayed. The options in the list are:
One Party – One Form – Select this option to view report of a particular form receivable from a particular party.
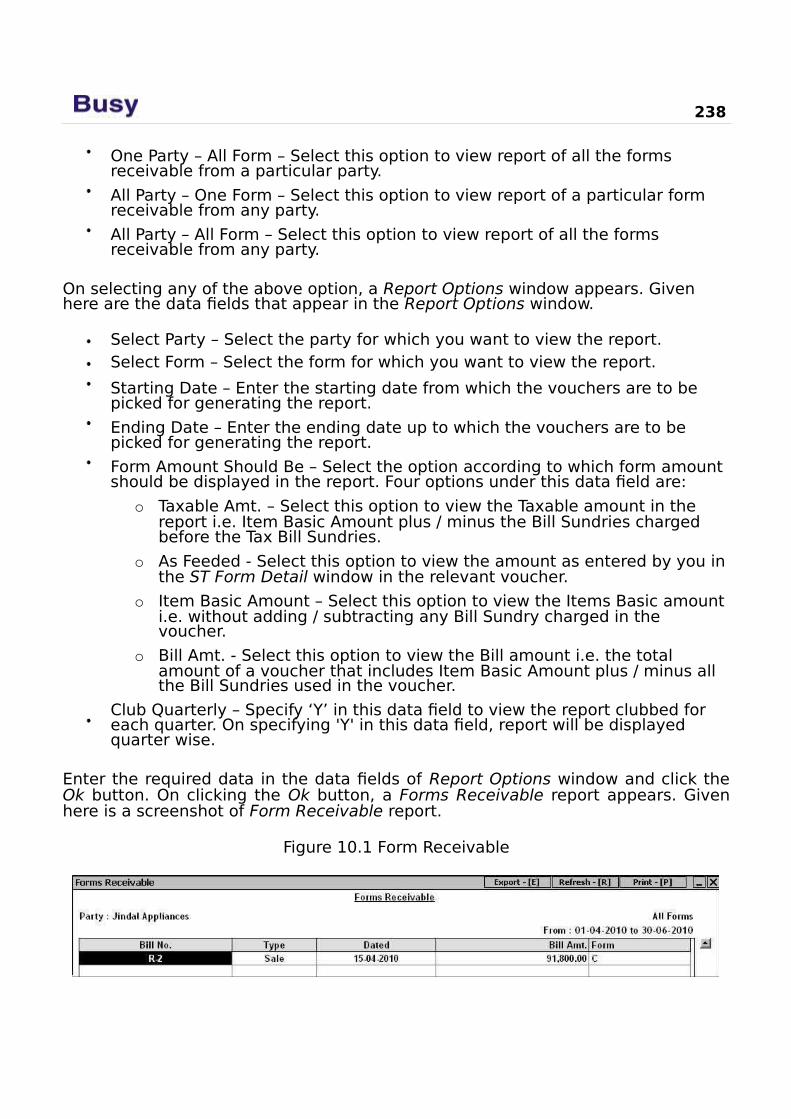
238
One Party – All Form – Select this option to view report of all the forms receivable from a particular party.
All Party – One Form – Select this option to view report of a particular form receivable from any party.
All Party – All Form – Select this option to view report of all the forms receivable from any party.
On selecting any of the above option, a Report Options window appears. Given here are the data fields that appear in the Report Options window.
Select Party – Select the party for which you want to view the report.Select Form – Select the form for which you want to view the report.
Starting Date – Enter the starting date from which the vouchers are to be picked for generating the report.
Ending Date – Enter the ending date up to which the vouchers are to be picked for generating the report.
Form Amount Should Be – Select the option according to which form amount should be displayed in the report. Four options under this data field are:
o Taxable Amt. – Select this option to view the Taxable amount in the report i.e. Item Basic Amount plus / minus the Bill Sundries charged before the Tax Bill Sundries.
o As Feeded - Select this option to view the amount as entered by you inthe ST Form Detail window in the relevant voucher.
o Item Basic Amount – Select this option to view the Items Basic amount i.e. without adding / subtracting any Bill Sundry charged in the voucher.
o Bill Amt. - Select this option to view the Bill amount i.e. the total amount of a voucher that includes Item Basic Amount plus / minus all the Bill Sundries used in the voucher.
Club Quarterly – Specify ‘Y’ in this data field to view the report clubbed for each quarter. On specifying 'Y' in this data field, report will be displayed quarter wise.
Enter the required data in the data fields of Report Options window and click theOk button. On clicking the Ok button, a Forms Receivable report appears. Givenhere is a screenshot of Form Receivable report.
Figure 10.1 Form Receivable
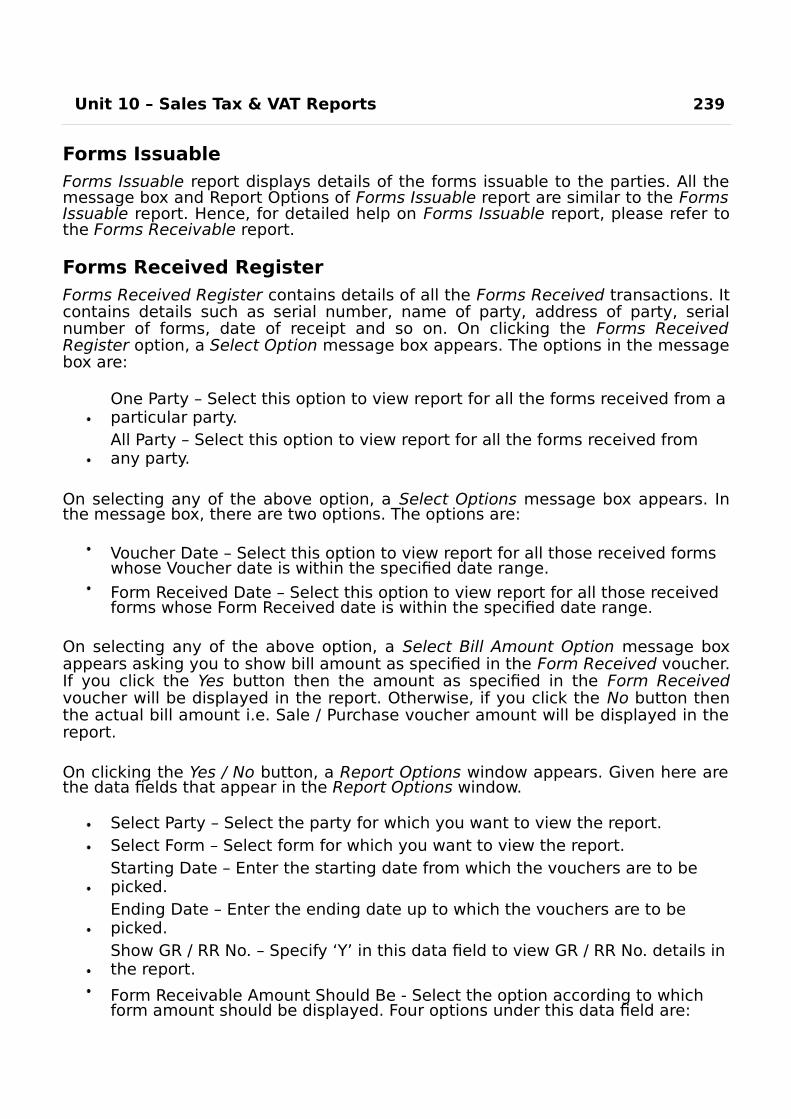
Unit 10 – Sales Tax & VAT Reports 239
Forms IssuableForms Issuable report displays details of the forms issuable to the parties. All themessage box and Report Options of Forms Issuable report are similar to the FormsIssuable report. Hence, for detailed help on Forms Issuable report, please refer tothe Forms Receivable report.
Forms Received RegisterForms Received Register contains details of all the Forms Received transactions. Itcontains details such as serial number, name of party, address of party, serialnumber of forms, date of receipt and so on. On clicking the Forms ReceivedRegister option, a Select Option message box appears. The options in the messagebox are:
One Party – Select this option to view report for all the forms received from aparticular party.All Party – Select this option to view report for all the forms received from any party.
On selecting any of the above option, a Select Options message box appears. Inthe message box, there are two options. The options are:
Voucher Date – Select this option to view report for all those received forms whose Voucher date is within the specified date range.
Form Received Date – Select this option to view report for all those received forms whose Form Received date is within the specified date range.
On selecting any of the above option, a Select Bill Amount Option message boxappears asking you to show bill amount as specified in the Form Received voucher.If you click the Yes button then the amount as specified in the Form Receivedvoucher will be displayed in the report. Otherwise, if you click the No button thenthe actual bill amount i.e. Sale / Purchase voucher amount will be displayed in thereport.
On clicking the Yes / No button, a Report Options window appears. Given here arethe data fields that appear in the Report Options window.
Select Party – Select the party for which you want to view the report.Select Form – Select form for which you want to view the report.Starting Date – Enter the starting date from which the vouchers are to be picked.Ending Date – Enter the ending date up to which the vouchers are to be picked.Show GR / RR No. – Specify ‘Y’ in this data field to view GR / RR No. details inthe report.
Form Receivable Amount Should Be - Select the option according to which form amount should be displayed. Four options under this data field are:

o Taxable Amt. – Select this option to view the Taxable amount in the report i.e. Item Basic Amount plus / minus the Bill Sundries charged before the Tax Bill Sundries.
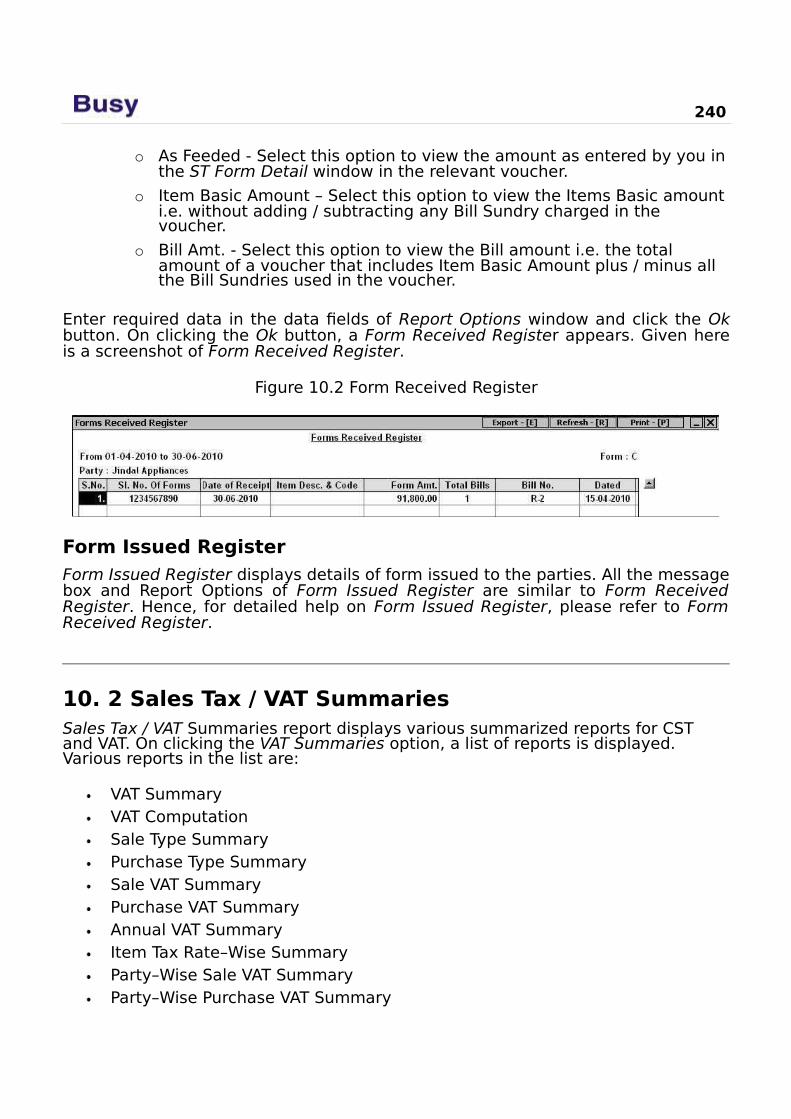
240
o As Feeded - Select this option to view the amount as entered by you inthe ST Form Detail window in the relevant voucher.
o Item Basic Amount – Select this option to view the Items Basic amount i.e. without adding / subtracting any Bill Sundry charged in the voucher.
o Bill Amt. - Select this option to view the Bill amount i.e. the total amount of a voucher that includes Item Basic Amount plus / minus all the Bill Sundries used in the voucher.
Enter required data in the data fields of Report Options window and click the Okbutton. On clicking the Ok button, a Form Received Register appears. Given hereis a screenshot of Form Received Register.
Figure 10.2 Form Received Register
Form Issued RegisterForm Issued Register displays details of form issued to the parties. All the messagebox and Report Options of Form Issued Register are similar to Form ReceivedRegister. Hence, for detailed help on Form Issued Register, please refer to FormReceived Register.
10. 2 Sales Tax / VAT SummariesSales Tax / VAT Summaries report displays various summarized reports for CST and VAT. On clicking the VAT Summaries option, a list of reports is displayed. Various reports in the list are:
VAT SummaryVAT ComputationSale Type SummaryPurchase Type SummarySale VAT SummaryPurchase VAT SummaryAnnual VAT SummaryItem Tax Rate–Wise SummaryParty–Wise Sale VAT SummaryParty–Wise Purchase VAT Summary
Unit 10 – Sales Tax & VAT Reports 241
Item–Wise Sale VAT SummaryItem–Wise Purchase VAT SummaryParty-Wise Sale CST SummaryParty-Wise Purchase CST SummaryItem-Wise Sale CST SummaryItem-Wise Purchase CST Summary
Let us discuss these reports in detail.
VAT SummaryVAT Summary report forms the base for all other VAT reports. It is a detailedsummary of all the transactions related to VAT and CST. It takes into account TaxFree and Exempted Sale / Purchase and Purchase CST that are not included in theVAT Computation report. The report calculates Nett Input VAT, Total Output VAT,Nett VAT payable / refundable and CST Payable. On clicking the VAT Summaryoption, a Report Options window appears. Enter required data in the data fields ofReport Options window and click the Ok button. On clicking the Ok button, a VATSummary report appears. Given here is a screenshot of VAT Summary report.
Image on next Page
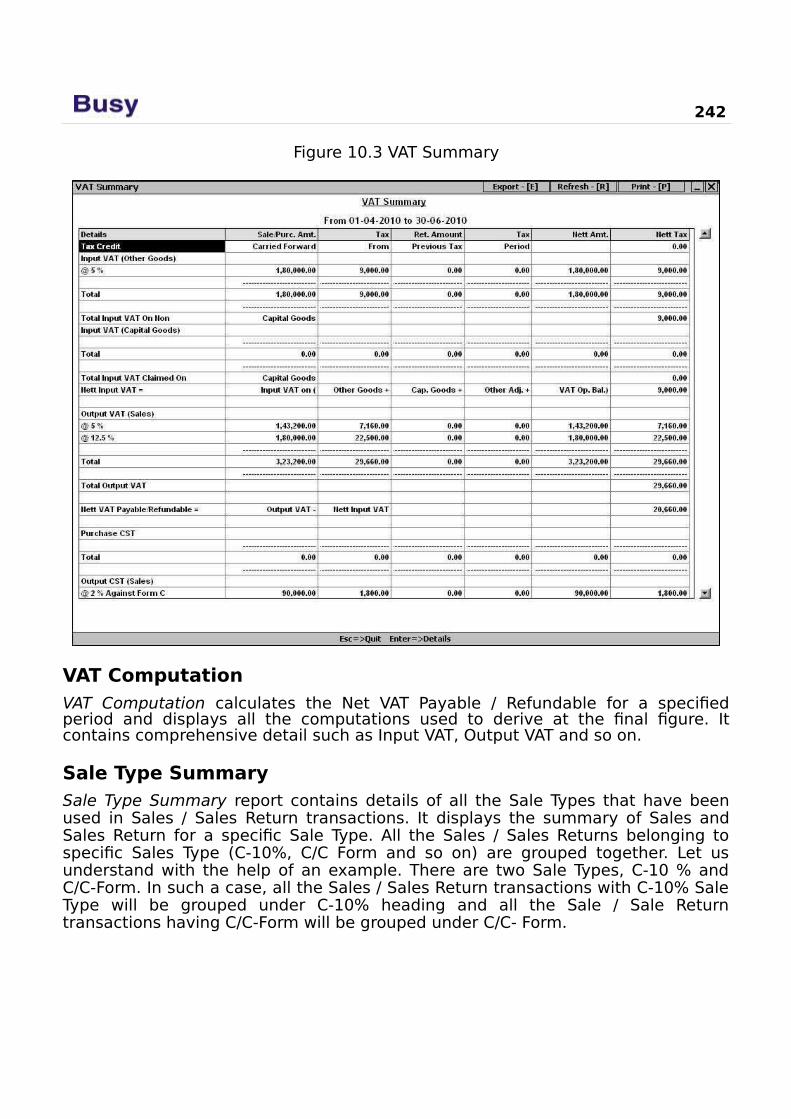
242
Figure 10.3 VAT Summary
VAT ComputationVAT Computation calculates the Net VAT Payable / Refundable for a specifiedperiod and displays all the computations used to derive at the final figure. Itcontains comprehensive detail such as Input VAT, Output VAT and so on.
Sale Type SummarySale Type Summary report contains details of all the Sale Types that have beenused in Sales / Sales Return transactions. It displays the summary of Sales andSales Return for a specific Sale Type. All the Sales / Sales Returns belonging tospecific Sales Type (C-10%, C/C Form and so on) are grouped together. Let usunderstand with the help of an example. There are two Sale Types, C-10 % andC/C-Form. In such a case, all the Sales / Sales Return transactions with C-10% SaleType will be grouped under C-10% heading and all the Sale / Sale Returntransactions having C/C-Form will be grouped under C/C- Form.
Unit 10 – Sales Tax & VAT Reports 243
Purchase Type SummaryPurchase Type Summary report contains details of all the Purchase Types thathave been used in Purchase / Purchase Return transactions. It displays thesummary of Purchase and Purchase Return transactions having a specific PurchaseType. All the Purchase / Purchase Returns belonging to specific Purchase Type (C-10%, C/C - Form and so on) are grouped together and displayed under separateheadings.
Annual VAT SummaryAnnual VAT Summary report displays the annual taxable and tax amountbifurcated either monthly or quarterly. On selecting the Annual VAT Summaryoption, an Annual Tax Summary message box appears. In the message box, thereare two options. The options are:
Month–Wise – Select this option to view month–wise tax details.Quarter-Wise – Select this option to view quarter–wise tax details.
On selecting any of the above option, a Report Options window appears. Givenhere are the data fields that appear in the Report Options window.
Include Sale / Purchase Return – Specify ‘Y’ in this data field to include sale / purchase transactions in the report.
Enter required data in the data field of Report Options window and click the Okbutton. On clicking the Ok button, Annual VAT Summary report appears. Givenhere are the screenshots of month–wise and quarter–wise Annual VAT Summaryreports.
Image on next Page
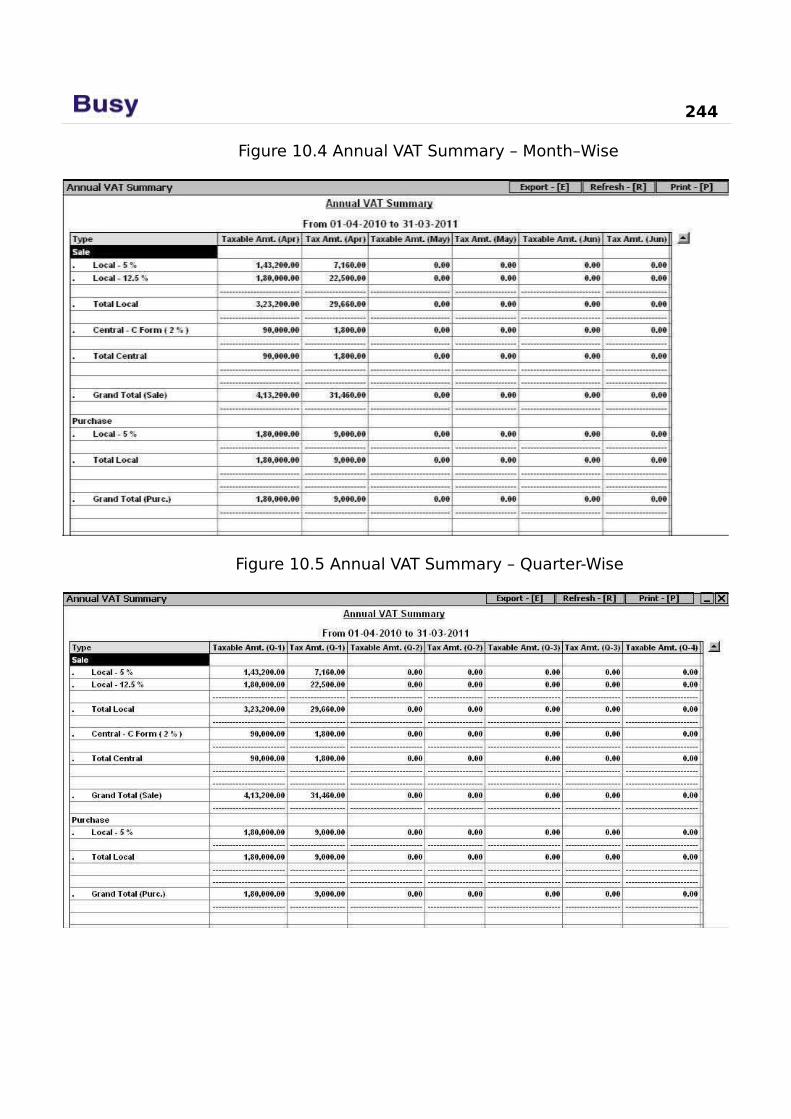
244
Figure 10.4 Annual VAT Summary – Month–Wise
Figure 10.5 Annual VAT Summary – Quarter-Wise

Unit 10 – Sales Tax & VAT Reports 245
Item Tax Rate-Wise SummaryItem Tax Rate-Wise Summary report displays the tax wise details of items. Thereport generate summary of Opening Stock, Purchase, Sales and Closing Stock ofitems clubbed on the basis of rate of tax. On clicking the Item Tax Rate-WiseSummary option, an Item Tax Rate-Wise Summary message box appears. In themessage box, there are two options. The options are:
All Items – Select this option to view tax rate–wise summary of all the items.
Group of Items – Select this option to view tax rate–wise summary of a particular Group of Items.
On selecting any of the above option, an Item Tax Rate-Wise Summary message box appears. In the message box, there are three options. The options are:
Local – Select this option to view report for only local transactions.Central – Select this option to view report for only central transactions.Both – Select this option to view report for both local and central transactions.
On selecting any of the above option, a Report Options window appears. Given here are the data fields that appear in the Report Options window.
Specify the Group Name – Select the Item Group for which you want to view the report.Starting Date – Enter the starting date from which the transactions are to be picked.Ending Date – Enter the ending date up to which the transactions are to be picked.
Consider Sales and Purchase Return Entries – Specify ‘Y’ in this data field to include sale / purchase return transactions also in the report.
Include CST in Purchase – Specify ‘Y’ in this data field if you want to include central purchase transactions also in the report.
Enter required data in the data fields of Report Options window and click the Okbutton. On clicking the Ok button, Item Tax Rate-Wise Summary report appears.Given here is a screenshot of Item Tax Rate-Wise Summary report.
Figure 10.6 Item Tax Rate -Wise Summary
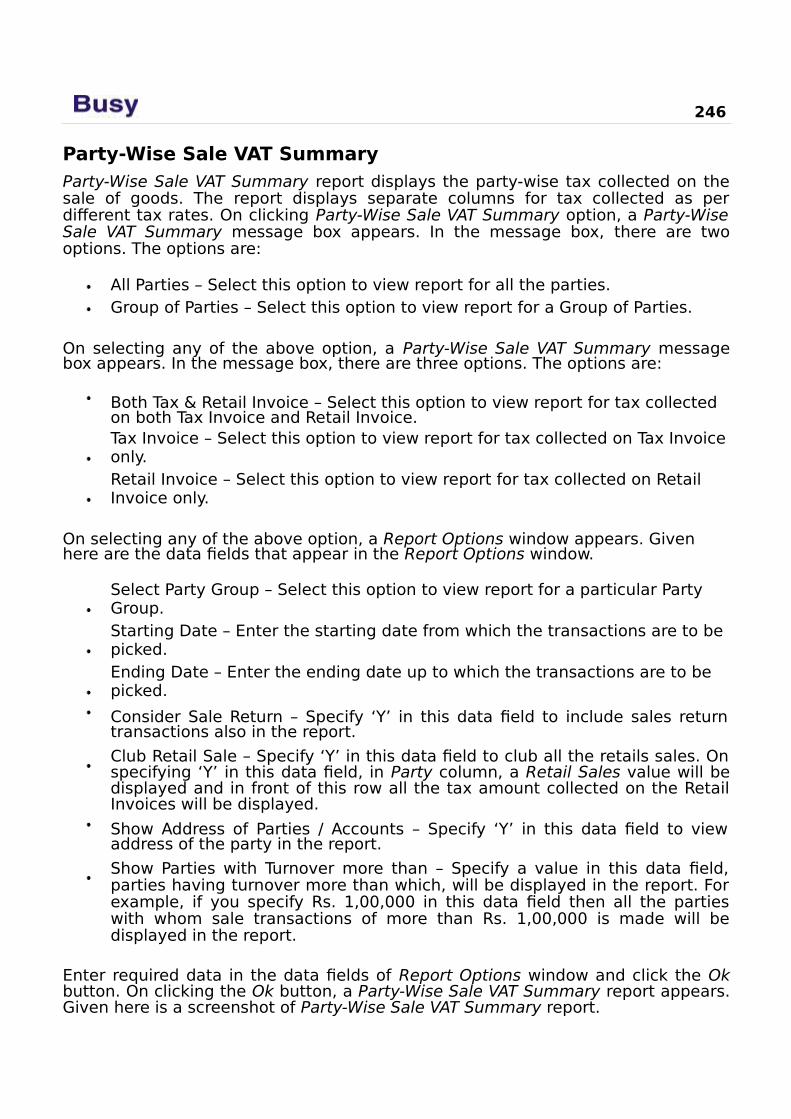
246
Party-Wise Sale VAT SummaryParty-Wise Sale VAT Summary report displays the party-wise tax collected on thesale of goods. The report displays separate columns for tax collected as perdifferent tax rates. On clicking Party-Wise Sale VAT Summary option, a Party-WiseSale VAT Summary message box appears. In the message box, there are twooptions. The options are:
All Parties – Select this option to view report for all the parties.Group of Parties – Select this option to view report for a Group of Parties.
On selecting any of the above option, a Party-Wise Sale VAT Summary messagebox appears. In the message box, there are three options. The options are:
Both Tax & Retail Invoice – Select this option to view report for tax collected on both Tax Invoice and Retail Invoice.Tax Invoice – Select this option to view report for tax collected on Tax Invoiceonly.Retail Invoice – Select this option to view report for tax collected on Retail Invoice only.
On selecting any of the above option, a Report Options window appears. Given here are the data fields that appear in the Report Options window.
Select Party Group – Select this option to view report for a particular Party Group.Starting Date – Enter the starting date from which the transactions are to be picked.Ending Date – Enter the ending date up to which the transactions are to be picked.
Consider Sale Return – Specify ‘Y’ in this data field to include sales returntransactions also in the report.
Club Retail Sale – Specify ‘Y’ in this data field to club all the retails sales. Onspecifying ‘Y’ in this data field, in Party column, a Retail Sales value will bedisplayed and in front of this row all the tax amount collected on the RetailInvoices will be displayed.
Show Address of Parties / Accounts – Specify ‘Y’ in this data field to viewaddress of the party in the report.
Show Parties with Turnover more than – Specify a value in this data field,parties having turnover more than which, will be displayed in the report. Forexample, if you specify Rs. 1,00,000 in this data field then all the partieswith whom sale transactions of more than Rs. 1,00,000 is made will bedisplayed in the report.
Enter required data in the data fields of Report Options window and click the Okbutton. On clicking the Ok button, a Party-Wise Sale VAT Summary report appears.Given here is a screenshot of Party-Wise Sale VAT Summary report.
Unit 10 – Sales Tax & VAT Reports 247
Figure 10.7 Party-Wise Sale VAT Summary
Party-Wise Purchase VAT SummaryParty-Wise Purchase VAT Summary report displays the party-wise tax paid on the purchase of goods.The report displays separate columns for tax paid on various tax rates.
Item-Wise Sales VAT SummaryItem-Wise Sales VAT Summary report displays item-wise summary for salestransactions on which VAT has been collected. The report displays separatecolumn for tax paid on various tax rates.
Item-Wise Purchase VAT SummaryItem-Wise Purchase VAT Summary report displays item-wise summary for purchasetransactions on which VAT has been paid. The report displays separate column fortax paid on various tax rates.
Party–Wise Sales CST SummaryParty-Wise Sales CST Summary report displays the party–wise CST collected on thesale of goods. The report displays separate column for tax paid on various taxrates.
Party-Wise Purchase CST SummaryParty-Wise Purchase VAT Summary report displays the party–wise CST paid on the purchase of goods.The report displays separate column for tax paid on various tax rates.
Item–Wise Sales CST SummaryItem-Wise Sales CST Summary report displays the item–wise CST collected on thesale of goods. The report displays separate column for tax paid on various taxrates.
Item-Wise Purchase CST SummaryItem-Wise Purchase CST Summary report displays the item–wise CST paid on the purchase of goods.The report displays separate column for tax paid on various tax rates.
10.3 Sales Tax / VAT Registers (General)
Sales Tax / VAT Registers contain details of Sale / Purchase, Sales Return /Purchase Return vouchers (VAT / Non-VAT related) in the format prescribed by thegovernment. On clicking the VAT Registers option, a list of Sale / Purchase and Sale/ Purchase Return Registers both Bill-Wise and Party-Wise appears. The list appearstwice, one for Standard option and another for Columnar option. In the
248
Courseware, we will cover only the Standard option. Columnar option will becovered in Advanced Courseware.
On clicking the Standard option, a list with following reports appears:
Sale (Bill-Wise)Sale (Party-Wise)Purchase (Bill-Wise)Purchase (Party-Wise)Sales Return (Bill-Wise)Sales Return (Bill-Wise)Purchase Return (Bill-Wise)Purchase Return (Party-Wise)
Sale (Bill-Wise)Sale (Bill-Wise) register displays bill-wise details of the sales (VAT / Non-VATrelated) made. On clicking the Sales (Bill-Wise) option, a VAT Register (Sales)message box appears. In the message box, there are three options. The optionsare:
Local – Select this option to view only local transactions in the report.Central – Select this option to view only central transactions in the report.Combined – Select this option to view both local and central transactions in the report.
On selecting any of the above option, a VAT Register (Sales) message box appears.In the message box, there are two options. The options are:
One Series – Select this option to view transactions for a particular series.All Series – Select this option to view transactions for all the series.
On selecting any of the above option, a Report Options window appears. Given here are the data fields that appear in the Report Options window.
Voucher Series – Select the required voucher series.Starting Date – Enter the starting date from which the transactions are to be picked.Ending Date – Enter the ending date up to which the transactions are to be picked.
Consider Sale Return – Specify ‘Y’ in this data field to include sales return transactions in the report.
Show Address of Parties / Accounts – Specify ‘Y’ in this data field to view address of the party in the report.

Unit 10 – Sales Tax & VAT Reports 249
Pick Billing Details instead of Party Details – Specify ‘Y’ in this data field toview party details as entered in the Separate Billing Details window invoucher instead of picking party details from Account master.
Show Transport Details – Specify ‘Y’ in this data field to view transport detailsas entered in the voucher.
Show Descriptions of Goods – Specify ‘Y’ in this data field to view itemdescription also in the report.
Enter required data in the data fields of Report Options window and click the Okbutton. On clicking the Ok button, a VAT Sale Register report appears. Given hereis a screenshot of VAT Sale Register report.
Figure 10.8 VAT Sale Register (Bill-Wise)
Sale Register (Party-Wise)Sale (Party-Wise) register displays the sales (VAT / Non-VAT related) made to aparticular party. On clicking the Sale (Party-Wise) option, a VAT Register (Sales)message box appears. In the message box, there are three options. The optionsare:
Local – Select this option to view report for only local transactions.Central – Select this option to view report for only central transactions.Combined – Select this option to view report for all the transactions.
On selecting any of the above, a VAT Register (Sales) message box appears. In themessage box, there are two options. The options are:
One Series – Select this option to view transactions for a particular series.All Series – Select this option to view transactions for all the series.
On selecting any of the above option, a Report Options window appears. Givenhere are the data fields that appear in the Report Options window.
Select Party – Select party for which you want to view the report.Voucher Series – Select the required voucher series.

250
Starting Date – Enter the starting date from which the transactions are to be picked.Ending Date – Enter the ending date up to which the transactions are to be picked.
Include Sales Return – Specify ‘Y’ in this data field to include sale returntransactions also in the report.
Show Address of Parties / Accounts – Specify ‘Y’ in this data field to viewaddress of the party in the report.
Pick Billing Details instead of Party Details – Specify ‘Y’ in this data field topick party details as entered in the Separate Billing Details window in thevoucher instead of picking party details from the Account master.
Enter required data in the data fields of Report Options window and click the Okbutton. On clicking the Ok button, VAT Sale Register report appears. Given here isa screenshot of VAT Sale Register report.
Figure 10.9 VAT Sale Register (Party-Wise)
For detailed help on other VAT Registers, please refer to Sale Register explained above.
10.4 Sales Tax / VAT Reports (State Specific)Depending on the state for which you have created the company, the VAT reportsas applicable for that state appear under the Sales Tax / VAT Reports menu.Currently BUSY provides VAT reports for 35 states & union territories. For each ofthe 35 states & union territories, there are different VAT reports. Hence, it ispractically very difficult to discuss each VAT report in the Courseware. For detailedhelp on state specific VAT report, you can refer to the User’s Manual of BUSY. Youcan invoke the User’s Manual by clicking the Users Manual option under Helpmenu of BUSY.
10.5 VAT Adjustment DetailsVAT Adjustment Details report displays the details of Input / Output Tax adjustmentor any payment / refund of VAT made. It displays all the details related to VATpayment and refunds such as Challan Number, Challan Date, Bank Name / Codeand so on. On clicking the VAT Adjustment Details report, a VAT Adjustmentswindow appears. In the window, there are four options. The options are:
Input Tax – Select this option to view details of Input Tax adjustment.Output Tax – Select this option to view details of Output Tax adjustment.
Unit 10 – Sales Tax & VAT Reports 251
Payment – Select this option to view details of VAT payment made.Refund – Select this option to view details of VAT refund.
On selecting any of the above option, a Report Options window appears. Givenhere are the data fields that appear in the Report Options window.
Starting Date – Enter the starting date from which the Input Tax / Output Tax / Payment / Refund details are to be considered.
Ending Date – Enter the ending date up to which the Input Tax / Output Tax / Payment / Refund details are to be considered.
Enter required data in the data fields of Report Options window and click the Okbutton. On clicking the Ok button, Input Tax Adjustment / Output Tax Adjustment /VAT Payment / VAT Refund report appears.
10.6 Reconcile Accounts & Sales / Purchase TaxWith Reconcile Accounts & Sales / Purchase Tax reports, you can view thevouchers due to which difference in the VAT Summary and Balance Sheet appears.For example, you have entered a Sales voucher in which an item of Rs. 100 istaxable @ 4%. Further freight and forwarding (in which Adjust in Sales Accountdata field is enabled) charges of Rs. 20 are levied on the sale. In such a case, salesamount is Rs. 120 but the taxable amount is Rs. 100. Now this report will list allsuch vouchers due to which the difference has appeared in the Balance Sheet andVAT Summary.
In the Sales Tax / VAT menu, two different reports for Reconcile Accounts & SalesTax and Reconcile Accounts & Purchase Tax appear. The only difference betweenthe two reports is that former report displays the vouchers in which taxableamount and sale amount is different and the later report displays the vouchers inwhich taxable amount and purchase amount is different.
As both the reports are totally similar, we will discuss only the Reconcile Accounts & Sales Tax report.
On clicking the Reconcile Accounts & Sales Tax option, a Reconcile Accounts &Sales Tax message box appears. In the message box, there are three options. Theoptions are:
Local – Select this option to view report for local transactions only.Central – Select this option to view report for central transactions only.Both – Select this option to view report for all the transactions.
On selecting any of the above option, a Report Options window appears. Givenhere are the data fields that appear in the Report Options window.
Starting Date – Enter the starting date from which the vouchers are to be picked.

Ending Date – Enter the ending date up to which the vouchers are to be picked.
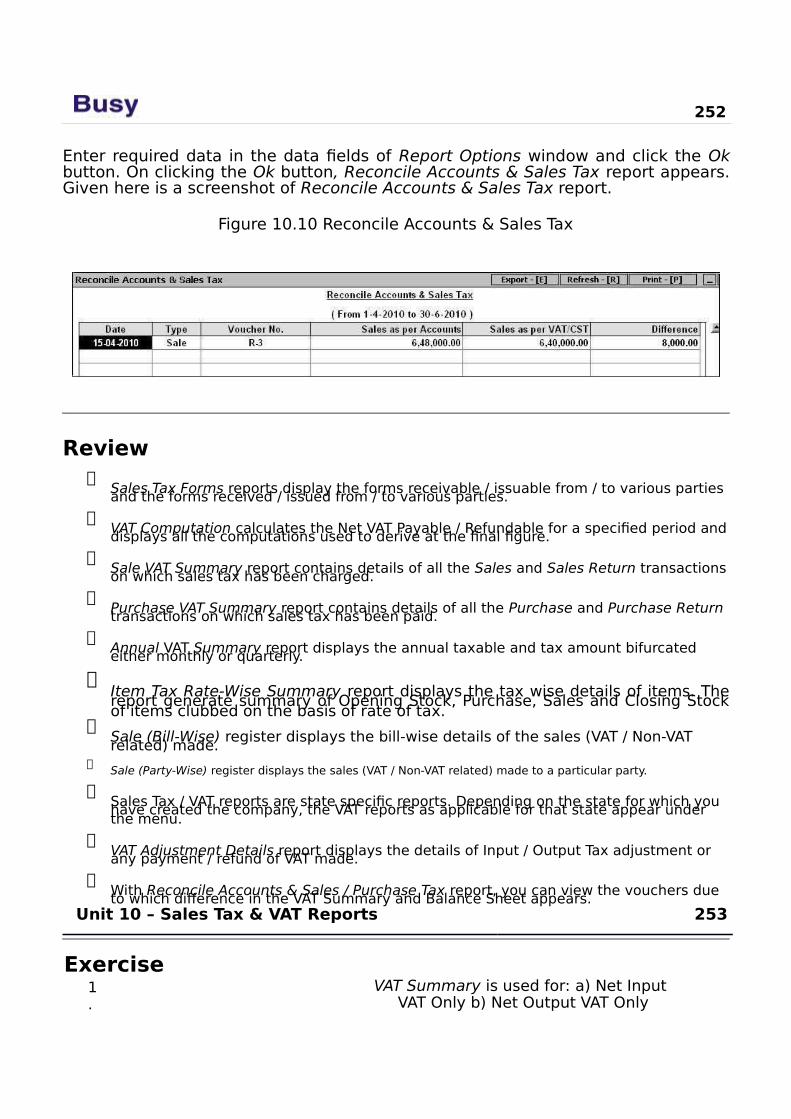
252
Enter required data in the data fields of Report Options window and click the Okbutton. On clicking the Ok button, Reconcile Accounts & Sales Tax report appears.Given here is a screenshot of Reconcile Accounts & Sales Tax report.
Figure 10.10 Reconcile Accounts & Sales Tax
Review
Sales Tax Forms reports display the forms receivable / issuable from / to various parties and the forms received / issued from / to various parties.
VAT Computation calculates the Net VAT Payable / Refundable for a specified period anddisplays all the computations used to derive at the final figure.
Sale VAT Summary report contains details of all the Sales and Sales Return transactionson which sales tax has been charged.
Purchase VAT Summary report contains details of all the Purchase and Purchase Return transactions on which sales tax has been paid.
Annual VAT Summary report displays the annual taxable and tax amount bifurcated either monthly or quarterly.
Item Tax Rate-Wise Summary report displays the tax wise details of items. Thereport generate summary of Opening Stock, Purchase, Sales and Closing Stockof items clubbed on the basis of rate of tax.
Sale (Bill-Wise) register displays the bill-wise details of the sales (VAT / Non-VAT related) made.
Sale (Party-Wise) register displays the sales (VAT / Non-VAT related) made to a particular party.
Sales Tax / VAT reports are state specific reports. Depending on the state for which you have created the company, the VAT reports as applicable for that state appear under the menu.
VAT Adjustment Details report displays the details of Input / Output Tax adjustment or any payment / refund of VAT made.
With Reconcile Accounts & Sales / Purchase Tax report, you can view the vouchers due to which difference in the VAT Summary and Balance Sheet appears.
Unit 10 – Sales Tax & VAT Reports 253
Exercise1 .
VAT Summary is used for: a) Net InputVAT Only b) Net Output VAT Only
c) Net Payment of VAT d) All of the above
2 .
Annual Tax Summary report can be viewed:
a) Monthlyb) Both Monthly / Quarterly
c) Quarterlyd) All of the above
3 .
Form amount can be:a) Item Basic Amountb) Taxable Amount
c) Bill Amountd) All of the above
4 . Reconcile Accounts & Sales Tax report displays vouchers due to which different VAT amount occurred in:
a) Balance Sheet & VAT Summaryb) Balance Sheet & VAT Computation
c) Balance Sheet & VAT Adjustment d) Balance Sheet & Sales Register
5 . Which report displays a single form receivable from all the parties?
6 . Which report displays bifurcated sales amount for all Sale Types?
7 . Which report displays bifurcated purchase amount for all Tax Percentage?
8 . Which report displays total VAT collected from a Group of Parties?
9 . Which report displays VAT paid on all items?
Module 5
Managing Data
Unit 11 – Managing Backup
Unit 12 – Utilities
Unit 13 – Housekeeping
Unit 14 – Year-end Process

What Sculpture is to a
block of Marble,
Education is to the
Human Soul.
Unit 11Managing Backup
While using accounting software, security of data is as important as the accuracyof data. It is necessary to ensure that the data remains secure to ensure smoothworking of organization. There can be circumstances in which data may getcorrupted. In such a case, if there is a backup of the data then you can restoredata from backup and continue with your work without any hindrance. It isrecommended that you take regular backup of the data to avoid loss of data dueto unexpected problems like data corruption, virus attack, abnormal shutdown ofthe PC, hard disk crash and so on.
Topics covered under this unit:
Backup Configuration
Taking backup
Restore Data
11.1 Backup ConfigurationBackup Configuration feature provides the facility to specify in advance, the path wherethe backup is to be taken on different days of the week. To specify backup configuration,
click Administration
Configuration
Backup Configuration option. On clicking theBackup Configuration option, a Backup Configuration window appears. Given here is ascreenshot of Backup Configuration window.
Image on next Page

258
Figure 11.1 Backup Configuration
In the Backup Configuration window, there are various data fields and groups. The data fields and groups are:
Normal Backup
Select this option if you want to take backup on hard disk or any other removabledisk. On selecting this option, a Backup Path for Week Days group gets active.Under this group, seven data fields are provided for each day of the week. You canspecify path where backup is to be taken on the corresponding day of the week.For example, you have specified the path as D:\Monday Backup and D:\TuesdayBackup in front of Monday and Tuesday data fields respectively. Now, if you takebackup on Monday then backup copy will automatically be created in D:\MondayBackup folder and if you take backup on Tuesday then backup copy will be createdin D:\Tuesday Backup folder.
BUSY takes into consideration the System date for taking day-wise backup.
FTP Backup

Select this option if you want to take backup on FTP Server. On selecting this option, a FTP Server and Backup Path Information group gets active. Let us discussthis group in detail.
Unit 11 – Managing Backup 259
FTP Server and Backup Path Information
Under this group various data fields and a sub group appears in which you canspecify details about the FTP Server on which backup is to be taken. Various datafields and sub group under this group are:
Server NameSpecify name of the Server where you want to take backup.
User NameSpecify User Name of the Server where backup is to be taken.
PasswordSpecify Password for the User Name specified in the above data field.
FTP Backup Folder for Week Days
Under this group, seven data fields are provided for each day of the week. You canspecify the folder name where backup for the corresponding day of the week is tobe taken.
Prompt for Backup at the time of closing the Company
Specify ‘Y’ in this data field if you want a reminder for taking data backup onclosing the company. On specifying ‘Y’ in this data field, a Proceed For Backupmessage box asking your confirmation to take backup of the data will alwaysappear before closing the company.
After entering appropriate data in the data fields, click the Save button to save thebackup configuration details.
11.2 Taking BackupTaking regular backup of data is a good practice and one has to follow it withoutfail. There can be circumstances in which the data may get corrupted. In such acase, if there is a backup of the data then you can restore the data from thebackup and continue with your work without any hindrance. In the previous topic,we have learnt about the configuration settings for taking backup, and in thissection, we will learn about the steps for taking backup of the company data.
To take backup of company data, open Company menu and click Backup Dataoption. On clicking the Backup Data option, a Select Company for Backup windowappears. The window displays the list of the companies created in BUSY. Select thecompany for which you want to take backup and click the Select button.
On clicking the Select button, an Authority Check window appears. In the window,you have to specify the User Name and Password. On specifying a valid User Name

and Password, a Company Backup window appears. Given here is a screenshot ofCompany Backup window.
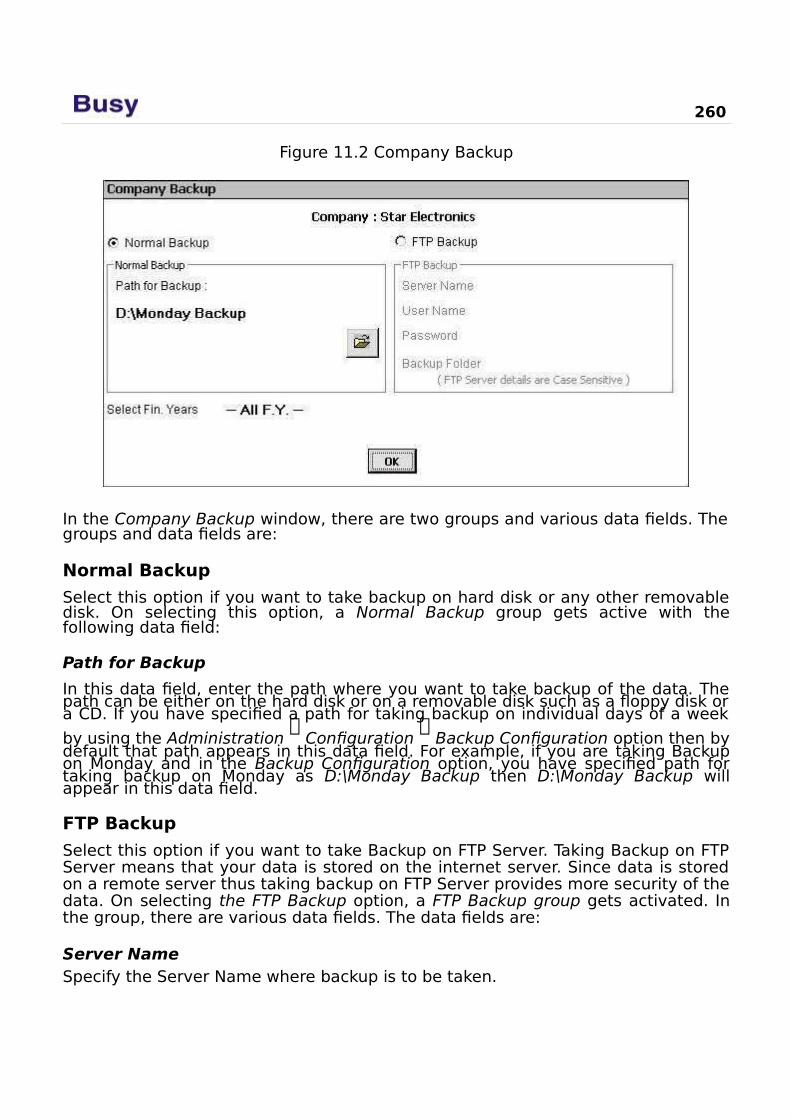
260
Figure 11.2 Company Backup
In the Company Backup window, there are two groups and various data fields. Thegroups and data fields are:
Normal Backup
Select this option if you want to take backup on hard disk or any other removabledisk. On selecting this option, a Normal Backup group gets active with thefollowing data field:
Path for Backup
In this data field, enter the path where you want to take backup of the data. Thepath can be either on the hard disk or on a removable disk such as a floppy disk ora CD. If you have specified a path for taking backup on individual days of a week
by using the Administration
Configuration
Backup Configuration option then bydefault that path appears in this data field. For example, if you are taking Backupon Monday and in the Backup Configuration option, you have specified path fortaking backup on Monday as D:\Monday Backup then D:\Monday Backup willappear in this data field.
FTP Backup
Select this option if you want to take Backup on FTP Server. Taking Backup on FTPServer means that your data is stored on the internet server. Since data is storedon a remote server thus taking backup on FTP Server provides more security of thedata. On selecting the FTP Backup option, a FTP Backup group gets activated. Inthe group, there are various data fields. The data fields are:
Server NameSpecify the Server Name where backup is to be taken.
Unit 11 – Managing Backup 261
User NameSpecify the User Name for the Server where backup is to be taken.
PasswordSpecify Password for the User Name specified in the above data field.
Backup Folder
Specify the backup folder name in which the backup of the data is to be taken.This folder is created on the internet server. Creating separate folders is beneficialif you want to take backup of different companies in different folders or if you wantto take backup for individual days in separate folders. If you have specified foldersfor taking backup on individual days of week in the Administration
Configuration
Backup Configuration option then by default that folder appears in this datafield. For example, if you are taking Backup on Monday and in the BackupConfiguration option, you have specified folder for taking backup on Monday asMonday-Backup then Monday-Backup will appear in this data field.
All the information provided for FTP Server is case sensitive.
Select Fin. Year
In this data field, you can specify whether you want to take backup for all theFinancial Years or a particular Financial Year. The data field displays list of all thefinancial years of the company. You can either select a single financial year forwhich you want to take backup or choose All F.Y. option to take backup of all thefinancial years of the company.
After entering appropriate data in the data fields, click the Ok button to start theprocess of taking backup. On clicking the Ok button, a Start Backup message boxappears informing you that the backup process is about to start.
Click the Ok button in the Start Backup message box. On clicking the Ok button,backup of the data will be taken at the specified path. After successful completionof backup, a Backup Successful message box will appear displaying that backup istaken successfully. Click the Yes button in the Backup Successful message box tocreate more backup copies otherwise click the No button if you do not want tomake any other backup copy.
11.3 Restore DataRestore Data option is used to restore data from the backup copy of data. In theprevious topic, we have learnt the steps to take backup of data. In this topic, wewill discuss the steps to restore data from the backup. Generally, the need forrestoring data arises when your company’s data is corrupted due to any reasonsuch as hard disk crash, virus or so on.
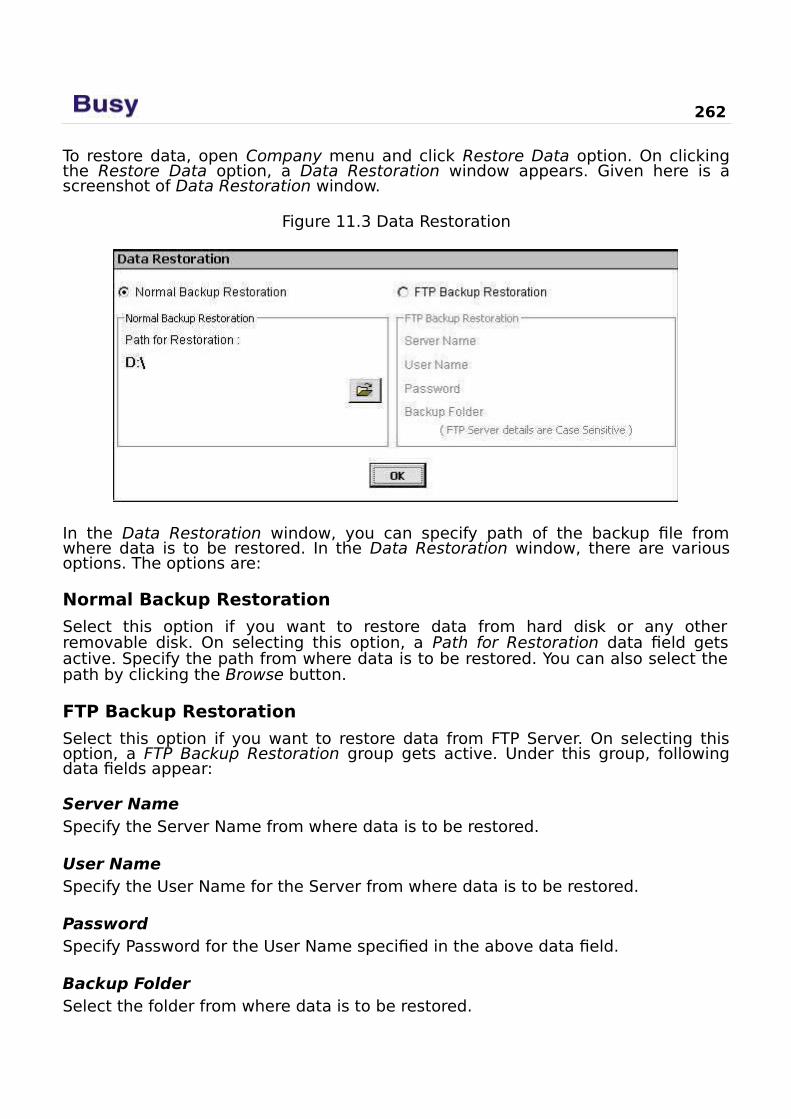
262
To restore data, open Company menu and click Restore Data option. On clickingthe Restore Data option, a Data Restoration window appears. Given here is ascreenshot of Data Restoration window.
Figure 11.3 Data Restoration
In the Data Restoration window, you can specify path of the backup file fromwhere data is to be restored. In the Data Restoration window, there are variousoptions. The options are:
Normal Backup Restoration
Select this option if you want to restore data from hard disk or any otherremovable disk. On selecting this option, a Path for Restoration data field getsactive. Specify the path from where data is to be restored. You can also select thepath by clicking the Browse button.
FTP Backup Restoration
Select this option if you want to restore data from FTP Server. On selecting thisoption, a FTP Backup Restoration group gets active. Under this group, followingdata fields appear:
Server NameSpecify the Server Name from where data is to be restored.
User NameSpecify the User Name for the Server from where data is to be restored.
PasswordSpecify Password for the User Name specified in the above data field.
Backup FolderSelect the folder from where data is to be restored.
Unit 11 – Managing Backup 263
After entering appropriate data in the data fields, click the Ok button to restore data from the backup folder.
On clicking the Ok button, a Data Restoration message box appears, asking your confirmation to restore the data. Click the Yes button in the message box to restore data.
On successful restoration of data, a Data Restoration Successful message box appears. Click the Ok button to close the message box.
If you are restoring the full data of a company and a company with thesame name exists in BUSY then BUSY will open a Company Existmessage box. It will ask you whether it should overwrite the existingdata for the company. If you click the Yes button, BUSY will overwrite theexisting data with the backup copy. If you click the No button, BUSY willcreate another company with the same name. To differentiate the twocompanies BUSY will append the current date with the newly createdcompany.
Similarly, if you are restoring the data of a single financial year of acompany and a company with the same financial year exists in BUSYthen BUSY will open a F.Y. Exist message box. It will ask you whetherit should overwrite the existing data for the company. If you click theYes button, BUSY will overwrite the existing data with the backupcopy. If you click the No button, BUSY will create another companywith the same financial year. To differentiate between the twocompanies BUSY will append the current date with the newly createdcompany.
Review
With Backup Configuration option, you can specify in advance the path where the backup for different days of the week is to be taken.
You can take backup of company data either on hard disk or any other removable disk or on FTP Server.
Backup of company data can be taken by using the Backup Data option provided under Company menu.
While restoring data, if the company with the same name exists then you canchoose to either overwrite the data or create a company with same name butthe current date appended with it.
Exercise1 . Information provided for FTP server is:
a) Case sensitive c) Not case sensitiveb) Always in Capital Letters d) Always in small letters
264
2 . We can take backup on:a) Pen Drive c) Zip Driveb) Hard Disk d) All of the above
3 . Backup files are restored at:a) Data Directory c) Restoration Pathb) Any Folder d) None of the above
4 . Take the back up of Star Electronics Company in the D:\BusyBackup2011 folder for financial year 2011-12 only.
5 . Restore backup of financial year for 2011-12 of Star Electronics Company at the path specified in the data directory.
6 . Using Backup Configuration option, specify the backup folder for each day ofthe week as D:\Monday Backup to D:\Sunday Backup. Now take backup ofStar Electronics Company to one of these folders.

We are like Tea Bags -
We don’t know our
Strength Until We are
in Hot Water.
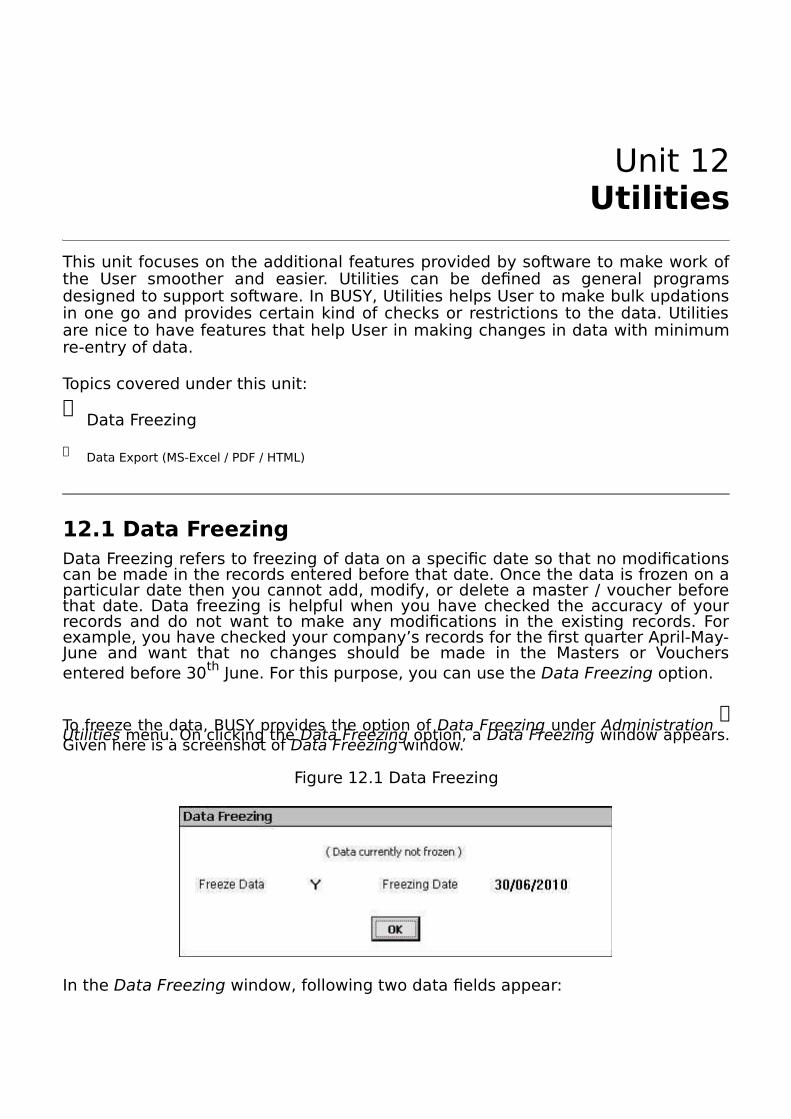
Unit 12Utilities
This unit focuses on the additional features provided by software to make work ofthe User smoother and easier. Utilities can be defined as general programsdesigned to support software. In BUSY, Utilities helps User to make bulk updationsin one go and provides certain kind of checks or restrictions to the data. Utilitiesare nice to have features that help User in making changes in data with minimumre-entry of data.
Topics covered under this unit:
Data Freezing
Data Export (MS-Excel / PDF / HTML)
12.1 Data FreezingData Freezing refers to freezing of data on a specific date so that no modificationscan be made in the records entered before that date. Once the data is frozen on aparticular date then you cannot add, modify, or delete a master / voucher beforethat date. Data freezing is helpful when you have checked the accuracy of yourrecords and do not want to make any modifications in the existing records. Forexample, you have checked your company’s records for the first quarter April-May-June and want that no changes should be made in the Masters or Vouchersentered before 30th June. For this purpose, you can use the Data Freezing option.
To freeze the data, BUSY provides the option of Data Freezing under Administration
Utilities menu. On clicking the Data Freezing option, a Data Freezing window appears.Given here is a screenshot of Data Freezing window.
Figure 12.1 Data Freezing
In the Data Freezing window, following two data fields appear:
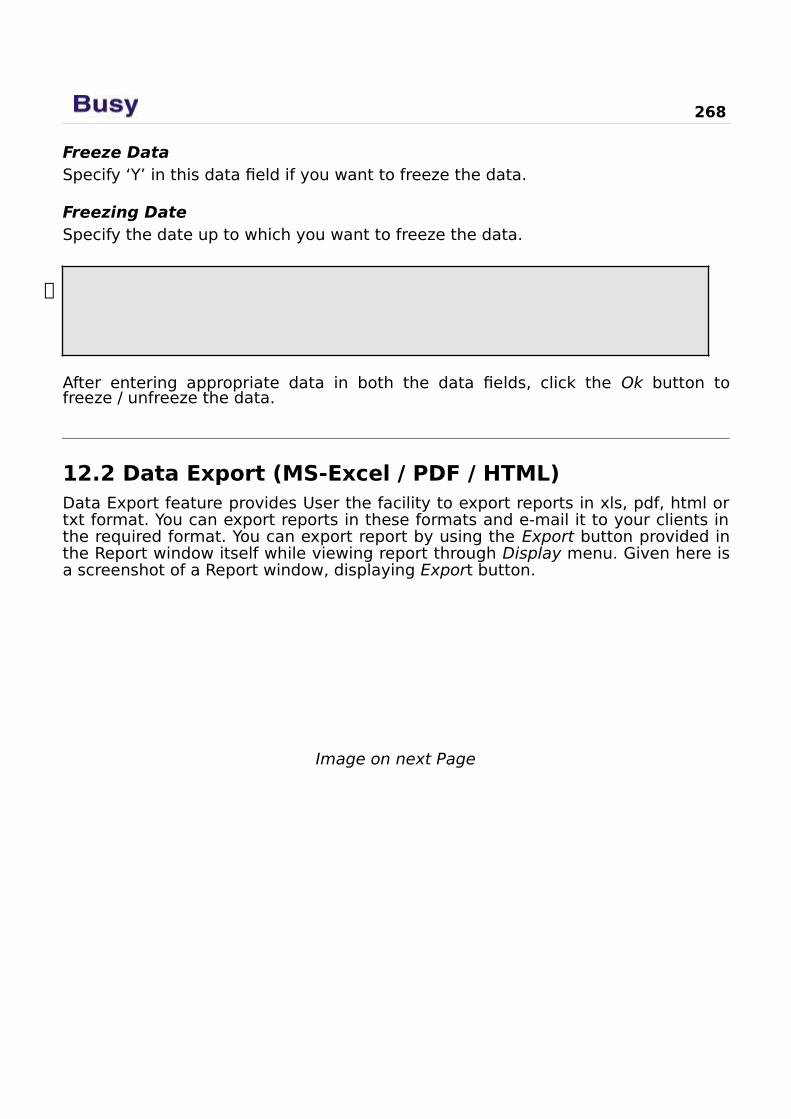
268
Freeze DataSpecify ‘Y’ in this data field if you want to freeze the data.
Freezing DateSpecify the date up to which you want to freeze the data.
If data is already frozen then you can unfreeze the data by entering 'N' inthe Freeze Data data field. In the Data Freezing window, a note alwaysappears to show whether the data is currently frozen or not.
After entering appropriate data in both the data fields, click the Ok button tofreeze / unfreeze the data.
12.2 Data Export (MS-Excel / PDF / HTML)Data Export feature provides User the facility to export reports in xls, pdf, html ortxt format. You can export reports in these formats and e-mail it to your clients inthe required format. You can export report by using the Export button provided inthe Report window itself while viewing report through Display menu. Given here isa screenshot of a Report window, displaying Export button.
Image on next Page
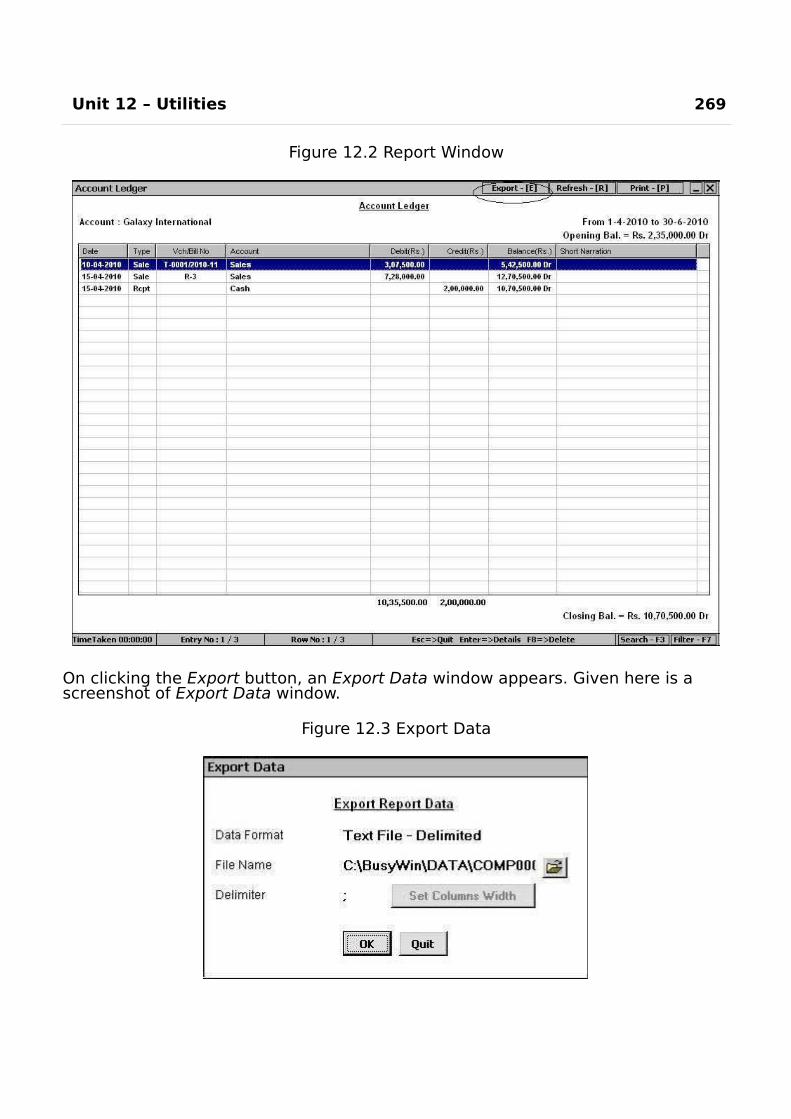
Unit 12 – Utilities 269
Figure 12.2 Report Window
On clicking the Export button, an Export Data window appears. Given here is a screenshot of Export Data window.
Figure 12.3 Export Data
270
In the Export Data window, following data fields appear:
Data FormatSelect the format in which you want to export the report.
File NameSpecify file name and path at which the exported file is to be created.
Delimiter
This data field gets active only if you have selected the Text File – Delimited optionin the Data Format data field. Specify the delimiter sign to separate value of eachcolumn of the report.
Set Column Width
This button gets active only if you have selected Text File – Fixed Width option inthe Data Format data field. Click this button to specify the width of each column ofthe report. On clicking this button, a Set Columns Width window appears in whichyou can specify width for each column of the report.
After entering appropriate data in the data fields, click the Ok button to export thereport in required format.
Review
You can freeze data once you have checked the accuracy of your records.
You cannot make changes in the Masters / Vouchers entered before the data freezing date.
You can unfreeze the data by using the Data Freezing option itself.
Reports in BUSY can be exported to pdf, xls, txt or html format.
While exporting reports to a Text file, you have to specify the delimiter sign or column width for differentiating value of each column of the report.
Exercise1 . Data can be exported in:
a) pdf file c) xls fileb) html file d) All of the above
2 . On freezing data, you cannot:a) Enter Vouchers c) Enter Mastersb) Modify Vouchers d) Both a & b
Unit 12 – Utilities 271
3 . Data Freezing option is provided under:a) Utilities Menu c) Housekeeping Menub) Configuration Menu d) Company Menu
4 . You can freeze data for:a) All Financial Yearsb) Current Financial Year
5 . You can un-freeze data by specifying:
a) ‘N’ in Data Freezing field
b) Blank Date
6 . You can export data of following :
a) Account Ledgerb) Trial Balance
c) Previous Financial Yeard) All of the above
c) Date beyond current financial yeard) Both a & b
c) Stock Ledgerd) All of the above
7 . You can separate report columns in a text file byspecifying:
a) Delimiter c) Row Widthb) Column Width d) Both a & b
8 . How can you unfreeze the data?
9 . What is the benefit of exporting data?
1 0 . Freeze data for Star Electronics Company up to 30th April 2010.
1 1 . Export the Trial Balance report in a text file and fix the column width as following:
Account – 50Debit – 35Credit - 35

We are what we Repeatedly do.
Excellence then is not an Act,
but a Habit.
Unit 13Housekeeping
The main objective of this unit is to let User know various measures to correct thedata in case data gets corrupted due to any reason. Users are always advised totake regular backup of data to ensure that minimum work gets hampered inunlikely event of data corruption. However, on the other side, good softwareshould always provide preventive measure to save data from being gettingcorrupted and the means to recover data if data gets corrupted due to any reason.
Topics covered under this unit:
Rebuild Databases
Rewrite Books
13.1 Rebuild DatabasesSometimes data get corrupted due to various reasons such as virus attack, harddisk crash and so on. In such a case, you can rebuild the databases to repair thecorrupted data. Rebuild Databases option helps to repair the corrupted data bymeans of re-indexing. Re-Indexing refers to rewriting the index for the database.An index in the database is like the index of a book that allows you to accessdifferent topics easily and quickly. In addition, the Rebuild Databases option freesup the unused space in the database and makes the database compact.
To rebuild database, either open Company menu and click Rebuild Databasesoption or click Housekeeping
Rebuild Databases option. On clicking the Rebuild
Databases option, a Select Company for Rebuilding Databases window appearsdisplaying list of all the companies created in BUSY. Select the company for whichyou want to rebuild the databases and click the Select button.
On clicking the Select button, a Please Take Backup Before Rebuilding Databasesmessage box appears advising you to take backup of the data before rebuildingthe database. Select the appropriate option and click the Ok button.
It is recommended to take backup of the company data before rebuildingthe databases.
On clicking the Ok button, a Rebuild Databases message box appears confirming the rebuild action.Click the Ok button to start the rebuilding process.
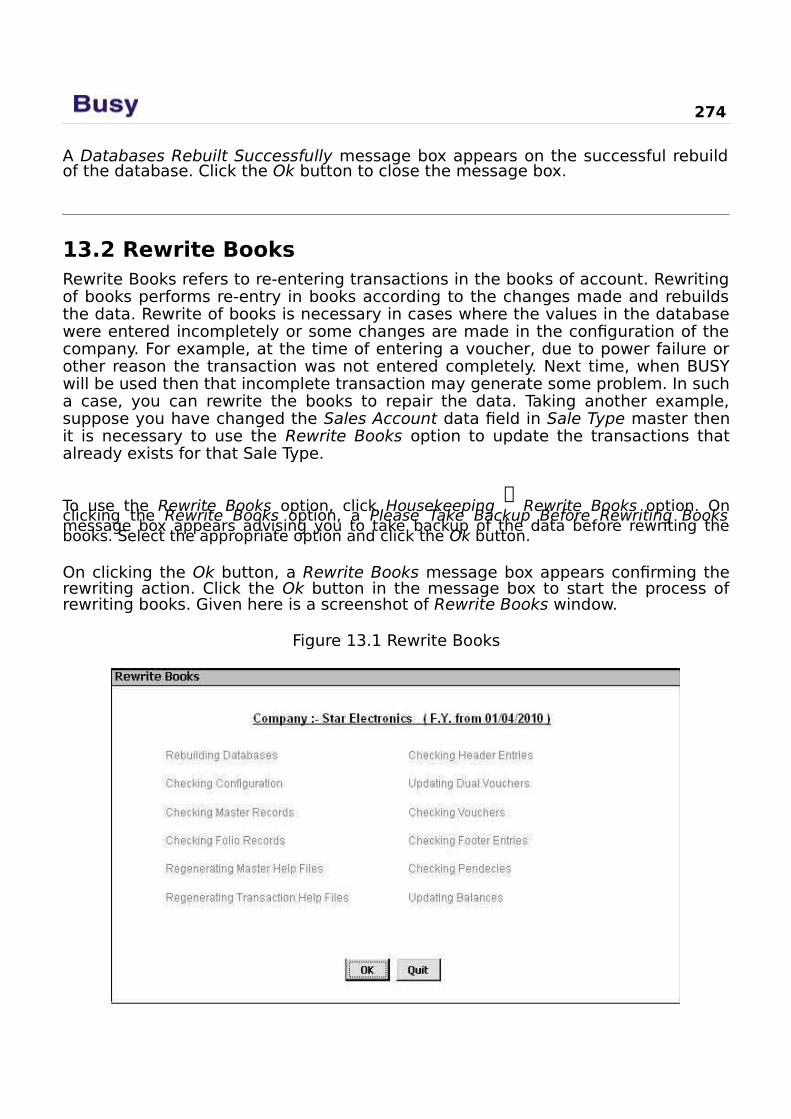
274
A Databases Rebuilt Successfully message box appears on the successful rebuildof the database. Click the Ok button to close the message box.
13.2 Rewrite BooksRewrite Books refers to re-entering transactions in the books of account. Rewritingof books performs re-entry in books according to the changes made and rebuildsthe data. Rewrite of books is necessary in cases where the values in the databasewere entered incompletely or some changes are made in the configuration of thecompany. For example, at the time of entering a voucher, due to power failure orother reason the transaction was not entered completely. Next time, when BUSYwill be used then that incomplete transaction may generate some problem. In sucha case, you can rewrite the books to repair the data. Taking another example,suppose you have changed the Sales Account data field in Sale Type master thenit is necessary to use the Rewrite Books option to update the transactions thatalready exists for that Sale Type.
To use the Rewrite Books option, click Housekeeping
Rewrite Books option. Onclicking the Rewrite Books option, a Please Take Backup Before Rewriting Booksmessage box appears advising you to take backup of the data before rewriting thebooks. Select the appropriate option and click the Ok button.
On clicking the Ok button, a Rewrite Books message box appears confirming therewriting action. Click the Ok button in the message box to start the process ofrewriting books. Given here is a screenshot of Rewrite Books window.
Figure 13.1 Rewrite Books

Unit 13 - Housekeeping 275
On successful rewriting of books, a Books Rewrite Successful message box appears displaying that the process of rewriting books is completed successfully.
Review
Rebuild Databases option helps to repair the corrupted data by means of re-indexing. Re-indexing refers to rewriting the index for the database.
Rebuild Databases option is provided under Company menu and Housekeeping menu.
Rewrite Books refers to re-entering transactions in the books of account. Rewriting of books performs re-entry in books according to the changes made and rebuilds the data.
Exercise1 . Rebuild Database option:
a) Repairs the corrupted data c) Does re-indexing of datab) Recreates the database d) Both a & b
2 . Before Rewriting books you are advised to:a) Take Backup of data c) Close the companyb) Freeze the data d) None of the above
3 . Rewrite Books helps in:a) Posting Vouchers c) Taking Backupb) Repairing Data d) Creating Masters
4 . Star Electronics Company has decided to not to include value of Installation Charges Bill Sundry in the cost of goods. Now make the necessary changes in Installation Charges Bill Sundry and run the Rewrite Books command.

Take your Heart to
Work. Integrate what
you Believe into every
single area of Life.
Meryl Streep
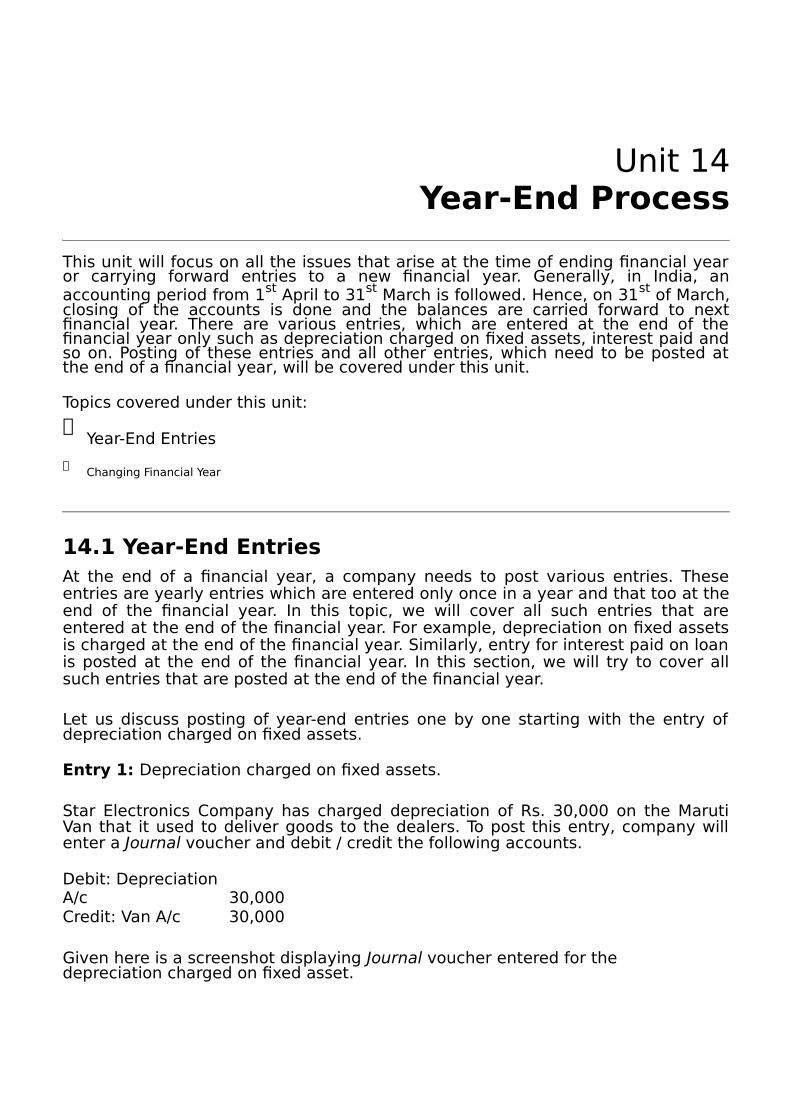
Unit 14Year-End Process
This unit will focus on all the issues that arise at the time of ending financial yearor carrying forward entries to a new financial year. Generally, in India, anaccounting period from 1st April to 31st March is followed. Hence, on 31st of March,closing of the accounts is done and the balances are carried forward to nextfinancial year. There are various entries, which are entered at the end of thefinancial year only such as depreciation charged on fixed assets, interest paid andso on. Posting of these entries and all other entries, which need to be posted atthe end of a financial year, will be covered under this unit.
Topics covered under this unit:
Year-End Entries
Changing Financial Year
14.1 Year-End EntriesAt the end of a financial year, a company needs to post various entries. Theseentries are yearly entries which are entered only once in a year and that too at theend of the financial year. In this topic, we will cover all such entries that areentered at the end of the financial year. For example, depreciation on fixed assetsis charged at the end of the financial year. Similarly, entry for interest paid on loanis posted at the end of the financial year. In this section, we will try to cover allsuch entries that are posted at the end of the financial year.
Let us discuss posting of year-end entries one by one starting with the entry ofdepreciation charged on fixed assets.
Entry 1: Depreciation charged on fixed assets.
Star Electronics Company has charged depreciation of Rs. 30,000 on the MarutiVan that it used to deliver goods to the dealers. To post this entry, company willenter a Journal voucher and debit / credit the following accounts.
Debit: Depreciation A/c 30,000Credit: Van A/c 30,000
Given here is a screenshot displaying Journal voucher entered for the depreciation charged on fixed asset.
278
Figure 14.1 Journal Voucher – Add
Entry 2: Interest paid on loan taken from HDFC Bank.
Star Electronics Company has taken a loan of Rs. 10,00,000 from HDFC Bank on which interest of Rs.80,000 has been paid throughout the year.
The Company will post the following entry in the Journal voucher:
Debit: Interest on LoanA/c 80,000Credit: HDFC Loan A/c 80,000
Entry 3: Profit transferred to Partners account.
Star Electronics Company has accrued a profit of Rs. 8,00,000 in the year 2010-2011.
The Company will post the following entry in the Journal voucher:

Unit 14 – Year-end Process 279
Debit: Profit & Loss A/c8,00,00
0Credit: Capital A/c - Rajesh
4,00,000
Capital A/c - Ankit
2,00,000
Capital A/c - Amit
2,00,000
In the above entry, profit is divided according to capital invested by the partners inthe firm.
In case of Proprietorship firm, the profit is transferred to Proprietor’s A/c.
Debit: Profit & Loss A/cCredit: Proprietor’s A/c
In case of a company, profit is transferred to Reserves & Surplus account.
Debit: Profit & Loss A/cCredit: Reserves & Surplus A/c
Entry 4: VAT Payment for the last quarter of the Year.
Apart from the entries explained above, one more entry that needs to beexplained is of VAT payment of the last quarter of the year. Payment of VAT to thegovernment for the last quarter of the year i.e. January–February-March is made inthe month of April. It means that although the VAT is of the previous financial yearbut it is deposited in the current financial year. This entry needs to be reflected inthe reports of the previous financial year as payment of VAT is for previous yearonly. In this section we will discuss the posting of such entry in BUSY.
Star Electronics Company has to Pay Rs. 20,000 as VAT for the quarter January-February-March of 2010-11 financial year. The company will post the followingentry in the Payment voucher on 31st of March 2011:
Debit: VAT A/c 20,000Credit: VAT Payable A/c 20,000
On saving the Payment voucher, a VAT Adjustment Details window appears (as VATaccount is debited) in which details about the VAT payment such as ChallanNumber, Cheque Number are to be entered. Since the VAT amount is not yetdeposited to the government, the company does not have these details on 31st ofMarch. Hence, the company will leave this window blank on 31st March 2011.
When the company will deposit the VAT to the government i.e. at any time in thecurrent financial year, then it has to do the following two steps:
1. Enter a Payment voucher with following entry:
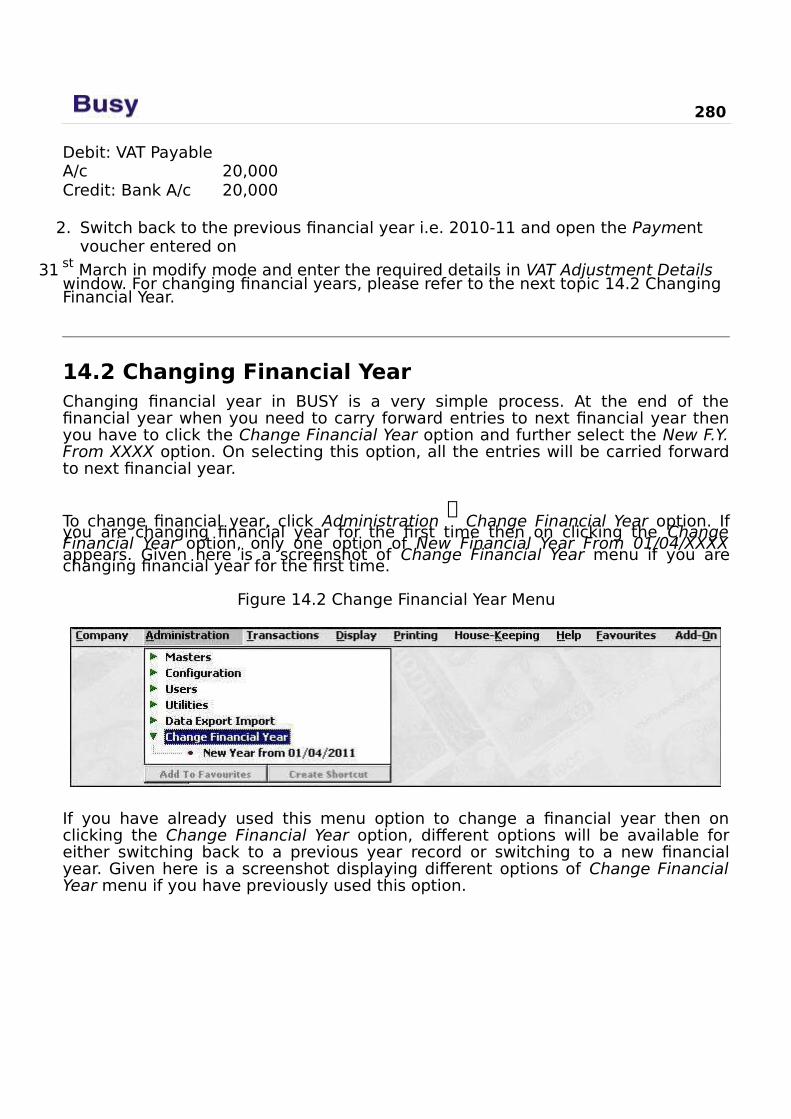
280
Debit: VAT Payable A/c 20,000Credit: Bank A/c 20,000
2. Switch back to the previous financial year i.e. 2010-11 and open the Payment voucher entered on
31 st March in modify mode and enter the required details in VAT Adjustment Details window. For changing financial years, please refer to the next topic 14.2 Changing Financial Year.
14.2 Changing Financial YearChanging financial year in BUSY is a very simple process. At the end of thefinancial year when you need to carry forward entries to next financial year thenyou have to click the Change Financial Year option and further select the New F.Y.From XXXX option. On selecting this option, all the entries will be carried forwardto next financial year.
To change financial year, click Administration
Change Financial Year option. Ifyou are changing financial year for the first time then on clicking the ChangeFinancial Year option, only one option of New Financial Year From 01/04/XXXXappears. Given here is a screenshot of Change Financial Year menu if you arechanging financial year for the first time.
Figure 14.2 Change Financial Year Menu
If you have already used this menu option to change a financial year then onclicking the Change Financial Year option, different options will be available foreither switching back to a previous year record or switching to a new financialyear. Given here is a screenshot displaying different options of Change FinancialYear menu if you have previously used this option.
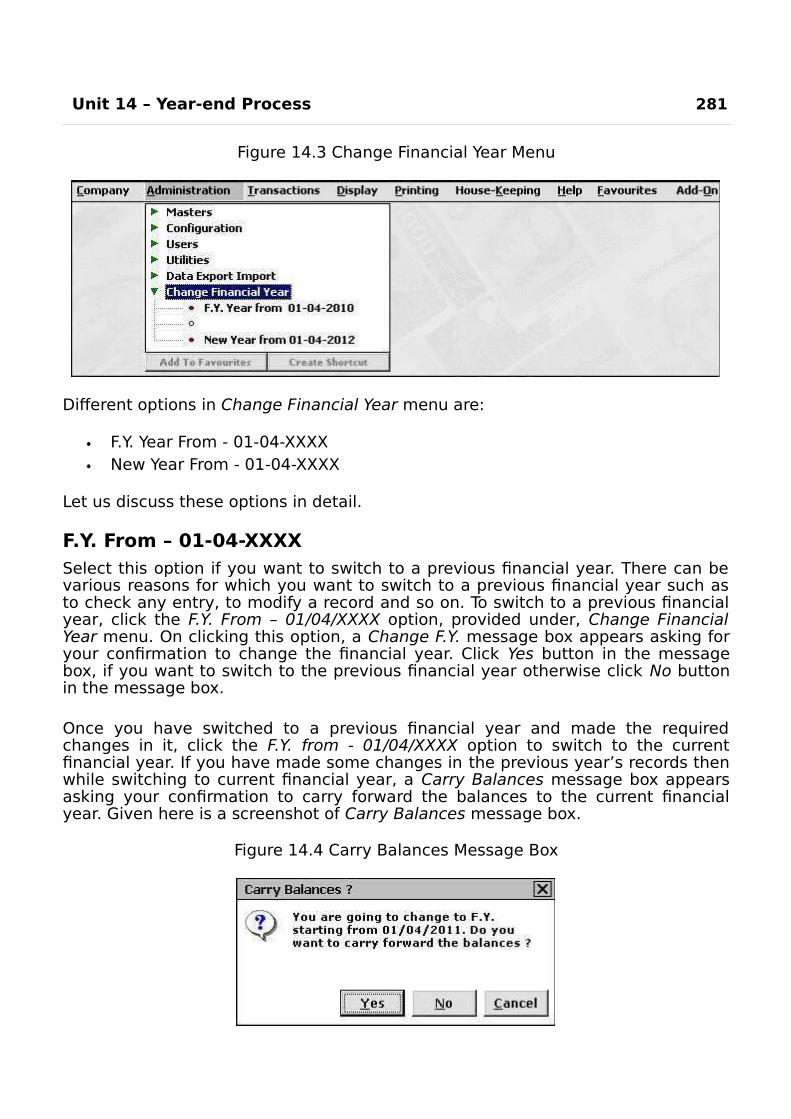
Unit 14 – Year-end Process 281
Figure 14.3 Change Financial Year Menu
Different options in Change Financial Year menu are:
F.Y. Year From - 01-04-XXXXNew Year From - 01-04-XXXX
Let us discuss these options in detail.
F.Y. From – 01-04-XXXXSelect this option if you want to switch to a previous financial year. There can bevarious reasons for which you want to switch to a previous financial year such asto check any entry, to modify a record and so on. To switch to a previous financialyear, click the F.Y. From – 01/04/XXXX option, provided under, Change FinancialYear menu. On clicking this option, a Change F.Y. message box appears asking foryour confirmation to change the financial year. Click Yes button in the messagebox, if you want to switch to the previous financial year otherwise click No buttonin the message box.
Once you have switched to a previous financial year and made the requiredchanges in it, click the F.Y. from - 01/04/XXXX option to switch to the currentfinancial year. If you have made some changes in the previous year’s records thenwhile switching to current financial year, a Carry Balances message box appearsasking your confirmation to carry forward the balances to the current financialyear. Given here is a screenshot of Carry Balances message box.
Figure 14.4 Carry Balances Message Box
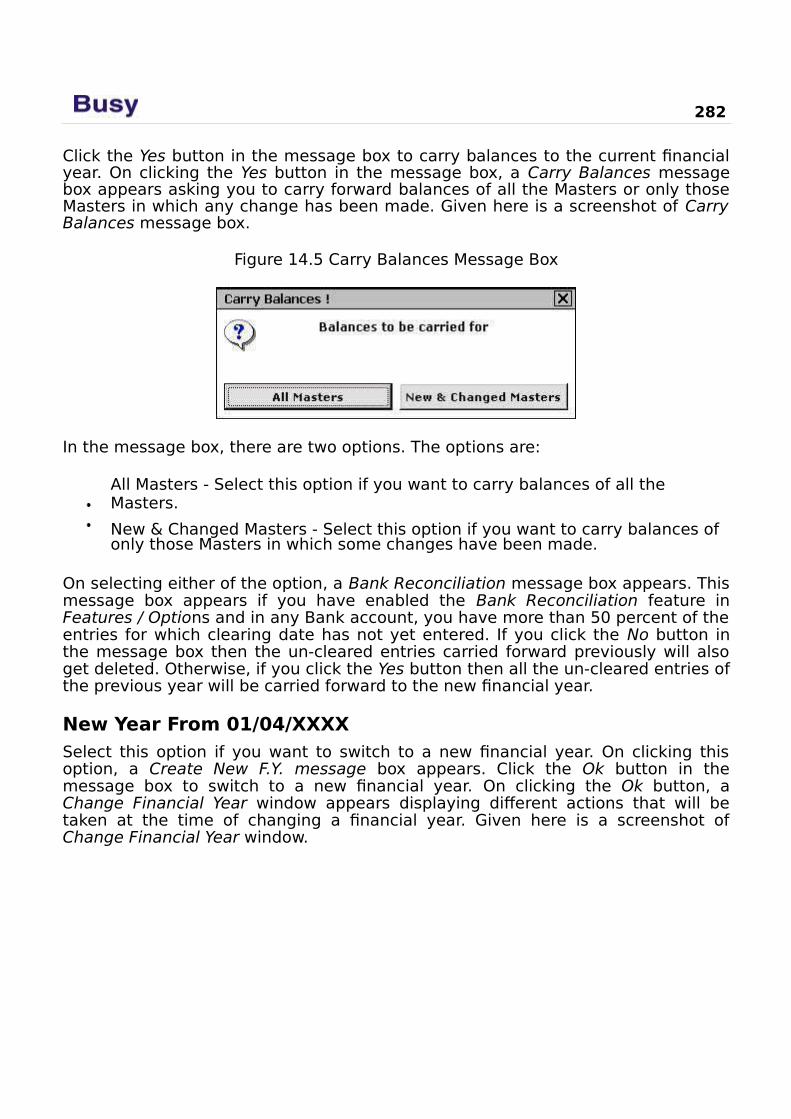
282
Click the Yes button in the message box to carry balances to the current financialyear. On clicking the Yes button in the message box, a Carry Balances messagebox appears asking you to carry forward balances of all the Masters or only thoseMasters in which any change has been made. Given here is a screenshot of CarryBalances message box.
Figure 14.5 Carry Balances Message Box
In the message box, there are two options. The options are:
All Masters - Select this option if you want to carry balances of all the Masters.
New & Changed Masters - Select this option if you want to carry balances of only those Masters in which some changes have been made.
On selecting either of the option, a Bank Reconciliation message box appears. Thismessage box appears if you have enabled the Bank Reconciliation feature inFeatures / Options and in any Bank account, you have more than 50 percent of theentries for which clearing date has not yet entered. If you click the No button inthe message box then the un-cleared entries carried forward previously will alsoget deleted. Otherwise, if you click the Yes button then all the un-cleared entries ofthe previous year will be carried forward to the new financial year.
New Year From 01/04/XXXXSelect this option if you want to switch to a new financial year. On clicking thisoption, a Create New F.Y. message box appears. Click the Ok button in themessage box to switch to a new financial year. On clicking the Ok button, aChange Financial Year window appears displaying different actions that will betaken at the time of changing a financial year. Given here is a screenshot ofChange Financial Year window.
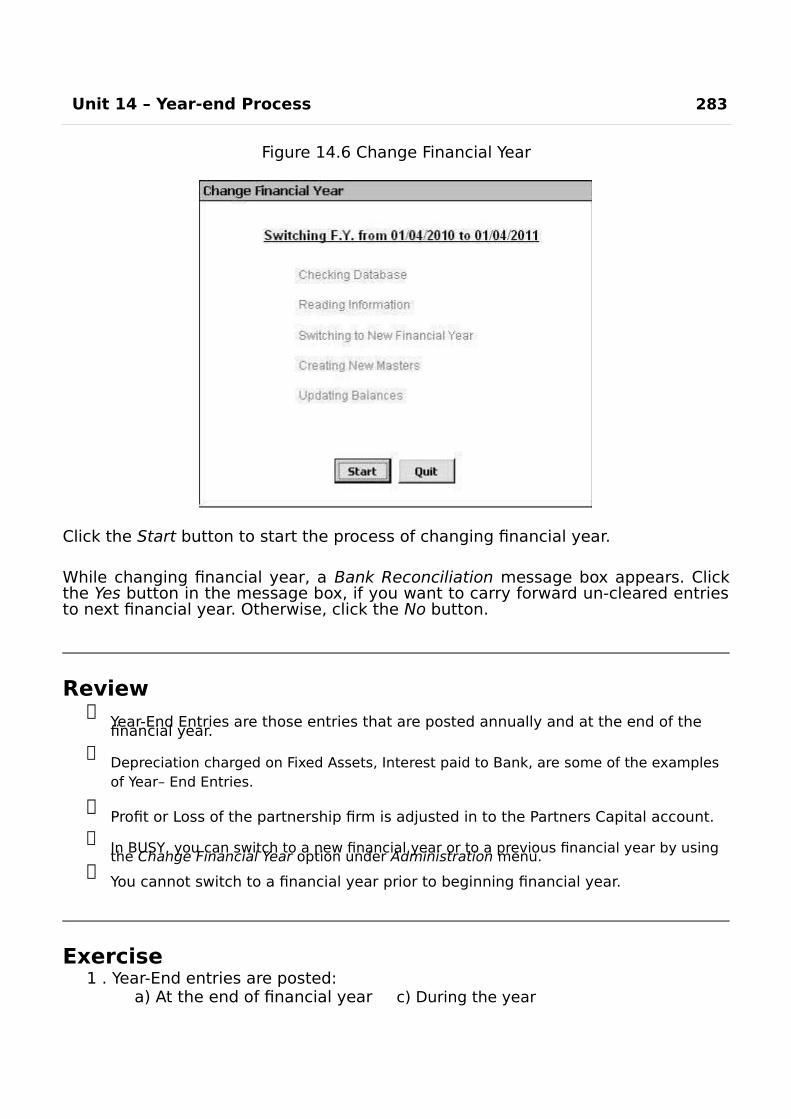
Unit 14 – Year-end Process 283
Figure 14.6 Change Financial Year
Click the Start button to start the process of changing financial year.
While changing financial year, a Bank Reconciliation message box appears. Clickthe Yes button in the message box, if you want to carry forward un-cleared entriesto next financial year. Otherwise, click the No button.
Review
Year-End Entries are those entries that are posted annually and at the end of the financial year.
Depreciation charged on Fixed Assets, Interest paid to Bank, are some of the examples of Year– End Entries.
Profit or Loss of the partnership firm is adjusted in to the Partners Capital account.
In BUSY, you can switch to a new financial year or to a previous financial year by using the Change Financial Year option under Administration menu.
You cannot switch to a financial year prior to beginning financial year.
Exercise1 . Year-End entries are posted:
a) At the end of financial year c) During the year
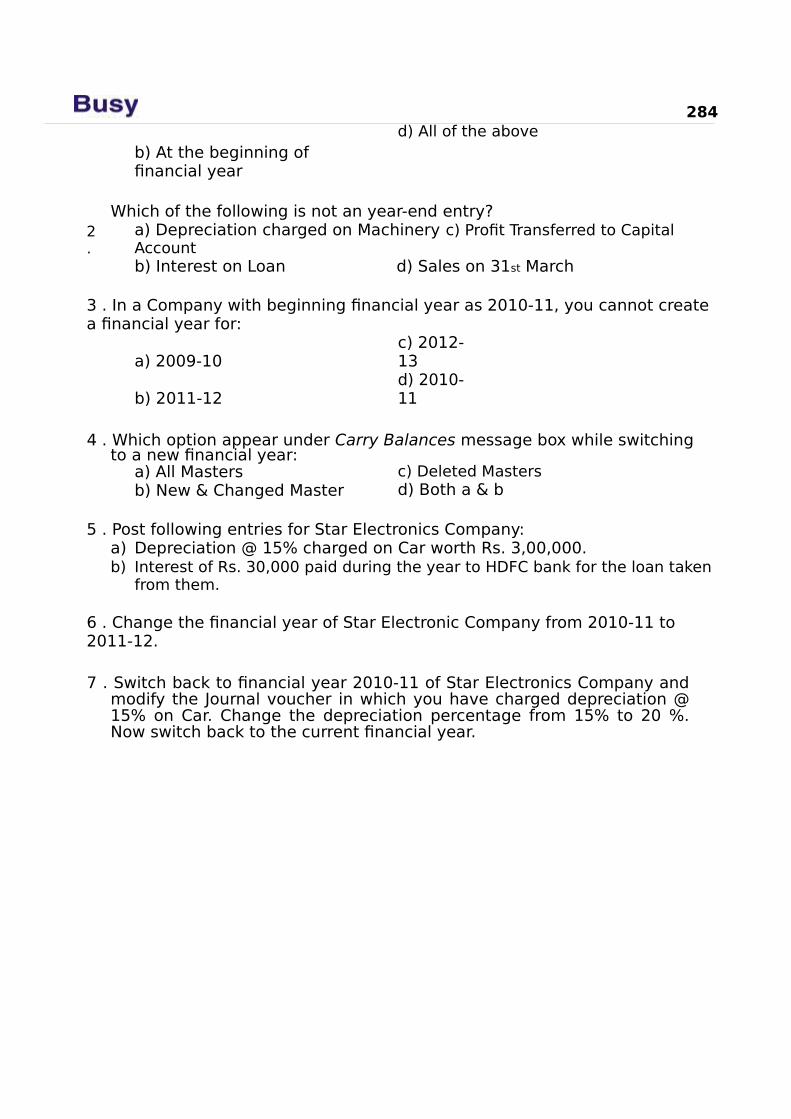
284
b) At the beginning of financial year
d) All of the above
2 .
Which of the following is not an year-end entry?a) Depreciation charged on Machinery c) Profit Transferred to Capital Accountb) Interest on Loan d) Sales on 31st March
3 . In a Company with beginning financial year as 2010-11, you cannot create a financial year for:
a) 2009-10c) 2012-13
b) 2011-12d) 2010-11
4 . Which option appear under Carry Balances message box while switchingto a new financial year:
a) All Mastersb) New & Changed Master
c) Deleted Mastersd) Both a & b
5 . Post following entries for Star Electronics Company:a) Depreciation @ 15% charged on Car worth Rs. 3,00,000.b) Interest of Rs. 30,000 paid during the year to HDFC bank for the loan taken
from them.
6 . Change the financial year of Star Electronic Company from 2010-11 to 2011-12.
7 . Switch back to financial year 2010-11 of Star Electronics Company andmodify the Journal voucher in which you have charged depreciation @15% on Car. Change the depreciation percentage from 15% to 20 %.Now switch back to the current financial year.
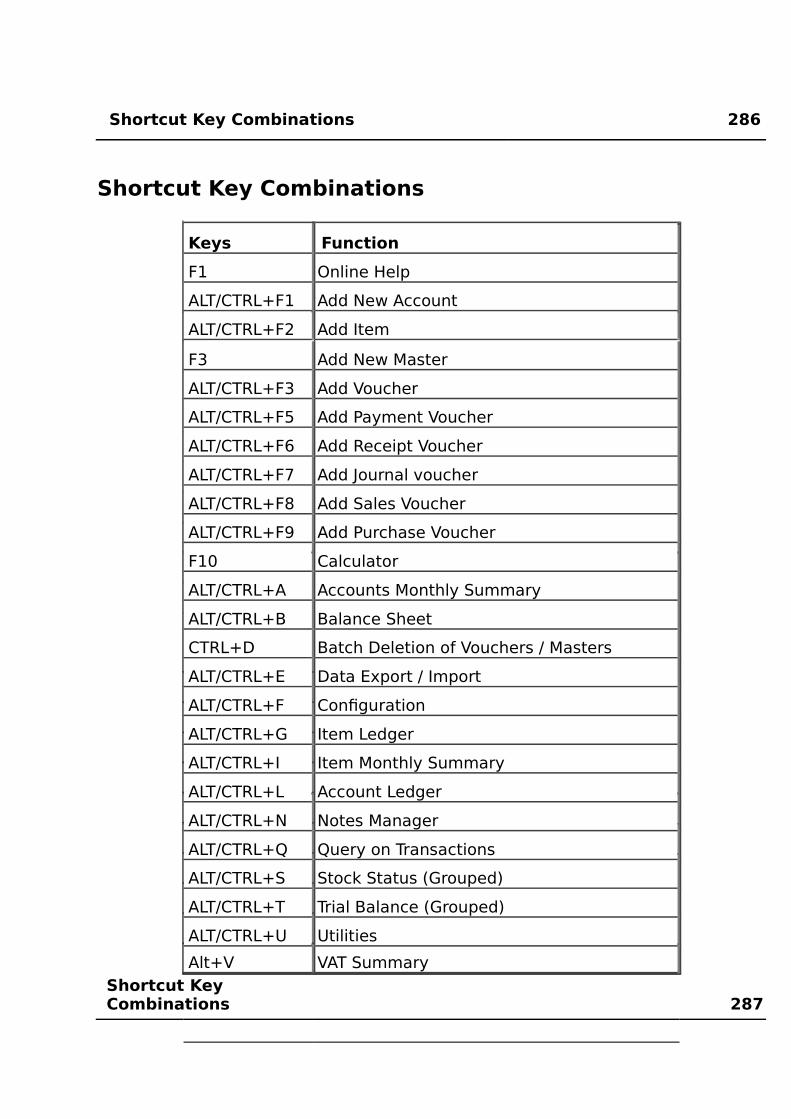
Shortcut Key Combinations 286
Shortcut Key Combinations
Keys Function
F1 Online Help
ALT/CTRL+F1 Add New Account
ALT/CTRL+F2 Add Item
F3 Add New Master
ALT/CTRL+F3 Add Voucher
ALT/CTRL+F5 Add Payment Voucher
ALT/CTRL+F6 Add Receipt Voucher
ALT/CTRL+F7 Add Journal voucher
ALT/CTRL+F8 Add Sales Voucher
ALT/CTRL+F9 Add Purchase Voucher
F10 Calculator
ALT/CTRL+A Accounts Monthly Summary
ALT/CTRL+B Balance Sheet
CTRL+D Batch Deletion of Vouchers / Masters
ALT/CTRL+E Data Export / Import
ALT/CTRL+F Configuration
ALT/CTRL+G Item Ledger
ALT/CTRL+I Item Monthly Summary
ALT/CTRL+L Account Ledger
ALT/CTRL+N Notes Manager
ALT/CTRL+Q Query on Transactions
ALT/CTRL+S Stock Status (Grouped)
ALT/CTRL+T Trial Balance (Grouped)
ALT/CTRL+U Utilities
Alt+V VAT SummaryShortcut Key Combinations 287
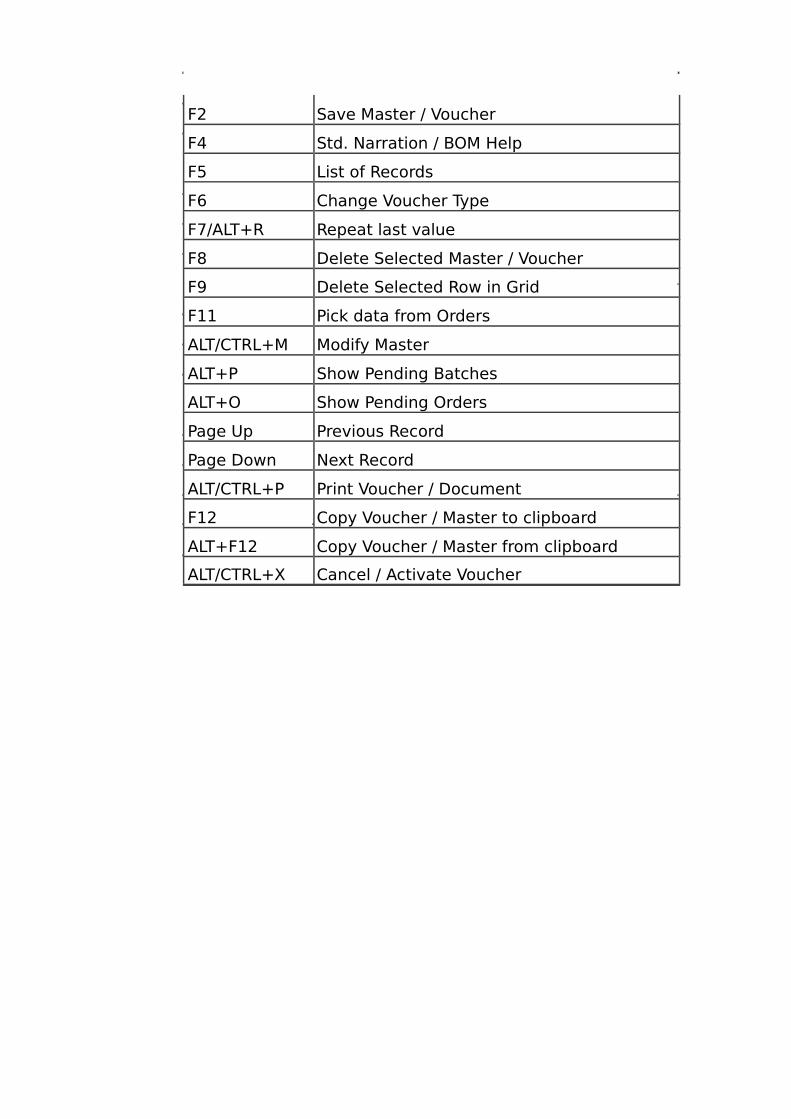
F2 Save Master / Voucher
F4 Std. Narration / BOM Help
F5 List of Records
F6 Change Voucher Type
F7/ALT+R Repeat last value
F8 Delete Selected Master / Voucher
F9 Delete Selected Row in Grid
F11 Pick data from Orders
ALT/CTRL+M Modify Master
ALT+P Show Pending Batches
ALT+O Show Pending Orders
Page Up Previous Record
Page Down Next Record
ALT/CTRL+P Print Voucher / Document
F12 Copy Voucher / Master to clipboard
ALT+F12 Copy Voucher / Master from clipboard
ALT/CTRL+X Cancel / Activate Voucher
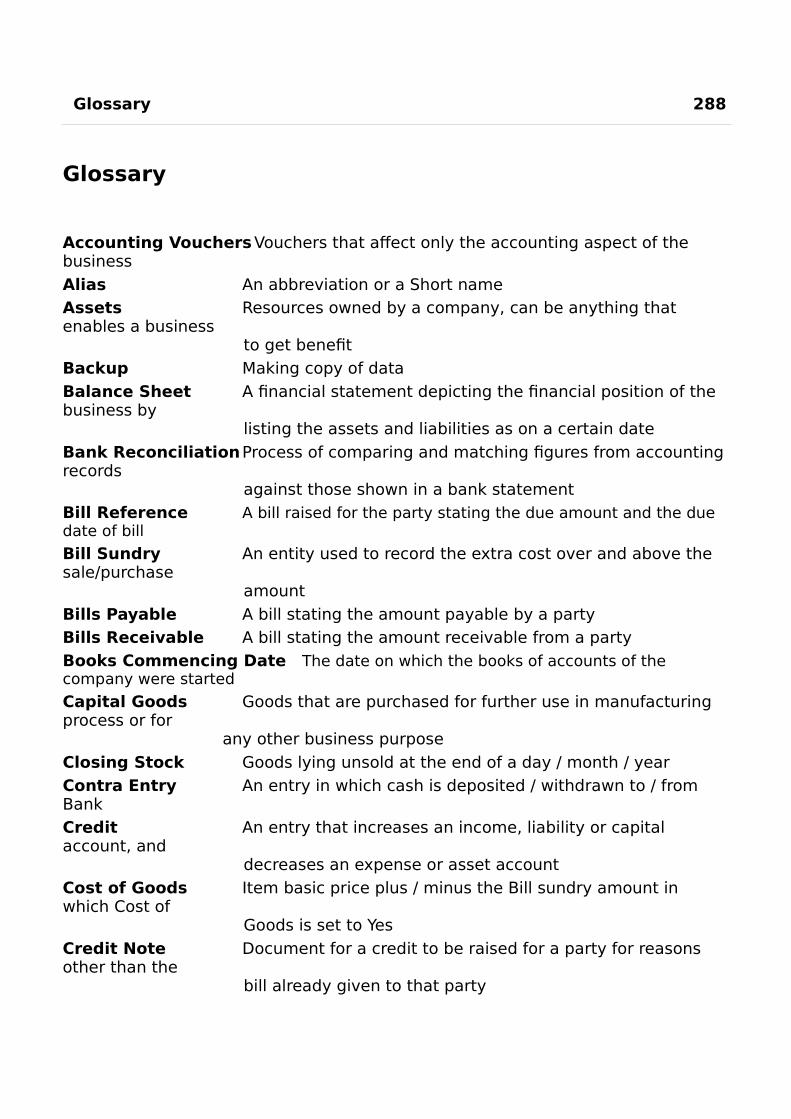
Glossary 288
Glossary
Accounting VouchersVouchers that affect only the accounting aspect of the business
Alias An abbreviation or a Short nameAssets Resources owned by a company, can be anything that enables a business
to get benefit
Backup Making copy of data
Balance Sheet A financial statement depicting the financial position of the business by
listing the assets and liabilities as on a certain date
Bank ReconciliationProcess of comparing and matching figures from accounting records
against those shown in a bank statementBill Reference A bill raised for the party stating the due amount and the due date of bill
Bill Sundry An entity used to record the extra cost over and above the sale/purchase
amount
Bills Payable A bill stating the amount payable by a partyBills Receivable A bill stating the amount receivable from a party
Books Commencing Date The date on which the books of accounts of the company were started
Capital Goods Goods that are purchased for further use in manufacturing process or for
any other business purpose
Closing Stock Goods lying unsold at the end of a day / month / year
Contra Entry An entry in which cash is deposited / withdrawn to / from BankCredit An entry that increases an income, liability or capital account, and
decreases an expense or asset account
Cost of Goods Item basic price plus / minus the Bill sundry amount in which Cost of
Goods is set to Yes
Credit Note Document for a credit to be raised for a party for reasons other than the
bill already given to that party
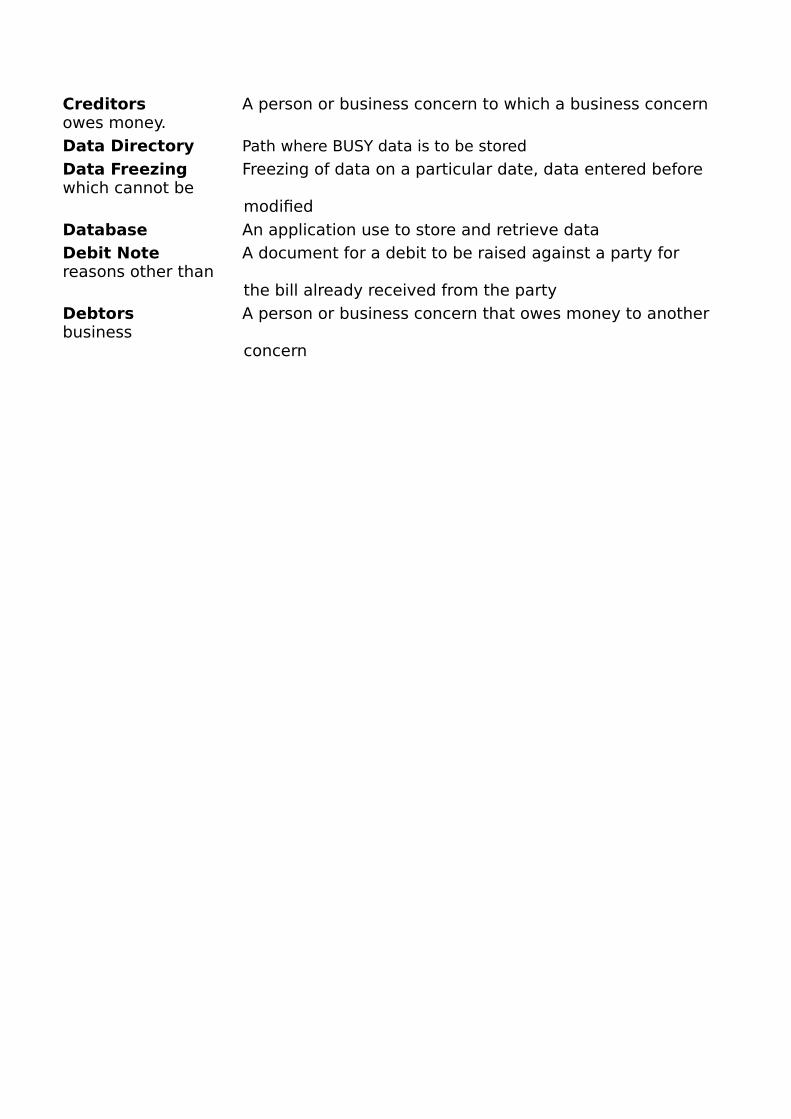
Creditors A person or business concern to which a business concern owes money.
Data Directory Path where BUSY data is to be stored
Data Freezing Freezing of data on a particular date, data entered before which cannot be
modified
Database An application use to store and retrieve dataDebit Note A document for a debit to be raised against a party for reasons other than
the bill already received from the party
Debtors A person or business concern that owes money to another business
concern
Glossary 289
Delimiter A symbol used as a separator between two components
Dongle A security device attached to the USB port to check the authenticity of the
softwareDual Vouchers Vouchers that affect both accounting and inventory aspect of business
Exempted Items Items, which are totally exempted from taxExpense Amount spent in order to produce and sell the goods and services, which
produce the revenue
Financial Year An accounting period, generally from 1st April to 31st MarchFTP File Transfer Protocol is a standard network protocol used to copy a file
from one host to other over a network such as InternetIncome Money received by a person or organization because of effort or works
done by the person
Input Tax Tax paid on purchases of goods not meant for consumptionInput Tax Credit Amount of input tax for which you are allowed to claim a credit
Inventory Vouchers Vouchers that affect only the inventory aspect of business
Invoice Popularly known as a bill, is a claim raised by the seller of the goods on the
buyer of the goods in respect of the goods sold
Item Basic Price Price of the item without charging any tax
Ledger A report displaying all the transactions for an account withina specified
date range
Liabilities Something that a business owes to a third party in the form of an
obligation to pay
Master Master signifies information that is generally created once but further
used in various activities and transactions
Material Centre A place where goods are kept, such as Godown, Showroom
Multi Tax Invoice A single Invoice in which different tax rates are used
Narration A one or two line explanation giving precise information about
the voucher entry

Net Tax Payable / Difference between Output Tax and Tax Credits allowed to claim in a givenReceivable tax periodNett Bill Amount Refers to final bill amount
On Account Entries Entries for which no bill reference has been created
Opening Stock Goods lying unsold at the beginning of the day / month / yearOptional Fields User defined fields created to store additional information about Masters
/ Vouchers
290
Output Tax The tax charged on sales that are subject to taxParent Group Group to which a Master belongs
Predefined Masters Accounts, which are necessary for maintaining books of accounts.
Without these accounts, you cannot maintain accounting aspect of business
Prefix Any string added in front of a word
Pricing Mode Mode or method by which Item price will be calculated in vouchers
Primary Group A group which is at the top most level of hierarchy and which does not
falls under any other group
Print Name Refers to the name that will appear on documents given to parties such as
sales invoice, receipt, debit note and so on
Purchase Return Refers to the goods returned by your company to the party from whom
the goods were purchasedPurchase Type Refers to the classification of purchase i.e. central / local, rate of tax and
so on
Restore To copy data from the backup copy already created
Retail Invoice Invoice on which Input Tax Credit cannot be claimedRevenue Income generated during a given period
Sale Return Refers to the goods returned to your company by the party to whom the
goods were sold
Sale Type Refers to the classification of sales i.e. central / local, rate oftax and so onST Form Sales Tax declaration forms used by registered dealers
Stock Refers to goods lying unsold on a particular dateStock Transfer Transfer of goods from one place to another generally from one Material
Centre to another for reason other than sale / purchase
Stock Updation Date Date on which the goods have been moved out or moved in. Basically, the
date on which the goods have been delivered orreceived Stock Valuation Method Method by which value of closing stock is calculated
SuperUser SuperUser is the top most user in the hierarchy of the users in BUSY. A
SuperUser is like the owner of a business who has all the rights and accessprivileges in the business. He can create and defines the rights and accessof other users
Tax Free Items Items, which are exempted from tax but under certain conditions or in
some statesTax Inclusive Items Items in which tax is included in their price
Tax Invoice An Invoice or bill on which Input Tax Credit can be claimedTax Paid Items Items on which tax is already paid or is paid at the first stage of
Glossary 291
manufacturing
Taxable Items Items on which tax is to be charged
Taxable Amount Amount on which tax will be calculatedTIN Tax Payer Identification Number. TIN is the registration number allotted
to a dealer registered under the Value Added Tax (VAT) Act
Transactions Day to day activities of a business such as sale, purchase, payment and
receipts
Trial Balance A statement prepared to check accuracy of the accounting records. It
shows the debit and credit balances of the accounts in two different columns
Unit Conversion Number of Sub Units per Main Unit, such as I Dozen = 12 pieces, I Kg =
1000 gmsVAT Value Added Tax is an indirect tax charged on both the purchase and sale
transactions in the chain of production and distribution of goods and provision for a set-off for the tax paid at earlier stages in the chain
Warning Alarms Refer to the alarms or warnings to be raised when the User is making any
wrong data entry or under any other situation, which can have a negative impact


![bD-h ( ) ( ) r 171] (ãÊ 1 171 171 (073-000-0000) b b -50 (Zîü ......r 171] (ãÊ 1 171 171 (073-000-0000) b b -50 (Zîü) ï640-8226 073-432-4704 ("MY "MY "MY O"MY 99 "MY ßfifVk"y5"](https://static.fdocuments.in/doc/165x107/6025e16303f4d66b72289886/bd-h-r-171-1-171-171-073-000-0000-b-b-50-z-r-171.jpg)