
Contents · Contents . Software Description ... hMailServer or . ... The first step after executing...
122
1 | Page Swift Email Processor v2.0 www.webemailverifier.com Support: www.webemailverifier.com/supportsuite/ Contents Software Description: ................................................................................................................................... 3 Program GUI Screenshots: ............................................................................................................................ 4 Program Features: ........................................................................................................................................ 9 Chapter 1: Installation and Settings Configuration ..................................................................................... 11 Configuration and Settings: .................................................................................................................... 12 Chapter 2: Using the Proxy Servers Module ............................................................................................... 31 Chapter 2.1: X-Originating-IP email header & Proxy Acceptable Usage Policy .......................................... 35 Chapter 3: Sending Messages using the Sender Module ........................................................................... 36 3.1: Unsubscribe link placements ........................................................................................................... 49 3.2: Installing and using the MySQL/MariaDB CRUD API script or application ...................................... 50 3.2.1 Installing MySQL API on Linux Server running Apache and PHP:................................................... 50 3.2.2 Installing MySQL API on Windows server or VPS: .......................................................................... 52 3.2.3: Sending permission pass emails to clean email addresses ........................................................... 63 3.2.4: Suppressing Email Addresses (Mailing Suppression List) ............................................................. 66 3.2.5: Using Google Analytics to track recipients opens/clicks actions .................................................. 71 Chapter 4: Using the Receiver Module ....................................................................................................... 75 Chapter 5: Using the Processor Module ..................................................................................................... 84 Chapter 6: Using the Mail Validator Module .............................................................................................. 95 6.1: What is Checked by Email Validation API: ....................................................................................... 97 6.2: Email Validation API Statuses and Status Codes .............................................................................. 97 6.3: What is required to use the Program: ............................................................................................ 100 6.4: API Key Authentication: ................................................................................................................. 100 6.5: Usage Steps: ................................................................................................................................... 100 6.6: Configuring the number of Automatic Re-Check of Unknown ...................................................... 102 6.7: Obtaining Email Validation API Key ................................................................................................ 103
Transcript of Contents · Contents . Software Description ... hMailServer or . ... The first step after executing...

1 | P a g e
Swift Email Processor v2.0
www.webemailverifier.com
Support: www.webemailverifier.com/supportsuite/
Contents Software Description: ................................................................................................................................... 3
Program GUI Screenshots: ............................................................................................................................ 4
Program Features: ........................................................................................................................................ 9
Chapter 1: Installation and Settings Configuration ..................................................................................... 11
Configuration and Settings: .................................................................................................................... 12
Chapter 2: Using the Proxy Servers Module ............................................................................................... 31
Chapter 2.1: X-Originating-IP email header & Proxy Acceptable Usage Policy .......................................... 35
Chapter 3: Sending Messages using the Sender Module ........................................................................... 36
3.1: Unsubscribe link placements ........................................................................................................... 49
3.2: Installing and using the MySQL/MariaDB CRUD API script or application ...................................... 50
3.2.1 Installing MySQL API on Linux Server running Apache and PHP:................................................... 50
3.2.2 Installing MySQL API on Windows server or VPS: .......................................................................... 52
3.2.3: Sending permission pass emails to clean email addresses ........................................................... 63
3.2.4: Suppressing Email Addresses (Mailing Suppression List) ............................................................. 66
3.2.5: Using Google Analytics to track recipients opens/clicks actions .................................................. 71
Chapter 4: Using the Receiver Module ....................................................................................................... 75
Chapter 5: Using the Processor Module ..................................................................................................... 84
Chapter 6: Using the Mail Validator Module .............................................................................................. 95
6.1: What is Checked by Email Validation API: ....................................................................................... 97
6.2: Email Validation API Statuses and Status Codes .............................................................................. 97
6.3: What is required to use the Program: ............................................................................................ 100
6.4: API Key Authentication: ................................................................................................................. 100
6.5: Usage Steps: ................................................................................................................................... 100
6.6: Configuring the number of Automatic Re-Check of Unknown ...................................................... 102
6.7: Obtaining Email Validation API Key ................................................................................................ 103

2 | P a g e
6.8: Supported Mailing List Formats: .................................................................................................... 105
6.9: Understanding Unknown Results .................................................................................................. 110
6.10 Recommended Practices for Dealing with Unknown Results ....................................................... 111
Chapter7: CSV-to-MySQL Data Loader/Exporter ...................................................................................... 113
Program Pre-requisites: ........................................................................................................................ 113
7.1 Using the CSV-to-MySQL Loader Tool (Step –by-step instructions) ............................................... 114
7.2 Creating additional tables ............................................................................................................... 120

3 | P a g e
Software Description: Swift Email Processor is an advanced CAN-SPAM and CASL compliant Windows application that allows email marketers perform a number of email marketing tasks such as sending transactional/marketing or permission pass/re-confirmation campaigns in order to convert your dirty/stale/old mailing list to a Confirmed Opt-in list (COI), processing of bounces and feedback loop complaints, removing hard bounces, unsubscribes and SPAM complainers from your database in real-time, automating sending messages to new subscribers on your database, validating email addresses via an email verifier API etc.
All that is needed to use Swift Email Processor is having one or more SMTP and POP3/IMAP servers; private or third-party. A locally installed Open Source or commercial MTA (Mail Transfer Agent) for Windows such hMailServer or PowerMTA as can also be used by the program directly as a localhost MTA. In addition, any third party SMTP relay server such as Mandrill or SparkPost can be used in the program.
Swift email processor allows you to automate all your email marketing tasks by combining 4 powerful email processing modules in a single application as follows:
• Sending messages ( Sender module) • Real-time bounce and feedback loop complaint processing ( Processor module) • Real-time retrieval of messages from POP3/IMAP mailboxes ( Receiver module) • Email validation ( Mail Validator module) to remove invalid and risky emails
The sender module allows email marketers to send CAN-SPAM-compliant messages to their subscribers with the ability to personalize the messages and insert unsubscribe links in every messages sent out. Recipients email addresses can be imported from TXT/CSV files or MYSQL database. The recipients email addresses can also be pooled automatically from a MySQL database every scheduled interval in real-time.
The application can also be used for sending permission pass or re-confirmation campaigns to cold or old/stale lists in order to convert cold/stale contacts into new engaging leads that can be saved automatically to your database in real-time. Swift Email Processor is 100% CAN-SPAM and CASL-compliant, allowing you to safely generate leads from your cold or stale/old lists.
In addition, the sender module makes it possible to send personalized campaigns to maximize open and click –through rates and ROI including powerful metrics such as Deliverability/Bounce rate and Complaint rates to enable you keep track of your email marketing success.
With the Receiver and Processor modules in the program, bounced emails in your mailbox can be retrieved and processed automatically using our powerful bounce processing engine and the

4 | P a g e
bounces can be saved to a CSV file or pushed to your database or update your email database server (delete bounces) in real-time.
In addition to the bounce processing, the program also includes a powerful automated processing of SPAM complaints emails in form of Abuse Reporting Format (ARF) [RFC 5965] which is implemented for Feedback Loop (FBL) and which are sent by ISPs to email marketers or bulk senders that have registered for their Feedback Loop program.
The application allows you to specify a custom email header to uniquely identify each of your recipients when you send out your emails so that SPAM complainers can be tracked easily using these unique X-headers identifiers. This unique recipient identifier ID is fetched by the application from your list database and automatically inserted in each message sent out.
Program GUI Screenshots:
Options window

5 | P a g e
Proxy Servers window

6 | P a g e
Receiver window
7 | P a g e
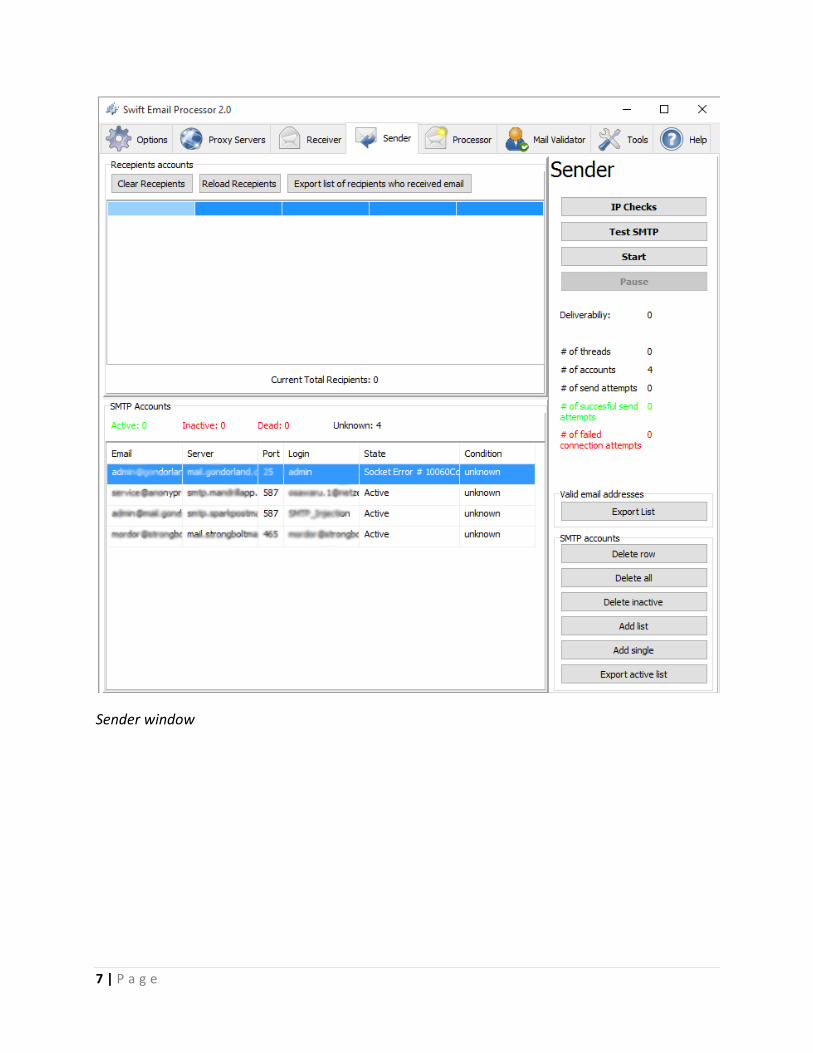
Sender window

8 | P a g e
Processor window

9 | P a g e
Mail Validator window
Program Features: Powerful bounce detection engine with very high accuracy
Protects the integrity of your email lists by ensuring they are clean and void of bounces.
Bounce detection engine can detect .dat, .msg, .eml and .txt message formats. The software currently recognizes over 2,000 different bounce formats.

10 | P a g e
Can detect and extract unlimited bounced emails from offline message files in all formats (.dat, .msg, .eml and .txt) stored on the local system.
Our powerful bounce processing engine can recognize thousands of bounce formats and DNS (Failed Delivery Status Notification) messages with over 98% accuracy
All bounces are classified into Hard, Soft and Non-Bounces with detailed bounced reasons
Processed bounce result are available in CSV file format with an additional option to push the emails directly to your MySQL database or delete the bounced emails from your database
Supports unlimited POP3 and IMAP accounts and parallel multiple processing. You can add hundreds/unlimited number of POP3 or IMAP accounts in a text file using the easy specified format
Support for downloading email messages from IMAP and POP mail servers and saving all the emails in a designated folder on your system
Option to delete bounced messages directly from the email server after downloading
Bounce processing can be stopped or resumed at any time as desired
Bounce detection engine and definitions are updated regularly and trained to recognize new bounce types with over 98% accuracy with no false positives
Super fast and multithreaded up to 1000 threads
Program runs in real-time continuously in order to download and process your messages 24/7 non-stop from unlimited POP3/IMAP accounts
Messages are downloaded directly from the remote POP3/IMAP account(s) into a folder and processed messages are automatically stored in a separate folder all in real-time
Application supports subject and message body content spinning using the spintax format
Includes an automatic IP warmup feature that allows new/cold SMTP IPs gradually gain reputation with ISPs
Application allows you to mimic manual sending to comply with ISPs sending etiquette by automatically rotating the time lag between sending each two emails
Build a global or specific suppression list by saving all unsubscribes/bounces/complaints or custom email addresses automatically to your database added to the program in real-time

11 | P a g e
Programs includes powerful free tools such as CSV to MySQL loader and Excel to CSV that allows you export your mailing lists in CSV formats to your database automatically
Lifetime license and free upgrades
Free 7 day unlimited trial license and free email validation API key with 500 quota
Chapter 1: Installation and Settings Configuration Swift Email Processor comes with a simple installer for Windows that makes the setup/installation easy. The program installer can be downloaded from the link below:
www.webemailverifier.com/emailprocessor.msi
Please note that the program works only for Windows. Other platforms are currently not supported. To install the program simply double click on the installer file and follow the prompts. After the program is installed successfully, proceed to execute the program by double clicking on the desktop icon.
Once executed, the program will begin to validate your license. If this is your first time to run the program and you do not have any active license for the program, the program will automatically generate a unique computer ID (CID) which is specific to your computer as shown below.

12 | P a g e
You will need to send this CID to us by email in order to activate your free trial 7 days usage. After we receive the CID, it will be activated within 24 hrs. You will be informed by email as soon as the CID is licensed. Once your CID has been activated, you will then be able to run the program. After your trial has expired, you can visit our order page to place an order for the lifetime license at: https://webemailverifier.com/member/signup.php
Configuration and Settings: The first step after executing the program is to configure the desired settings in the Options tab. The program has the following settings groups which must be configured. Most of the default settings can be used with the program and do not need to be changed. The following explains the various settings in each group settings as follows:

13 | P a g e
Connection Settings:
• Use Proxies: If you want to use socks 5 proxies for the processing of emails or sending of messages, you can enable this option. You will need to provide the socks5 proxies on the “Proxy Servers” tab. The program supports unlimited socks 5 proxies.
• Maximum number of threads: This is the maximum number of simultaneous parallel connections desired. The program supports up to a maximum threads of 1000. However, depending on your type of mailbox account, you may have to choose an appropriate number of threads. If the mailbox is a private mailbox, you can use the maximum number of threads. If you have a free mailbox account such as Yahoo or Hotmail, it is recommended as use low threads. We recommend no more than 5 threads per account if you are using a free POP/IMAP mailbox account.
• Time delay between thread packets, minutes: This is a delay between each connection attempts in minutes to the POP3/IMAP mailboxes. As we indicated above, if you are using a free mailbox, we recommend you set an appropriate

14 | P a g e
delay between each thread in order to avoid blocking of your accounts. If you are using private mailbox accounts, you can ignore this setting.
• Maximum number of failed connection attempts during the same session: This is
a connection retry option to instruct the program to automatically attempt to connect to any of the account that failed to connect previously. You can set this to a high value such as 999 to instruct the program to perform a persistent connection. After the number of connection attempts has exceeded the value specified on the “Maximum number of failed connection attempts during the same session “setting, the account (POP3/SMTP) will be flagged “dead” by the program.
• Maximum number of failed connection attempts after which the account data
will be removed from the list: This is the maximum number of connection attempts the program will make for any given mailbox account after which the account will be automatically deleted from the program. After the number of connection attempts has exceeded the value specified, the account (POP3/SMTP) will be flagged “dead” by the program and will be automatically deleted the next time the program is run.
• SMTP throttling/Speed Settings: This powerful feature allows users to perform SMTP based rate limit connections which is designed to give users additional control. SMTP based rate-limiting allows for throttling the number of connections on a per-second basis for each SMTP server configured on the application. This feature will be primarily used by senders that configure multiple SMTP servers and that want to limit the attempted delivery rate for each SMTP server in the program to the recipient mail servers.
In addition, SMTP based rate limiting allows one to specify the maximum number of connections to be attempted during the specified time period per SMTP.
Note: By setting the appropriate values in 2 program parameters (Max connect rate & Max message rate) shown below, throttling email delivery to ISPs can be effectively achieved and prevent ISPs blocking and deferal errors such as the one shown below from Hotmail when the maximum allowed connection rate or message delivery rate is exceeded:

15 | P a g e
421 PR(ct1) The mail server IP connecting to Windows Live Hotmail server has exceeded the connection limit allowed. If you are not an email/network admin please contact your E-mail/Internet Service Provider for help. For e-mail delivery information, please go to http://postmaster.live.com
IP Warmup Settings With the program automated IP warmup settings, you can limit the number of emails that can be delivered through each of the SMTP IPs you have configured on the program per day until they are fully warmed up.

16 | P a g e
Note: Please be aware that this SMTP speed throttling and IP warmup settings is applicable globally for all the SMTP servers that is configured and enabled on the program. It is not a per SMTP setting. Therefore, if you are using multiple SMTP servers and the speed throttling setting that will not apply globally for all the SMTP servers, then you must either disable the SMTP servers that you do not want to inherit the global speed throttling setting or use them separately.
Sender Settings

17 | P a g e
The Sender Settings controls the Sender module which is used for messaging subscribers. It is divided into 2 parts as follows:
• Location of recipients email addresses: This setting specifies where the recipient email addresses are located as shown in the screenshot below:

18 | P a g e
Email addresses can be fetched by the program from either a CSV file or a MySQL database. The program comes with a database settings that allows you to specify the database where the recipients email addresses can be found. When using a CSV file, the exact column letters of the CSV file that holds the recipients email , unique identifier or X-header and names should be specified using the letter drop-down boxes. The personalized properties such as the unique identifier X-header and names column allow you to process feedback loop complaints (detect complainers ) and also minimize complaints by sending personalized messages.
When opting to use a database, then the database connection details and credentials must be entered on the database connection settings tab as would be explained later. Please ensure that the database details are entered on the “Mailing List Database” database tab under the “DB Connection settings” tab as shown below:

19 | P a g e
• Email Message Settings: These includes message settings such as Return-Path/Reply to, subject, sender email address, message body etc as shown below:

20 | P a g e
Swift email processor allows you to specify a dedicated/custom email address where bounced email notification (DSN) are to be sent to. This dedicated or custom email address is known as the “Return-Path”or the “Bounce Address”. The return-path or bounce address is an invisible field contained in the email headers that specifies the email address which bounces should be delivered to. This Return-Path/Bounce Address is different from the “Mail from” address which serves a different purpose.
To specify a Return-path/Bounce address in the application, navigate to the Sender settings under the Options tab and under the “Email settings”enter the return-path/bounce address in the “Return-path for outgoing messages” field as shown below:

21 | P a g e
The “From Email” address is specified with the SMTP credentials under the Sender tab in the “email” field as shown below:
Note: Unless the “Return-Path (also known as “Bounce address”) email address is explicitly specified, the application by default will automatically use the exact email address specified in each SMTP account as the “Reply to”/”Mail From” /”Return-Path” when sending out messages.
In addition, please be aware that different ISPs interpret Return-path differently. Some can replace the return-path with their own or even ignore it altogether and decide to send bounce

22 | P a g e
backs to the “mail from” address. Therefore it is a good idea that both return-path/bounce address and mail-from addresses are processed for bounces where possible.
Messages can be composed both in plain text or HTML. To compose your message, select the appropriate message type and enter the message by clicking on the “Enter text “ or “Edit file” buttons.
In addition, the program supports the spinning of the subject and the message body using the spintax curly bracket based format { | }. The spinner allows you to send unique and dynamic content to your recipients and vary your offers or campaigns so that it creates a unique experience for your recipients every time they open one of your emails. Sending the same email to the same recipients repeatedly can irritate subscribers and cause your emails to be flagged as SPAM.
For example, a spinned content can be :
Hello {Customer|Client|Subscriber} we have a new{version|release|product} of our email marketing app.
The following content can be spinned:
• Subject • HTML Content • Text Content • Mail From Name • Mail From Email Address ( Automatically spinnable when using multiple SMTP accounts) • Reply To/Bounce Email Address • Company Address/Footer/Header/URLs
In addition, by utilizing the spintax format to vary your campaigns subject lines and message body , you will be able to spun test your campaigns in order to obtain the best-performing subject lines that encourages recipients to open your emails thereby maximizing your open rate.
Once this is done, the message is now ready to be used by the sender module.

23 | P a g e
Processor Settings
• Check the “Delete messages from server after downloading/processing”
checkbox if you want the program to automatically delete messages from the mailbox server after the message is downloaded.
• Under the “Settings for processing on local drive”, browse and select the respective folders you want the program to dump all the downloaded messages and the processed messages. A message is said to be have processed after it has been scanned by the program for bounces. Once a message has been scanned , it will be moved to the “Folder for processed messages”

24 | P a g e
• Swift email processor has the ability to process two popular MTA ( Mail Transfer Agents) namely PowerMTA (a third party MTA developed by Port25) and the Open source Postfix. If you’re running any of these MTA, you can import either the accounting log file from the PowerMTA or the “maillog” file (from the /var/log path ) from postfix and have these processed for bounced emails.
• For feedback loop (FBL) messages processing where the complainers email
addresses are to be determined in the abuse report emails sent by the ISPs, the X-header name must be specified and the source where these unique X-header fields are be looked up from must be specified. There are 2 options to choose from ( CSV file or MySQL database).
With the sender module on the program, the program has the ability to insert these unique X-headers identifiers in every message sent out as specified. For example, you can instruct the program to lookup the unique x-header Ids from a CSV file or from the database details specified in the “Mailing List Database” form under the database connection settings which contains both the emails addresses and the corresponding IDS. A sample is shown below:

25 | P a g e
• In the “Saving/Deleting the bounced email addresses” sub group setting, you
have 3 options to specify how you want the processed bounced emails to handled: 1. Save data on local drive in CSV file: This option allows the program to save
the processed bounced emails to a CSV file in the folder you will specify. To specify the folder, simply click on the browse button and point it to a folder of your choice that you have created. Please ensure that Microsoft Excel is not in use when choosing this option since the program will automatically save the bounced emails to the CSV files.
If you choose this option, 6 CSV files will be generated. One set of the files will contain the Hard, Soft and Non bounces with their detailed bounce detailed such as bounce reason. The other set of the CSV files will contain only the email addresses that you can easily re-use in your email marketing program or suppression database.
2. Save data to MySQL database: Please choose this option if you want the processed bounced or spam complainant’s emails to be pushed directly to your database. This is usually the recommended option to create a global suppression database.
3. Delete data from MySQL database: Select this option if you would rather prefer to make the program automatically update your database by removing the bounced emails from your database which is specified in the “Updated List Database” form. When the program deletes the bounced emails from the database, all other fields/columns associated with the bounced emails is left intact. This is very useful in case you want to manually request affected subscribers to update their email addresses by reaching them through telephone or postal mail.
• Select bounce/complainers types to store/delete: In this group setting, you have the option to select which types of bounces/complainers to store or delete from the database or CSV files. By default only the Hard and Soft bounce types are selected. However, you can select any type that suits you best. Please ensure that at least one bounce type is selected.

26 | P a g e
Database connection settings: If you have selected the option of saving or deleting the
bounced emails directly from your database, then you must input the database connection details and credentials in the database connection settings group. You will find three tabs under the database connection settings group (Mailing List Database, Updated List Database and Suppression List Database). Each of these databases signals the type of email address operation to be carried out in each of the databases. In the program, email addresses are read from the “Mailing List Database” database, email addresses can be deleted or added from the database details specified in the “Updated List Database” tab and suppressed email addresses are written to the database server details specified on the “Suppression List Database” database tab.
At any point in time, the program can perform read, write or delete operations on any of databases or simultaneously depending on the operation instruction that is given to the program.
These 3 databases are shown below:

27 | P a g e
Database details tab for “Mailing List“

28 | P a g e
Database details tab for Suppression List

29 | P a g e
Database details tab for Updated List
To input the database details and credentials, please click on the appropriate tab and ensure that you test the database connection using the “Test connection” button after entering the database details. You can also click on the “save connection info” button to save the settings.

30 | P a g e
The following explains the fields in the database connection settings :
• Host: : Enter the IP Address /Hostname of the database server • Port: Enter here the port of the MySQL server which is usually 3306 • Username: Enter the username for the database • Password: Enter the password for the database • Schema name: This is the database name • Table: This is the table in the database where the emails will be saved or deleted • Field name: This is the column in the table where the emails will be saved or
deleted
Note: Whenever the program is being executed, the application will automatically test the connection details/credentials of all 3 databases configured. If any fails the connection test, you will be alerted accordingly of the exact database that failed the connection tests. This is illustrated in the screenshots below:

31 | P a g e
In this screenshot above, the test for the “Updated List Database” failed. Therefore it would be necessary to check the database details/credentials before performing any actions that is dependent on the database.
Chapter 2: Using the Proxy Servers Module Swift Email Processor supports the use of proxies for sending messages or processing messages (downloading messages) from POP3/IMAP mail boxes. Only Socks 4/5 proxies with IP based authentication are supported. Please note that if you intend to send email via a Socks 5 proxy account, you must ensure that the Socks proxy has the SMTP port 25 open.
Unlimited Socks proxies can be added or imported into the program in text file in the format: IP:Port on each line. A sample is shown below.
Important Notice: When you configure the program to use Socks 5 proxies to connect to your POP3 or SMTP accounts, please be aware that it’s not always 100% accurate when the program give the status of the SMTP or POP account as "inactive" because the actual status of the POP3 and SMTP servers depends on the status of the Socks 5 proxy as well.

32 | P a g e
This is because when using a proxy server to access the SMTP or POP3 servers, if the socks proxy fails, then the result will show an “inactive” account status for the SMTP or POP3 because you are actually connecting to the SMTP or POP3 via the socks proxy as a transport medium
To add a single Socks proxy to the application, click on the “Add single” button on the right hand pane to open the single proxy add form as shown below:

33 | P a g e
Then click on OK to complete.
To import a socks proxy list, click on the “Add list” button and browse to the text file.
The proxy module in the application includes a tester functionality that allows you to test all the configured proxies easily. Other functions exists such as editing single proxies, deleting single proxies, deleting inactive proxies, exporting active lists etc. You will find the buttons for these tasks on the right panel of the window as shown below:

34 | P a g e
To edit or delete a single socks proxy, simply right click on the proxy on the grid and the context menus will appear to edit or delete the proxy. This is shown below:

35 | P a g e
Chapter 2.1: X-Originating-IP email header & Proxy Acceptable Usage Policy Most MTA or email servers will add the X-Originating-IP header to all outgoing emails to assist with investigation of the sources for spam and unsolicited bulk email. However, when using a proxy server in your email client, the X-originating IP would then appear as the IP address of the proxy server in the email headers.
Note that some MTA or email servers are configured to automatically strip off the X-originating IP in the email headers when messages are delivered. However, there are majority of MTA that will include your real IP as the X-originating IP in the email headers especially public mail servers as a way of preventing SPAM and investigating sources of spam and unsolicited bulk email while using the information to build IP-based reputation data in order to improve deliverability for legitimate senders.
Warning: In line with CAN-SPAM ACT, it is illegal to send spam or unsolicited bulk email (UBE) via proxies as a way to anonymize your identity or location by way of anonymizing the X-originating IP. You may not use the application with proxies ( private or public) to send SPAM or UBE . It is strictly forbidden to use this application with proxies to send SPAM/UBE as a way to sneaking around or evading detection as a spammer.
Using a proxy to send emails is only permissible with the application under the following circumstances:
• When you are sending high volume emails and you wish to minimize the throttling or deferring of your messages by ISPs that only permit the sending of a given amount of emails per X-originating IP source (Volume Caps). Every IP address has a volume cap depending on its sending reputation. Using proxies in this case would help to minimize throttling/deferrals and enable you to deliver more emails to these ISPs.
• When your original IP do not have an established reputation yet with the various ISPs. We strongly recommend that your IP be properly authenticated such as having fixed forward/reverse DNS so that your IP and hostname can build reputation together over time.
• When you have a dynamic IP address such as a residential ISP where your IP addresses is constantly changing. Since sending emails from a dynamic X-originating IP address will likely make your emails blocked or deferred, you can use a static IP proxy server to send

36 | P a g e
your emails which will make your X-originating IP appear as fixed IP address in the email headers.
Chapter 3: Sending Messages using the Sender Module The sender module in the application is used to send messages to your recipients. Both plain text and HTML messages can be composed and sent using the sender module. The sender module includes a easy HTML editor that can be used to import your html files or edit your already existing html message templates.
To use the sender module, take the following steps:
Step 1: Navigate to the “Sender settings” tab under the “Options” main tab as shown below:
Step 2: Enter the email message settings such as Return-path or “From email” address, the subject for the message and the “From name”. Then click on the type of message (plain text or HTML) that you wish to send. Select the appropriate message type and click on the “Enter text” or “Edit file” button to import or paste your message. If composing your message in HTML format, click on the “Edit file” button to open the in-built HTML editor as shown below.

37 | P a g e
In addition, if desired, the subject and message body contents can be entered using the spintax format {|}. The program includes a spinner that allows you to send unique content to your recipients and vary your subject and message content so that it creates a unique experience for your recipients each time they open one of your emails. It is also possible to combine the spinning with the supported placeholders or tags in the application such as %name%, %subscribe% and %unsubscribe%
An example of a spinned subject line can be:
Spinned Content: Hello %Recipient%,New {version|release|product} is now available
Processed Content: Hello John, New version is now available
Hello Peter, New release is now available
Hello Mary, New product is now available
The HTML compose window is shown below:
Once you are done composing your HTML message or importing your pre-existing HTML file, click on the save button or go to File>>>>Save to save the message before closing the HTML message compose window.

38 | P a g e
Step 3: Select the source of the recipients. If you have your recipients email addresses on a CSV file, select the CSV file option and select the CSV file using the “Select file” button. If the CSV file contains personalized information such as names and unique identifier IDs, then select the appropriate column of the CSV file that holds the data. A sample is shown below:
If your recipient email addresses are stored in a MySQL database, then you must enter first the database connection details and credentials on the “Mailing List Database” tab under the database connection settings as shown below.
Step 4: Optional (Enable IP warmup ) and enter the desired settings:
Swift Email Processor includes a powerful automated IP warmup feature that allows you to limit the amount of emails that can be delivered via each of your SMTP IP per a specified time period until they are warmed up. The aim is to restrict the number of SMTP requests (Threshold) to a particular SMTP IP address for a given period of time. Then based on the threshold set if the value of a particular IP SMTP connection frequency value exceeds the threshold value, then the SMTP connection is blocked, else it is allowed to proceed.

39 | P a g e
Before using the IP warm-up feature, please ensure you comply with the following recommended best practices in order to achieve the desired maximum benefits from warming up your SMTP IP:
• Before starting the warm-up process for a new/cold IP, ensure that the IP is properly authenticated/certified such as having SPF, DKIM, Forward and Reverse DNS etc.
• Register the IP in all available Feedback Loop programs (FBL) including Microsoft SNDS • Send slowly and ramp up gradually • For best results, send only to clean and high quality email addresses that are 100% opt-
in • Increase sending volumes gradually as reputation increases • Monitor your reputation constantly and make necessary adjustments based on the
feedback received from ISPs.
The below sample illustrates where the email addresses are stored on the “Mailing List Database”.

40 | P a g e
To automatically allow the program to pool the email addresses from the database in real-time every scheduled interval, in the “MySQL database settings (Data update auto pool interval), select the time in minutes. When this is done, the program will automatically pool or dump new email addresses entries on the database to the sender module. This might be useful as an auto responder where you can automatically email your subscribers that subscribe to your mailing lists in real-time once they are successfully subscribed.
Step 3: Click on the “Sender” tab

41 | P a g e
On the “Email field” form, the email addresses that were imported from the CSV or database will appear.
Step 4: Configure one or more SMTP servers. To add a single SMTP server, click on the “Add single” button and proceed to enter your SMTP server details. When done click OK to save it.

42 | P a g e
If the SMTP requires SSL connection, remember to tick the “Use SSL” checkbox.
If you have multiple SMTP servers and would like to load balance between all to send your messages, you can add multiple SMTP servers or import the SMTP servers in a text file using a specific format.
The format is provided below:
[email protected]:SMTPserver:Port:[email protected]:password:0/1
Where ; [email protected] = Your mailbox account
SMTP Server = Your SMTP server name
Port = The SMTP server port. Most SMTP servers by default use 25. Alternate
ports include 587 or 465 Port 465 is mostly supported for STARTTLS/TLS. [email protected] = this is your username for the SMTP account. Please
note that if using free SMTP servers, the username must include the domains such as [email protected]

43 | P a g e
Password = This is your password for the SMTP server 0/1= If the SMTP server requires SSL or STARTTLS protocol, you must enter 1.
Otherwise enter 0
Note: All entries for each account must be on a single line on a plain text file.
Once the SMTP accounts have been added (single or bulk added), they will appear on the account grid as shown below:
You can test all the added SMTP servers easily at the same time by clicking on the “SMTP Test” button which you can find at the right hand panel of the Sender tab as shown below:

44 | P a g e

45 | P a g e
Each SMTP account on the grid can be edited, deleted or disabled/enabled as desired easily by simply right clicking on an account and using the appropriate button on the context menu that appears as shown in the screenshot above.
Step 5: You are now ready to begin sending the messages. Simply click on the “Start” button. You may test the SMTP server prior to hitting the “Start” button to check if the SMTP server(s) is active.
Once the sending is in progress, you can monitor and view the sending metrics on the right hand panel as shown below:

46 | P a g e
One of the most important metric here to keep an eye on is the Deliverability. Deliverability is a way to measure the success at which an email marketer gets a campaign into subscribers' inboxes. It is expressed as a percentage and calculated by computing the difference between the number of sent messages and the number of messages that bounced back. Then the value is divided by the number of sent messages. The final value is then multiplied by 100.
In addition to these metrics, it is possible to automatically subtract the bounced emails during the campaign session from the number of emails the message was delivered to. Using the “Export List”, under the “Valid email address” group, in the right hand panel, this action can be automatically executed. Once clicked, the cleaned emails can be downloaded for further use in subsequent campaigns.
This effectively prevents you from sending future campaigns to invalid email addresses thereby safeguarding your reputation.
In addition, the raw lists of recipients who successfully received messages can be downloaded using the “Recipient who received emails” export list button. Other functions such as deleting single/all SMTP accounts, deleting inactive SMTPs and exporting active SMTP lists are possible using the appropriate button on the right panel as shown below:

47 | P a g e
Step 6: Checking the reputation of the SMTP servers. Swift email verifier is integrated with IP blacklist and reputation checker API (Application Programming Interface) that allows you to quickly check whether any of your SMTP IPs is blacklisted in all major DNSBL (Blacklists) such as Spamcop.
In addition, the reputation of the SMTP server IPs can be checked using the Senderscore and Senderbase free reputation checking services as follows:
• SenderScore™: Senderscore is a free service provided by Return Path. Senderscore provides a measure of your reputation by using scores that ranges between 0 and 100. The higher your score, the better your reputation and the higher your email deliverability rate. To learn more about Senderscore, please visit the official Return Path website.
• Senderbase™: Senderbase is a free service provided by Cisco. Senderbase ranks the reputation of your SMTP IP or domain as Good, Neutral, or Poor. To learn more about how senderbase works and the full meanings of these rankings, please visit the official website.
To check the reputation of your SMTP IPs configured on the program and to check if any is blacklisted, simply click on the “IP Check” button and wait until the checking process is completed. Due to the large number of DNSBLs against check the SMTP IPs are checked, it may take a while before the results are presented.
Note: All trademarks displayed on this manual are the exclusive property of the respective holders.

48 | P a g e

49 | P a g e
Once the checking process has been completed, the result excel files for both the SMTP IPs found to be blacklisted or with poor reputation can be exported and reviewed in order to assist with taking the right actions in remediating the blacklisting or reputation issues.
3.1: Unsubscribe link placements Swift Email Processor allows you to insert unsubscribe links in your campaigns which is required by law in most countries. Using the %unsubscribe% tag or placeholder which is mapped needs to be linked to your database, your recipients will be able to easily unsubscribe using a simple one-click unsubscribe process.
Also, all unsubscribe requests are processed for you automatically giving you and your subscribers peace of mind and ensures that your email campaigns are CAN SPAM compliant. The user email address is automatically removed from the linked database when a user clicks on the unsubscribe link and will be taken to a simple web page telling him that his email address has been unsubscribed. You can customize and place the unsubscribe link in any part of your message. Just make sure the tag "%unsubscribe%" is present. It is also possible to replace the unsubscribe link with your custom external unsubscribe link in order to manage unsubscribe to external mailing list manager.
We provide a free MySQL API script or application that has to be installed on your database server or any web server (Linux and Windows). This MySQL REST API will make it possible to automatically delete the recipient email address directly from the database table and column you specified on the API settings config file.
To learn more about to setup the MySQL API and usage, please see the next chapter 3.2.

50 | P a g e
3.2: Installing and using the MySQL/MariaDB CRUD API script or application
Swift Email Processor comes with a powerful and simple MySQL/MariaDB API server script or application that can be used to link your unsubscribe and subscribe links which is used to add or remove recipients email addresses from your database in real-time when clicked by your email campaign recipients.
We offer 2 versions of the MySQL API depending on your web server operating system as follows:
• For Linux web server running Apache and PHP : MySQL API zip archive • For Windows server or VPS : MySQL API bundled with Apache/PHP installer
The following sections will now describe how each of the API is setup depending on the operating system.
3.2.1 Installing MySQL API on Linux Server running Apache and PHP: If you have a MySQL server running on a Linux based web server with Apache and PHP running, take the following steps to install the MySQL API:
Step 1: Download the MySQL API zip archive: MySQL API zip archive

51 | P a g e
Step 2: Decompress the zip archive and upload the full folder to the document root of your web server so that your URL becomes like : http://www.yourhost_or_ip/mysqlapi/
If you do not have Apache and PHP running on your Linux server where the MySQL database is running, you can deploy the API script on another web server that has Apache and PHP running.
Step 3: Configure the MySQL API by editing the “config.ini” configuration file. To edit the config file, go to the your web server document root and navigate to the folder where the config file.
On most Linux web server running Apache, your document root is normally at: /var/www/html
##############################################################################
dbhost = your database hostname or IP. Leave as "localhost" if running the API script on the same server where the MySQL server is running dbuser = your database user dbpass = your database password dbname = your database name table = the database table addcolumn = the column or field where email addresses will be added or deleted deletecolumn = the column or field where email addresses will be deleted
primarykey_column = AUTOINC_PK (This is set as default and do not need to be changed) token = your secret token to prevent unauthorised persons from executing the API request ##############################################################################
Note: The “addcolumn” will be the column where recipients that subscribes by clicking on the “subscribe” link will be added whereas the “deletecolumn” will be the column where recipients that unsubscribes or opt-out will be removed. Therefore, make sure you configure or set the appropriate column on your database for these actions.
Step 4: Grant CRUD (Delete/Add) Permissions to Database User:
The MySQL API script requires that the database user configured on the config file has the full permission to add and delete records on the database from any host. This is also known as GRANT option. To grant this permission, connect to your MySQL database as "root" and issue the following command:
GRANT ALL PRIVILEGES ON *.* TO 'database_user'@'%' IDENTIFIED BY 'password' WITH GRANT OPTION;
Note: Make sure you: replace the database_user and password with the actual ones provided on the API config file. In addition, ensure that all rest columns in the database table specified on

52 | P a g e
the config file allows NULL values with the exception of the primary key column that is set to auto-increment.
Step 5: API Base URL and Secret Token Configuration on Swift Email Processor:
After configuring the API script, you will need to enter the base URL of the API into Swift Email Processor "Sender" settings. The base URL is the consistent part or common prefix of URL address. For example, if you installed the application on your computer and its now accessible at:
http://localhost:8080/mysqlapi/[email protected]&key=786723&action=delete
Then the Base URL will be :
http://localhost:8080/mysqlapi
or
http://IP-address:8080/mysqlapi ( if accessing the URL from another system).
Please ensure you use the external IP-based Base URL in Swift Email Processor when specifying the Opt-in/Opt-out MySQL base URL.
In addition, you are also required to enter the secret authentication key or token you have specified in the API config file on Swift Email Processor "Sender" settings as well.
3.2.2 Installing MySQL API on Windows server or VPS:
If you wish to install a new MySQL-based database server is running on Windows server or VPS you can install the Windows version of the API on the same server or VPS. To do this, you will need to download the Windows version of the API server installer package which comes bundled with MariaDB ( a open source replacement for MySQL), Apache+PHP and a free powerful application to load data from a CSV file to your database.
Note that MariaDB is a drop-in replacement for MySQL and offers similar features as MySQL. To learn more about MariaDB, please visit the official website at: http://mariadb.org/
The API installer will automatically install MariaDB and create a specified database with the table and columns. In addition, Apache and PHP will be installed on your server and deploy the API script by simply running the installer.

53 | P a g e
To install the API, take the following steps:
Step 1: Ensure that you have a Windows based VPS or server that is accessible over the web. Make sure the port you wish to use is not already used such as the HTTP port 80 or 8080. You can also use any other port provided the port is not blocked by your firewall. All windows server OS editions are supported such as Windows server 2003, 2008, 2012 etc.
Step 2: Download the Windows MariaDB API Server installer : MariaDB Insert/Delete API bundled with Apache/PHP installer and CSV loader.
Step 3: Execute the installer and follow the prompts.
Click Next and proceed to enter your desired database parameters/credentials:

54 | P a g e
Note: These database parameters you enter will be used to create automatically a database for you which you can later configure in the API server config file. Please make sure you take note of them.
The database paremeters are explained below:
##############################################################################
dbhost = your database hostname or IP. Leave as "localhost" if running the API script on the same server where the MySQL server is running dbuser = your database user dbpass = your database password dbname = your database name table = the database table addcolumn = the column or field where email addresses will be added or deleted deletecolumn = the column or field where email addresses will be deleted
Note: The CSV-MySQL (MariaDB) data loader that is installed along with the API server installer can be used to populate the “deletecolumn” database table column by exporting your email addresses in CSV files to the database table. To learn more on how to use the CSV-to-MySQL loader, please see chapter 7.

55 | P a g e
primarykey_column = AUTOINC_PK (This is set as default and do not need to be changed) token = your secret token to prevent unauthorised persons from executing the API request ##############################################################################
A sample is provided below:
Next, click Install and proceed:

56 | P a g e
The MariaDB will now begin to install….. Please be patient while it is being installed as this might take some time.

57 | P a g e
After the MariaDB has been successfully installed and the database specified have been created, the Apache and PHP web server applications will now start…
Leave at the default path : C:\ and click on Next
The default port is 80. Please ensure that this port is unused on the server or VPS. If the port 80 is already used, you can use an alternate port such as 8080. Leave the Server name as “localhost” and click on Install.

58 | P a g e
Wait for the installation to complete and click on close. Upon clicking on close, the default web server page shown below will automatically open confirming that the installation was successful. Finally click on the Finish button on the other installation window to complete the setup.

59 | P a g e
To see the configuration help file, click on the link in the page as shown below which will take you to the configuration guide.
Step 4: Configure the MySQL API config file:
To edit the config file, go to the path where the program is installed and navigate to the folder where the config file is as follows: C:\Apache2\htdocs\mysqlapi\config.ini ( This assumes that you installed the program on the default path which is C:\)
##############################################################################
dbhost = your database hostname or IP. Leave as "localhost" if running the API script on the same server where the MySQL server is running dbuser = your database user dbpass = your database password dbname = your database name table = the database table addcolumn = the column or field where email addresses will be added or deleted deletecolumn = the column or field where email addresses will be deleted
primarykey_column = AUTOINC_PK (This is set as default and do not need to be changed) token = your secret token to prevent unauthorised persons from executing the API request ##############################################################################
For example, using the database parameters and credentials specified in step 3 above, the corresponding config file would look as shown below:

60 | P a g e
Note: The “addcolumn” will be the column where recipients that subscribes by clicking on the “subscribe” link will be added whereas the “deletecolumn” will be the column where recipients that unsubscribes or opt-out will be removed. Therefore, make sure you configure or set the appropriate column on your database for these actions.
Step 5: API Base URL and Secret Token Configuration on Swift Email Processor:
After configuring the API script, you will need to enter the base URL of the API into Swift Email Processor "Sender" settings. The base URL is the consistent part or common prefix of URL address.
For the API which is now accessible at:
http://localhost:8080/mysqlapi/[email protected]&key=786723&action=delete. Then the Base URL will be:
http://localhost:8080/mysqlapi
or
http://IP-address:8080/mysqlapi ( if accessing the URL from another system).
When testing the API by inserting or deleting records such as email addresses, if the action is successful, you will get a “Action successfully completed” response. Otherwise, if the API request fails, you will get the response “Action Failed”.
Samples are shown below:

61 | P a g e
==============================================================================
Note: Please ensure you use the external IP-based Base URL in Swift Email Processor when specifying the Opt-in/Opt-out MySQL base URL. Also ensure that the MariaDB database port 3306 and the HTTP web server port you have specified for the API server are opened on your server or VPS firewall in order to be able to access the API URL externally.
In addition, you are also required to enter the secret authentication key or token you have specified in the API config file on Swift Email Processor "Sender" settings as well.
Example :
Step 6: Using the unsubscribe (opt-out) and subscribe (opt-out) tags on Swift Email Processor:
Once the opt-in and opt-out links setup and mapping has been successfully setup and confirmed working, the final step is to use the links in your message compose window by way of tags in the Sender module of the application. The subscribe link which is the Opt-in link can be inserted anywhere on your message by using %Opt-in% tag whereas the opt-out link can be inserted by using the %Opt-out% tag. A sample composed message containing these tags and

62 | P a g e
other supported tags such as the recipient name and email address tags is illustrated in the screenshot below:
The message composed in the screenshot above when sent would appear to the recipient as shown below with the subscribe and unsubscribe links:

63 | P a g e
3.2.3: Sending permission pass emails to clean email addresses Swift Email Processor includes an email list hygiene management feature that allow you to automatically include opt-in and opt-out links which are used to add or delete subscribers email addresses from your database using a free MySQL API in real-time without any need for you to maintain your own opt-in or opt-out forms or landing pages. These opt-in and opt-out links can be inserted as desired in your campaigns such as permission pass bulk mailing to ensures that your old or stale opt-in email lists are converted to current, clean and deliverable confirmed opt-in list in order to prevent and minimize bounces or spam complaints since ISP's regard repeated attempts to deliver to undeliverable or nonexistent addresses as spamming or namespace mining (email harvesting). What is a permission pass email? A permission pass or re-confirmation email involves sending out a new bulk email to your list and asking the recipients to confirm they wish to remain subscribed to your list. Only those who confirm will then continue to receive emails. Any subscriber that do not explicitly opt-back in or unsubscribes/opts out are removed from your mailing list, forgotten or suppressed from all your future mailings. After the permission pass campaign is completed, the resultant mailing list will be a completely clean confirmed opt-in list. This whole process is depicted in the diagram below:
Therefore by sending permission pass emails you can purge or delete recipients email addresses from their old or stale mailing lists that are no longer engaged or valid and leave only the subscribers who want to continue to continue to receive emails from them. This process allows email marketers to ensure the hygiene of their emails via a process known as “Confirmed Opt-in “whereby the recipient has verifiably confirmed permission for his/her

64 | P a g e
address to be included on the specific mailing list, by confirming (responding to) the list subscription request verification email.
The most common way re-confirmation emails are sent is by sending “re-opt-in” messages which are basically emails specifically sent to remind your recipients of your services that they once opted into and politely ask for the recipient’s permission to continue sending emails. A typical means to do this would be to send an email with two links:
• one link to re-opt-in the recipient • one link to opt-out the recipient
A typical re-opt or re-confirmation email could look like the sample provided below:
Upon receiving the permission pass email, the following actions will carried out automatically depending on which of the links (ReOpt-in or Opt-out) the recipient clicks on as follows:
1. If the recipient clicks on the Opt-out link, the email address is removed from the database
2. If the user clicks on the Opt-in link, the email address is added to a database that will be specified by the user

65 | P a g e
So the links will be inserted by placeholders as you can see in the screenshot above. Therefore when composing the message, you use these placeholder or tags to indicate the exact place where the links is to be auto inserted.
To setup a permission pass bulk mailing in Swift Email Processor is easy. Simply follow these steps:
Step 1: Download and deploy/install the appropriate MySQL API script or installer package for your server as described in chapter 2.22 above.
Step 2: Configure the MySQL API script and set the appropriate database table columns that will be used to add or delete recipient email addresses from the database. Please note that the “addcolumn” corresponds to the column where the recipient email addresses will be added and will be used by the %subscribe% tag or placeholder to link to the database column. On the other hand, the “deletecolumn” corresponds to the column where the recipient email addresses will be deleted and will be used by the %unsubscribe% tag or placeholder to link to link to the database column.
Step 3: Using the sender module in Swift Email Processor, compose your permission pass message and insert the appropriate tags or placeholders to denote the opt-in/opt-out links also known as subscribe/unsubscribe links.
Step 4: Complete the setup of the permission pass campaign settings by using any other appropriate settings in the program sender settings as desired and finally send out the permission emails.
Step 5: Wait for up to 72 hrs before downloading the list of recipient email addresses that explicitly opted back in (those that clicked on the subscribe links) on your database. Also, ensure that those recipients email addresses that opted-out are added to your global suppression list or can be used as suppression list database in order to suppress any future mailings to those that unsubscribed.
As you can see, with Swift email processor software, you can fully automate and simplify the process of cleaning your old/stale lists by using the built-in automatic re-opt link generation for each of your recipients in the re-confirmation email that is sent out from within the application. Once a recipient clicks on the unique re-opt link, their email address is automatically saved to your database. This can be handy in case you need to use it as a global suppression list to purge other email lists or databases.
In addition to this, all bounces from the re-confirmation emails and the opt-out requests from the opt-out links will be processed automatically in real-time and the emails can be removed from your database instantly or saved to a CSV file.

66 | P a g e
On the other hand, Swift Email Processor also allows you to insert simple one-click unsubscribe or opt-out links in your campaigns using simple tags or placeholders. If the recipients clicks on the opt-out link, their email addresses are automatically removed from the database mapped to the links. A simple and powerful MySQL REST API program installer is provided free that allows the recipients email addresses automatically removed or added to your database in just a single one-click.
In summary, using Swift Email Processor to send out bulk permission pass emails gives you the unique ability to obtain 3 sets of lists as follows:
1. Subscribers who still intends to continue to receive your emails and are still interested in your offers or campaigns
2. Subscribers who no longer wish to receive your emails or have become disinterested in your offers or campaigns by opting out
3. Subscribers whose email address have hard bounced
Armed with these lists, you will then be able to make informed decisions for your email marketing campaigns and take full control of your list hygiene measures. For example, If a subscriber email address did not bounce and does not explicitly opt back in by clicking the opt-in link, this might a sign that he do not want to engage with your campaigns or may have become disinterested, so it may be a good idea to remove such recipient from your list or send them re-engagement emails.
By combining the above two approaches in your email list hygiene efforts, greater email deliverability can be achieved since your email sender reputation will improve significantly when you employ these best practices.
3.2.4: Suppressing Email Addresses (Mailing Suppression List)
A suppression list is a list of suppressed e-mail addresses used by e-mail senders to comply with the CAN-SPAM Act. A suppression list is used to "suppress" future email messages to that email address.
It is often used when you have multiple email list and you want to make sure that no recipient on the suppression list receives your message such as when used a global suppression list. There are 2 types of suppression lists that you can create or build using Swift Email Processor:
• Specific Suppression List: This is a list specific suppression list only valid for the particular mailing list.
• Global Suppression List: This is a central suppression list containing email addresses that will be excluded from any mail deliveries from all the mailing list.

67 | P a g e
A best practice is to build a Global Mailing Suppression List and use it to suppress the specific email addresses in every mailing campaign. Doing so greatly reduces the risk of mailing people who shouldn't receive emails.
In Swift Email Processor, it is easy to create a specific or global suppression list that can be used to suppress a list of email addresses that you do not want to mail to. In general, 5 kinds of email addresses can be automatically or manually added to a specified database you set in the program. These are as follows:
• Opt-out/unsubscribes • Abuse/SPAM complainer (Feedback Loop) • Hard bounces/undeliverables • Risky email addresses such as role accounts and disposable email addresses • Custom email addresses or third-party suppression lists
Let’s assume you wish to build a global suppression list based on the first 3 groups of email addresses, the steps you would take will be as follows:
Step 1: You need to have a separate/dedicated database that you need to write these email addresses to. This database must be configured on the program and must be accessible from any host using the free MySQL API that we provide. For details on how the MySQL API works and how to set it up for your database, please see section 3.2.1.
Step 2: Add this dedicated global suppression database to the program by going to the Options tab and then click on “Database Connection Settings” as shown below:

68 | P a g e
Then enter the database details and credentials on the “Suppression List database” form. Click the test button to ensure that the database connection works.
Step 3: Optionally, you can configure the program to suppress sending messages to the email addresses on the “Suppression List Database” as a global suppression list for any campaigns sent. To do this, go to the Options tab >>>>>Sender Settings and tick the checkbox “Do not mail to recipients in Suppression List Database” as shown below:
Step 4: To allow unsubscribes to be written to the database, Insert unsubscribe/opt-out links in your messages that you send out using the %opt-out% tag or placeholder.
Step 5: To configure the program to automatically write spam complainers and bounces email addresses to the database, click on the “Processor settings” tab in the program and choose the “Save data to MySQL database” option under the “Saving/Deleting the bounced/complainers email addresses group section as shown below. Then select the types of bounces that should be saved to the database.
For details on how to use the program to download and process your messages for bounces and spam complainers, please see chapter 3.

69 | P a g e
For feedback loop (FBL) or SPAM complainers processing where the complainers email addresses are to be determined in the abuse report emails sent by the ISPs, the X-header name must be specified and the source where these unique X-header fields are be looked up from must be specified.
Note that by default the complainers and hard bounces are selected on the “Processor settings” tab. However, if desired you may select soft bounces to be saved to the database too. However, we recommend saving the complainers and the hard bounces only.
The soft bounced email addresses can re-mailed several times and can generally get flagged as hard bounces after "X" number of consecutive bounces over a minimum "Y" number of days. As a general rule of thumb, if a message hard bounced, then the email must not be retried. If the message gets a soft bounce then it can be retried. If a soft bounced mail cannot be delivered over your retry period (usually over 3 – 5 days) then it should be flagged as a hard bounce.
Note: It is also possible to add a custom or third party suppression list files in CSV formats to the suppression list database by manually importing the suppression list email addresses to your MySQL database. We provide a free CSV to MySQL data loader software that can be used

70 | P a g e
to perform this operation. The CSV to MySQL data loader application is accessible from the “Tools” tab in Swift Email Processor.
To learn more on how to use the CSV to MySQL data loader tool and other free tools that is included with the program, please see chapter 7.

71 | P a g e
3.2.5: Using Google Analytics to track recipients opens/clicks actions
Swift Email Processor email sender doesn’t use the standard method of using invisible images that are embedded into email campaigns with the aim of tracking opens and clicks on the email recipient mailboxes. The tracking works by placing a tiny, transparent graphic in the body of the email message. Whenever the graphic is downloaded by the recipient on their mailboxes, the email is then recorded as “opened”. Although this method is the standard method that is commonly used, it is not so effective nowadays due to recent ISPs stringent anti-spam policies.
Most ISPs now by default blocks these invisible graphics/images used for this tracking and require that recipients explicitly click on the image to download it on their mailbox. Therefore if the recipient fails to click to enable or download the transparent tracking images, the tracking will fail.
As a counter approach, we recommend using Google Analytics for tracking opens and click actions based on the fact that it’s easy to implement and ISP friendly. All you need simply do is to make sure you send a campaign that involves a recipient clicking on a link that will be created via Google Analytics.
Google Analytics is a free service that generates detailed statistics about the visitors to a website. Tracking your email campaigns with Google Analytics will enable you to accurately measure your email campaign effectiveness by tracking how many visitors are coming to your site via your email campaigns using a special link. This link consists of a URL address followed by a question mark and your campaign variables. But, you won’t need to worry about link syntax if you use the Google Analytics URL Builder form and press the Generate URL button.
A tagged link will be generated for you and you’ll be able to copy and paste it to your email campaigns. When someone clicks this link that you have added tracking code to, the tag information is passed to Google Analytics and available for you to review on your Google Analytics Dashboard. You will be able to track clicks from your email to your website as well as all purchases made as a result of someone clicking through your email.
To track your email campaigns using Google Analytics is quite easy. The following steps explains how this is done:
Step 1: Signup for a Google Analytics account if you don’t already have one.
Step 2: Create a custom tracking link you will use in the campaigns by using the Google Analytics URL Builder which you can find here
Step 3: Enter the following minimum parameters and click on ‘Generate Link”

72 | P a g e
• Website URL: This is your website domain name that needs to tracked • Campaign Source: This is the link referrer which is used to identify the campaign. The
campaign source helps you identify where the clicks came from. You can enter any word here as the Campaign source.
• Campaign Medium: This is the marketing medium. In this case, enter “Email” • Campaign Name: This is used to name the campaign. Make sure that each campaign you
send has a unique campaign name parameter. Example can be : 50% Discount off on abc software

73 | P a g e

74 | P a g e
After clicking on the “Generate URL” button, you should obtain a link that looks like the one below:
http://www.mydomain.com/signup.html?utm_source=abc_software&utm_medium=email&utm_campaign=50%25%2BDiscount%2Boff%2Bon%2Babc%2Bsoftware
Step 4: Copy the generated link and paste it into your email campaigns. Because these links are long and ugly, we recommend that you use the HTML editor link to insert the long URL. Please refer to the section above on how to add links to your campaign messages. Once you have sent your campaign, log into your Google Analytics dashboard to view the reports and details of the campaigns.
Alternatively, you can follow a third party guide on the link below which explains how to use Google Analytics to track Email Opens:
http://dyn.com/blog/tracking-email-opens-via-google-analytics/

75 | P a g e
Chapter 4: Using the Receiver Module When you send your campaigns to a specific mailing list, invalid addresses will bounce back to you. Bounce message, also called a (failed) Delivery Status Notification (DSN) is an automated electronic email message from a mail system informing the sender about a delivery problem. The original message is said to have bounced. These bounced e-mails can be processed automatically with bounce processing software to extract the bounce e-mail addresses.
Our real-time bounce email processing application (for Windows) can process your bounces and write to your database or update your email database (delete bounces) directly from the database server in real-time. The bounce processing software supports unlimited POP3 and IMAP accounts and bounced email addresses from all message file formats: .dat, .eml, .txt, .msg can be detected with over 98% accuracy using our in-house powerful bounce detection engine that we constantly update daily based on our vast experience with email validation. The POP3/IMAP email bounce processor software classifies all bounces into Hard, Soft and Non-Bounces.
The program is designed to automatically connect to your mailboxes (unlimited mailbox accounts is supported and can be imported in an easy specific txt file format) and check for incoming messages, processing the messages to detect bounces and saving the bounced emails in a CSV file or updating your database (deleting the bounced emails)/saving the bounced emails in a database ( as a suppression database). All these operations can be configured to occur automatically in real-time while you sit back and drink your cup of coffee:)
Note that email bounces are either classified a soft or a hard bounce. Hard bounces are addresses denied for delivery due to invalid emails, blocked emails, emails reported for fraud/abuse or an unexpected error during sending. Soft bounces are recognized by the recipient's mail server but are returned to the sender because the mailbox is either full or temporarily unavailable.
To learn more about the program, please click here
Real-Time Bounce Email Processing Flow Chart:

76 | P a g e
The bounce handling takes place in the following sequence:
• User Specifies Bounce Email Address(s) and Connection Details: Bounced emails are sent to a dedicated central bounce email address such as [email protected] which has to be specified by the user. The software supports unlimited mailbox accounts. POP3 and IMAP are both supported. We highly recommend the use of a dedicated e-mail address for this purpose. Please note that depending on your mail server settings or configuration, a dedicated bounce email address may not exist for your mail server.
However, because most email servers do recognize the “From” email address (otherwise known as the Sender envelop address) automatically as the bounce email address, you can specify the “From” address as the bounce email address in our bounce processor software. With our bounce processing software, users do not need to worry about having a dedicated bounce email address. They can also use the “From” address because the bounce handler uses powerful algorithm to analyze your inbox messages and detects the bounced messages from other messages.

77 | P a g e
• Bounce Processor Connects to the IMAP or POP3 Mail Server: In order to use the bounce
processor software, users must provide the bounce-to email IMAP or POP3 connections details. Using the provided IMAP/POP3 settings and login credentials, our bounce processor will connect to the mail server and scan all messages in the inbox of the bounce email address provided. It then uses Multipart/Report mime parts (defined in RFC 6522) to recognize bounce messages, as well as other methods (X-Failed-Recipients header, subject and body scanning) to detect the bounces. Once the POP3 or IMAP account(s) have been specified on the program, the program then connects to the accounts and downloads all the messages in inbox. The messages are then stored in a local folder specified by the user on the system.
• Bounce Processor processes the messages and detects all the bounced emails: Once the
raw messages from the mailbox accounts have been downloaded, the final step is the processing of the messages in order to detect the bounces. The program detects 2 main types of bounces: Hard and Soft bounces. Every other messages not belonging to either Hard or Soft bounce is categorized as Non bounce. Depending on the options chosen, the detected bounced emails are can be stored directly on a local CSV file or can be piped to a MySQL database. Additionally, it is also possible to update your existing email database by deleting the bounced emails directly from the database.
To process bounces and feedback loop reports ( ARF), take the following steps:
1. Add or import your POP3/IMAP accounts
After entering all the processor settings in the “Options” tab, the next step is to add your mailbox account or accounts. The program supports both POP3 and IMAP accounts and unlimited accounts can be added or imported to the program. To begin adding your accounts or import your accounts, click on the “Receiver” tab. If you want to add a single account, click on the “Add single” button to bring up the account add form as shown below.

78 | P a g e
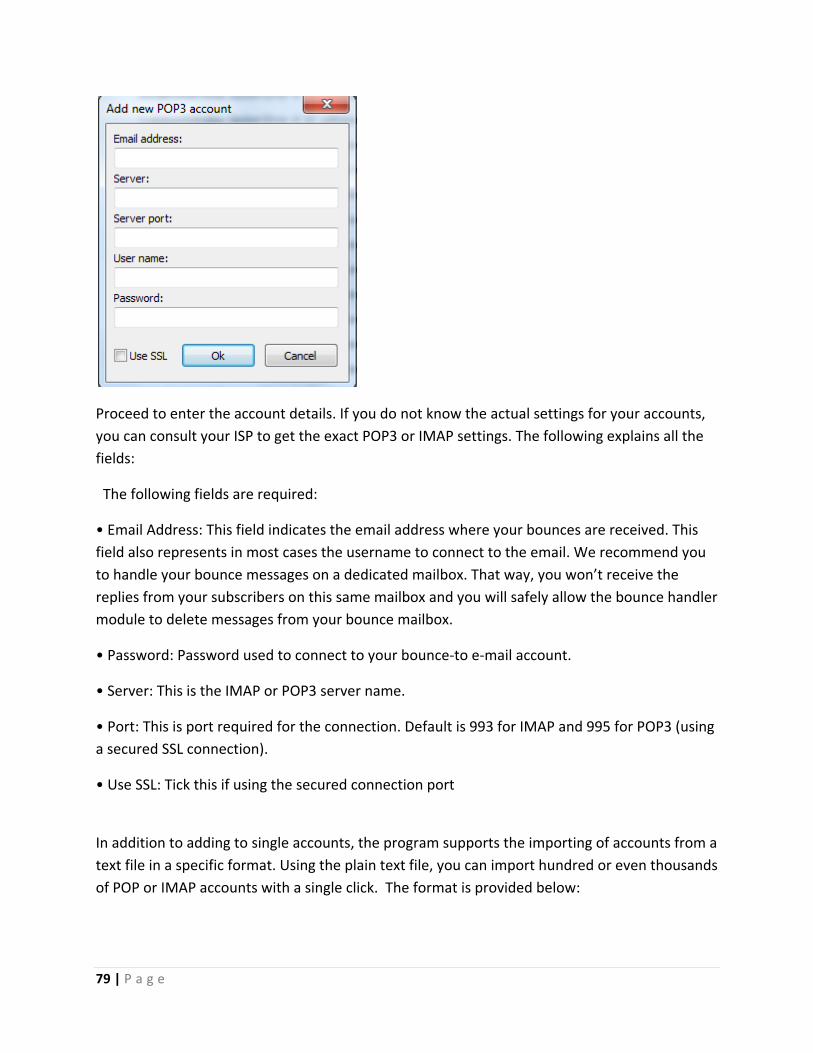
79 | P a g e
Proceed to enter the account details. If you do not know the actual settings for your accounts, you can consult your ISP to get the exact POP3 or IMAP settings. The following explains all the fields:
The following fields are required:
• Email Address: This field indicates the email address where your bounces are received. This field also represents in most cases the username to connect to the email. We recommend you to handle your bounce messages on a dedicated mailbox. That way, you won’t receive the replies from your subscribers on this same mailbox and you will safely allow the bounce handler module to delete messages from your bounce mailbox.
• Password: Password used to connect to your bounce-to e-mail account.
• Server: This is the IMAP or POP3 server name.
• Port: This is port required for the connection. Default is 993 for IMAP and 995 for POP3 (using a secured SSL connection).
• Use SSL: Tick this if using the secured connection port
In addition to adding to single accounts, the program supports the importing of accounts from a text file in a specific format. Using the plain text file, you can import hundred or even thousands of POP or IMAP accounts with a single click. The format is provided below:

80 | P a g e
[email protected]:IMAP/POP3 server:Port:[email protected]:password:0/1
Where; [email protected] = Your mailbox account
IMAP/POP Server = Your IMAP or POP server name
Port = The IMAP or POP server port. Most IMAP servers by default use 143 and
993 Port 143 is mostly supported for STARTTLS/TLS. On the other hand, most default POP port is 110 or 995 (SSL). [email protected] = this is your username for the SMTP or POP3 account.
Please note that if using free SMTP server or free POP servers, the username must include the domains such as [email protected]
Password = This is your password for the SMTP or POP3 server
0/1= If the IMAP or POP server requires SSL or STARTTLS protocol, you must
enter 1. Otherwise enter 0 Note: All entries for each account must be on a single line on a plain text file.
Once the SMTP accounts have been added (single or bulk added), they will appear on the account grid as shown below:

81 | P a g e
Each SMTP account on the grid can be edited, deleted or disabled/enabled as desired easily by simply right clicking on an account and using the appropriate button on the context menu that appears as shown in the screenshot above.
Other operations on the Accounts tab: • Delete row: : This button can be used to delete a single account row from the accounts grid.
To delete an account, simply click on it and click on this button. • Delete all: Use this button if you wish to flush all the accounts. Please note that this
operation cannot be undone. • Delete inactive: Use this button to delete all inactive accounts on the account grid. You will
see the number of inactive accounts at the right hand panel of the accounts tab. • Export active accounts: Use this button to export all current active accounts to a text file
which you can later reuse. The exported active accounts file can be imported easily for reuse anytime.
Step 2: Start downloading the messages from all your accounts After you have entered your accounts, you can now start downloading the messages in the accounts in real-time by pressing the “Start” button. Please note that only messages in your inbox will be downloaded. Therefore if you have messages in your junk or spam folder, it is recommended you push all to the inbox before downloading the messages.

82 | P a g e
In addition, please note that the program performs a real-time continuous bounce processing. Therefore when you press the “Start” button, the program will continue to connection to all your mailboxes and download any messages it sees on your inbox non-stop. If you want to pause the downloading, simply click on the ‘Pause” button. You can also resume the downloading at any time when needed. Once the downloading starts, you will see some metrics displayed on the tab as shown in the sample screenshot below. These metrics include:
• Num of threads: This is the current active number of threads the program is using

83 | P a g e
• Number of accounts: This is the total number of accounts that was added to the program.
• Received emails: This is the number of messages that has been downloaded from all the accounts
• Active accounts: This is the number of accounts that are currently active. That is which the program was able to successfully connect to
• Inactive accounts: This is the number of accounts that are inactive. That is those accounts which the program was unable to connect to and download messages from.
Note: It is possible for the program to process also offline messages that has been downloaded previously by any other third party program. To do this, simply place the messages in the folder you specified for the “Folder for messages received from server”.

84 | P a g e
Chapter 5: Using the Processor Module The processor module in the program is responsible managing list hygiene and for processing bounces and feedback loop (FBL) reports in order to determine process or determine emails of complainers, unsubscribes and bounces and updating your email list database in real –time to ensure that your list remain clean. Bounces and FBL spam complaint processing protects the integrity of email lists by ensuring they are clean and current. Once the messages from your mailbox or FBL mailbox have been downloaded by the receiver module, the next step is to process these messages to determine the bounces and complaints. As explained in the introductory section of this manual, Swift email processor is capable of processing thousands of bounce formats. All processed bounces are then categorized into Hard, Soft and None bounces. The bounce results and the corresponding emails can be configured to save to a CSV file or a database in real-time. The bounces can also be removed or deleted from any specified database in real-time thereby helping you to maintain a clean mailing list and remove bounces directly from your databases. On the other hand, the program is capable of processing feedback loop reports or SPAM reports/complaints (FBL) which are in the standard Abuse Reporting Format. A Feedback Loop (FBL) is an automated stream of spam reports sent by prior agreement between individual receiving and sending parties, often based on a "This Is Spam" button in the user interface. The most common way this is done is when the email recipient reports a message as spam by clicking on the “This is Spam” or “Report as Spam” button (or equivalent) from within their web-based email application, such as those provided by Hotmail (now Outlook), Gmail and Yahoo. When this button is clicked, most ISPs or email providers will report that action, along with a copy of the email message, back to the sender via what’s known as a feedback loop. The main purpose for the feedback loop process is to be able to unsubscribe a member from your database. You want to avoid members submitting multiple complaints, which will hurt your deliverability. Aside from that, complaints also drive future emails to a member’s spam folder. As ISPs are moving more toward engagement, the amount of mail going into the spam folder can also hurt your reputation.
Note that the information being sent back to the sender’s feedback loop email address is simply a copy of the message that the complaining member received. The most popular format that most Mailbox Providers use is Abuse Reporting Format (ARF). Using this ARF reports, the sender can then strip out the email address so that it can be added to the suppressed list.

85 | P a g e
Unfortunately since Mailbox Providers sometimes redact the member’s email address from the message sent back, it is necessary to identify the member from the message. Swift email processor handles this automatically by automatically adding subscriber identifiers in the x-headers of the messages being sent out.
The main purpose for the feedback loop process is to be able to unsubscribe a member from your database. You want to avoid members submitting multiple complaints, which will hurt your deliverability. Aside from that, complaints also drive future emails to a member’s spam folder. As ISPs are moving more toward engagement, the amount of mail going into the spam folder can also hurt your reputation.
A standard Abuse Reporting Format (ARF, RFC5965) is specified and implemented for FBLs. It is important to note that Swift email processor only processes the “Abuse” type of feedback loop reports. That is messages which contain this string: "Feedback-Type: abuse
If you are not familiar with feedback loops, it is primarily used as a mechanism for ISPs to notify senders of the recipients that are reporting their mail as spam. Feedback loop reports are specific to each ISP so you must sign up with each ISP separately. Normally you are required to fill out a form on each ISP’s web site proving that you are the owner of the IP addresses you wish to monitor and providing an email address to send the reports to. Once your feedback loop is setup with the ISP, you can then configure the feedback loop mailbox in Swift email processor to process the messages.
Since these spam complaints damage your reputation and hurt your deliverability, it is imperative that the recipients responsible for the complaints be removed from your list immediately. More information is available from the link below : https://wordtothewise.com/isp-information/
Swift Email Processor has the ability to process feedback loop reports that are in the Abuse Feedback Reporting Format (ARF) such as Aol, Yahoo, Comcast. .
Once the mailboxes and FBL mailboxes have been added to the “Receiver” window tab, click on the start button to begin processing the messages downloaded. Please note that you do not need to wait until all messages have been downloaded before processing the bounces. The program is a real-time bounce processor and therefore you do not need to wait. Simply process click on the start button to start processing the messages while the messages are being

86 | P a g e
downloaded. Therefore you can execute both the downloading of the messages ( bounces and FBL reports) and processing them at the same time. The following steps are required to successfully use the processor module to process bounces and FBL reports: Step 1: Ensure that you have configured a folder on your system where the downloaded messages from your mailboxes ( bounce and FBL mailboxes) are stored. Under the “Options” tab, click on the “Processor settings” tab and specify the folders.
If you have accounting log or maillog file from your PowerMTA server or your Postfix server that you would like to process for bounces also, you can also specify the folder where the log files are located to have them processed either separately or in combination with raw messages downloaded from the POP3 server. To do this, simply place the log files and select the folder using the browse button as shown below:
Step 2: configure optional connection settings under the “Connection settings tab” such as number of simultaneous connections, delay between connections, etc Step 3: If processing FBL reports, enter the unique identifier X-header field name in your CSV or database for lookups/determination of the complainers email addresses. If using a CSV file, enter the exact column field name of the CSV file that holds the identifier IDs of the subscribers in the “personalized subscriber identifier X-header name field as shown below:

87 | P a g e
Then select the “Use a tab delimited text or CSV file” and browse for the file. A sample is shown below:
On the other hand, if the unique identifier X-headers IDs are stored in your MySQL database, please go to the Database connection settings tab and enter the database details on the “Email Address Read” database and enter the unique identifier X-header field name in the database in the “Unique identifier field” field. A sample is illustrated below:

88 | P a g e
Step 4: specify how you want the processed emails to be stored. Swift email processor can store or delete the processed emails automatically from your database in real-time. Just enter the database details on the appropriate database window ( Delete database or Write database ) in the database connection settings tab and specify the appropriate one as shown below:

89 | P a g e
Step 5: Select the types processed email data you wish to store/delete from the database or CSV specified in the step 4 above.
Step 6: Press the “Start” button to begin processing the messages.

90 | P a g e
Step 7: Retrieve the processed emails and results CSV files that are generated. Two sets of bounce types will be generated. One will contain only the email addresses for each bounce type and another will contain all the raw results of the processing including the bounce reasons and codes. A sample of the raw bounce result is shown below for the hard bounce type:

91 | P a g e
Please note that the processing occurs in real-time continuous mode. Therefore results and emails are written to the generated CSV files in real-time as they are processed. You can however pause/resume the process at any time when needed. The ARF reports results will be generated in CSV file format and grouped per the following parameters:
• Complaints by ISP • Complaints by Subject • Complaints per sending IP address • Complaints per From: address
Monitoring your SPAM Complaint Ratio
Swift Email Processor will automatically compute and display the SPAM complaint Ratio as it processes your messages. Although it’s almost inevitable that your email will generate some spam complaints, high complaint rates are indicative of a problem and will cause poor inbox delivery.
Spam complaints are a key driver of email deliverability, so it’s important that you carefully monitor it and take proactive measures to reduce it. It is important to monitor your complaint ratio always. A consistently high complaint rate can definitely hurt your sending reputation and affect inbox delivery. A benefit of receiving the feedback loop data that results from a subscriber clicking the spam button is that this information can be used for reporting purposes. The number of complaints received can be tracked and used to calculate your complaint rate. The complaint rate is calculated as follows:
Complaint Rate = Total Number of Complaints / Total Emails Delivered
Note that the value “Total Emails Delivered” in the above formula includes both messages placed in the Inbox and the Bulk folder which is known as the “messages sent spam complaint ratio”. This is calculated by taking the messages sent and subtracting bounces.
As an example, 100,000 messages are sent, and of those, 20,000 are placed in the Inbox and 80,000 are placed in the Bulk folder. Of the 20,000 placed in the Inbox, there are 100 complaints. Therefore, the “message sent spam complaint ratio” is 100 divided by 100,000 = 0.1%.

92 | P a g e
Just like the messages downloading operation in step 3, the processing operation can also be paused and resumed when needed. While the processing is ongoing, you will see the statistics of the processed bounces in the right hand panel as illustrated below. As the bounces are being processed, they are either saved in CSV files in the folder you have specified in step 2 or directly saved to your database or deleted from your database depending on the option you have chosen. However, please note that if you have chosen to save the bounced emails to a CSV files, do not attempt to open the files while the processor is in operation as this may disrupt the write process. Handling Soft Bounces
Swift Email Processor offers a very convenient way to handle or manage your soft bounces that are processed by the processor module in the application. Typically, a Soft bounce occurs

93 | P a g e
because the recipients email is temporarily unavailable, such as "mailbox is full" or "destination server is down or experiencing sync issues between their MTA and their backend database.
The RFCs clearly specifies what to do with a single email that gets a 4xy or a 5xy during the SMTP transaction. If the message gets a 5xy (Hard bounce) during the SMTP transaction, then the email MUST NOT be retried. If the message gets a 4xy (Soft bounce) during the SMTP transaction then it can be retried. Therefore it is a recommended practice to always retry sending messages to soft bounced email addresses. However, there is a limit in doing this.
Generally, two actions may be taken as regard to handling soft bounced emails:
1. You could attempt to resend your message to the soft bounced emails after some time has elapsed. To push the soft bounced emails to the sender module in the program, go to the right hand panel and click on “Export soft bounces to sender”. Once you click this button, the soft bounced emails will be dumped to the sender and they will be available under the “recipient’s accounts” form field in the sender module.
The recommended number of retries is 5 times every 24 hours. If the mail cannot be delivered over your retry period (usually over 3 – 5 days) then the email should be flagged as a hard bounce. Hence the downside of this action is that you risk having hard bounces should the previously soft bounced emails fails.
2. You can push the soft bounced emails to the integrated email verifier API module ( Mail
Validator) in the program which will allow you verify the emails periodically (such as 5 times every 24 hours ) via our REST based API. Then once the soft bounced emails have been successfully verified or confirmed as being valid or active, you can then use them for your email campaigns. This method is highly recommended as it greatly minimizes the chance of getting high bounces from previously soft bounced emails.

94 | P a g e

95 | P a g e
Chapter 6: Using the Mail Validator Module Swift Email Verifier API client for Windows is a highly optimized and high speed/multithreaded Windows desktop application that allows users to verify bulk email addresses easily using an API key. The program can verify email addresses at speed up to 1000 simultaneous threads. However, you may be able to run more threads up to the limit of your system hardware.
You do not need port 25 (SMTP port) to be open in your network in order to use the application. All you need is a good and stable internet connection. Mailing lists can be uploaded both in plain text formats and CSV formats. To take care of network failures which may result to unknown email results, the program includes a feature to automatically recheck unknown emails up to a number of times specified by the user. This ensures that validation result has minimal unknowns. Note: This email verifier API client does not use your IP to verify emails. All verifications are done completely in the cloud through our servers. Therefore there is no risk of your IP being blacklisted. In addition, since the program uses our REST based API, you have 100% confidentiality of your email lists since you do not upload the lists to our servers. No requests logs containing your email addresses are kept on our servers.
Program Screenshot:

96 | P a g e

97 | P a g e
6.1: What is Checked by Email Validation API:
Email syntax: This checks the email addresses syntax and ensures that they conforms to IETF standards
Fake Email Pattern Detection: This checks the email address against a powerful in-built fake email pattern detector algorithm. This fake email pattern detector is capable of detecting thousands of fake email automatically with very high accuracy.
Typo Check and Curse Words Check: This checks the email address against all known common typos for most email domains. The API can also detect certain curse words present in the email address.
Mail Server Existence Check: This checks the availability of the email address domain using
DNS MX records
Mail Existence Check: This checks if the email address really exists and can receive email
Catch-All Domain Email Check: This checks if the email domain will receive all of the email messages addressed to that domain, even if their addresses do not exist in the mail server.
Disposable Email Address Check: This checks if the email is provided by a known
Disposable Email Address (DEA) provider such as Mailinator, 10MinuteMail, GuerrillaMail and about 2000 more.
6.2: Email Validation API Statuses and Status Codes
Our email validation API is a web service API and uses status codes to indicate API success or errors. The status codes provide further information regarding the result of the validation and indicate why the validation of an email may have failed.
The API defines the validity of an email address as follows using only 3 statuses and each of these statuses have their corresponding status codes.
Status Description/Meaning Valid Mailbox exists and not handled by Catch-all
domains or known to be a DEA Invalid Mailbox does not exists Unknown Mailbox could not be verified or is determined
to be handled by a Catch-all domain, DEA, Greylisted,, SMTP/Mailbox timeouts, Temporary mailbox unavailability. Specific

98 | P a g e
Each of these Statuses is linked to the following status Codes:
Status Codes Meaning Mailbox Exists and Active The email was successfully verified as Valid
Known Disposable Email Domain This failure means that the email address is provided by a well-known disposable email address provider (DEA) such as mailinator.com
Syntax Error This failure means that the email is not syntactically correct
Domain Does Not Exist This means that the email domain has be found to be non-existent
Mailbox Not Found This failure means that the mailbox for the provided email address does not exist.
DNS Query Error This failure means that there was a DNS error when querying the MX server
SMTP Connection Blocked This failure means that the external mail exchanger rejected the local sender address or the incoming connecting IP.
Mailbox Validation Error This failure means that a timeout or error occurred while verifying the existence of the mailbox for the provided email address.
Mailbox temporary not reachable (Graylisting) This failure means that the requested mailbox is temporarily unavailable; this is not an indicator that the mailbox actually exists or not but, often, a message sent by external mail exchangers with greylisting enabled.
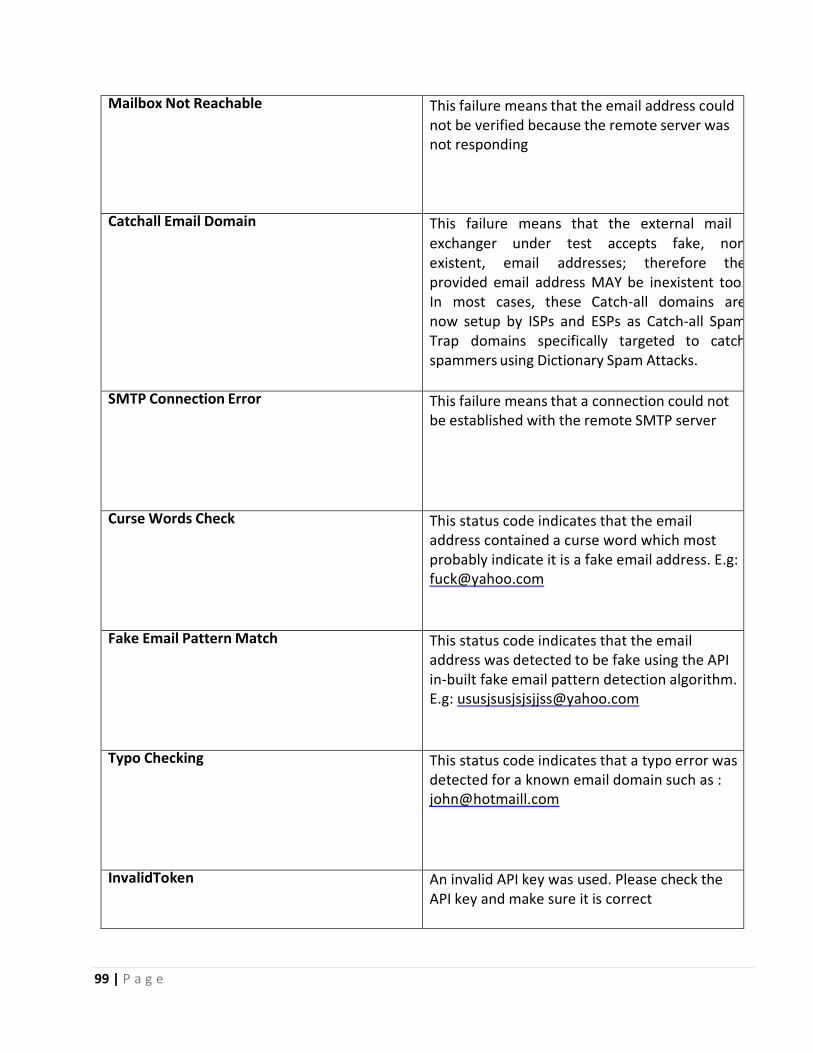
99 | P a g e
Mailbox Not Reachable This failure means that the email address could
not be verified because the remote server was not responding
Catchall Email Domain This failure means that the external mail exchanger under test accepts fake, non existent, email addresses; therefore the provided email address MAY be inexistent too. In most cases, these Catch-all domains are now setup by ISPs and ESPs as Catch-all Spam Trap domains specifically targeted to catch spammers using Dictionary Spam Attacks.
SMTP Connection Error This failure means that a connection could not be established with the remote SMTP server
Curse Words Check This status code indicates that the email address contained a curse word which most probably indicate it is a fake email address. E.g: [email protected]
Fake Email Pattern Match This status code indicates that the email address was detected to be fake using the API in-built fake email pattern detection algorithm. E.g: [email protected]
Typo Checking This status code indicates that a typo error was detected for a known email domain such as : [email protected]
InvalidToken An invalid API key was used. Please check the API key and make sure it is correct

100 | P a g e
NoMoreQueries The allocated # of queries or requests for the
API key has been exhausted. InternalError There was an unexpected error on our server.
InternalDBError This error indicates that the API request failed due to database connection error from our server
6.3: What is required to use the Program:
To validate your email addresses using the application, you will need the following: 1. Your Email validation API Key 2. The mailing list in the proper and supported format.
6.4: API Key Authentication:
Clients must authenticate to the API by providing their API key. Care must be taken to secure the key from unauthorized access. It is your responsibility to keep your API key secure at all times and ensure that unauthorized users do not have access to it.
The API keys can be top-up at any time and will remain valid until all credits have been used up. The API key can also be used by multiple persons from unlimited devices or computers at the same time without any restrictions.
6.5: Usage Steps:
Step 1: Download the program on the link below:
http://www.webemailverifier.com/windowsclient.exe
Step 2: Execute the Program: Execute the program by double clicking on it and click on the

101 | P a g e
“Parameters” tab as shown below: Note: Please make sure you click on the “Activate API Key” button when you run the program for the first time.
Proceed to set the following parameters:
• API Key: Please enter the API key you purchased. Then click on the “Store API Key” to save it • Activate API Key: You must click this button to activate and save your API key when you
run the program for the first time • Unknown addresses retries: This parameter specifies how many times the
unknown email addresses are retried • Max number of threads: Please set this to 500 or more threads for maximum speed
and throughput. If you have a very slow network, you may reduce this to 100. If you

102 | P a g e
have a system with powerful hardware such as multiple cores/Multiple CPU, you can run more threads as desired to boost up the number of threads.
• Read timeout for each thread(in seconds): Please set this to 200 or more sec
6.6: Configuring the number of Automatic Re-Check of Unknown Due to multiple factors such as network issues, rare server outrage issues or inability to verify an email address where the ISP do not cooperate with the email validation method because it requires an actual message to be sent, unknown results are bound to happen when using our API. However, since a majority of these network issues causing the unknown results are transient (temporary) it makes sense to retry the emails again. To this end , the program has a feature to automatically re-check or re-validate emails up to a specified number of times in order to improve the success of the validations and minimize unknowns as much as possible. To configure the number of times you want the application to automatically re-check an email address which previously gave an unknown result, go to the “unknown addresses retries“ parameter and enter a number there. The default value which is 3 is quite OK for most network conditions.

103 | P a g e
6.7: Obtaining Email Validation API Key
You can purchase your API keys securely from our website using the link below: https://www.webemailverifier.com/member/signup.php or you can click on the “Buy Validation API Key” button directly from the program.
The following payment options are accepted:
• Paypal • Swift Wire Money Transfer • Payza • CashU • Perfect Money
Each API key has a fixed maximum requests or email validation quota and each request is priced at $0.001. Please purchase the package that best suits your mailing list size and needs.
Please contact us to order for discounted purchases.
Step 2: Checking the current Remaining Quota of the API Key
If you wish to check your API key current quota, simply click on the “Check Quota” button. You should get a popup like the one shown below:

104 | P a g e
Step 3: Importing your Mailing List:
Once the parameters in the program has been setup, the next step is to import your mailing list. Mailing lists can be imported in plain text file or CSV formats. Mailing lists can also be dragged and dropped into the email address form. Please note that only 1 single file can be imported or dragged and dropped at a time. If you have multiple mailing lists, you can merge them before importing it.
To import your list, simply click on the “Import” button and browse to the folder or path where your mailing list is located and import it.
To drag and drop your mailing list, simply drag and drop the list into the email address list form as shown below.

105 | P a g e
6.8: Supported Mailing List Formats: You can upload csv or txt format files to add mailing list to the program. Swift Email Verifier API client only supports 2 types of mailing list file formats as follows: • TEXT (.txt) • CSV (.csv) The mailing list can be uploaded in either .txt or .csv formats. Custom fields or information such as names, zip codes, addresses or phone numbers are supported and may be present in the mailing lists. If the mailing lists contain extra information, the validation results will also retain the extra information. Note that when you upload your mailing lists into the program, duplicates are automatically removed. This ensures that all email addresses imported into the program is unique. Samples screenshots for the mailing lists in both TXT and CSV formats are shown below:

106 | P a g e
Mailing List in .txt format

107 | P a g e
Mailing list in .csv format

108 | P a g e
Mailing list in .csv format with extra information

109 | P a g e
Step 4: Start the verification
Once you have imported your list, you can then begin the verification by clicking on the “Start” button. Once the start button is clicked, the program starts validating the email addresses. You can see the active verifications on the “Status” tab. During the validation, the respective results groups (Valid, Invalid and Unknown) can be seen under the Valid, Invalid and Unknown tabs.
In addition, the real-time results will be displayed in a pie chart which updates in real time as shown below:

110 | P a g e
Step 5: Retrieve the results CSV files
Upon clicking the “Start” button, 4 CSV files will be generated automatically in the path or folder where the program was executed. The results of the validation will be written to these files. Once the verification completes, you should retrieve these files and review them.
Please note that if you run multiple instances of the application at the same time, all the results from all the instances will be written to the same CSV files.
6.9: Understanding Unknown Results The Unknown results are those emails which could not be verified due to one reason or the other. These unknown results in most cases results from Greylisting which is technology that reduces spam by rejecting initial email delivery attempts. The Greylisting works by returning a "Temporarily Unavailable" message to the sending mail server the first (and only the first) time a message is received from a given sender. Hence, it makes sense to retry these validations again after some time has elapsed.
We have compiled a list of all the current known issues which you may encounter while using our email validation system. You can download this document in the link below:
www.webemailverifier.com/issues.pdf

111 | P a g e
Also unknown results can also result from the inability to verify the emails by simulating a message sending to the recipient email server because the recipient email server requires that a REAL message is sent. Thus, it is impossible to verify whether the address is good or not. You won't know definitively until the message bounce because these mail servers won't cooperate or cannot be checked without sending a real message to them.
However, please be aware that some emails which return unknown results could be valid. Examples of such emails which are determined unknown by our API and which may be valid are:
• Disposable Email Addresses from email address providers, like Mailinator, 10MinuteMail, GuerrillaMail,etc
• Catch-all email addresses • Temporarily Unavailable emails (Graylisting) and soft bounces
In order to minimize the number of unknown emails results returned by the program, the JAVA verifier uses an intelligent automatic multiple re-validation of unknown emails up to the number of times specified until a possible valid or invalid result is obtained. By doing this, the number of unknowns is greatly minimized.
6.10 Recommended Practices for Dealing with Unknown Results
The following recommended practices are strongly recommended to deal with the unknown results reported by the program:
1. After validating your list, save the VALID emails marked by the verifier. Do NOT add the emails marked as Unknown to the valid emails. As a rule, never upload the unknown emails to your third party email delivery service.
2. Since it is technically impossible for our API to verify all emails with 100% success rate due to multiple reasons beyond our control, you can send us the unknown emails results from your verifications when using our email verifier service and we would verify them manually via bounce processing.
The price remains $0.001 per email that is successfully verified. We can also deduct the credits from your current API key for the unknown emails that were successfully validated as Valid or Invalid. Each email successfully validated would attract a 1 credit.

112 | P a g e
To allow us verify your unknown emails, you can gather all the unknowns and thereafter send all the unknowns to us. You can send them securely by email, FTP or file sharing portal such as Dropbox or Google drive. The unknown emails can send be sent to us in either plain text or CSV files. The privacy of your email addresses you send to us to verify is ensured and we do not resell or share our client’s emails with any third party.
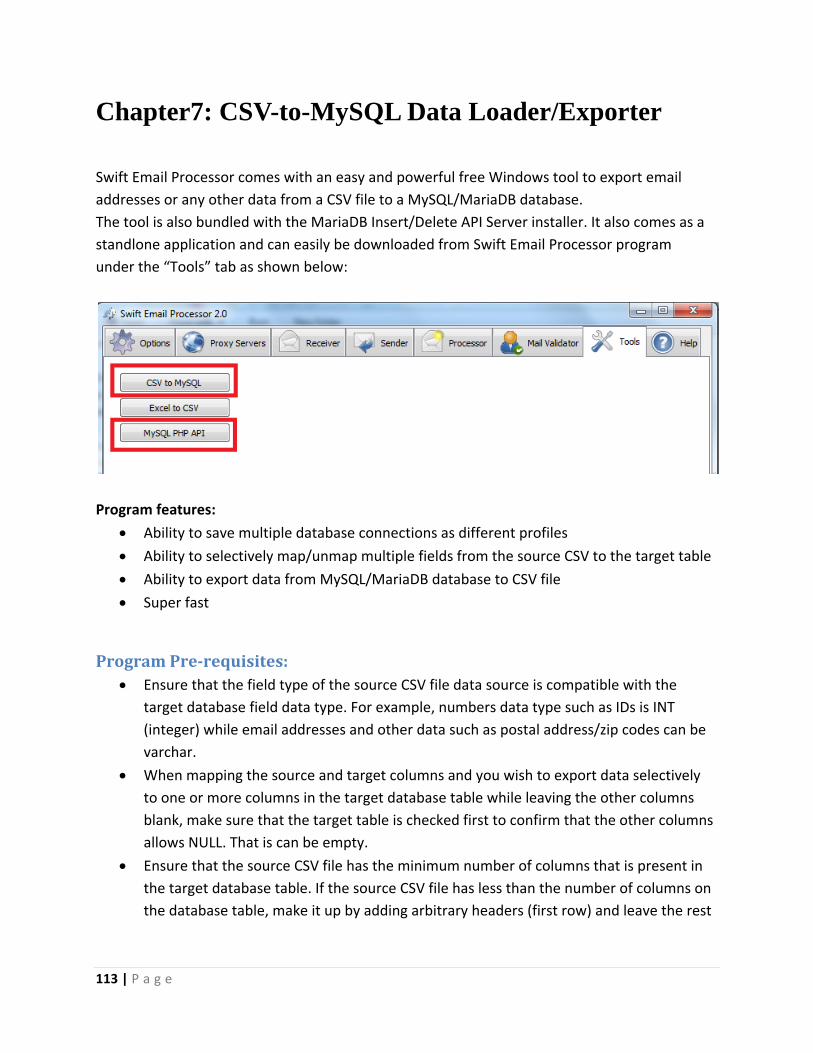
113 | P a g e
Chapter7: CSV-to-MySQL Data Loader/Exporter Swift Email Processor comes with an easy and powerful free Windows tool to export email addresses or any other data from a CSV file to a MySQL/MariaDB database. The tool is also bundled with the MariaDB Insert/Delete API Server installer. It also comes as a standlone application and can easily be downloaded from Swift Email Processor program under the “Tools” tab as shown below:
Program features:
• Ability to save multiple database connections as different profiles • Ability to selectively map/unmap multiple fields from the source CSV to the target table • Ability to export data from MySQL/MariaDB database to CSV file • Super fast
Program Pre-requisites: • Ensure that the field type of the source CSV file data source is compatible with the
target database field data type. For example, numbers data type such as IDs is INT (integer) while email addresses and other data such as postal address/zip codes can be varchar.
• When mapping the source and target columns and you wish to export data selectively to one or more columns in the target database table while leaving the other columns blank, make sure that the target table is checked first to confirm that the other columns allows NULL. That is can be empty.
• Ensure that the source CSV file has the minimum number of columns that is present in the target database table. If the source CSV file has less than the number of columns on the database table, make it up by adding arbitrary headers (first row) and leave the rest

114 | P a g e
rows in the columns empty. By default the program takes the first row entries as headers and these are not exported to the target database table.
7.1 Using the CSV-to-MySQL Loader Tool (Step –by-step instructions) The following steps show how to export a list of email addresses for example from a CSV file to a MariaDB/MySQL database server: Step 1: Double click on the CSV-to-MySQL loader tool icon on the desktop to start the program:
Step 2: Proceed to enter the database details. A sample is shown below. In this example, we will be exporting email addresses from a CSV file to the “unsubscribe” table column in the database credentials provided below: ========================================= Database host = 172.98.194.30 Port: 3306 Database user = apitest Password = apitest Database name = apitest Table = apitest Table column = unsubscribe
To create a profile for the database in order to save the database details which is useful if you have multiple databases, first click on the “Create New Profile” button and enter a name for the profile:

115 | P a g e
Under the “Conn Name” field, select the profile you just created and then proceed to enter the database credentials on the CSV-to MySQL tool as shown below and press the “Test Connection” button to test the connection. If the database credentials are correct, the status of the program will change from “Ready” to “ Successfully Tested” as shown in the screenshot below. Note: The “Reset” button can be used to flush all the database credentials when desired. Pressing the Reset button clears all the database details.

116 | P a g e
Step 2: Connect to the database by clicking on “Connect to Database”

117 | P a g e
Once connected successfully, you will see the columns of the database table displayed on the “MySQL Table Columns” form under the Column Mapping as shown above. Step 3: Save the profile for the successfully connected database (optional) by clicking on “Save Profile”.

118 | P a g e
Step 4: Click on the “Load CSV” button to import your CSV file containing the data you wish to export/load to the database table. Once the import process is finished, you will see the CSV column alphabet letters displayed on the map table as shown below:
The CSV file we wish to export data from looks like as shown below:
As shown in the screenshot above, the B CSV file column has been mapped with the database “unsubscribe” column and the B and C columns in the CSV file was set to have arbitrary first

119 | P a g e
rows entries as headers without any data in the columns meaning no data will be exported from the B and C columns: The next step is to map the source columns with the target database columns for the export of the data. Since we are only exporting the email addresses from the CSV file from the B column, we then map this B column to the database “unsubscribe” column: To map the right source column to the target columns , right click on the column alphabet letter in the CSV source map form and from the context menus, use the “Move up” or “Move down” buttons to move the columns to their respective mappings.
Note: If there is any column in the CSV file that contains data that you do not want to export to the database, please delete the column before importing it into the program. However make sure the number of columns on the source CSV file is same as the number of columns on the target database. In addition, all the columns on the target database table must be mapped with the corresponding columns on the CSV file. If the CSV file does not have the required number columns, simply add arbitrary headings on the first row of the CSV file which means that column is empty. Step 5: Insert the data by clicking on the “Run” button. The default insertion Algo ( Algo 2) is best suited for highly multithreaded data insertion which is useful if inserting very huge data. Otherwise if inserting a few data from the CSV file, Algo 1 may be sufficient. If the data was successfully inserted, the status of the program will change to “Successfully Inserted Data into DB” as shown below:

120 | P a g e
7.2 Creating additional tables It is possible to create a database table using data from a CSV file directly from the program. To do this, first import the CSV file and then enter the database details and the desired table name you wish to create in the “Table name” field.
Next, choose the column you want to be the primary key column from the dropdown box and tick the “auto-increment”. To use the first row of the CSV file as the header column names, tick the “First row as header” checkbox.

121 | P a g e
Then finally click on the “Create New Table” button. If successful, the status of the program will display “Table successfully created” as shown below:

122 | P a g e