
· 8 1" ; " / 2 8 18" >$ ˚ ++ ˚+ $? ˚ ##& # / 5 ˛# '$ $ & ' >$ + 5ˆ "$( " ' # - $" # )!' #?...
103
N o t e b o o k : C C N A S e c u r i t y C r e a t e d : 9 / 2 7 / 2 0 1 2 5 : 4 3 A M U p d a t e d : 1 0 / 7 / 2 0 1 2 8 : 4 4 P M T a g s : c c n a s e c u r i t y 0 1 N e t w o r k i n g S e c u r i t y C o n c e p t s U n d e r s t a n d i n g N e t w o r k a n d I n f o r m a t i o n S e c u r i t y B a s i c s A b o u t : K n o w i n g t h e b a s i c s o f s e c u r i t y . M a i n I d e a s : C I A C o n f i d e n t i a l i t y a l l o w s o n l y a u t h o r i z e d u s e r s t o v i e w s e n s i t i v e d a t a . U n a u t h o r i z e d u s e r s w i l l n o t h a v e a n y a c c e s s t o t h e d a t a . F o r d a t a i n m o t i o n , i t m u s t b e e n c r y p t e d . I n t e g r i t y m e a n s o n l y a u t h o r i z e d u s e r s c a n m o d i f y t h e d a t a . U n a u t h o r i z e d m o d i f i c a t i o n i s a r e s u l t o f c o r r u p t d a t a a n d l o s s o f i n t e g r i t y . R e s o u r c e s m u s t b e a v a i l a b l e t o a u t h o r i z e d u s e r s . L o s s o f a v a i l a b i l i t y c o u l d b e l o s s o f r e v e n u e . C o s t - B e n e f i t A n a l y s i s o f S e c u r i t y R i s k m a n a g e m e n t i s u s e d t o d e t e r m i n e p r i n c i p l e s a n d c o n c e p t s r e l a t e d t o a s s e t p r o t e c t i o n a n d s e c u r i t y m a n a g e m e n t . I n c l u d e s a s s e t s ( v a l u a b l e i t e m s t o o r g ) , v u l n e r a b i l i t i e s ( w e a k n e s s e s ) , t h r e a t s ( d a n g e r s t o a s s e t ) , a n d c o u n t e r m e a s u r e ( a c t i o n t o m i t i g a t e r i s k ) . C l a s s i f y i n g A s s e t s W h y i s d a t a c l a s s i f i e d ? T o t a k e s p e c i f i c a c t i o n o n d a t a i n a g i v e n c l a s s . W h a t a r e t h e d i f f e r e n t a s s e t c l a s s i f i c a t i o n s ? Governmental Unclassified Sensitive but unclassified Confidential Secret Top Secret Private sector Public Sensitive Private Confidential Classification critera Value Age Replacement cost Useful lifetime Classification roles Owner Custodian
Transcript of · 8 1" ; " / 2 8 18" >$ ˚ ++ ˚+ $? ˚ ##& # / 5 ˛# '$ $ & ' >$ + 5ˆ "$( " ' # - $" # )!' #?...

NNNNoooo tttt eeee bbbbooooooookkkk:::: CCNA Security
CCCCrrrreeee aaaatttt eeee dddd :::: 9/27/2012 5:43 AM UUUUppppddddaaaatttt eeee dddd:::: 10/7/2012 8:44 PM
TTTT aaaaggggssss:::: ccna security
01 Networking Security Concepts
Understanding Network and Information Security Basics
About: Knowing the basics of security.
Main Ideas:
CIA
Confidentiality allows only authorized users to view sensitive data. Unauthorized users will not have
any access to the data. For data in motion, it must be encrypted. Integrity means only authorized
users can modify the data. Unauthorized modification is a result of corrupt data and loss of
integrity. Resources must be available to authorized users. Loss of availability could be loss of
revenue.
Cost-Benefit Analysis of Security
Risk management is used to determine principles and concepts related to asset protection and
security management. Includes assets (valuable items to org), vulnerabilities (weaknesses), threats
(dangers to asset), and countermeasure (action to mitigate risk).
Classifying Assets
Why is data classified? To take specific action on data in a given class. What are the different asset
classifications?
Governmental
Unclassified
Sensitive but unclassified
Confidential
Secret
Top Secret
Private sector
Public
Sensitive
Private
Confidential
Classification critera
Value
Age
Replacement cost
Useful lifetime
Classification roles
Owner
Custodian

User
Classifying Vulnerabilities
Why are vulnerabilities classified? To use an appropriate countermeasure to mitigate the threat
against those vulnerabilities. Where do vulnerabilities come from?
Policy flaws
Design errors
Protocol weaknesses
Misconfiguration
Software vulnerabilities
Human factors
Malicious software
Hardware vulnerabilities
Physical access to network resources
Vulnerabilities can be found online from the Common Vulnerabilities and Exposures and National
Vulnerability Database.
Classifying Countermeasures
Countermeasures are introduced after identifying the asset and its risks. Countermeasures are
placed in the following categories:
Administrative: Such as a written policy.
Physical: Such as a locked door or key fob entry.
Logical: Such as a firewall or password.
What to do with risk
Many options to deal with risk such as eliminating or mitigating it as much as possible.
Summary: Understanding Network and Information Security Basics
Basic network and information security begins with the CIA model. Beyond the CIA model is a cost-
benefit analysis of assets to determine its threats and risks. These assets, threats, and risks are
placed in various classifications which result in a determined countermeasure to mitigate or
eliminate threats and risks.
Recognizing Current Network Threats
About: Network Threats and strategies to stay ahead of those threats.
Main Ideas:
Potential Attackers

Types of adversaries behind attacks are:
Terrorists
Criminals
Government agencies
Nation-states
Hackers
Disgruntled employees
Competitors
Anyone with access to a computing device
Reasons for attacks could be for the sole purpose of attention, financial gain, or recreational.
Attack Methods
Methods which attackers use to gain access to a network or to information:
Reconnaissance - discovery process. Gathering more information on the target such as
finding IP addresses and vulnerabilities.
Social engineering - exposing the user into leaking out information. Tricking the user into
giving information.
Privilege escalation - the act of gaining higher privileges which result in greater access to
resources.
Back doors - method for attacker to easily regain entry into the system.
Attack Vectors
Attackers can come from outside the network and from within. Implement security policies and
mitigate risk at different levels.
Man-in-the-Middle Attacks
An attacker places themselves in between two devices communicating and intercepts data in
transit. The attacker can perform reconnaissance or manipulate the data and forward it on. Ways
to mitigate this is encrypting the data in transit. For management data, use SSH instead of Telnet
or HTTPS instead of HTTP.
Other Attack Methods
Not an end all list but some other attack methods include:
Covert channel - the act of using a protocol in an illegitimate manner. Hiding traffic or data
within another protocol.
Trust exploitation - using one attack vector to attack the real target by going through a
trusted source of the target.
Password attacks
Botnet
DoS and DDoS

Summary: There are various types of attackers with different reasons for attacking targets.
Different attack methods are used to gather information on the target such as gathering IP
addresses and vulnerabilities and using social engineering to get information out of employees.
Once an attacker exploits vulnerabilities they can escalate their privileges to get access to more
resources then leave a way for the attacker to regain entry without notice. Other attack methods
include sniffing data as it is in transit. Encryption must and should be used instead of clear text
communication.
Applying Fundamental Security Principles to Network Design
About: Improving security posture
Main Ideas:
Guidelines
Some guidelines to follow to improve your security posture overall:
Rule of least privilege - Minimal access required for users or services.
Defense in depth - Implement security at every point in your network.
Separation of duties - Individuals with specific roles for checks and balances.
Auditing - Keeping record of what happens on the network.

NNNNoooo tttt eeee bbbbooooooookkkk:::: CCNA Security
CCCCrrrreeee aaaatttt eeee dddd :::: 10/1/2012 5:25 AM UUUUppppddddaaaatttt eeee dddd:::: 10/7/2012 8:44 PM
TTTT aaaaggggssss:::: ccna security
02 Understanding Security Policies Using a Lifecycle Approach
About: Risk analysis and security policies
Main Ideas:
Risk Analysis and Management
Secure Network Lifecycle
Security is a continuation which is never ending. There are five phases in the security lifecycle:
Initiation - Start of risk assessments, categorizing risks into low, medium and high.
Acquisition and development - Detailed risk assessment and beginning of testing to verify
correct implementation.
Implementation - Applying countermeasures to production.
Operations and maintenance - Active monitoring of the network.
Disposition - Disposing network gear properly.
Risk Analysis Methods
Finding the impact or risk of an asset before it is compromised. Educated guesses using methods:
Qualitative - Data is gathered by a subject matter expert to determine asset's value,
vulnerabilities, threats, and impact/risk based on those factors.
Quantitative - Use of raw numbers and statistics to determine risk.
Both methods can be used to determine a risk score (risk value). This helps to determine the cost
of the mitigating techniques.
Security Posture Assessment
Activities that are done to document the current security posture of a network:
General security posture assessment - A high-level idea of the security posture looked at
from different perspectives.
Internal assessment - Determines how well protected you are from inside attacks.
External assessment - Assess the security risk of attacks from external devices on the
network (devices from the Internet).
Wireless assessment - Assess security posture for potential threats from wireless devices.
Analysis and documentation - Combination of all assessments into a thorough document
listing countermeasures and recommended solutions.
Approach to Risk Management
Things that should be considered with assets:
Value
Vulnerabilities
Potential threats
Compliance issues

Business requirements
Checklist for new assets where risk has not been calculated:
Qualitative/quantitative analysis of risk
Action regarding risk - transferring risk, accepting risk, or reducing risk using
countermeasures.
Monitor risk
Compliance
Consider impact of not complying. Implement whatever regulatory compliance is required.
Security Policies
WWW (Who, What, Why)
Who creates the security policies? Senior management team is responsible for creating the
overall security policy. This is the overall goals or the high-level security policy (governing
policy).
What is in a security policy? Incorporates many aspects of risk management. Should have a
general overview of why the policy was written and what it covers and what it doesn't
cover.
Why do we have security policies? It is used to educate workers and become a baseline for
security.
Types of Policies
Guideline - AUP, password policy, etc.
Email - forwarding policies, spam, etc.
Telephony - AUP of telephony services.
Application - security requirements, etc.
Network - AUP, etc.
Standards, Procedures, and Guidelines
Standards - use of specific tech as a countermeasure.
Procedures - detailed doc about standards and guidelines that help implement security for
the network.
Guidelines - suggestions but not mandatory.
Policies - high level policies set forth by senior management.
Testing the Security Architecture
Testing security can be done by using techniques such as:
network scanning
vulnerability scanning
password cracking

penetration testing
social engineering
Responding to an Incident
If an attack succeeds there needs to be a policy that documents how to handle this incident. An
incident policy should:
Help in recovery of business operations.
Document details of the incident.
Prevent further incidents from happening.
Collecting Evidence
If attacker is detected then preserving evidence is important such as taking a snapshot of data,
having logs correlated, pictures of the equipment and a chain of evidence.
Reasons for Not Being an Attacker
You can be punished. Don't be an attacker.
Liability
Company may have a liability if revenue is lost, if company data is stolen, if customer data is stolen
or lost, etc. Money is spent on security to minimize the risk to lower their liability.
DR and BCP
Many companies require minimal downtime. Factors into Business Continuity are:
Maximum tolerable downtime (MTD)
Recovery time objective (RTO) - number of hours or days set as the objective for resuming
the business process in the event of a disaster.
Recovery point objective (RPO) - state at which the data is being restored.

NNNNoooo tttt eeee bbbbooooooookkkk:::: CCNA Security
CCCCrrrreeee aaaatttt eeee dddd :::: 10/4/2012 12:28 PM UUUUppppddddaaaatttt eeee dddd:::: 10/4/2012 1:50 PM
TTTT aaaaggggssss:::: ccna security
03 Building a Security Strategy
Securing Borderless Networks
About: Goes over the current strategies for securing borderless networks.
Main Ideas:
The Changing Nature of Networks
Borderless networks is a term to describe access without any physical borders. There is no starting
from one location and ending at another. It is uninterrupted access. Users are not aware of where
the data is. They use any device to gain access to that data. The concept is similar to cloud
services. Although, access and physical location of data may change, the security concepts do not.
Logical Boundaries
Traditional infrastructure is made up of switch blocks. Users connect to access layer switches
which are Layer 2. The access layer connects to distribution switches which is Layer 2 and 3.
Multiple blocks can be connected by core switches.
Borderless Network Components:
Borderless end zone - where devices connect to the network.
Borderless data center - represents where the services are provided.
Borderless Internet - which is.. the Internet.
Policy management point - the enforcement of policies and secure management.
SecureX and Context-Aware Security
SecureX is an architecture strategy. Core elements are:
Context awareness - being aware of context. Tools to implement include ISE, NAC and AAA.
AnyConnect Client - can establish SSL or IPsec VPNs for confidentiality and integrity of data.
TrustSec - access policy enforcement to provide and control end-to-end security based on
who, what, where and how users are connected to the network.
Security Intelligence Operations - SIO. A cloud-based solution from Cisco that identifies
threats on the Internet to help protect you before you're infected.
Summary: The traditional network architecture is changing. Users now access data anywhere.
The security concepts stay the same. New terms are introduced to describe the security domain
which is borderless networks and SecureX from Cisco.
Controlling and Containing Data Loss
About: Tools used to implement and maintain the CIA model.

Main Ideas:
An Ounce of Prevention
ASA firewalls - provides perimeter security such as packet filtering, stateful filtering, and
VPN.
Integrated Services Routers (ISR) - building additional security into routers.
Intrusion prevention systems (IPS) - performs signature matching to identify malicious traffic
and prevents attacks.
IronPort Email Security Appliances and IronPort Web Security Appliances (WSA) - enforcing
security over email and web traffic.
ScanSafe - Filtering web traffic.
Secure Connectivity Using VPNs
Increase security of SSH, HTTPS, HTTP, and Telnet with a VPN tunnel. Offers confidentiality by
encrypting data. Additionally, can configure site-to-site VPN to encrypt data moving between sites.
Secure Management
When managing devices, should use SSH or HTTPS for secure management. GUIs include: ASDM,
CCP, IDM (IPS Device Manager), and IDM Express (IME).

NNNNoooo tttt eeee bbbbooooooookkkk:::: CCNA Security
CCCCrrrreeee aaaatttt eeee dddd :::: 10/6/2012 2:29 PM UUUUppppddddaaaatttt eeee dddd:::: 10/7/2012 8:44 PM
TTTT aaaaggggssss:::: ccna security
04 Network Foundation Protection
Using Network Foundation Protection to Secure Networks
About: Approaches to hardening the network.
Main Ideas:
The Network Foundation Protection (NFP) Framework
Framework is broken down into three basic areas:
Management plane - the protocols and traffic used to manage network devices.
Control Plane - protocols and traffic the router uses without direct interaction from an
administrator. An example is a routing protocol.
Data Plane - traffic going through the network. An example is a user communicating with a
web server.
Interdependence
Interdependence exists between planes. Such as a control plane failure will impact the data plane
as users' traffic will not be forwarded to its destination.
Implementing NFP
Components of a threat control and mitigation strategy:
Plane Security Measures Protection Objectives
Management AAA, NTP, SSH, SSL, syslog,
SNMP, parser views.
Authenticate and authorized administrators. Use
encrypted protocols, limit what an individual can
see on a network device.
Control Control plane policing (CoPP),
Control plane protection
(CPPr), authenticated routing
protocol updates.
Control plane tools used to limit damaged caused
by an attacker. Routing protocol updates are
authenticated to mitigate an attacker manipulating
the routing updates.
Data ACL, private VLANs, STP, IOS
IPS, Zone-based firewall
Filtering traffic, protecting network from rogue
switch affecting data plane, firewall filtering.
NFP is built on three components to protect a network. Command line auto secure implements
security measures from each plane.
Understanding the Management Plane

About: What can be done to protect management access and protocols.
Main ideas:
Best Practices for Securing the Management Plane
Implement a password policy
Implement RBAC
Utilize AAA services for central management
Use secure NTP
Use encrypted versions of SNMP
Lock down the IP addresses allowed to initiate management
Lock down syslog
Understanding the Control Plane
About: Protecting network devices involving nontransit traffic directed to the network device.
Main ideas:
Best Practices for Securing the Control Plane
CoPP - Control plane policing. The act of rate limiting management traffic. Like applying QoS
to the logical control plane interface of the device.
CPPr - Control plane protection. Detailed classification of traffic. Can rate limit and filter
traffic more finely than CoPP.
Routing protocol authentication - Used to protect network from a rogue router that may be
used to modify routing traffic.
Understanding the Data Plane
About: Implementing policy to transit traffic going through network devices
Main ideas:
Protecting the Data Plane
ACLs used for filtering - Can configure ACL to filter certain traffic.
IOS firewall support - Can apply Zone-Based Firewall.
IOS IPS - Applied over the existing routing platform. Uses signature matches to find
malicious traffic.
TCP Intercept - Helps protect from Syn-flood attacks.
Unicast Reverse Path Forwarding - Limits IP spoofing.

Best Practices for Protecting the Data Plane
Block unwanted traffic at the router.
Reduce DoS attacks with TCP Intercept and firewall services.
Reduce spoofing attacks.
Provide bandwidth management by rate-limiting certain types of traffic.
Implement an IPS.
Additional Data Plane Protection Mechanisms
Enable port security to mitigate MAC address flooding and CAM overflow attacks.
Implement DHCP snooping to prevent a rogue DHCP server from handing out incorrect
default gateways and to protect DHCP starvation attacks.
Implement Dynamic ARP Inspection (DAI) to protect against ARP spoofing. ARP spoofing is
advertising the incorrect IP-to-MAC address mapping.
Implement IP source guard to prevent IP spoofing.

NNNNoooo tttt eeee bbbbooooooookkkk:::: CCNA Security
CCCCrrrreeee aaaatttt eeee dddd :::: 10/7/2012 8:45 PM UUUUppppddddaaaatttt eeee dddd:::: 10/8/2012 5:51 AM
TTTT aaaaggggssss:::: ccna security
05 Using Cisco Configuration Professional to Protect the NetworkInfrastructure
Introducing Cisco Configuration Professional
Can be located locally on the computer or on the router. Used to configure routing, firewalls, IPS,
VPNs, UC, and other features on an IOS router using a GUI. Can monitor a group of routers using a
device community.
Understanding CCP Features and the GUI
The Menu Bar
Contains two options, Application and Help.
Application - Manage Community, Setup New Device, Create User Profile, Import User
Profile, Options, Template, Work Offline, Exit.
Help - Help Contents, Feedback, About.
The Toolbar
Home button - Clicking goes to the Community View page.
Configure button - Make a change to the configuration or view an existing configuration of a
router.
Monitor button - Shows router and security features that can be monitored.
Manage community icon - View, edit or add new communities.
Refresh icon - Gets current running configs from specified device.
Provide feedback to Cisco icon - Feedback for Cisco.
Help icon - Looks like a question mark, click to get help.
Search icon - Opens a browser window to search the help documents.
Left Navigation Pane
Can select an item you want to create or manage on the IOS router.
Content Pane
Right of the navigation pane, where parameters are entered or changed.
Status Bar

Located at the bottom and displays info about CCP. A router preinstalled with Cisco Configuration
Profession Express can be browsed to 10.10.10.1 (default IP of CCP Express).
Required for CCP:
Supports HTTP or HTTPS.
Authentication for HTTPS set to local database.
Username with privilege 15.
How to prepare the router for http/https connections:
R1(config)# ip http server
R1(config)# ip http secure-server
R1(config)# username admin priv 15 secret cisco
R1(cofnig)# ip http authentication local
Setting Up New Devices
About: Required basic configuration to allow CCP to communicate with a router.
CCP Building Blocks
About: Tools used for security policy deployment and configuration.
Main Ideas:
Communities
A community must be created before administering a router using CCP. A community is a group of
routers that share something in common.
The max number of routers in a community is 10.
To create a community and add devices:
1. Use the Manage Community dialog box to create the community.
Click Manage Community in the toolbar.
From the menu bar, click Application | Manage Community.
2. In the Manage Community dialog box, enter the IP address or hostname of the router,
including the username and password.
3. To connect securely to the router, check the Connect Securely check box.
4. To change the default port information, click the down arrow to the right of the device.
5. To discover all the devices in the community, check the Discover All Devices check box.
6. Click OK and the Community View page opens.
Templates

Templates are used to copy configuration to another router or device. Certain parameters will be
changed, such as the hostname.
To create and apply a template:
1. Select Application from the menu bar, and from the drop-down select Template, and then
Create.
2. You can then select a discovered router or select a file from your local computer.
3. Highlight the items that need to be replaced before applying the configuration to another
router. After highlighting each item, click the Parameterize button. This identifies each item
as a variable that would be replaced before applying the configuration to another router.
Click Finish.
4. Save the file.
5. Apply the configuration to another router by selecting Application from the menu bar, and
from the drop-down select Template, then Apply.
6. Browse for the previously saved template file and click Next. Click the Find Parameterized
Attribute button to search for and identify the variables to replace them with the new values.
Then click Next.
7. From the drop-down list select a discovered router that you want to apply the configuration
to. Click Next to continue, followed by Finish.
User Profiles
You can restrict which features are shown as available by using user profiles. User profiles only
restrict information from CCP and not SSH. To create and implement a user profile:
1. Select Applications then select Create User Profile.
2. Click Next.
3. Select the routers that the user profile will have an effect on then click Next.
4. Expand each content by clicking on the triangle to the left of each item. Select the
permissions by clicking on the icon and selecting what level of permissions to this item you
want to give to the user. When done, click Next.
Green = Full Permissions, Blue = View Only, Red = Not Available
5. Click Save User Profile, then click Finish.
6. On the computer using the user profile, click Application menu and select Import User
Profile.
7. Click Browse, select the previously saved user template, and click Next. Confirm the settings
for the template and click Next then Finish.
CCP Audit Features
About: How to use the Security Audit feature in CCP.
Based on the command line auto secure, The Security Audit feature will evaluate the
configuration and make recommendations on how to make the router more secure.

To perform a security audit:
1. On the toolbar click Configure then go to Security > Security Audit
2. Click Perform Security Audit and then click Next.
3. For each interface listed, check either the Inside or Outside check box to indicate where the
interface connects then click Next.
4. Security Audit Wizard checks the configuration to find any security problems.
5. Check the Fix It boxes next to any problems you want CCP to fix then click Next.
6. Enter any information required and click Next
7. On the summary page, click Finish to deliver the changes to the router.
One-Step Lockdown
Addresses several features that do not require an administrator to provide input. Provides a subset
of security measures that the interactive Security Audit feature can perform.

NNNNoooo tttt eeee bbbbooooooookkkk:::: CCNA Security
CCCCrrrreeee aaaatttt eeee dddd :::: 10/12/2012 5:34 AM UUUUppppddddaaaatttt eeee dddd:::: 10/13/2012 10:59 PM
TTTT aaaaggggssss:::: ccna security
06 Securing the Management Plane on Cisco IOS Devices
Securing Management Traffic
About: Classifying and describing management traffic, their vulnerabilities and how to protect it.
Main ideas:
What is Management Traffic and the Management Plane?
The management plane includes the method of managing a device, the credentials to log into the
device, configuring the device, etc. Everything involved with management of a system. That traffic
to the administrator is management traffic.
Beyond the Blue Rollover Cable
A console cable gives you physical access into a device. Without it, you would use IP to connect to
the device. This increases the risk because unauthorized users may attempt to gain access.
Management Plane Best Practices
Strong passwords - make password complex and difficult to guess.
User authentication and AAA - make admins connect using usernames and passwords. Then
authorize them with what they can do on the device and keep an audit trail.
Role-based access control (RBAC) - give junior admins a custom privilege level account
and/or put them in a special group with specific permissions to devices.
Encrypted management protocols - use SSH and HTTPS to manage devices.
Logging - used as an audit trail and also to receive messages from devices.
Network Time Protocol - synchronize time across all devices so logs can be correlated.
Secure system files - make it difficult to delete or modify the startup config and the IOS
images.
Password Recommendations
Use a minimum of eight characters. Longer the better.
Use alphanumeric characters, symbols, phrases, etc.
Change passwords regularly.
Using AAA to Verify Users
AAA identifies the user before giving network resources, then give them access based on what they
are authorized to use, and then create an audit trail of what they did and when they did it.

AAA Components
Authentication - proving who users claim to be. Specify authentication with a
"method list" that says how to authenticate a user.
Authorization - after authentication, authorization is used to determine which
resources an individual has and what they can do to the resource. Authorization
method lists are created to specify how to authorize an individual.
Accounting and auditing - once a user is authenticated and authorized, an audit trail
keeps track of what resources were accessed and what was performed on those
resources.
Options for Storing Usernames, Passwords, and Access Rules
Cisco Secure ACS Solution Engine
Cisco Secure ACS for Windows Server
Current flavors of ACS functionality
Self-contained AAA
Authorizing VPN Users - authenticate the user and determine what access they have by the
authorization method list.
Router Access Authentication - must use authentication first before using authorization.
AAA Method List - can specify individual lists of ways we want to authenticate, authorize,
and account for users. A default list applies to the whole router or switch. A custom list can
be created.
Syntax: aaa type {default | list-name} method-1 [method-2 method-3 method-4]type = identifies the type of list being created. Either authentication, authorization, or accounting.
default = specifies the default list of methods to be used based on the methods that
follow this argument.
list-name = Used to create a custom method list.
method = at least one method must be specified. To use the local database you can
use the local keyword. Other methods include:
enable - the enable password is used.
krb5 - kerberos 5 is used.
krb5-telnet - kerberos 5 telnet is used when using telnet to connect.
line - the line password is used.
local - the local username database is used.
local-case - requires a case-sensitive local username.
none - no authentication is used.
group radius - a radius server is used.
group tacacs+ - a tacacs server is used.
group group-name - Uses either a subset of radius or tacacs+ servers
Role-Based Access Control
RBAC concept is to create a set of permissions and assign it to users or groups.
Custom Privilege Levels - user mode is privilege 1. Privileged mode is level 15. Can create
custom privilege levels with assigned commands associated with that custom level.
Limiting the Administrator by Assigning a View - by creating parser views. Can create a view
with associated commands. User logs into CLI and is restricted by the commands that are
associated with the view.

Encrypted Management Protocols
Most common option for remote access is Telnet. Telnet is not secure because it transmits data in
plain text. SSH gives the same functionality but data in transit is encrypted. For GUI management
applications HTTPS should be used instead of HTTP.
Using Logging Files
Console - log messages that are sent to the terminal window.
vty lines - virtual tty connections receiving log messages at the terminal.
Buffer - router memory that can store messages up to a configured memory size.
SNMP server - generated log messages from SNMP traps that are sent to the SNMP server.
Syslog server - stores large volumes of logs. Syslog severities:
0 - emergencies - system is unusable.
1 - alerts - immediate action needed.
2 - critical - critical conditions.
3 - errors - error conditions.
4 - warnings - warning conditions.
5 - notifications - normal, but significant conditions.
6 - informational - informational messages.
7 - debugging - highly detailed info based on current debugging enabled.
Understanding NTP
Network time protocol uses UDP port 123. Used to synchronize time between devices. Network
devices should connect to a trusted time server using NTP version 3 to support cryptographic
authentication.
Protecting Cisco IOS Files
Cisco operating system is called the IOS. To protect the IOS and startup configuration, secure boot
set is enabled so that a secured working copy of the IOS image and startup config is accessible at
all times.
Implement Security Measures to Protect the Management Plane
About: Implementing best practices to protect the management plane.
Main Ideas:
Implementing Strong Passwords
Use the secret keyword when configuring user passwords:username admin secret ci$co!619
Configure login and passwords for access to the lines:
line console 0

password $ecr3t
login
exit
line vty 0 4
password $secr3t$
login
Encrypt all plain text passwords:
service password-encryption
User Authentication with AAA
Enable AAA:
aaa new-model
Configure the AAA server being used. This example uses TACACS+
tacacs-server host 10.10.10.5
tacacs-server key P@ssword01
A default method list is created
aaa authentication login default local enable
A custom method list is created
aaa authentication login CUSTOM_LOGIN group tacacs+ local enable
Custom authorization method lists are created
aaa authorization commands 1 AUTHZ_PRIV1 group tacacs+ local
aaa authorization commands 15 AUTHZ_PRIV15 group tacacs+ local
Custom accounting method lists are created
aaa accounting commands 1 ACCT_PRIV1 start-stop group tacacs+
aaa accounting commands 15 ACCT_PRIV15 start-stop group tacacs+
Create a backup local privilege 15 user account in case tacacs server cannot be contacted
username admin priv 15 secret S3cretS@uce
Apply the method lists to the VTY lines
line vty 0 4
login authentication CUSTOM_LOGIN
authorization commands 1 AUTHZ_PRIV1
authorization commands 15 AUTHZ_PRIV15
accounting commands 1 ACCT_PRIV1
accounting commands 15 ACCT_PRIV15
How to view AAA using CCP:
Click on Configure | Router | AAA | AAA Summary
How to add, edit, or modify the authentication policies:

Configure | Router | AAA | Authentication Policies | Login
To see the method lists applied to the vty lines:
Configure | Router | Router Access | VTY
Using the CLI to Troubleshoot AAA for Cisco Routers
debug aaa authentication
debug aaa authorization
debug aaa accounting
RBAC Privilege Level/Parser View
Creating a custom privilege level:
conf t
! This assigns the command 'configure terminal' to privilege level 8
privilege exec level 8 configure terminal
enable secret level 8 0 P@ssword01
Can assign custom privilege level to a user account in the local database:
username rowell privilege 8 secret CiscoS@uce
line vty 0 4
! login local requires a username and password for access if the "aaa new-model" command isn't
present.
login local
Implementing Parser Views
Requirements to create a view
enable secret password must be configured
AAA must be enabled
Creating a view:
conf t
enable secret Cisco
aaa new-model
enable view
password:
%PASER-VIEW_SWI: successfulyse view 'root'.
conf t
! Creating the new view
parser view New_VIEW
! Setting the password for the view
secret New_VIEW_PW
! Specify commands included in the view
commands exec include ping

commands exec include all show
commands exec include configure
commands configure include access-list
exit
exit
To use the view:
R1> enable view New_VIEW
Password: New_VIEW_PW
To associate a user with a parser view:
username tsadmin view New_VIEW secret Cisco123
SSH and HTTPS
Requirements for SSH:
Hostname configured
Domain name
Generating public/private key pair
Requiring user login via the vty lines, instead of just a password
User account to log in with
Configuring SSH:
hostname R1
ip domain-name rcdlab.net
crypto key generate rsa modulus 1024
username admin secret Cisco
line vty 0 4
login local
Enabling secure HTTPS:
ip http secure-server
ip http authentication local
Implementing Logging Features
Configuring Syslog Support
Configure timestamps on log messages:
service timestamps log datetime
To configure syslog from CCP:
Configure | Router | Logging
Configure syslog in CLI:
logging 10.10.10.5
logging trap debugging
logging buffered 8192 informational

SNMP Features
Components
SNMP manager - runs the management application. Called the Network Management Server
(NMS).
SNMP agent - software that runs on a managed device.
Management Information Base - collection of unique numbers associated with each of the
individual components of a router. Information about the device's resources and activity is
defined by a series of objects.
Categories of SNMP message types
GET - used to retrieve info from a managed device.
SET - used to set a variable in a managed device or to trigger an action.
Trap - an unsolicited message sent from a managed device to the SNMP manager.
Security models and security levels:
Security Model Security Level Authentication Strategy Encryption Type
SNMPv1 noAuthNoPriv Community string None
SNMPv2c noAuthNoPriv Community string None
SNMPv3 noAuthNoPriv
authNoPriv
authPriv
Username
MD5 or SHA
MD5 or SHA
None
None
CBC-DES (DES-56)
Configure SNMP using CCP:
Configure | Router | SNMP
CLI to configure SNMPv1
snmp-server location 10.1.10.26
snmp-server contact Admin
snmp-server community super-secret RW
snmp-server host 10.1.10.26 trap Cisco
Configuring NTP
To configure using CCP:
Configure | Router | Time | NTP and SNTP then click ADD
To configure using CLI:
ntp update-calendar
ntp authentication-key 1 md5 S3cret!
ntp authenticate
ntp trusted-key 1
ntp server 55.1.2.3 key 1 source FastEthernet0/0 prefer
Verify NTP:
show ntp status

show ntp association
Securing the Cisco IOS Image and Configuration Files
Create a secure bootset:
! Secure the IOS image
conf t
secure boot-image
! Secure the startup config
secure boot-config
! edify the boot set
do show secure bootset

NNNNoooo tttt eeee bbbbooooooookkkk:::: CCNA Security
CCCCrrrreeee aaaatttt eeee dddd :::: 10/15/2012 5:29 AM UUUUppppddddaaaatttt eeee dddd:::: 10/15/2012 12:20 PM
TTTT aaaaggggssss:::: ccna security
07 Implementing AAA Using IOS and the ACS Server
Cisco Secure ACS, RADIUS, and TACACS
About: How to use ACS for centralized authentication of clients.
Main Ideas:
Why Use Cisco ACS?
Centrally manage users and control what access they have to routers and switches (authorize).
Useful for creating user accounts one time when authenticating to multiple devices.
What Platform Does ACS Run On?
Can be installed on a Windows server, a physical Cisco appliance or installed in a virtual
environment.
What is ISE?
Identity Services Engine (ISE) is an identity and access control policy platform. Used to do posturing
and policy-compliance checking for hosts.
Protocols Used Between the ACS and the Router
Two main protocols used between ACS and the client: TACACS+ and RADIUS.
TACACS+
Terminal Access Control Access Control Server.
Cisco proprietary.
RADIUS
Remote Authentication Dial-In User Service.
Open standard.
Only encrypts passwords.
Protocol Choices Between the ACS Server and the Client (the Router)
TACACS+ versus RADIUS
TACACS+ RADIUS
Functionality Separates AAA functions into distinct
elements. Authentication is separate
from authorization, and both are
separate from accounting.
Combines many of the functions of
authentication and authorization together.
Has detailed accounting capability when
accounting is configured for use.
Standard Cisco proprietary. Open standard.
L4 protocol TCP UDP
Replacement
coming
None officially planned. Possibly Diameter
Confidentiality All packets encrypted between ACS
and router
Only password is encrypted between ACS
and router
Granular
command by
command
authorization
Supported No explicit command authorization checking
rules can be implemented
Accounting Supported Supported
Configuring Routers to Interoperate with an ACS Server
About: Configuring ACS
Main Ideas:
Using the CLI to configure client with ACS
! enable aaa
conf t
aaa new-model
! configure tacacs and local method list
aaa authentication login AUTHEN_via_TACACS group tacacs+ local
! configure the authorization method list
aaa authorization exec Author-Exec_via_TACACS group tacacs+ local
! create a local user account as a backup
username admin priv 15 secret cisco
! specify the ACS server used for tacacs
tacacs-server host 192.168.1.252 key cisco123
! apply authentication and authorization method lists to the vty lines
line vty 0 4
authorization exec Author-Exec_via_TACACS
login authentication AUTHEN_via_TACACS

To troubleshoot TACACS use command:
debug tacacs
debug aaa authentication
debug aaa authorization
Task list for configuring router to use ACS via TACACS+
Decide what the policy should be - part of the planning process for developing concept for
authentication and authorization.
Enable AAA - use command aaa new-model.
Specify the ACS server to use - use the tacacs-server host command.
Create a method list for authentication and authorization - each method list is created in
global configuration mode.
Apply the method lists to the location that should use those methods.
Using CCP to configure the client with ACS
Enable AAA with in CLI with command aaa new-model
In CCP configure AAA:
Configure | Router | AAA | AAA Servers and Groups | Servers | Click ADD to add the
ACS server.
Create the method lists:
Configure | Router | AAA | Authentication Policies | Login | Click ADD to specify the
authentication method list details.
Create the authorization method list:
Configure | Router | AAA | Authorization Policies | EXEC Command Mode | Click ADD to
create a similar process as the authentication method list.
Apply the method lists to the vty lines:
Configure | Router | Router Access | VTY | click Edit and use the drop down to select the
method lists to be used.
Create a local user account:
Configure | Router | Router Access | User Accounts/View | click ADD
Configuring the ACS Server to Interoperate with a Router
About: Configuring the ACS using the GUI interface.
Main Ideas:
Configuring the ACS
Key Components for Configuring ACS:

Network device groups - Used to group network devices with similar functions managed by
the same administrators.
Network devices - Individual network devices that go into device groups.
Identity groups - Groups of admins.
User accounts - Individual admins which are placed into identity groups.
Authorization profiles - Controls what rights are permitted.
Create device groups:
Network Resources | Network Device Groups | Device Type | click Create
Add a single router and add to a device group:
Network Resources | Network Devices and AAA Clients | click Create
Create a user group:
Users and Identity Stores | Identity Groups | click Create
Create individual users:
Users and Identity Stores | Internal Identity Stores | Users | Click Create
Create authorization policies:
Access Policies | Access Services | Default Device Admin | Authorization | click Create
Verifying and Troubleshooting Router-to-ACS Server Interactions
About: Commands that can be used to troubleshoot and verify AAA when using ACS.
Main Ideas:
Verification
Verify ping, make sure device is powered on, in the correct VLAN, has correct switchport
configuration, etc.
Testing AAA between router and the ACS use command:
test aaa group tacacs+ admin cisco123 legacy
On the ACS server, view the reports:
Monitoring & Reports | Reports | Favorites | select Authentications - TACACS - Today

NNNNoooo tttt eeee bbbbooooooookkkk:::: CCNA Security
CCCCrrrreeee aaaatttt eeee dddd :::: 10/16/2012 5:24 AM UUUUppppddddaaaatttt eeee dddd:::: 10/21/2012 8:02 PM
TTTT aaaaggggssss:::: ccna security
08 Securing Layer 2 Technologies
VLAN and Trunking Fundamentals
About: The basics of how VLANs and trunking operate.
Main Ideas:
What is a VLAN?
A VLAN is a virtual LAN where devices on the same VLAN have the same layer 3 IP address and are
on the same layer 2 broadcast domain. From the switch, a switchport is assigned to a VLAN.
Creating a new VLAN:
conf t
vlan 10
int f0/1
switchport mode access
switchport access vlan 10
Trunking with 802.1Q
By default, separate, physical, switches are not trunked to communicate 802.1Q tags between
physical switches. 802.1Q is the standard for VLAN trunking and tagging of a packet. If SW1
needed to tell SW2 that a frame is destined for VLAN 10, it would need to go through a trunk port.
To allow proper communication between the physical switches, a trunk needs to be configured on
both switches.
Configuring trunk ports:
conf t
int range f0/23-24
switchport trunk encapsulation dot1q
switchport mode trunk
Following the Frame, Step by Step
When SW1 forwards a frame over the trunk tagged as VLAN 10 to SW2, SW2 sees the tag, knows
its for VLAN 10, removes the tag, and forwards the frame to all interfaces associated with VLAN 10
(for a broadcast) or directly to the interface associated with VLAN 10 (unicast).
The Native VLAN on a Trunk
By default, the native VLAN is VLAN 1. The native VLAN is not tagged across a trunk port. If a

device connects to the switch and is placed on the native VLAN, it can send a broadcast which
would be transmitted to the other switches on the native VLAN.
So, What Do You Want to Be? (Says the Port)
Trunks can be automatically negotiated between two switches, or between a switch and a device
that supports trunking. This determines if a port is a trunk or an access port.
Inter-VLAN Routing
Devices can communicate with each other on the same VLAN. If two devices wanted to
communicate from different VLANs, a default gateway needs to be configured for both VLANs for
routing the packets to the destination VLAN.
The Challenge of Using Physical Interfaces Only
When creating 50 VLANs it is not feasible to have 50 physical interfaces. One solution is to create a
router on a stick.
Using Virtual "Sub" Interfaces
To use one interface, trunk the switchport to the router. From the router create subinterfaces for
the additional VLANs. This allows the router to route the packets to its destination.
Configuring Router on a Stick:
sw1(config)# int f0/3
sw1(config-if)# switchport trunk encap dot1q
sw1(config-if)# switchport mode trunk
! Go to router
r3(config)# int f0/0
r3(config-if)# no shut
r3(config-if)# int f0/0.1
r3(config-subif)# encap dot1q 10 ! we tag the frames with VLAN 10
r3(config-subif)# ip address 10.0.0.1 255.255.255.0
Spanning-Tree Fundamentals
About: How STP avoids loops at layer 2 and how STP works.
Main Ideas:
Loops in Networks Are Usually Bad

Whenever there are parallel connections between layer 2 devices there will be layer 2 loops. STP
solves that problem.
The Life of a Loop
A pc on sw1 sends a frame belonging to vlan10. The switch forwards the frame to all ports in
vlan10, including the two trunk ports to sw2, interface 23 and 24. Sw2 receives this frame and
sends the frame to all ports on vlan10. Interface 5, on vlan10, receives the frame. Sw2 also sends
the frame out it's own trunk interface, interface 24, back to sw1. Sw1 does the same process and
sends the frame out its trunk interfaces. A loop occurs in both directions. Additionally, there is MAC
address flapping in the dynamically learned MAC address table.
The Solution to the Layer 2 Loop
802.1D STP identifies parallel layer 2 paths and blocks one of the paths so a loop does not occur. A
single switch becomes a root bridge if it has the lowest bridge ID. All other nonroot bridges identify
any redundant layer 2 paths it has to the root and blocks all but one of the paths.
STP communicates using bridge protocol data units (BPDU) to accomplish negotiation and loop
detection.
STP is Wary of New Ports
STP is cautious about allowing other devices to connect because of the possibility of loops. When a
device is connected, STP will wait 30 seconds before letting frames go through the interface; 15
seconds of that is the listening state to see if BPDUs are coming in. During the 15 seconds it does
not record the MAC address in the dynamic table.
The second half of the 30 seconds is still looking for BPDUs but STP will begin to record the source
MAC address to the dynamic MAC address table. This is the learning state. After the 30 seconds
(listening and learning), the switch can begin forwarding the frames.
If the port was at first in a blocking state, there is an additional 20 second delay as the port
determines that the parallel path is gone before moving to the listening and learning state.
Improving the Time Until Forwarding
802.1w (Rapid Spanning Tree) introduced features for faster convergence.
Configuring portfast and rapid spanning tree:
conf t
int f0/2
spanning-tree portfast
spanning-tree mode rapid-pvst

Common Layer 2 Threats and How to Mitigate Them
About: Security threats at Layer 2 and mitigation.
Main Ideas:
Disrupt the Bottom of the Wall, and the Top Is Disrupted, Too
If an attacker can disrupt the layer 2 forwarding of data then they can attack the upper layer
protocols.
Layer 2 Best Practices
Change the native VLAN to an unused VLAN for all your trunks.
Avoid using VLAN 1.
Administratively configure access ports so users cannot negotiate a trunk.
Limit the number of mac addresses learned on a port with port security.
Use BPDU guard and root guard to control spanning tree.
Turn off CDP on untrusted ports.
On a new switch, shut down all unused ports and assign them to a parking lot VLAN.
Locking down switch ports:
int f0/2
switchport mode access
switchport access vlan 10
switchport nonegotiate
int f0/23
switchport trunk encap dot1q
switchport mode trunk
switchport trunk native vlan 3
switchport nonegotiate
Layer 2 Security Toolkit
Port security - Limits number of MAC addresses learned on an access switch.
BPDU guard - Switch protects itself if BPDUs are identified where they should not be
allowed.
Root guard - Control which ports are not allowed to become root ports to remote root
switches.
Dynamic ARP inspection - Prevents spoofing of layer 2 information by hosts.
IP source guard - Prevents spoofing of layer 3 information by hosts.
802.1x - Authenticates users before allowing frames on the network.
DHCP snooping - Prevents rogue DHCP servers from impacting network.
Storm control - Limits the amount of broadcast or multicast traffic.
Access control lists - Traffic control to enforce policy.

Specific Layer 2 Mitigation for CCNA Security
BPDU Guard
When enabled switch port is disabled when BPDU is seen inbound on the interface.
conf t
int f0/2
spanning-tree bpduguard enable
If a port has been disabled because of a violation will show a status of: err-disabled.
To bring interface back up:
shutdown
no shutdown
Can enable interface to reset automatically:
conf t
errdisable recovery cause bpduguard
errdisable recovery interval 30
Root Guard
Helps prevent switch from learning about a new root switch.
conf t
int f0/24
spanning-tree guard root
Port Security
Used to control how many MAC addresses can be learned on a switch port. Implemented on a
port-by-port basis. Also prevents a client from depleting DHCP server resources. Can configure
three violation options:
shutdown the port
protect the port - will not shut down but will deny any frames from new MAC addresses.
restrict the port - same as protect but generates a syslog message as well.
conf t
int f0/2
switchport port-security
switchport port-security maximum 5
switchport port-security violation protect
switchport port-security mac-address sticky

NNNNoooo tttt eeee bbbbooooooookkkk:::: CCNA Security
CCCCrrrreeee aaaatttt eeee dddd :::: 10/21/2012 9:55 PM UUUUppppddddaaaatttt eeee dddd:::: 10/22/2012 5:51 AM
TTTT aaaaggggssss:::: ccna security
09 Securing the Data Plane in IPv6
Understanding and Configuring IPv6
About: Reviews IPv6 basics and how to configure it.
Main Ideas:
Why IPv6?
Move to IPv6 because:
More address space available
Running out of public IPv4 addresses
Differences between IPv4 vs IPv6
IPv4 IPv6
32-bit address; supports 232,4,294,967,296
addresses
128-bit address; supports 3.4 x 1038 addresses
Can use NAT to extended space limitations Doesn't support NAT by design
Uses DHCP or static configuration to assign
IP addresses to hosts
Hosts can use stateless address autoconfiguration to
assign an IP address to themselves but can also use
DHCP
IPsec support is optional IPsec support is supposed to be required
Multiple pieces in an IPv4 header Simplified IPv6 header
Uses broadcast for several functions Doesn't use broadcasts and doesn't use ARP. Uses
NDP.
Supports common Layer 4 protocols Supports common Layer 4 protocols
Supports common application protocols Supports common application protocols
Supports common Layer 2 technologies Supports common Layer 2 technologies
Contains two parts in an IP address:
network and host
Contains two parts in an IP address: network and
host
Uses a network mask to identify which part
of the address is the network and which is
the host
Uses a network mask to identify which part of the
address is the network and which is the host
Format of an IPv6 Address
Lengh: 128 bits long.

Groupings: Segmented into eight groups of four hex characters.
Separation of groups: Each group is separated by a colon (:).
Length of mask: Usually 50% (64 bits) for a network ID, 50% (64 bits) for interface ID (using a 64
bit mask).
Number of networks: 2^64 (1.8 x 10¹⁹).
Understanding the Shortcuts
Leading 0's can be omitted in the IPv6 address.
Consecutive groups of all 0s can be represented as a double colon (::).
Did We Get an Extra Address?
System automatically configures a link local address beginning with FE80. Link local addresses are
used to communicate with other IPv6 devices on the same local network (local broadcast domain).
IPv6 Address Types
Link local address - dynamically configured beginning with FE80. Last 64 bits are the host ID
(interface ID), and the device uses a modified EUI-64 format to create it. EUI-64 uses the
MAC address and inserts four hexadecimal characters of FFFE into the middle of the MAC
address. Also looks at 7th bit from the left and inverts it.
Loopback address - ::1 which is the same as 127.0.0.1
All-nodes multicast address - Multicasts begin with FFxx:. 02 designates a multicast address
that is link local in scope. IPv6 multicast group that all IPv6 devices join is FF02::1.
All-routers multicast address - FF02::2.
Unicast and anycast addresses (configured automatically or manually) - Global IPv6 unicast
addresses begin with range: 2000 to 3FFF. Anycast address can be a route or an IP address
that appears more than one time in a network. The network decides the best way to reach
that IP.
Solicited-node multicast address for each of its unicast and anycast addresses - Devices that
have global and link local addresses join FF02::1:FFxx:xxxx - x characters represent last 24
bits of the host ID being used for the addresses. This method is used to avoid broadcasts.
Multicast addresses of all other groups to which the host belongs - Routers w/ IPv6 routing
enabled join FF02::2 (all routers) and join their multicast group depending on the routing
protocol enabled.
Configuring IPv6 Routing
About: Configuring IPv6
Main Ideas:

Configuring IPv6 Routing
! Enable IPv6 routing:
conf t
ipv6 unicast-routing
! Enable routing protocols on interface
int f0/1
ipv6 rip MYRIP enable
ipv6 ospf 1 area 0
ipv6 eigrp 1
exit
! Do no shutdown on eigrp
ipv6 router eigrp 1
no shutdown
Moving to IPv6
Moving to IPv6 will be a transition. Support for IPv6 and IPv4 coexistence is necessary. Router or
device can run both IPv4 and IPv6 or tunneling can be used.
Developing a Security Plan for IPv6
About: Security threats common to both IPv4 and IPv6 (some specific to IPv6) and how to address
them.
Main Ideas:
Best Practices Common to Both IPv4 and IPv6
Physical security
Device hardening
Control access between zones
Routing protocol security
Authentication, authorization, and accounting (AAA)
Mitigating DoS attacks
Have and update a security policy
Threats Common to both IPv4 and IPv6
Application layer attacks
Unauthorized access
Main-in-the-middle attacks
Sniffing or eavesdropping
Denial-of-Service (DoS) attacks
Spoofed packets

Attacks against routers and other network devices
New Potential Risks with IPv6
Network Discovery Protocol
DHCPv6
Hop-by-hop extension headers
Packet amplification attacks
ICMPv6
Tunneling options
Autoconfiguration
Dual stacks
Bugs in code
IPv6 Best Practices
Filter bogus addresses
Filter non-local multicast addresses
Filter ICMPv6 traffic that is not needed on your specific networks
Drop routing header type 0 packets
Use manual tunnels rather than automatic tunnels
Protect against rogue IPv6 devices

NNNNoooo tttt eeee bbbbooooooookkkk:::: CCNA Security
CCCCrrrreeee aaaatttt eeee dddd :::: 10/22/2012 12:18 PM UUUUppppddddaaaatttt eeee dddd:::: 10/22/2012 12:46 PM
TTTT aaaaggggssss:::: ccna security
10 Planning A Threat Control Strategy
Designing Threat Mitigation and Containment
About: Guiding principals to follow and implement to mitigate threats.
Main Ideas:
Where Do We Go from Here?
Threat Control and Mitigation Strategy Components
Formal process for policy creation, implementation, and review
Sr management is responsible for policy. Network admin implements and enforces
policy.
Mitigation policies and techniques
Policies should be in place specifying course of action in response to an attack or
threat.
End-user education and awareness.
Have end-user policy, educate end-users, and review periodically.
Defense in depth.
Take the layered security approach.
Centralized monitoring and analysis.
Centrally manage multiple devices. Use logging to correlate events.
Application layer visibility.
Verify whether protocol abuse is occurring.
Incident response.
Policy should be written to specify what will happen and how it will happen when an
incident occurs.
Securing a Network via Hardware/Software/Services
About: High level look into how to achieve network security.
Main Ideas:
Switches
Security features on switches:
Port security.
Limit number of MAC addresses learned on a port. This protects against CAM
overflow.
DHCP snooping.
Allow only server responses from specifically trusted ports.

Dynamic Address Resolution Protocol (ARP) inspection.
Protecting against an attacker from performing layer 2 spoofing by confirming that
traffic includes accurate MAC address.
IP source guard.
Verifies the client on port is not doing Layer 3 spoofing.
Root guard, BPDU guard, BGDU filtering.
Control spanning-tree topology by resisting a rogue switch's attempt to become root.
Storm control.
Clamps down on traffic at configurable levels.
Additional modules.
The additional of additional modules such as IPS, VPN, firewall..
Routers
Router security features:
Reflexive access lists.
Allow traffic from the outside unless if it is initiated from the inside. Not used much
anymore.
Context-based access control (CBAC).
To support stateful filtering without creating reflexive access lists.
Zone-Based Firewall.
Replaced CBAC. Uses class maps to identify traffic, policy maps to specify actions on
that traffic, and a service policy to put policy in place.
Packet-filtering ACLs.
Uses standard and extended ACLs, can implement policy of what traffic is allowed or
denied.
AAA.
Authentication, authorization, and accounting.
VPNs.
Remote access using SSL or IPsec VPNs.
IPS.
Intrusion prevention system.
Routing protocol authentication.
Prevents unauthorized router from being trusted.
Control plane protection and control plane policing.
Sets thresholds and limits for traffic that is directed to the router.
Secure management protocols.
SSH and SSL.
ASA Firewall
Security features:
Stateful filtering.
ASA remembers state of a connection and dynamically allows the return traffic.

Modular policy framework (MPF).
Used via class maps, policy maps, and service policy rules to perform simple protocol
and application layer inspection and policy enforcement.
URL filtering.
Control which URLs are allowed to be accessed through the firewall.
Packet-filtering ACLs.
Using standard and extended ACLs to allow or deny traffic.
AAA.
Authentication, authorization, and accounting.
VPNs.
SSL or IPsec VPN remote access.
IPS.
Intrusion prevention system.
Routing protocol authentication.
Prevents unauthorized rogue router from being trusted.
Secure management protocols.
SSH and SSL.
Other Systems and Services
IPS.
Analyzes network traffic.
Cisco Security Manager (CSM).
Enterprise-level configuration tool used to manage most security devices.
Cisco Security Intelligence Operations (SIO) Service.
SIO researches and analyzes threats to profile real time updates and best practices
regarding these threats.

NNNNoooo tttt eeee bbbbooooooookkkk:::: CCNA Security
CCCCrrrreeee aaaatttt eeee dddd :::: 10/23/2012 3:12 AM UUUUppppddddaaaatttt eeee dddd:::: 10/23/2012 4:16 AM
TTTT aaaaggggssss:::: ccna security
11 Using Access Control Lists for Threat Mitigation
Access Control List Fundamentals and Benefits
About: Use of ACLs focusing on the function of filtering.
Main Ideas:
Access Lists Aren't Just for Breakfast Anymore
Features that can use an ACL:
IOS Inspect class map
Used w/ Zone-Based Firewall. Can refer to an ACL to identify traffic that matches and
is permitted in the ACL. Traffic permitted is considered a match for the purposes of
the class map.
IOS class map
Typical class map could be used for features such as policy-based routing. Ability to
refer to ACL for classification (identification) of specific types of traffic.
Routing protocols
Can be used to control behavior of various aspects of the routing protocol.
Quality of Service (QoS)
High-priority traffic can be assigned to specific traffic that is classified by an ACL.
VPN
Can identify which traffic is "interesting" that will be part of a VPN config. Traffic not
matched by a permit statement in the ACL would be forwarded normally instead of
through the VPN tunnel.
ASA Firewall Modular Policy Framework
Class maps can refer to ACL to identify traffic.
NAT/PAT
Using policy-based NAT, ACL can identify devices that require translation.
Packet filtering
ACLs used as a filter on an interface to control which traffic is allowed through that
interface.
What Can We Protect Against?
IP address spoofing
Can deny spoofed packets going out an Interface using an ACL.
TCP Syn-flood attacks
Use of Zone-Based Firewall or ASA firewall to mitigate attack.
Reconnaissance attacks
Deny ICMP or UDP traffic used by an attacker to learn details behind the router.
General vulnerabilities
Applying least permissions

The Logic in a Packet-Filtering ACL
ACLs are processed in order. Once there is a match it does not continue down the list. If there is at
least one entry in the ACL there is an implicit deny at the end. An empty ACL does not deny any
traffic, there has to be at least one Access Control Entry. If the ACL is applied outbound on an
interface, the rules in the ACL apply only to outbound traffic that is being routed through the router
and doesn't have any effect on traffic generated by the router itself, such as a routing prate, that is
exiting that same interface.
Standard and Extended Access Lists
Standard ACLs
Can only match packets based on source IP address.
Extended ACLs
Can match source or destination and most of the content that is contained in the
Layer 4 protocol.
Standard ACL Extended ACL
Numeric
Range
1 - 99, 1300 - 1999 100 - 199, 2000 - 2699
Options
for using
names
for the
ACL
instead
of
numbers
Yes Yes
What
they can
match on
Source IP only of the packet
compared to the list
Source or destination IP, plus most Layer 4 protocols,
including items in the Layer 4 header of the packet being
compared
Where to
place
Relatively close to the
destination. Applying too
close to the source may limit
that source from reaching
other destinations that were
not intended to be limited.
Because of the granularity of the matching on specific
source and destination, you can place these very close to
the source of the host who is generating the packet,
because it will only deny the traffic to the specific
destination and will not cause a loss of service to other
destinations that are still being permitted.
Line Numbers Inside an Access List
An ACL is a collection of entries called access control entries (ACE). Adding a new line is placed at
the bottom of the list. By default, router automatically assigns sequence numbers to each line. They
usually begin with 10 and increment by 10 for each new line. You can specify a new sequence
number in front of the entry.

Wildcard Masks
A wildcard mask is a binary representation that says wherever there is a bit on in the wildcard
mask, the corresponding bit from the IP address being looked at does not have to match.
IP address that is 32 bits long and has a wildcard mask of 0.0.0.255 means that the last 8 bits of
the IP address being checked are not being compared.
Object Groups
Can be created to include various devices, even if they are all on different subnets. An example is
grouping 15 different servers to allow 2 protocols to those servers.
Implementing IPv4 ACLs as Packet Filters
About: How to implement ACLs using CCP and CLI.
Main Ideas:
Putting the Policy in Place
To create an apply an ACL using CCP:
Configure | Router | ACL | ACL Editor | Click Add
Create a new rule. Specify the name or number of the rule, whether it is standard or extended.
Click Add to insert details for the first entry. Then click OK.
Using the CLI to Implement an Access List
config t
access-list 5 remark Block Server1's subnet from reaching Server 3
access-list 5 deny 11.11.11.0 0.0.0.255 log
access-list 5 permit 0.0.0.0 255.255.255.255
Apply the Access List to an Interface
Within CCP:
While editing the Rule, click on Associate and select an interface specifying the direction we want
to apply.
Another CCP method:
Configure | Interface Management | Interface and Connections | edit properties of an
interface, then select the ACL from a drop-down menu
Using CLI:
conf t

int g3/0
ip access-group 5 out
Create a Network Object Group
Using CCP:
Configure | Router | ACL | Object Groups | Network Object Groups
Using CLI:
conf t
object-group network A_Couple_Servers
description Server2 and Server3's host addresses
host 33.33.33.33
host 22.22.22.22
Using Object Groups as Part of the ACL
CLI:
conf t
ip access-list extended IINS_Extended_ACL_Example
remark This ACL uses object groups
permit tcp 44.44.1.0 0.0.0.255 object-group A_Couple_Servers eq www
deny ip 44.44.0.0 0.0.255.255 object-group A_Couple_Servers
permit ip any any
exit
int g1/0
ip access-group IINS_Extended_ACL_Example in
Verifying the Details of the ACLs
In CCP, visit the ACL Editor to view the created ACLs.
Monitoring the Access Lists
To display details about the access lists:
show access-lists
To view IP related info on an interface, including whether filtering is applied:
sh ip int g3/0
To Log or Not to Log
Adding the log keyword generates a syslog message when the line is matched.

Implementing IPv6 ACLs as Packet Filters
About: Implementing IPv6 access lists.
Main Ideas:
Creating an IPv6 Access List and Applying it as a Filter
IPv6 packet-filtering:
Can filter based on source and destination addresses.
Can filter based on source and destination ports.
Can filter based on the presence of a next header.
Implicit deny at the end of the ACL w/ exception to the NS and NA packets.
Empty ACL doesn't deny traffic.
Reflexive and time-based ACLs are supported.
Can filter on IPv6 extension headers.
Creating the IPv6 ACL:
conf t
ipv6 access-list BOGUS_SOURCE_FILTER
deny 2001:12::/64 any
permit any any
int g0/3
! different syntax for applying than IPv4
ipv6 traffic-filter BOGUS_SOURCE_FILTER in
Verify:
sh ipv6 int g0/3
sh ipv6 access-list

NNNNoooo tttt eeee bbbbooooooookkkk:::: CCNA Security
CCCCrrrreeee aaaatttt eeee dddd :::: 10/23/2012 5:26 AM UUUUppppddddaaaatttt eeee dddd:::: 10/25/2012 3:36 AM
TTTT aaaaggggssss:::: ccna security
12 Understanding Firewall Fundamentals
Firewall Concepts and Technologies
About: Concept of firewalls, their strengths and weaknesses, and why they are used.
Main Ideas:
Firewall Technologies
Function is to primarily deny unwanted traffic. Could be implemented by the following:
A router or other layer 3 forwarding device that has access lists or other method to filter
traffic.
Switch that has two VLANs w/o any routing between them to keep traffic from the two
networks separated.
Hosts/servers running software that prevents certain types of received traffic from being
processed.
Objectives of a Good Firewall
It must be resistant to attacks
Should not be brought down due to vulnerabilities in the firewall or DoS.
Traffic between networks must be forced through the firewall
Shouldn't be any alternative path going around the firewall.
The firewall enforces the access control policy of the organization
Policy should be created first to identify what traffic is required and allowed through
the firewall. Then deploy the firewall, not the other way around.
Firewall Justifications
Protective Measures Provided by a Firewall
Exposure of sensitive systems to untrusted individuals
Permitting certain individuals/traffic to services.
Exploitation of protocol flaws
Inspection of protocols.
Unauthorized users
Using authentication methods.
Malicious data
Detect and block.
Potential Firewall Limitations

Having a firewall is a mitigation step to reduce risks but doesn't completely eliminate the risk.
Configuration mistakes have serious consequences
Not all network applications were written to survive going through the firewall
Individuals who are forced to go through a firewall might try to engineer a way around it
Latency being added by the firewall
Defense-in-Depth Approach
Don't rely on a single firewall to provide security. Take a layered approach to security. Utilize
security at all levels of the network including routers, switches, and servers.
Five Basic Firewall Methodologies
Static packet filtering
Proxy server
Stateful packet filtering
Application inspection
Transparent firewall
Static Packet Filtering
Based on layer 3 and layer 4 of the OSI model.
Advantages and Disadvantages of Packet Filters
Advantages Disadvantages
Based on simple set of permit or deny entries Susceptible to IP spoofing.
Have a minimal impact on network performance Doesn't filter fragmented packets w/ the same
accuracy as nonfragmented packets
Are simple to implement Extremely long access control lists are difficult to
maintain
Configurable on most routers Stateless
Can perform many basic filtering needs w/o
requiring expense of high-end firewall
Some applications jump around and use many
ports, some of which are dynamic
Application Layer Gateway
Sometimes called proxy firewalls or application gateways. Operates at Layer 3 and higher in the
OSI model. Acts as an intermediary between the original client and the server. It takes the client's
requests, puts the client on hold for a moment, then makes the request on its own behalf for the
client.
Advantages and Disadvantages of Application Layer Gateways

Advantages Disadvantages
Very tight control is possible Is processor intensive
More difficult to implement an attack against an
end device
Not all applications are supported
Can provide very detailed logging Special client software may be needed
May be implemented on common hardware Memory and disk intensive. Could be single
point of failure
Stateful Packet Filtering
Most important firewall technologies being used. It remembers the state of the sessions going
through the firewall.
Advantages and Disadvantages of Stateful Packet Filtering Devices
Advantages Disadvantages
Can be used as a primary means of
defense
Might not be able to identify or prevent an application
layer attack
Can be implemented on routers and
dedicated firewalls
Not all protocols contain tightly controlled state
information
Dynamic in nature compared to static
packet filtering
Some applications may dynamically open up new
ports from the server
Provides a defense against spoofing and
DoS attacks
Doesn't support user authentication
Application Inspection
Can analyze and verify protocols up to Layer 7 of the OSI model. But doesn't act as a proxy
between the client and server.
Advantages of an Application Inspection Firewall
Feature Explanation
Can see deeper into
conversations
Could analyze the conversation and dynamically allow
connection from server to allow it through firewall and to the
client
Awareness of the details at the
application layer
If there is a protocol anomaly, application layer firewall could
identify and either correct or deny packet
Can prevent more kinds of attacks
than stateful filtering on its own
Transparent Firewalls

More about how we inject the firewall into the network. Implemented at Layer 2. Traditional
firewalls are implemented as a Layer 3 hop in the network. Interfaces of the transparent firewall
do not have IP addresses and act more like a bridge.
Using Network Address Translation
About: Look at options that exist for NAT
Main Ideas:
NAT Is About Hiding or Changing the Truth About Source Addresses
Primary device that does NAT is a router or a firewall. It translates private IP addresses to globally
reachable IP addresses.
Inside, Outside, Local, Global
Translation of a packet coming from an inside host is referred to as inside NAT.
Translation of the source IP address of a device on the outside as the packets come into the local
network is referred to as outside NAT.
It is either inside our network and control or it is not. In reference to inside and outside.
Local and global have to do with the appearance of the address and may be pre- or post-NAT
manipulation.
NAT Terminology
NAT
Term
Description
Inside
local
Real IP of an inside host
Inside
global
Mapped/global address that router is
swapping out for the inside host during
NAT. Outside world sees device coming
from this mapped/global address.
Outside
local
If performing NAT on outside devices,
this is the mapped address of the
outside device. If not doing outside NAT
on the router, this appears as the
normal outside device's IP address to
the inside devices.
Outside
global
The real IP configured on an outside
host, such as the IP on Server A

Port Address Translation
PAT still swaps out the source IP address as traffic goes through the NAT/PAT device except with
PAT not everyone gets their own translated IP address. PAT will keep track of each session based
on the port numbers and forwards all packets using a single shared source IP address. This is NAT
with overload.
NAT Options
Static NAT
One-to-one permanent mapping.
Dynamic NAT
Pool of global addresses, and only mapping those global addresses to inside devices
when those inside devices need to go out to the Internet.
Dynamic PAT (NAT w/ overload)
Used for most users who access the Internet. Dynamically assigning global addresses
only when needed, uses overload so thousands of inside devices use the same global
IP address by tracking all ports and IP addresses in use.
Policy NAT/PAT
Based on a set of rules.
Creating and Deploying Firewalls
About: Best practices for implementing a firewall.
Main Ideas:
Firewall Design Considerations
Firewalls should be placed at security boundaries.
Firewalls should be a primary security device, but not the only security device or security
measure on the network.
Start with "deny all" attitude and specifically permit traffic.
Leverage the firewall feature that best suits the need.
Make sure physical security controls and management access to the firewall devices are
secure.
Have regularly review process looking at the firewall logs.
Practice change management for any configuration modification on the firewalls.
Firewall Access Rules
Rules based on service control
Are based on the types of services that may be accessed through the firewall.
Rules based on address control
Based on the source/destination addresses involved.
Rules based on direction control
Specifies where the initial traffic can flow.
Rules based on user control

Based on knowing who the user is and what that user is authorized to do.
Rules based on behavior control
How a particular service is used.
Packet-Filtering Access Rule Structure
An ACL is applied to an interface either inbound or outbound. In an inbound ACL, packets coming
through the interface must be permitted by the ACE. ACE are processed from the top-down. Once
a firewall identifies a match, it implements the action of permit or deny and moves on to the next
packet. It at least starts from the top until a match occurs and if there is no match, the packet-
filtering function denies the packet.
Firewall Rule Design Guidelines
Use a restrictive approach
Presume that internal users' machines may be part of the security problem
Be as specific as possible in permit statements
Recognize the necessity of a balance between functionality and security
Filter bogus traffic, and perform logging on that traffic
Periodically review the policies that are implemented on the firewall to verify that they are
current and correct
Rule Implementation Consistency
Results of inconsistent or ill-considered rule implementation
Rules that are too promiscuous
Allows more access than necessary.
Redundant rules
ACLs are processed from top to bottom.
Shadowed rules
Incorrect order placement in the access list.
Orphaned rules
Configuration error that is referencing incorrect IPs.
Incorrectly planned rules
Error made as the business requirements are being translated to the technical and
logical controls that the firewall will implement.
Incorrectly implemented rules
Administrator implementing the incorrect port, protocol, or IP information on the
firewall.

NNNNoooo tttt eeee bbbbooooooookkkk:::: CCNA Security
CCCCrrrreeee aaaatttt eeee dddd :::: 10/25/2012 3:40 AM UUUUppppddddaaaatttt eeee dddd:::: 11/3/2012 11:53 PM
TTTT aaaaggggssss:::: ccna security
13 Implementing Cisco IOS Zone-Based Firewalls
Cisco IOS Zone-Based Firewall
About: Logic and structural components of the IOS-based Zone-Based Firewall (ZBF).
Main Ideas:
How Zone-Based Firewall Operates
Interfaces are placed into zones.
Administrator creates zones such as Inside, Outside, and DMZ.
Policies are specified as to what user traffic is allowed to be initiated and what action the firewall
will take.
Stateful packet inspection allows traffic back inbound.
Policies are implemented in a single direction making them unidirectional. Two policies need to be
created to allow inspection from inside to outside and from outside to inside.
Specific Features of Zone-Based Firewalls
Major features:
Stateful inspection
Application inspection
Packet filtering
URL filtering
Transparent firewall (implementation method)
Support for virtual routing and forwarding (VRF) - virtual routing tables used to
compartmentalize the routing tables on the router instead of keeping them in the global
(primary) routing table.
Access control lists (ACL) are not required as a filtering method to implement a policy
Zones and Why We Need Pairs of Them
Zone is created and then interfaces are assigned to zones.
An interface can only belong to one zone.
Default zone = self zone (logical) - packets directed to the router directly is entering the self zone.
Any traffic initiated by the router is leaving the self zone.
No traffic is allowed between interfaces in different zones.
Interfaces in the same zone can pass traffic to each other.
To allow traffic between zones, a policy must be created - zone pair comes into play.
Zone pair - configuration that identifies traffic sourced from one zone and destined for another
zone. Rules are associated with the zone pair.

Putting the Pieces Together
Cisco Common Classification Policy Language (C3PL) for implementation of the policy. Three
components:
Class maps - Used to identify traffic based on Layer 3 - 7. Class maps can refer to ACLs or
even other class maps. Within class maps are match statements. Class maps can specify if
all match statements have to match (match-all condition) or can specify any of the entries
as a match (match-any condition)
Policy maps - Specifies actions taken on the traffic. Policy maps call on class maps for
classification of traffic. When multiple sections exist, policy maps processes them in order.
Primary actions include: inspect (stateful inspection), permit (traffic is permitted but not
inspected), drop, or log.
Service policies - Where policies are applied, identified from a policy map, to a zone pair.
Policy Map Actions
Policy
Action
Description When to Use it
Inspect Permit and
statefully
inspect the
traffic
Should be used on transit traffic initiated by users
who expect to get replies from devices on the other
side of the firewall.
Pass Permits/allows
traffic but
doesn't create
an entry in the
stateful
database
Traffic that doesn't need a reply. Also in the case of
protocols that do not support inspections, this policy
could be applied to the zone pair for specific
outbound traffic, and be applied to the second zone
pair for inbound traffic.
Drop Deny the packet Traffic you don't want to allow between the zones
where this policy map is applied.
Log Log the packets If you want to see log info about packets that were
dropped because of policy, add this option.
Service Policies
Service policies are applied to a zone pair. Only one service policy can be assigned to a zone pair.
Ingress = packets going into an interface of the router.
Egress = packets being sent out of an interface of the router.
Traffic Interaction Between Zones
Ingress
Interface
Member
of Zone
Egress
Interface
Member
of Zone
Zone Pair
Exists,
w/
Applied
Policy
Result
No No Doesn't Traffic is forwarded

matter
No Yes (any
zone)
Doesn't
matter
Traffic is dropped.
Yes (Zone
A)
Yes (Zone
A)
Doesn't
matter
Traffic is forwarded.
Yes (Zone
A)
Yes (Zone
B)
No Traffic is dropped.
Yes (Zone
A)
Yes (Zone
B)
Yes Policy is applied. If policy
inspects or pass, the initial traffic
is forwarded. If policy is drop,
initial traffic is dropped.
Components That Make Up the ZBF! class map "classifies" the traffic. Example class map will match on either telnet traffic or any type
of icmp traffic
conf t
class-map type inspect match-any MY-CLASS-MAP
match protocol telnet
match protocol icmp
exit
! policy map calls the class map that it wants to use, then specifies policy action. This action is to
inspect the traffic
policy-map type inspect MY-POLICY-MAP
class type inspect MY-CLASS-MAP
inspect
exit
exit
! create security zones
zone security inside
exit
zone security outside
exit
! create the zone-pair and specify direction
zone-pair security in-to-out source inside destination outside
! implement service policy in zone-pair config mode to apply the policy map you want to use
service-policy type inspect MY-POLICY-MAP
exit
! configure interfaces for zones
int g3/0
description Belongs to outside zone
zone-member security outside
exit

int g1/0
description Belongs to inside zone
zone-member security inside
exit
The Self Zone
Traffic directed or initiated to or by the router is from the self zone.
Self Zone Traffic Behavior
Source Traffic
Member of
Zone
Destination
Traffic Member of
Zone
Zone Pair Exists,
w/ Policy Applied
Result
Self Zone A No Traffic
is
passed
Zone A Self No Traffic
is
passed
Self Zone A Yes Policy is
applied
Zone A Self Yes Policy is
applied
Configuring and Verifying Cisco IOS Zone-Based Firewall
About: Configuring IOS ZBF from CCP and CLI
Main Ideas:
Using CCP to Configure the Firewall
1. Navigate to Configure | Security | Firewall | Firewall
Basic firewall involves two interfaces, which are different zones.
Advaned firewall enables you to apply predefined rules and allow configuration of a third zone such
as a DMZ.
2. Click Launch of the Selected Task for Basic Firewall
3. Click Next
4. Specify the interface that is inside and the interface that is outside. Warning comes up because
interfaces are not part of a zone. Click Yes to continue and configure.

A level of security needs to be selected.
Three security levels when configuring the ZBF Wizard
High Security - Firewall identifies and drops IM and peer-to-peer traffic. Performs
application inspection for web and email traffic and drops noncompliant traffic. Does generic
inspection of TCP and UDP applications.
Medium Security - Similar to High Security but does not check web and email traffic for
protocol compliance.
Low Security - Doesn't perform any application layer inspection. Does generic TCP and UDP
inspection.
5. Configure DNS if needed.
6. Finish configuration wizard.
Verifying the Firewall
Can verify the firewall from CCP and CLI.
To verify policy within CCP:
Configure | Security | Firewall | Firewall | Edit
To view the Firewall status:
Monitor | Security | Firewall Status
Verifying the Configuration from the Command Line
Commands used to verify the ZBF
show class-map type inspect
show policy-map type inspect zone-pair ccp-zp-in-out sessions
Implementing NAT in Addition to ZBF
To configure NAT:
Configure | Router | NAT | Launch Basic NAT or Advanced NAT
! Basic NAT translates user traffic. Advanced NAT should be used if configuring DMZ.
Select Basic NAT | Launch the Selected Task
Click Next
Select the interface connected to the Internet. Then select the networks that are internal which will
be permitted to be translated.
Click Next then Finish
Implement NAT from CLI:
! Use ACL to classify traffic to be translated
access-list 2 permit 10.0.0.0 0.0.0.255
! Label inside and outside interfaces
int g3/0

ip nat outside
exit
int g1/0
ip nat inside
exit
! Create NAT statement matching access list 2
ip nat inside source list 2 interface g3/0 overload
Verifying Whether NAT Is Working
To verify in CCP:
Configure | Router | NAT | Edit NAT Configuration
View existing translations in CLI:
show ip nat translations

NNNNoooo tttt eeee bbbbooooooookkkk:::: CCNA Security
CCCCrrrreeee aaaatttt eeee dddd :::: 10/30/2012 5:17 AM UUUUppppddddaaaatttt eeee dddd:::: 11/1/2012 5:41 AM
TTTT aaaaggggssss:::: ccna security
14 Configuring Basic Firewall Policies on Cisco ASA
The ASA Appliance Family and Features
About: Various models and offerings of the ASA.
Main Ideas:
Meet the ASA Family
ASA comes in different sizes, smaller the number of the model represents a smaller capacity for
throughput.
ASA Features and Services
ASA provides the following features:
Packet filtering - supports both standard and extended access lists. Never uses a wildcard
mask. To represent a mask related to a permit or deny statement, it uses the real mask in
the ACL.
Stateful filtering - used by default.
Application inspection/awareness - can pay attention to application layer information.
Network Address Translation (NAT) - supports NAT and PAT. Policy that indicates traffic
should not be translated is referred to as NAT zero.
DHCP - can be server or client.
Routing - supports most interior gateway routing protocols and static routing.
Layer 3 or Layer 2 implementation - can be implemented as a Layer 3 firewall or
transparent firewall (Layer 2).
VPN support - can be head-end or remote-end device for VPN tunnels. Can support remote-
access VPN users, site-to-site, clientless SSL VPN, and the full AnyConnect SSL VPN.
Object groups - configuration item on the ASA that refers to one or more items.
Botnet traffic filtering - works w/ an external Cisco system that updates info about the
Botnet Traffic Filtering Database.
High availability - using two firewalls in a high-availability failover combination to protect
against a single system failure.
AAA support - use of AAA locally or from an external server.
ASA Firewall Fundamentals
About: Logic used by the ASA, ways to manage the firewall, and components used to implement
policy.
Main Ideas:

ASA Security Levels
Uses security levels associated with each routable interface.
Security level is between 0 and 100. Bigger number = more trust.
Must assign a name to the interface
Inside - connects to your trusted inside network
Outside - interface that connects to the internet.
Three things to make an ASA operational:
Assign a security level to the interface.
Assign a name to the interface.
Bring up the interface with the no shutdown command.
Default Flow of Traffic
By default, ASA forwards traffic coming from a high-security interface (inside security level 100) to
a destination being routed out of an interface that has a lower security level.
By default, traffic is not allowed between two interfaces with the same security level. Also, ASA
doesn't like to receive a packet on an interface and route the same packet out of the exact same
interface.
Tools to Manage the ASA
Several tools:
CLI
ASA Security Device Manager (ASDM)
Cisco Security Manager (CSM)
Packet Filtering on the ASA
By default, we have to create ACLs to permit traffic from lower to higher security levels. Access
lists need to be implemented on the interfaces and can be applied inbound or outbound.
From firewall perspective:
Inbound (interface perspective) - Traffic going into an interface, referred to ingress traffic.
Inbound (security level perspective) - Traffic going from a lower-security interface to a
higher-security interface.
Outbound (to an interface) - Traffic exiting an interface, referred to as egress traffic.
Outbound (security level perspective) - Traffic going from a high-security interface to a
lower-security interface.

Implementing a Packet-Filtering ACL
Initial traffic flow is controlled by entries in an access list, processed from top to bottom; and the
stateful inspection allows return traffic to come back through the firewall regardless of any access
lists in place related to the return traffic.
Modular Policy Framework
Can use class maps to identify traffic, policy maps to identify actions on that traffic, and service
policy commands to implement the policy.
Can allow ASA to use MPF to perform application layer inspection, listen in and dynamically allow
the data connection to commence from the server. Another option is to forward the traffic destined
to your servers to the IPS module.
Class maps identify traffic on Layer 3 and Layer 4. They identify traffic:
Referring to an ACL
Looking at differentiated services codepoint (DSCP) and/or IP Precedence fields of the
packet
TCP or UDP ports
IP Precedence
Real-time Transport Protocol (RTP) port numbers
VPN tunnel groups
The policy maps use the services of the class maps to identify traffic and perform actions on each
class of traffic:
Reroute the traffic
Perform inspection
Give priority treatment
Rate-limit or police that traffic
Perform advanced handling of the traffic
Where to Apply Policy
Can apply policy to an interface but only one policy can be applied.
Can apply policy globally to apply to all interfaces.
Configuring the ASA
About: Using the ASDM GUI to implement and verify a security policy on the ASA.
Main Ideas:
Beginning the Configuration

Connect the console cable to the firewall and boot it up. Use setup to configure ASDM access.
Getting to the ASDM GUI
Once ASDM is set up, browsing to the IP address will display a certificate error. Accept certificate
since PKI is not set up.
Configuring the Interfaces
To configure interfaces:
Click on Configuration then navigate to Configuration | Device Setup | Interfaces
To create new switched virtual interfaces, click Add and enter information. VLAN information can
be configured in the Advanced tab.
Implementing Additional Firewall Interfaces
configure terminal
! Configure svi VLAN 1
interface vlan1
no shutdown
description Connect to the dmz
nameif dmz
! Assign a security level
security-level 50
ip address 192.168.1.254 255.255.255.0
exit
! Repeat process for other interfaces
interface vlan2
no shut
description Connects to my private network
nameif inside
security-level 100
ip address 10.0.0.1 255.255.255.0
exit
int vlan4
no shut
description Connects to the Internet
nameif outside
security-level 0
ip address 21.1.2.3 255.255.255.240
exit
! Assign ports to the VLANs

int e0/1
switchport acc vlan 4
exit
int e0/2
switchport acc vlan 2
exit
int e0/3
switchport acc vlan 2
exit
int e0/4
switchport acc vlan 2
exit
int e0/5
switchport acc vlan 2
exit
! Verify
show run interface
IP Addresses for Clients
Assign DHCP addresses to clients:
Configuration | Device Management | DHCP | DHCP Server
Edit the properties of the inside interface. Enable DHCP server. Then apply pool of the addresses to
be handed out.
Within CLI:
configure terminal
dhcpd address 10.0.0.101-10.0.0.132 inside
dhcpd enable inside
dhcpd dns 8.8.8.8 interface inside
dhcpd domain iins.com interface inside
Basic Routing to the Internet
ASA needs to know where to forward traffic. It can learn routes via IGRP, directly connected
networks or default routes.
To look up or modify the routing table:
Configuration | Device Setup | Routing
Configuring static route using CLI:
configure terminal
route outside 0.0.0.0 0.0.0.0 23.1.2.7

NAT and PAT
To implement NAT/PAT:
Configuration | Firewall | NAT Rules and click Add
Configuring in CLI:
configure terminal
object network Inside_Hosts
subnet 10.0.0.0 255.255.255.0
description Inside_Hosts
exit
! Create NAT rule
nat (inside,outside) 1 source dynamic Inside_Hosts interface outside
Permitting Additional Access Through the Firewall
Configuring access rules:
Configuration | Firewall | Access Rules
Creating and applying an ACL at the CLI:
configure terminal
access-list inside_access_in deny tcp any any eq telnet
access-list inside_access_in permit ip any any
access-group inside_access_in in interface inside
Using Packet Tracer to Verify Which Packets are Allowed
Packet tracer is a built-in tool used to identify whether traffic is forwarded or dropped by the ASA.
Using Packet Tracer at the CLI:
packet-tracer input inside tcp 10.0.0.101 1065 22.33.44.55 80

NNNNoooo tttt eeee bbbbooooooookkkk:::: CCNA Security
CCCCrrrreeee aaaatttt eeee dddd :::: 11/3/2012 2:34 PM UUUUppppddddaaaatttt eeee dddd:::: 11/4/2012 12:14 PM
TTTT aaaaggggssss:::: ccna security
15 Cisco IPS/IDS Fundamentals
IPS Versus IDS
About: Platforms used for intrusion detection/prevention and explains the differences between IPS
and IDS.
Main Ideas:
What Sensors Do
A sensor is a device that looks at traffic on the network and makes a decision based on a set of
rules.
Difference between IPS and IDS
An IPS is meant to be placed inline where all traffic is routed through the device. If traffic is
characterized as malicious, the IPS prevents that traffic from reaching its destination.
An IDS is a device that analyzes traffic, just the same as an IPS, except it is not placed inline.
Traffic arrive at the IDS on a promiscuous port which can see all traffic. The IDS detects the attack
but doesn't prevent it.
IDS IPS
Position in the network
flow
Off to the side IDS is
sent copies of the
original packets.
Directly inline.
Also known as Promiscuous mode, out
of band.
Inline mode.
Latency or delay None added. Small amount added.
Ability to prevent malicious
traffic from going into the
network
By itself, cannot stop the
original packet.
IPS can drop the packet
on its own because it is
inline.
Normalization ability Cannot manipulate any
original inline traffic.
Can normalize
(manipulate or modify)
traffic inline.
Sensor Platforms
Options included for implementing an IPS/IDS sensor:
Dedicated IPS appliance.
Software running on IOS.
Module in an IOS router, such as the AIM-IPS or NME-IPS modules.
Module on an ASA.
Blade that works in a 6500 switch.
True/False Negatives/Positives
It is desired to receive accurate information from an IPS/IDS. If information from the IPS/IDS is
false, that is not the desired outcome.
Positive/Negative Terminology
Terms for IPS/IDS:
False positive
False negative
True positive
True negative
False positive is an alert generated by the IPS/IDS for traffic that is not malicious.
False negative is when malicious traffic is on the network but the IPS/IDS failed to trigger an alert.
True positive is when malicious traffic was picked up by the IPS/IDS.
True negative is when non-malicious traffic is not picked up by the IPS/IDS.
Identifying Malicious Traffic on the Network
About: Techniques used by IPS and IDS sensors.
Main Ideas:
Methods
There are different methods sensors can be configured to identify malicious traffic:
Signature-based
Policy-based
Anomaly-based
Reputation-based
Signature-Based IPS/IDS

A set of rules looking for a specific patterns or characteristics within packets.
Policy-Based IPS/IDS
Can be configured according to a network policy such as no telnet traffic should be used.
Anomaly-Based IPS/IDS
Used to catch instances that are not normal or do not align with a baseline.
Reputation-Based IPS/IDS
Information collected all over the world that a local sensor can use.
IPS/IDS Method Advantages & Distadvantages
Advantages Disadvantages
Signature
based
Easy to configure, simple to
implement
Doesn't detect attacks outside of
the rules.
Policy
based
Simple and reliable, very
customizable, allows only
policy-based traffic.
Policy must be manually created.
Anomaly
based
Self-configuring baselines Difficult to accurately profile
extremely large networks
Reputation
based
Leverages enterprise & global
correlation.
Requires timely updates, and
requires participation in the
correlation process.
When Sensors Detect Malicious Traffic
Based on how sensors are configured, the sensor can implement an action.
Controlling Which Actions the Sensors Should Take
A risk rating is used to allow an IPS/IDS sensor to take appropriate countermeasure actions
without user intervention.
There are three primary influencers of the final risk rating value:
1. Signature Fidelity Rating (SFR) - is an accuracy rating.
2. Attack Severity Rating (ASR)
3. Target Value Rating (TVR)

Risk Rating (RR) Calculation Factors
Factor
influencing
risk rating
Description
Target
value rating
(TVR)
Value that the administrator has
assigned
Signature
fidelity
rating
(SFR)
Accuracy of the signature by the
person who created that signature
Attack
severity
rating
(ASR)
How critical the attack is as
determined by the person who
created the signature
Attack
relevancy
(AR)
A minor contributor to the risk
rating.
Global
correlation
Sensor participating in global
correlation and receives
information about specific source
addresses
Circumventing an IPS/IDS
IPS/IDS evasion techniques
Evasion
Method
Description Cisco Anti-
Evasion
Techniques
Traffic
fragmentation
Attacker splits malicious traffic
into multiple parts to avoid
detection
Complete session
reassembly
Traffic
substitution &
insertion
Attacker substitutes characters
in the data using different
formats to have the same final
meaning
Data
normalization &
de-obfuscation
techniques
Protocol level
misinterpretation
Attacker attempts to cause a
sensor to misinterpret the end-
to-end meaning of a network
protocol
IP TTL analysis,
TCP checksum
validation
Timing attacks Sending packets at a low rate
to not trigger a signature
Configurable
intervals and use
of third-party

correlationEncryption and
tunneling
Attacking through encryption Encrypted traffic
cannot be
inspected.
Resource
exhaustion
Disguising attack within
thousands of alerts
Dynamic and
configurable
event
summarization
Managing Signatures
About: How signatures are manipulated and managed.
Main Ideas:
Micro-Engines (Groupings of Signatures)
Signature
Micro-
Engine
Signatures in this grouping
Atomic Signatures that can match on a
single packet, as compared to a
string of packets
Service Signatures that examine application
layer services
String or
multistring
Supports flexible pattern matching,
and can be identified in a single
packet or group of packets, such as
a session
Other Miscellaneous signatures that may
not specifically fit into other
categories
Monitoring and Managing Alarms and Alerts
About: Options for working with sensor-generated alarms and alerts
Main Ideas:
Alarms and Alerts
Three main protocols are used to deliver alerts:
Security Device Event Exchange (SDEE)
Syslog
SNMP

Security Intelligence
Having multiple sensors into various parts of the network will provide a clear understanding to an
attack through correlation.
Cisco offers Security Intelligence Operations (SIO) service, which facilitates global threat
information, reputation-based services, and sophisticated analysis.
IPS/IDS Best Practices
Implement an IPS to analyze traffic going to critical servers and mission-critical devices.
If you cannot afford a dedicated appliance, use modules or IOS IPS/IDS.
Take advantage of global correlation to improve resistance against attacks. Use correlation
internally across all sensors.
Use a risk-based approach, where countermeasures occur based on the calculated risk
rating as opposed to manually assigning countermeasures to individual signatures.
Use automated signature updates when possible to keep signatures current.
Continue to tune IPS/IDS infrastructure as traffic flows and network devices and topologies
change.

NNNNoooo tttt eeee bbbbooooooookkkk:::: CCNA Security
CCCCrrrreeee aaaatttt eeee dddd :::: 11/4/2012 8:58 AM UUUUppppddddaaaatttt eeee dddd:::: 11/14/2012 10:17 PM
TTTT aaaaggggssss:::: ccna security
16 Implementing IOS-Based IPS
Understanding and Installing an IOS-Based IPS
About: Features of Cisco IPS included in IOS implementation of IPS.
Main Ideas:
What can IOS IPS Do?
IPS supports the following detection technologies:
Profile based
Signature based
Protocol analysis based
Benefits of IOS IPS:
Dynamic update of signatures
Integrates easily with network
Compatible to work alongside ZBF, VPN, ACL, AAA, and others
Can be managed by CCP, IME, CSM, and CLI
Supports attack signatures from the same signature database that is used by the IPS
appliance
IOS IPS Features
IOS IPS
Signature
Features
Description
Regular
expression
string pattern
matching
Enables creation of string
patterns using variables
Response
actions
Enables sensor to take
action in response to a
triggered event
Alarm
summarization
Helps prevent resource
exhaustion by summarizing
events that are all the
same
Threshold
configuration
Identifies thresholds, which
if exceeded may trigger
events

Anti-evasive
techniques
Designed to interpret actual
data regardless if it is
fragmented or using a
combination of character
sets
Risk ratings Calculated between 0-100
associated with an alert.
Higher the number, the
more risk is presumed
Installing the IOS IPS Feature
First make sure version of IOS supports IPS. Then obtain signature files from Cisco for the router.
Getting To The IPS Wizard
Configure | Security | Intrusion Prevention
Depending on platform it may be:
Configure | Security | Advanced Security | Intrusion Prevention
Then launch the wizard: Launch IPS Rule Wizard
Welcome to IPS Policies Wizard window displays. Click Next to continue where you specify the
interface you want to apply the IPS policy to.
After selecting the interface, click Next to view a dialog box asking for the signature file. Upload
the signature file then click OK.
Then the public key needs to be configured. This is to verify the authenticity of Cisco's signature
files to prevent an attacker from pretending to be Cisco and installing false rules. Then click Next
to specify the location of the configuration files the router will use to maintain any configurations
related to signatures.
Signature files are not maintained in the running config. They can be stored locally in the file
system. Then click OK.
Then the category must be specified, either Advanced or Basic. Then click Next and Finish.
Working with Signatures in an IOS-Based IPS
About: Enabling and tuning a signature and cause it to trigger using CCP.
Main Ideas:
Viewing/Modifying Signatures

To view/modify signatures in CCP:
Configure | Security | Intrusion Prevention and click the Edit IPS tab.
Then click Signatures option to view all the signatures.
Matrix for Retired/Unretired/Enabled/Disabled
Compiling/Allowing
Action
Enabled Disabled
Retired No memory
consumption
No memory
consumption
Unretired Consumes
memory, is
considered
during
packet
analysis
Consumes
memory, no
action
related to
signature
during
packet
analysis
A signature is enabled once you click on Enable, and also Unretire, then click on Apply Changes. A
green checkmark appears on the signature rule.
Actions That May Be Taken
Deny attacker inline
Deny connection inline
Deny packet inline
Produce alert
Reset TCP connection
To modify the actions, right click on the signature and select Actions. Place a check mark in the
boxes next to the actions you want to take against the attacker.
Click OK and then Apply Changes to implement any changes made.
CLI commands for Configuring IPS
! Enable SDEE
config t
ip ips notify SDEE
! Create an IPS rule
ip ips name sdm_ips_rule
! Disables the advanced, and basic categories included in "all"
ip ips signature-category
category all

retired true
exit
! Enables the basic signature category
category ios_ips basic
retired false
exit
exit
! apply the IPS rule inbound on the interface
int f1/0
ip ips sdm_ips_rule in
exit
! specify location of custom or tuned signatures
ip ips config location ftp://10.0.0.2/ips5
! enable signature 2004 to ensure it is both enabled and not retired
ip ips signature-definition
signature 2004
status
enabled true
retired false
exit
exit
exit
! verify configuration
show ip ips configuration
! verify signature
show ip ips signatures sigid 2004 subid 0
! view the number of active signatures
show ip ips signatures count
Best Practices When Tuning IPS
Begin with basic signature category
Schedule downtime for installation and updates
Retire irrelevant signatures
Monitor available memory
Be careful before unretiring and enabling the All category of signatures
Managing and Monitoring IPS Alarms
About: Options for viewing alerts and alarms and demonstrating how to do it via CCP and CLI.

Main Ideas:
Viewing Alerts in CCP
Monitor | Security | IPS Status
Another way:
Monitor | Router | Logging | SDEE Message Log tab
Another method:
Monitor | Security | IPS Status | Click the IPS Alert Statistics tab
Viewing Alerts from CLI
From device:
show ip sdee alerts
show ip ips statistics

NNNNoooo tttt eeee bbbbooooooookkkk:::: CCNA Security
CCCCrrrreeee aaaatttt eeee dddd :::: 11/4/2012 12:13 PM UUUUppppddddaaaatttt eeee dddd:::: 11/15/2012 9:57 PM
TTTT aaaaggggssss:::: ccna security
17 Fundamentals of VPN Technology
Understanding VPNs and Why We Use Them
About: Why VPNs are important and what types of VPNs are available.
Main Ideas:
What is a VPN?
A VPN is a virtual private network connecting two endpoints together to provide a secure and
confidential connection between the two.
Types of VPNs
IPsec
Can be used for site-to-site VPNs or remote-access VPNs.
Implements security of IP packets at Layer 3.
SSL
Implements security of TCP sessions at Layer 4.
Can be used for remote-access.
MPLS
Multiprotocol Label Switching and MPLS Layer 3 VPNs provided by a service provider.
No encryption by default.
IPsec can be used on top of MPLS to add confidentiality.
Two Main Types of VPNs
Remote-access VPNs
A VPN connection from a computer to HQ.
Site-to-Site VPNs
Connecting two or more sites in a secure fashion.
Main Benefits of VPNs
Confidentiality
Data integrity
Authentication
Antireplay
Confidentiality
Only the intended parties can understand the data this is sent.

Accomplished using encryption.
Data Integrity
Ensuring the data is accurate from end to end.
Authentication
Verifying the other end of the connection using pre-shared keys, public and private key pairs, or
user authentication.
Antireplay
Attacker capturing traffic with the intent of replaying it back to fool one of the VPN peers into
believing that the peer trying to connect is a legitimate peer.
Cryptography Basic Components
About: Basic components of cryptography, algorithms for hashing, encryption, and key
management.
Main Ideas:
Confidentiality is a function of encryption.
Data integrity is a function of hashing.
Authentication is the process of proving the identity of the other side of the tunnel.
Ciphers
A cipher is a set of rules, which is also an algorithm, about how to perform encryption and
decryption.
Common methods that ciphers include:
Substitution - substituting one character for another.
Polyalphabetic - similar to substitution but instead of using a single alphabet, could use
multiple alphabets.
Trasposition - uses many different options, including the rearrangement of letters.
Keys
An example of a key is a one-time pad which can only be used once.
Block Ciphers

A symmetric key (same key to encrypt and decrypt) that operates on a group of bits called a block.
May take a 64bit block of plain text and generate a 64bit block of cipher text.
Examples of symmetrical block cipher algorithms:
Advanced Encryption Standard (AES)
Triple Digital Encryption Standard (3DES)
Blowfish
Digital Encryption Standard (DES)
International Data Encryption Algorithm (IDEA)
Stream Ciphers
A symmetric key cipher where each bit of plaintext data to be encrypted is done 1 bit at a time
against the bits of the key stream, also called a cipher digit stream.
Symmetric Algorithm
Uses the same key to encrypt the data and decrypt the data.
Common examples:
DES
3DES
AES
IDEA
RC2, RC4, RC5, RC6
Blowfish
Much faster to use as it takes less CPU.
Asymmetric Algorithm
Example is public key algorithms. Instead of using the same key for encrypting and decrypting, two
different keys mathematically work together as a pair.
Uses a private key and a public key. Together they are a key pair.
High CPU cost when using key pairs to lock and unlock data.
Hashes
Hashing is a method used to verify data integrity.
A cryptographic hash function takes a block of data and creates a small fixed-sized hash value. This
is a one-way function.

The result is a fixed-length string of data referred to a digest, message digest, or hash.
Most popular types of hashes:
Message digest 5 (MD5): Creates 128-bit digest.
Secure Hash Algorithm 1 (SHA-1): Creates a 160-bit digest.
Secure Hash Algorithm 2 (SHA-2): Options include a digest between 224 bits and 512 bits.
Hashed Message Authentication Code (HMAC)
Uses the mechanism of hashing but also includes a secret key.
Digital Signatures
A way of proving that you are who you say you are. Three core benefits:
Authentication
Data integrity
Nonrepudiation
IPsec
A collection of protocols and algorithms used to protect packets at Layer 3. Core benefits of
confidentiality through encryption, data integrity through hashing and HMAC, authentication using
digital signatures or pre-shared key (PSK).
ESP and AH
Two primary methods for implementing IPsec. Encapsulating Security Payload and
Authentication Header.
Encryption algorithms for confidentiality
DES
3DES
AES
Hashing algorithms for integrity
MD5
SHA
Authentication algorithms
PSK
RSA digital certificates
Key management
Diffie-Hellman (DH)
Internet Key Exchange (IKE)
SSL
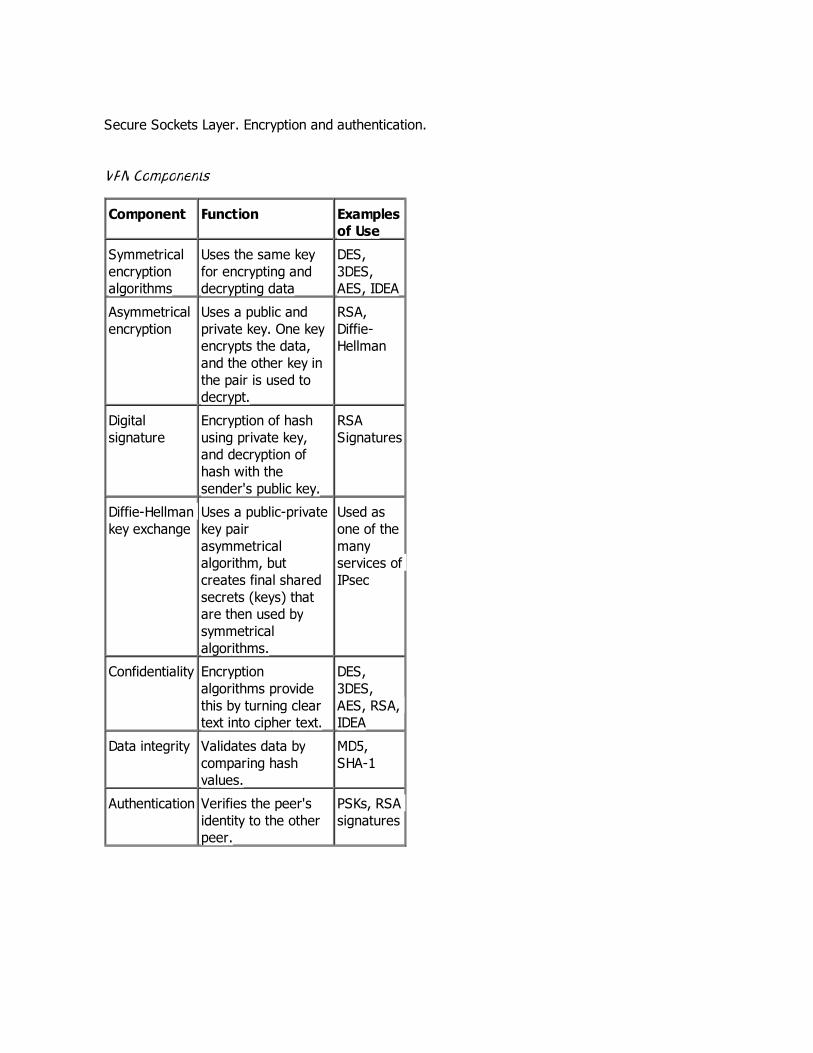
Secure Sockets Layer. Encryption and authentication.
VPN Components
Component Function Examples
of Use
Symmetrical
encryption
algorithms
Uses the same key
for encrypting and
decrypting data
DES,
3DES,
AES, IDEA
Asymmetrical
encryption
Uses a public and
private key. One key
encrypts the data,
and the other key in
the pair is used to
decrypt.
RSA,
Diffie-
Hellman
Digital
signature
Encryption of hash
using private key,
and decryption of
hash with the
sender's public key.
RSA
Signatures
Diffie-Hellman
key exchange
Uses a public-private
key pair
asymmetrical
algorithm, but
creates final shared
secrets (keys) that
are then used by
symmetrical
algorithms.
Used as
one of the
many
services of
IPsec
Confidentiality Encryption
algorithms provide
this by turning clear
text into cipher text.
DES,
3DES,
AES, RSA,
IDEA
Data integrity Validates data by
comparing hash
values.
MD5,
SHA-1
Authentication Verifies the peer's
identity to the other
peer.
PSKs, RSA
signatures

NNNNoooo tttt eeee bbbbooooooookkkk:::: CCNA Security
CCCCrrrreeee aaaatttt eeee dddd :::: 11/4/2012 9:03 PM UUUUppppddddaaaatttt eeee dddd:::: 11/5/2012 6:54 AM
TTTT aaaaggggssss:::: ccna security
18 Fundamentals of the Public Key Infrastructure
Public Key Infrastructure
About: Moving parts and pieces involved with the PKI.
Main Ideas:
Public and Private Key Pairs
A key pair is a set of two keys that work together. There is a public key and a private key. The
private key is not shared. A public key can be used to encrypt data and the private key can decrypt
that data and vice versa.
Asymmetrical algorithms:
RSA
Named after Rivest, Shamir, and Adleman. PKCS #1 with a key length from 512 -
2048.
DH
Allows two devices to negotiate and establish shared secret keys. Can be used with
3DES and AES.
ElGamal
Asymmetrical encryption based on DH exchange.
DSA
Digital Signature Algorithm developed by the US National Security Agency.
ECC
Elliptic Curve Cryptography.
RSA Algorithm, the Keys, and Digital Certificates
Who Has Keys and a Digital Certificate?
With RSA digital signatures, both parties have a public-private key pair. They are also both enrolled
with a CA.
How Two Parties Exchange Public Keys
When two parties want to authenticate, they send a copy of their digital certificates. Both will verify
the authenticity of the certificate.
Certificate Authorities
A CA is a computer or entity that creates and issues digital certificates. Inside a digital certificate is
information about the identity of a device such as its IP address, FQDN, and the public key of the

device. The CA takes all the information and generates a digital certificate, assigns a serial number
and signs the certificate with its own digital signature.
Root and Identity Certificates
Root Certificate
A root certificate contains the public key and details of the CA server.
Relevant parts of the certificate:
Serial number
Issued and tracked by the CA that issued the certificate.
Issuer
The CA that issued the certificate.
Validity dates
Time window during which the certificate may be considered valid.
Subject of the certificate
Includes the Organizational Unit (OU), Organization (O), Country (C), and other
details found in an X.500 structured directory. The subject of the root certificate is
the CA itself.
Public key
Contents of the public key and the length.
Thumbprint algorithm and thumbprint
Hash for the certificate.
Identity Certificate
Similar to a root certificate but describes the client and contains the public key of the client.
X.500 and X.509v3 Certificates
X.500 is a series of standards focused on directory services and how those directories are
organized.
Digital certificates contain the following info:
Serial number
Assigned by the CA
Subject
Person or entity that is being identified
Signature algorithm
Specific algorithm that was used for signing the digital certificate
Signature
Digital signature from the certificate authority
Issuer
Entity or CA that created and issued the digital certificate
Valid from

Date the certificate became valid
Valid to
Expiration date of the certificate
Key usage
Functions for which the public key in the certificate may be used
Public key
Public portion of the public and private key pair
Thumbprint algorithm
Hash algorithm used for data integrity
Thumbprint
The actual hash
Certificate revocation list location
URL used to see whether the serial number of any certificates issued by the CA have
been revoked
Authenticating and Enrolling with the CA
1. Step 1
1. Authenticate the CA server. Download and verify the root certificate.
2. Step 2
1. Request your own identity certificate. Involves generating a public-private key pair
and including the public key portion in any requests for your own identity certificate.
Public Key Cryptography Standards (PKCS)
These standards control the format and use of certificates, including requests to a CA for new
certificates, the format for a file that is going to be the new identity certificate, and the file format
and usage access for certificates.
PKCS #10
Format of a certificate request sent to a CA who wants to receive their identity
certificate.
PKCS #7
Format used by a CA as a response to a PKCS#10 request.
PKCS #1
RSA Cryptography Standard.
PKCS #12
Format for storing both public and private keys using a symmetric password-based
key to "unlock" the data whenever the key needs to be used or accessed.
PKCS #3
Diffie-Hellman key exchange.
Simple Certificate Enrollment Protocol
Simple Certificate Enrollment Protocol (SCEP) can automate most of the process for requesting and
installing an identity certificate. Not an open standard but supported by most Cisco devices.

Revoked Certificates
To check if a certificate has been revoked due to security concern. Device checks a URL that has a
list of revoked certificates.
Three basic ways to check:
Certificate Revocation List (CRL)
List of certificates, based on serial numbers, that had initially been issued by a CA but
have since been revoked and as a result should not be trusted.
Online Certificate Status Protocol (OSCP)
Alternative to CRLs. Client sends a request to find the status of a certificate and gets
a response.
Authentication, authorization, and accounting (AAA)
Cisco AAA services provide support for validating digital certificates.
PKI Topologies
Single Root CA
One trusted CA to service requests.
Hierarchical CA with Subordinate CAs
Supporting fault tolerance and increased capacity by using intermediate or subordinate CAs to
assist the root CA.
Cross-Certifying CAs
A CA with a horizontal trust relationship over to a second CA so that clients of either CA could trust
the signatures of the other CA.
Putting the Pieces of PKI to Work
About: How to implement components
Main Ideas:
Default of the ASA
ASA uses self-signed digital certificate by default. If you don't want to use self-signed, must install
root certificate and request an identity certificate from the root CA.
Viewing the Certificates in ASDM
Under Device Management section, there are options for configuring and viewing both identity

certificates and root certificates which is under the Certificate Management section.
Adding a New Root Certificate
To add a root certificate, click Add, and options to install a root certificate from a file or paste in
the information or use SCEP.
When adding the new root certificate, you can click More Options to answer questions about the
CRL and other details about which protocols to be used for certificate verification for the firewall.
Easier Method for Installing Both Root and Identity certificates
Easier option than manually installing the root certificate is to use SCEP and install root cert,
generate new key pair, and request your identity certificate.. all using SCEP.
Begin in Identity Certificate area in ASDM. Click Add, assign a name, then click Add a New
Identity Certificate radio button. Click New and assign the key pair a name and the size of the
key to use, then click Generate Now.
After you click Generate Now, a public-private key pair is generated and public key portion is sent
to the CA as part of the SCEP cert request process.
Generating a New Key Pair
crypto key generate rsa label My-Key-Pair modulus 2048 noconfirm
Authenticating and Enrolling with a New CA via SCEP
! Create the name that you want the ASA to reference the CA by
config t
crypto ca trustpoint New-CA-to-Use
! Specify which key-pair will be used for the public portion that will go into the digital cert. New key
pair created will be used.
keypair New-Key-Pair
! Specify what cert may be used for (SSL and IPsec)
id-usage ssl-ipsec
! Specify if fqdn will be required
no fqdn
! Specify the x.500 CN
subject-name CN=ciscoasa
! Specify where CA server can be reached

enrollment url http://192.168.1.105
exit
! Retrieve and install the root cert.
crypto ca authenticate New-CA-to-Use noninteractive
! Request and install identity cert from CA
crypto ca enroll New-CA-to-Use noconfirm
Key PKI Components
Component Description
RSA digital
signatures
Using its private
key to encrypt a
generated hash, a
digital signature is
created.
Digital
signature
File that contains
the public key of
the entity, serial
number, and the
signature of the CA
that issued the
cert.
Public and
private keys
Used as a pair to
encrypt and
decrypt data in an
asymmetrical
fashion.
Certificate
authority
CA's job is to fulfill
certificate requests
and generate
digital certificates
for its clients to
use. Maintain valid
certs that have
been issued and a
CRL list.
X.509v3 Common certificate
format used today
Subordinate
CA/RA
Assistant to the CA,
can issue certs to
clients. Used in
hierarchal PKI
topology.
PKCS Public Key

Cryptography
Standards.

NNNNoooo tttt eeee bbbbooooooookkkk:::: CCNA Security
CCCCrrrreeee aaaatttt eeee dddd :::: 11/6/2012 6:10 AM UUUUppppddddaaaatttt eeee dddd:::: 11/6/2012 6:55 AM
TTTT aaaaggggssss:::: ccna security
19 Fundamentals of IP Security
IPsec Concepts, Components, and Operations
About: Moving parts and pieces of IPsec.
Main Ideas:
The Goal of IPsec
Confidentiality
Provided through encryption changing clear text to cipher text.
Data integrity
Provided through hashing or Hashed Message Authentication Code (HMAC).
Authentication
Provided through PSK or digital certificates.
Antireplay support
Packets are sequentially labeled.
The Play by Play for IPsec
Step 1: Negotiate the IKE Phase 1 Tunnel
To initiate the VPN tunnel, one of the devices first negotiates an Internet Key Exchange (IKE) Phase
1 tunnel.
It is done in either two modes:
Main mode
Uses more packets for the process
Considered more secure
Most devices use as default
Aggressive mode
The IKE Phase 1 tunnel is used to protect the management traffic related to the VPN between the
two devices.
The initiator sends all its configured/default parameters that it will use for IKE Phase 1 tunnel.
For the IKE Phase 1 to be successful, five items need to be agreed upon:
Hash algorithm
MD5 or SHA
Encryption algorithm
DES

3DES
AES
Diffie-Hellman group to use
Refers to the modulus size (length of the key) to use for the DH key exchange.
Group 1 = 768 bits
Group 2 = 1024 bits
Group 5 = 1536 bits
Purpose is to generate a shared secret keying material (symmetric keys)
Authentication method
Used to verify the identity of the VPN peer on the other side
PSK or RSA signatures
Lifetime
How long until IKE Phase 1 tunnel is torn down.
Default is 1 day (in seconds).
Only parameter that doesn't have to match.
How to remember the five items to negotiate IKE Phase 1
HAGLE
H - Hash
A - Authentication method
G - DH group
L - lifetime
E - Encryption algorithm
Step 2: Run the DH Key Exchange
After agreeing to the IKE Phase 1 policy of the peer, both devices run the DH key exchange. The DH
group agreed upon is used.
Step 3: Authenticate the Peer
Authentication is used from the agreed upon item. After authentication, the tunnel is now
bidirectional.
What About the User's Original Packet?
IKE Phase 1 tunnel is only used for management. After IKE Phase 1 tunnel is built, another tunnel is
used for encrypting the end-user packets which is an IKE Phase 2 tunnel.
Leveraging What They Have Already Built
With the IKE Phase 1 tunnel built, the two devices negotiate and establish an IPsec or IKE Phase 2
tunnel. A different set of configuration is used to specify the IKE Phase 2 tunnels, separate from IKE
Phase 1.

Mode used to build the IKE Phase 2 tunnel is Quick mode.
Now IPsec Can Protect the User's Packets
With the IKE Phase 2 tunnel built, the devices can encrypt the user's traffic directly between each
other. The payload of the packets is encrypted and contains the original IP addresses and contents
of the user forwarding a packet.
Traffic Before IPsec
Packets sniffed can see the payload within the packet.
Traffic After IPsec
The same packet being sent through the untrusted Internet will be encrypted by IKE Phase 2 and
encapsulated in a new IP header. The Layer 4 protocol would show as being Encapsulating Security
Payload (ESP).
Summary of IPsec
VPN peers negotiate an IKE Phase 1 tunnel using Aggressive or Main mode, then use Quick mode
to establish an IKE Phase 2 tunnel. The IKE Phase 2 tunnel is used to encrypt and decrypt user
traffic. IKE Phase 2 really creates two one-way tunnels: one from Device A to Device B, and one
from Device B to Device A.
These tunnels are referred to as security agreements between two VPN peers or security
associations (SA). Each SA is assigned a unique number for tracking.
Configuring and Verifying IPsec
About: Applying theory.
Main Ideas:
Start with a Plan
First thing to do is decide what protocols to use for IKE Phase 1 and IKE Phase 2 and to identify
which traffic should be encrypted.
Applying the Configuration
Within CCP navigate to:
Configure | Security | VPN | Site-to-Site VPN

Then verify that the Create a Site-to-site VPN option is selected. Then click Launch the
Selected Task
Select Step by Step Wizard and click Next
Select the interface facing the Internet (interface facing toward its peer), configure the IP address
of the peer, select an option for authentication using PSK and configure the key.
Then click Next.
Then select the IKE Phase 1 proposals to be used
Click Add to create a new IKE Phase 1 policy, enter desired IKE Phase 1 policies and then click OK.
After creating the new IKE Phase 1 policy, select it and then click Next.
Now select the transform set used for encryption and hashing for the IKE Phase 2 tunnels.
Click Add and specify the IKE Phase 2 policies and click OK. Verify the new transform set is
selected and click Next.
Now specify the traffic that should be encrypted. Packets not matched for IPsec protection will be
forwarded as normal packets.
Viewing the CLI Equivalent at the Router
! Implement IKE Phase 1
config t
crypto isakmp policy 2
authentication pre-share
encr aes 128
hash md5
group 2
lifetime 600
exit
! Configure the PSK for IKE Phase 1
crypto isakmp key cisco123 address 43.0.0.2
! Specify ACL for interesting traffic
access-list 100 permit ip 10.0.0.0 0.0.0.255 172.16.0.0 0.0.0.255
! Implement IKE Phase 2 transform set
crypto ipsec transform-set MY-SET esp-sha-hmac esp-aes 256
! Specify user traffic as tunnel mode
mode tunnel
exit

! Configure the crypto map. ipsec-isakmp means the router will automatically negotiate IKE Phase 2
tunnel using isakmp (Internet security association key management protocol). "1" represents
sequence number 1.
crypto map SDM_CMAP_1 1 ipsec-isakmp
! Tells crypto map to pay attention to ACL 100
match address 100
! If traffic matches ACL, device should use transform-set named MY-SET to negotiate IKE Phase 2
tunnel with peer.
set transform-set My-SET
set peer 43.0.0.2
exit
! Apply crypto map to the interface
int g1/0
crypto map SDM_CMAP_1
exit
Completing and Verifying IPsec
When finishing the configuration of the tunnels, configuration needs to be done on the other peer
as well.
To configure peer device from CCP, select Generate Mirror from Edit Site to Site VPN tab.
Verifying the IPsec VPN from CLI
! Verify the IKE Phase 1 policies on the device
show crypto isakmp policy
! Show details of the crypto map
show crypto map
! See details for the IKE Phase 1 tunnel
show crypto isakmp sa detail
! See details of the IKE Phase 2 tunnels
show crypto ipsec sa
! Verifying encryption and decryption is working
show crypto engine connections active

NNNNoooo tttt eeee bbbbooooooookkkk:::: CCNA Security
CCCCrrrreeee aaaatttt eeee dddd :::: 11/8/2012 9:28 PM UUUUppppddddaaaatttt eeee dddd:::: 11/8/2012 10:18 PM
TTTT aaaaggggssss:::: ccna security
20 Implementing IPsec Site-to-Site VPNs
Planning and Preparing an IPsec Site-to-Site VPN
About: Identifying a customer's need for VPN services and plan the details to implement the VPN.
Main Ideas:
Protocols That May Be Required for IPsec
Protocol/Port Who
Uses
it
How it is used
UDP port 500 IKE
Phase
1
For negotiation
UDP port 4500 NAT-
T
Negotiating to put a fake UDP 4500
header on each IPsec packet to survive
a NAT device
Layer 4
protocol 50
ESP IPsec packets have the layer 4 protocol
of ESP, which is encapsulated by the
sender and de-encapsulated by the
receiver for each IPsec packet
Layer 4
protocol 51
AH Have the Layer 4 protocol of AH.
Planning IKE Phase 1
After confirming connectivity, first step is to choose the components to use for IKE Phase 1 tunnel.
Function Strong
Method
Stronger Method
Hashing MD5, 128 bit SHA1, 160 bit
Authentication Pre-shared Key
(PSK)
RSA-sigs (digital
signatures)
Group # for DH key
exchange
1,2 5
Lifetime 86400 seconds Shorter than 1 day,
3600
Encryption 3DES AES-128 (or 192, or

256)
These parameters are used for the IKE Phase 1 policy, specified using the command crypto
isakmp policy
Planning IKE Phase 2
This is the actual tunnel to protect the user traffic
Item to
Plan
Implemented
by
Notes
Peer IP
addresses
Crypto map Reachable IP for VPN peer is
needed to negotiate and establish
site-to-site VPN
Traffic to
encrypt
Crypto ACL,
referred to in
the crypto map
Extended ACL not applied to an
interface but is referenced in the
crypto map. Should only
reference outbound traffic, which
should be protected by IPsec.
Encryption
method
Transform set,
referred to in
crypto map
DES, 3DES, AES are options.
Hashing
(HMAC)
method
Transform set MD5 and SHA HMACs may be
used and need to match the
Phase 2 policy of the peer.
Lifetime Global config
command:
crypto ipsec
security-
association
lifetime ...
Should match between peers.
Perfect
Forward
Secrecy
(PFS) (run
DH again
or not)
Crypto map DH is run during IKE Phase 1, and
Phase 2 reuses that same keying
material that was generated.
Which
interface
used to
peer with
the other
VPN device
Crypto map
applied to the
outbound
interface
Interface of a VPN peer that is
closest to the other peer.
Implementing and Verifying an IPsec Site-to-Site VPN

About: Implementing, verifying, and troubleshooting the VPN using a combination of CCP and CLI.
Main Ideas:
Verifying NTP Status
Configure in CCP:
Configure | Router | Time | NTP and SNTP | Add
From CLI:
show ntp status
Preparing for and Obtaining Digital Certificates
From CLI:
! Specify the domain name
config t
ip domain-name cisco.com
crypto key generate rya modulus 1024
! Specify the CA to use
crypto pki trustpoint CA
enrollment URL http://3.3.3.3
exit
! Request the root cert
crypto pki authenticate CA
! Request identity certificate
crypto pki enroll CA
Configure IKE Phase 1 policy on CCP:
Configure | Security | VPN | Site-to-Site VPN | click Launch the selected task
Choose the Step-by-Step Wizard | then click Next
Select PSK or Digital Certificates then click Next
Add a new policy, click Add
After adding the new policy, click OK and then Next
Add the IKE Phase 2 policy by clicking on Add then OK
Confirm the ACL info by clicking OK

Select the policy and click Next
CLI Implementation of the Crypto Policy
Config t
crypto isakmp policy 1
encr aes 256
group 5
lifetime 3600
authentication rsa-sig
hash sha
! Verify the config:
show crypto isakmp policy
! Create the transform-set, crypto ACL
crypto ipsec transform-set MYSET esp-aes esp-sha-hmac
exit
access-list 100 permit ip 172.16.0.0 0.0.255.255 192.168.0.0 0.0.0.255
! Crypto map contains if/then statement to decide to encrypt or not to encrypt traffic
crypto map MYMAP 1 ipsec-isakmp
match address 100
set peer 23.0.0.2
set transform-set MYSET
! Configure PFS
set pfs group2
exit
! Apply crypto map to interface
int g1/0
crypto map MYMAP
exit
Mirrored configuration is then placed on the peer device.
Troubleshoot IPsec Site-to-Site VPNs
First verify the configuration
! Verify the IKE phase 1 policy
show crypto isakmp policy
! Verify crypto maps
show crypto map

! debug the IKE phase 1 process
debug crypto isakmp
If no debug output is shown for debug crypto isakmp it may mean the IKE Phase 1 process is
already up or it is not currently up because there is not interesting traffic triggering it.
! Verify IKE Phase 1 tunnel already in place:
show crypto isakmp sa
! Verify the IPsec (IKE Phase 2) tunnel:
show crypto ipsec sa
! Bird's eye view of the cryptography:
show crypto engine connections active

NNNNoooo tttt eeee bbbbooooooookkkk:::: CCNA Security
CCCCrrrreeee aaaatttt eeee dddd :::: 11/8/2012 10:18 PM UUUUppppddddaaaatttt eeee dddd:::: 11/10/2012 10:58 AM
TTTT aaaaggggssss:::: ccna security
21 Implementing SSL VPNs Using Cisco ASA
Functions and Use of SSL for VPNs
About: Alternative to IPsec for implementing secure VPN tunnels.
Main Ideas:
Is IPsec Out of the Picture?
SSL VPNs are easy to deploy. SSL is installed on most devices because it is utilized on web
browsers. If a user needs quick access, they can log in using the clientless SSL vpn without having
to install software on the computer or kiosk they are using.
Comparison of IPsec Versus SSL
SSL IPsec
Applications Web-based apps, file
sharing, email. W/ full
AnyConnect client, all
IP-based apps are
available.
All IP-based apps are
available. Experience is
like being on the
network.
Encryption Moderate range of key
lengths
Stronger range of
longer key length
Authentication Moderate, one-way or
two-way authentication
Strong, two-way
authentication using
shared secrets or
digital certificates.
Ease of use Very High Moderate. Can be
challenging for
nontechnical users,
and deployment is
more time consuming.
Overall
security
Moderate. Any device
can initially connect.
Strong. Only specific
devices with specific
configurations can
connect.
SSL and TLS Protocol Framework
Operating at the session layer and higher, can use PKI and digital certificates for authentication of

VPN endpoints and for establishing encryption keys.
Comparison Between SSL and TLS
SSL TLS
Developed by
Netscape
Standard developed by IETF
Starts w/ a secured
channel & continues
directly to security
negations on a
dedicated port.
Can start w/ unsecured
communications &
dynamically switch to a
secured channel based on
negotiation w/ the other side.
Widely supported on
client-side apps
Supported & implemented
more on servers.
More weaknesses
identified in older SSL
versions
Stronger implementation
because of the standards
process.
The Play by Play of SSL for VPNs
Client initiates connection using destination TCP port 443.
Three-way handshake occurs.
Server responds, providing digital certificate containing public key.
Client uses PKI to validate the certificate.
Client generates a shared secret to use for encryption between itself and the server. Client
uses public key of the server to encrypt the shared secret and send the encrypted shared
secret to the server.
Server decrypts sent symmetric key using its own private key and now both devices know
and can use the shared secret key.
Key is used to encrypt the SSL session.
SSL VPN Flavors
Options for SSL VPN Implementation
Clientless SSL
VPN
Clientless SSL VPN w/
Plug-Ins for Some Port
Forwarding
Full AnyConnect SSL VPN
Client
Other names Web VPN Thin client. Full SSL client.
Installed
software on
client
None required Small applets and/or
configuration required
Full install of AnyConnect

User experience Feels like accessing
resources through
a web browser
Some applications can run
locally with output
redirected through the
VPN
Full access to the corporate
network. Local computer feels
like part of the network.
Servers that can
be used
IOS w/ correct
software, ASA w/
correct license.
IOS w/ correct software,
ASA w/ correct license
IOS w/ correct software, ASA
w/ correct license
How the user
looks from the
corporate
network
Traffic is proxied by
SSL server
Traffic is proxied by SSL
server
Clients are assigned their own
virtual IP address while
accessing corporate network
Clients
supported
Most SSL-capable
computers
Computers that support
SSL and Java
Most computers that support
SSL
Configuring SSL Clientless VPNs on ASA
About: Using the ASDM to configure clientless SSL VPN
Main Ideas:
High level tasks used to implement the SSL clientless VPN:
Launch wizard for SSL VPN inside ASDM.
Configure SSL VPN url and interface.
Configure user authentication.
Configure user group policy.
Configure bookmark lists.
Verify that the config is what was intended, and verify it works.
Using the SSL VPN Wizard
Within ASDM:
Click the Wizards menu bar option | Select VPN Wizards | from drop-down list, select Clientless
SSL VPN Wizard
Click Next to continue to specify a connection profile to be associated with the users connecting to
the clientless SSL VPN and interface that will be initially connecting to
Digital Certificates
By default, ASA uses self-signed digital certificate.

Authenticating Users
We specify how we're going to authenticate individuals using two general options, AAA or local
database.
When clicking Next to continue, you are asked what group profile you want to use for these users.
By default all users belong to a default group. Specific groups inherit policies from the default
group.
When clicking Next you are prompted as to whether you want to provide these authenticated SSL
VPN users with a convenient list of links that go to specific services on the corporate network.
After you have confirmed using the Add, OK, and or Edit buttons the bookmarks that you want to
provide to users, and click Next to continue to view a summary of what is about to be deployed.
Implementing a Clientless SSL VPN using CLI
! Specify creation of a local group
configure term
group-policy SSL_Group internal
! Specify self signed certs and enable SSL VPN on outside interface
ssl trust-point ASDM_TrustPoint0 outside
webvpn
enable outside
! Specifies attributes for local group, including bookmarks
group-policy SSL_Group attributes
vpn-tunnel-protocol ssl-clientless
webvpn
url-list value MyList
exit
exit
! Specify tunnel group for remote access
tunnel-group Connection_Profile_IINS type remote-access
! Define attributes for the connection profile, including the group policy to be used
tunnel-group Connection_Profile_IINS general-attributes
default-group-policy SSL_Group
! Define the URL the profile will use and what grow profile should be applied
tunnel-group Connection_Profile_IINS webvpn-attributes
group-alias SSL_VPN enable
group-url https://73.143.61.175/SSL_VPN enable

Logging In
Users browse to the configured URL and log in with their username and password.
Seeing the VPN Activity from the Server
Within ASDM:
Monitoring | VPN | VPN Statistics | Sessions
Configuring the Full SSL AnyConnect VPN on the ASA
About: Implementing a full-tunnel VPN using AnyConnect and the SSL Functionality
Main Ideas:
Configuring Server to Support the AnyConnect Client
Click on Wizards option on the Menu bar, select VPN Wizards from the drop-down, select
AnyConnect Wizard.
Click Next to proceed to the Connection Profile screen. Specify a connection profile name and
associate the VPN access interface.
Click Next to specify the protocols to support and which digital certificate to use on the server.
Click Next to proceed to identify the AnyConnect software package to deploy to users from the
server.
After specifying the images, click Next to determine how users will authenticate - either AAA or
local database.
Click Next to answer questions about what IP address pool to use to assign internal addresses to
the VPN clients.
Click OK to confirm the DHCP pool. Then click Next to continue to specify which DNS entries are
handed to the clients and any NetBIOS, WINS, and a domain name.
Click Next to confirm that you want to avoid NAT between subnets directly connected to the inside
interface of the ASA.
Click Next to indicate the AnyConnect client can either be preinstalled on a pc or the user can
connect using SSL basic connectivity and then install the client from the server.
Click Next to read the summary of changes then click Finish.
Configuring an SSL AnyConnect Client VPN on CLI:

Object network NETWORK_OBJ_10.0.0.0 _25
subnet 10.0.0.0 255.255.255.128
! Create DHCP pool for VPN users
ip local pool POOLS-for-AnyConnect 10.0.0.51-10.0.0.100 mask 255.255.255.0
! Create an internal group on the name below
group-policy GroupPolicy_SSL_AnyConnect internal
! Specify attributes of this group
group-policy GroupPolicy_SSL_AnyConnect attributes
vpn-tunnel-protocol ssl-client
dns-server value 8.8.8.8
wins-server none
default-domain value cisco.com
exit
! Specify that SSL is enabled, and which packages from flash are available for client images
webvpn
enable outside
anyconnect image disk0:/anyconnect-win-2.5.2014-k9.pkg 1
! Enable AnyConnect, provided group list (so users can select their group)
anyconnect enable
tunnel-group-list enable
! Create a tunnel group and specify the type of tunnel group
tunnel-group SSL_AnyConnect type remote-access
! Specify what group policy is used by this tunnel group and what DHCP pool is used
tunnel-group SSL_AnyConnect general-attributes
default-group-policy GroupPolicy_SSL_AnyConnect
address-pool POOLS-for-AnyConnect
! Enable the URL used to access the server
tunnel-group SSL_AnyConnect webvpn-attributes
group-alias SSL_AnyConnect enable
! Provide exception for NAT for VPN traffic from the inside network if it is going to the address
range used by the AnyConnect clients
nat (inside,outside) 3 source static inside interface destination static
NETWORK_OBJ_10.0.0.0_25 NETWORK_OBJ_10.0.0.0_25 no-proxy-arp route-lookup
One Item with Three Different Names
From user's perspective, the drop-down list is called a Group. On ASDM, the created connection
profile is called SSL_AnyConnect. At the CLI it is referred to a tunnel group. They are all the same.

Split Tunneling
Split-tunneling is the act of tunneling only if the packets are destined to a specific subnetwork at
the internal site.
To enable split tunneling on the ASA:
Configuration | Remote Access VPN | Network(Client) Access | Group Policies
Edit the group policy by going to Advanced | Split Tunneling
Specify the networks for which you want to tunnel traffic.
To monitor VPN sessions:
Monitoring | VPN | VPN Statistics | Sessions
Click on Details to see more information.


![· [ sqo(ž) I *tiiiiiiiiiii (So) (8) (Q) (9 (S) 68) (S) (8) [ (O) (So) (Q) (9 (S (s) 68) [ (q) sqo(8) ] (Q) (So) (s) (8)](https://static.fdocuments.in/doc/165x107/6002c27d2ede8c2cdb209c54/-sqo-i-tiiiiiiiiiii-so-8-q-9-s-68-s-8-o-so-q-9-s-s.jpg)

